
- 1Eureka服务发现注册详解_register-with-eureka
- 2《深度学习之pytorch实战计算机视觉》第10章 循环神经网络(代码可跑通)_for循环epoch
- 32024华为OD机试(C卷+D卷)最新题库(Java & Python & C++)_华为od题库c卷
- 4FPGA - 7系列 FPGA内部结构之SelectIO -02- 源语简介_ibufg原语
- 5小红书商城店铺所有商品接口(整店商品API接口)_小红书公共接口
- 6C语言——文件
- 7【MySQL命令】远程连接、数据库备份_mysql远程连接命令
- 8问题与解决:大华视频后台播放报错_the play() request was interrupted because video-o
- 9Golang Redis:构建高效和可扩展的应用程序_golang开发的redis工具
- 10十、chatGPT4.0_chatgpt申请研究人员访问计划
.net6API使用SignalR+vue3聊天+WPF聊天_signalr vue3
赞
踩
目录
此案例分为3部分。首先创建.net6api接口,然后使用前端vue3进行聊天,再使用wpf客户端进行聊天,并且互通聊天。
一、.net6api接口
1.首先建立一个能正常运行的api,然后增加ChatHub
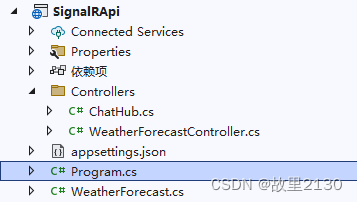
2.ChatHub.cs代码
其中注释已经写了,目前的功能是全部发送消息和1对1发送消息,也可以建立组,进行组发送消息。
官网参考
使用 ASP.NET Core SignalR 中的中心 | Microsoft Learn
ASP.NET Core SignalR JavaScript 客户端 | Microsoft Learn
- using Microsoft.AspNetCore.SignalR;
- using System.Security.Cryptography;
-
- namespace SignalRApi.Controllers
- {
- public class ChatHub : Hub
- {
- private static Dictionary<string, string> dicUsers = new Dictionary<string, string>();
- public override Task OnConnectedAsync() //登录
- {
- Console.WriteLine($"ID:{Context.ConnectionId} 已连接"); //控制台记录
- var cid = Context.ConnectionId;
- //根据id获取指定客户端
- var client = Clients.Client(cid);
-
- //向指定用户发送消息
- //client.SendAsync("Self", cid);
-
- //像所有用户发送消息
- Clients.All.SendAsync("ReceivePublicMessageLogin", $"{cid}加入了聊天室"); //界面显示登录
- return base.OnConnectedAsync();
- }
- public override Task OnDisconnectedAsync(Exception? exception) //退出的时候
- {
- Console.WriteLine($"ID:{Context.ConnectionId} 已断开");
- var cid = Context.ConnectionId;
- //根据id获取指定客户端
- var client = Clients.Client(cid);
-
- //向指定用户发送消息
- //client.SendAsync("Self", cid);
-
- //像所有用户发送消息
- Clients.All.SendAsync("ReceivePublicMessageLogin", $"{cid}离开了聊天室"); //界面显示登录
- return base.OnDisconnectedAsync(exception);
- }
- /// <summary>
- /// 向所有客户端发送消息
- /// </summary>
- /// <param name="user"></param>
- /// <param name="message"></param>
- /// <returns></returns>
- public async Task SendPublicMessage(string user, string message)
- { //string user,
- await Clients.All.SendAsync("ReceivePublicMessage", user, message); //ReceiveMessage 提供给客户端使用
- }
-
- /// <summary>
- /// 用户登录,密码就不判断了
- /// </summary>
- /// <param name="userId"></param>
- public void Login(string userId) //对应前端的invoke
- {
- if (!dicUsers.ContainsKey(userId))
- {
- dicUsers[userId] = Context.ConnectionId;
- }
- Console.WriteLine($"{userId}登录成功,ConnectionId={Context.ConnectionId}");
- //向所有用户发送当前在线的用户列表
- Clients.All.SendAsync("dicUsers", dicUsers.Keys.ToList()); //对应前端的on
- }
-
- public void ChatOne(string userId, string toUserId, string msg) //用户 发送到的用户 发送的消息
- {
- string newMsg = $"{userId}对你说{msg}";//组装后的消息体
- //如果当前用户在线
- if (dicUsers.ContainsKey(toUserId))
- {
- Clients.Client(dicUsers[toUserId]).SendAsync("ChatInfo", newMsg);
- }
- else
- {
- //如果当前用户不在线,正常是保存数据库,等上线时加载,暂时不做处理
- }
- }
-
- }
- }

3.Program.cs代码
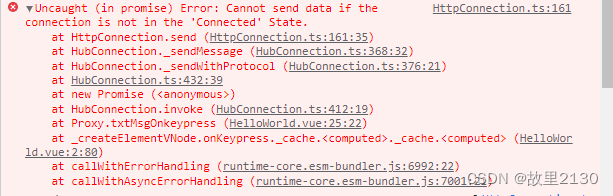
一定要写指定的ip地址,否则报错
Cannot send data if the connection is not in the 'Connected' State
- using SignalRApi.Controllers;
-
- var builder = WebApplication.CreateBuilder(args);
-
- // Add services to the container.
-
- builder.Services.AddControllers();
- // Learn more about configuring Swagger/OpenAPI at https://aka.ms/aspnetcore/swashbuckle
- builder.Services.AddEndpointsApiExplorer();
- builder.Services.AddSwaggerGen();
- builder.Services.AddSignalR(); //增加AddSignalR
- string[] urls = new[] { "http://localhost:3000" }; //此处一定要写指定的ip地址,地址是前端的ip地址,坑了我1天的时间
- builder.Services.AddCors(options =>
- options.AddDefaultPolicy(builder => builder.WithOrigins(urls)
- .AllowAnyMethod().AllowAnyHeader().AllowCredentials())
- );
- var app = builder.Build();
-
- // Configure the HTTP request pipeline.
- if (app.Environment.IsDevelopment())
- {
- app.UseSwagger();
- app.UseSwaggerUI();
- }
- app.UseCors(); //增加跨域问题
- app.UseHttpsRedirection();
-
- app.UseAuthorization();
-
-
- app.MapControllers();
- app.MapHub<ChatHub>("/api/chat"); //前端访问的地址,2边要统一就行了
- app.Run();
-
4.效果
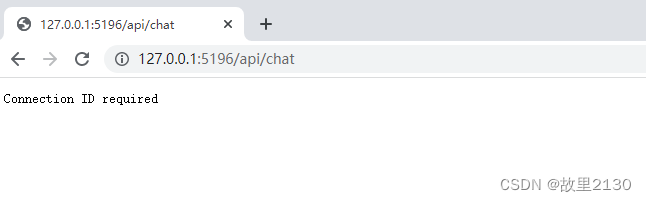
控制器不取消的话,如图所示
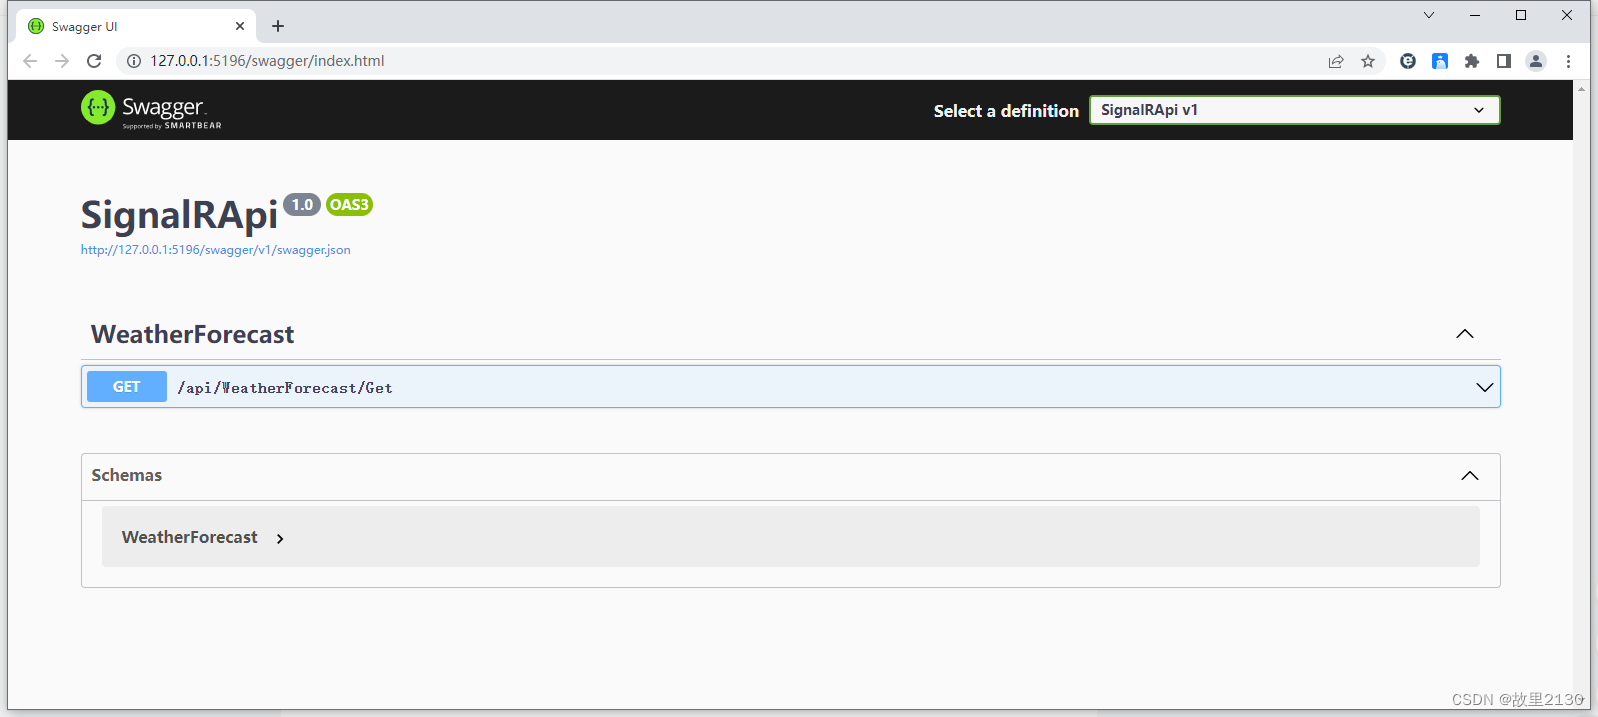
地址后面增加字符串,弹框如下,那么api就算是完成了
补充说明:如果调试的时候可以使用,实际用的时候,发布Nginx,或者IIS,其中iis要下载安装运行时。
二、vue3前端
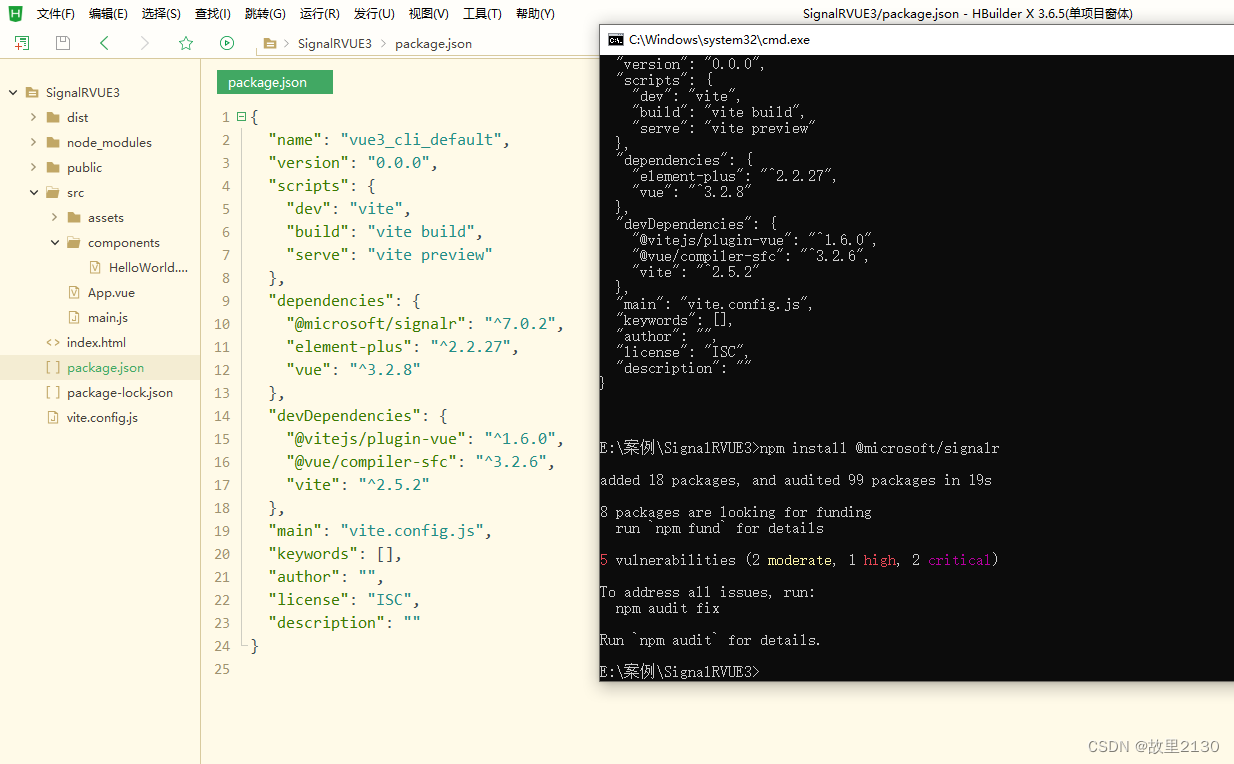
1.首先使用HBuilder X建立一个可以运行的vue3程序
然后安装下面@microsoft/signalr,不需要安装@aspnet/signalr,因为前者更加新,后者已经淘汰了。
- npm init -y
- npm install @microsoft/signalr
2.代码
ui 界面随便做一下,主要看效果就行了
- <template>
-
- <el-input v-model="userid" :disabled="isdisabled" placeholder="输入账号" />
- <el-input v-model="password" :disabled="isdisabled" placeholder="输入密码" />
- <el-button type="primary" :disabled="isdisabled" @click="Login">登录</el-button>
- <div>
- <ul>
- <li v-for="user in LoginUser">{{user}}用户登录</li>
- </ul>
- </div>
- <el-input v-model="sendUserid" :disabled="!isdisabled" placeholder="发送给某人" />
- <el-input v-model="sendContent" :disabled="!isdisabled" placeholder="发送内容" />
- <el-button type="primary" :disabled="!isdisabled" @click="SendAll">发送所有人</el-button>
- <el-button type="primary" :disabled="!isdisabled" @click="SendUser">发送到个人</el-button>
- <div>
- <ul>
- <li v-for="user in msgContent">{{user}}</li>
- </ul>
- </div>
- <!-- <input type="text" v-model="state.userMessage" v-on:keypress="txtMsgOnkeypress" />
- <div>
- <ul>
- <li v-for="(msg,index) in state.messages" :key="index">{{msg}}</li>
- </ul>
- </div>
- <el-button type="primary">发送</el-button>
- <el-button type="success">Success</el-button>
- <el-button type="info">Info</el-button>
- <el-button type="warning">Warning</el-button>
- <el-button type="danger">Danger</el-button> -->
- </template>
-
- <script setup>
- import {
- ref
- } from 'vue'
- import {
- reactive,
- onMounted
- } from 'vue'
- import * as signalR from '@microsoft/signalr'
-
- defineProps({
- msg: String
- })
-
- var connection
- const LoginUser = ref([])
-
- const msgContent = reactive([])
-
- const isdisabled = ref(false)
- const userid = ref('')
- const password = ref('')
- const sendUserid = ref('')
- const sendContent = ref('')
-
- const Login = async () => {
- connection = new signalR.HubConnectionBuilder()
- .withUrl(' http://127.0.0.1:5196/api/chat') //这里一定要写指定的ip,否则报错,大坑搞了1天的时间
- .withAutomaticReconnect().build();
- await connection.start();
-
- connection.on('dicUsers', msg => { //监听用户登录的信息,前后端要一致
- console.log(msg)
- LoginUser.value = msg
- console.log(LoginUser.value)
- });
-
- connection.on('ReceivePublicMessageLogin', (Loginmsg) => { //监听登录的信息,前后端要一致
- console.log(Loginmsg)
- msgContent.push(Loginmsg)
- console.log(msgContent.value)
- console.log('aaa')
- });
- connection.on('ReceivePublicMessage', (user, msg) => { //监听发送的信息,前后端要一致
- console.log(user)
- console.log(msg)
- msgContent.push(user + "说:" + msg)
- console.log(msgContent.value)
- console.log('bbb')
- });
-
- connection.on('ChatInfo', msg => { //监听单独发送的信息,前后端要一致
- console.log("单独说:" + msg)
- msgContent.push("单独说:" + msg)
- console.log("单独说:" + msgContent.value)
- console.log('ccc')
- });
-
- await connection.invoke("Login", userid.value); //发送消息
- // connection.on('ReceivePublicMessage', msg => {
- // state.messages.push(msg); //监听发送的信息,前后端要一致
- // });
- isdisabled.value = true
- console.log('wewew')
- }
- const SendAll = async () => {
- console.log(userid.value)
- console.log(sendContent.value)
- await connection.invoke("SendPublicMessage", userid.value, sendContent.value); //发送消息
- console.log('zxzx')
- }
-
- const SendUser = async () => {
- console.log(sendContent.value)
- await connection.invoke("ChatOne", userid.value, sendUserid.value, sendContent.value); //发送消息
- console.log('55fff')
- }
-
- // onMounted(async function() {
- // connection = new signalR.HubConnectionBuilder()
- // .withUrl(' http://127.0.0.1:5196/api/chat') //这里一定要写指定的ip,否则报错,大坑搞了1天的时间
- // .withAutomaticReconnect().build();
- // await connection.start();
- // connection.on('ReceivePublicMessage', msg => {
- // state.messages.push(msg);
- // });
- // });
- </script>
-
- <style scoped>
- a {
- color: #42b983;
- }
- </style>
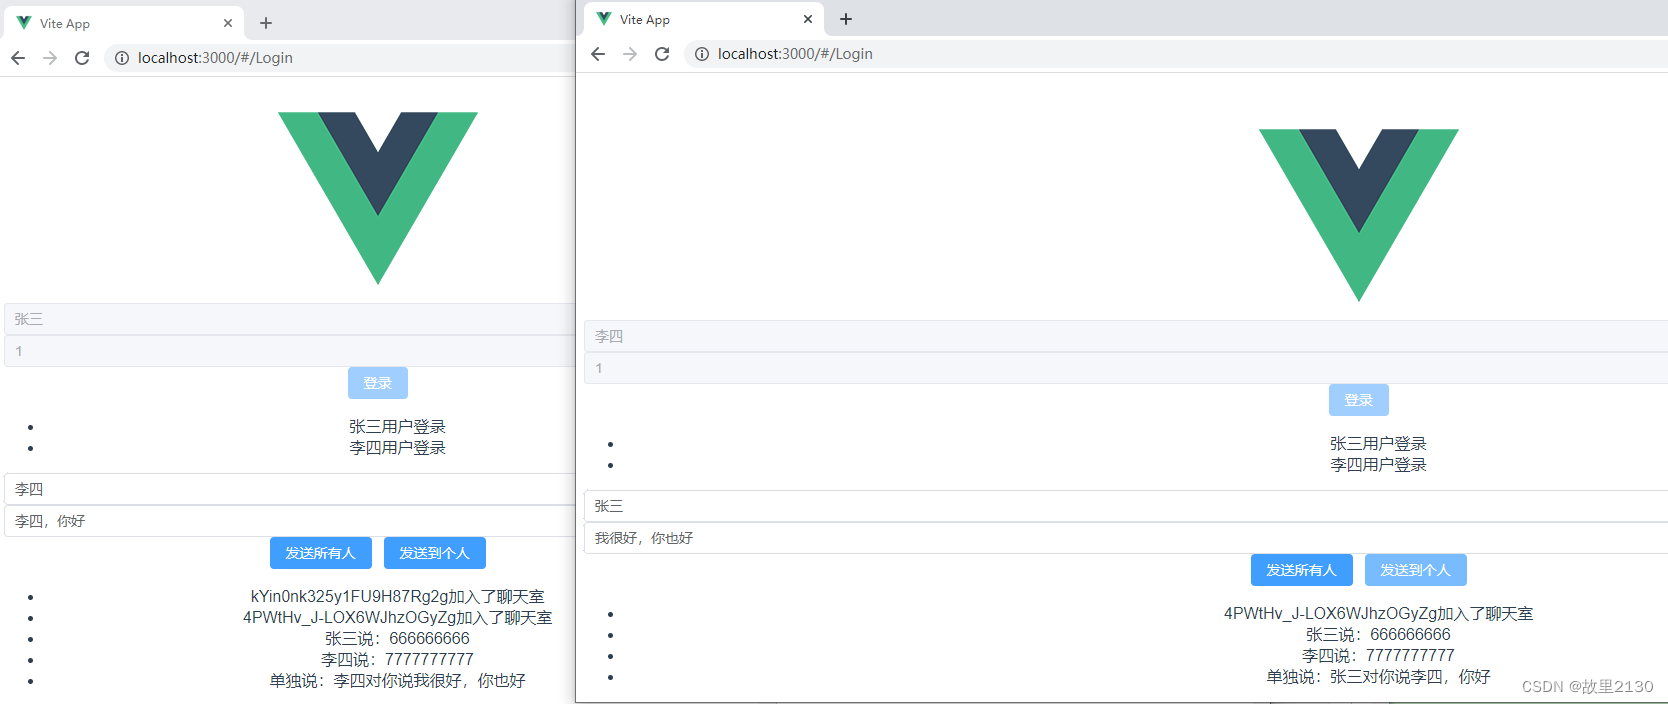
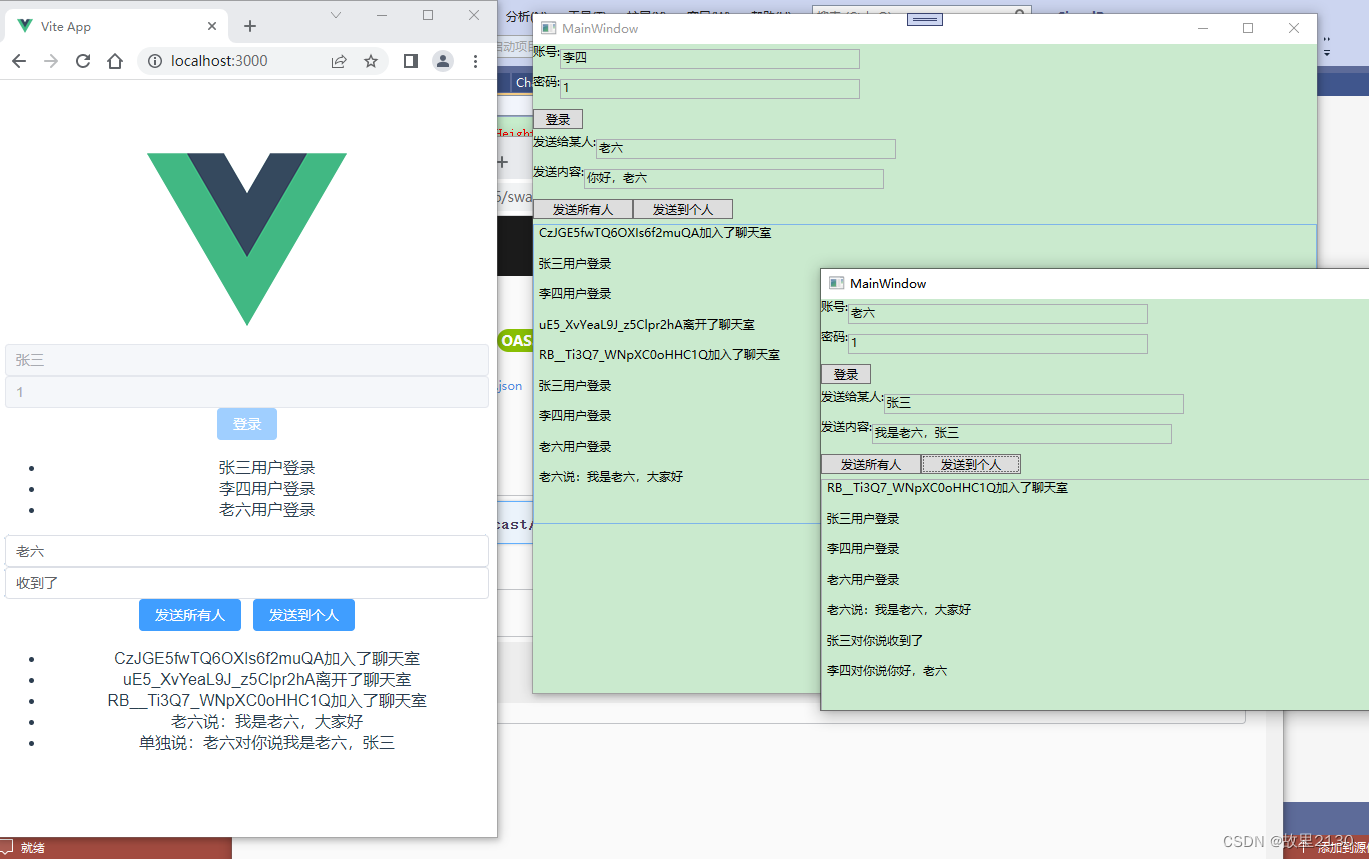
3.运行效果
此时把api运行起来,然后运行vue3项目。
可以1对所有人说,也可以1对1说
三、WPF客户端
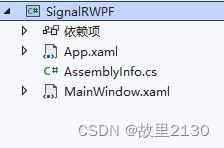
1.首先建立一个wpf程序,其实winform也可以
为了简单,wpf就不使用mvvm的方式了,只为实现效果
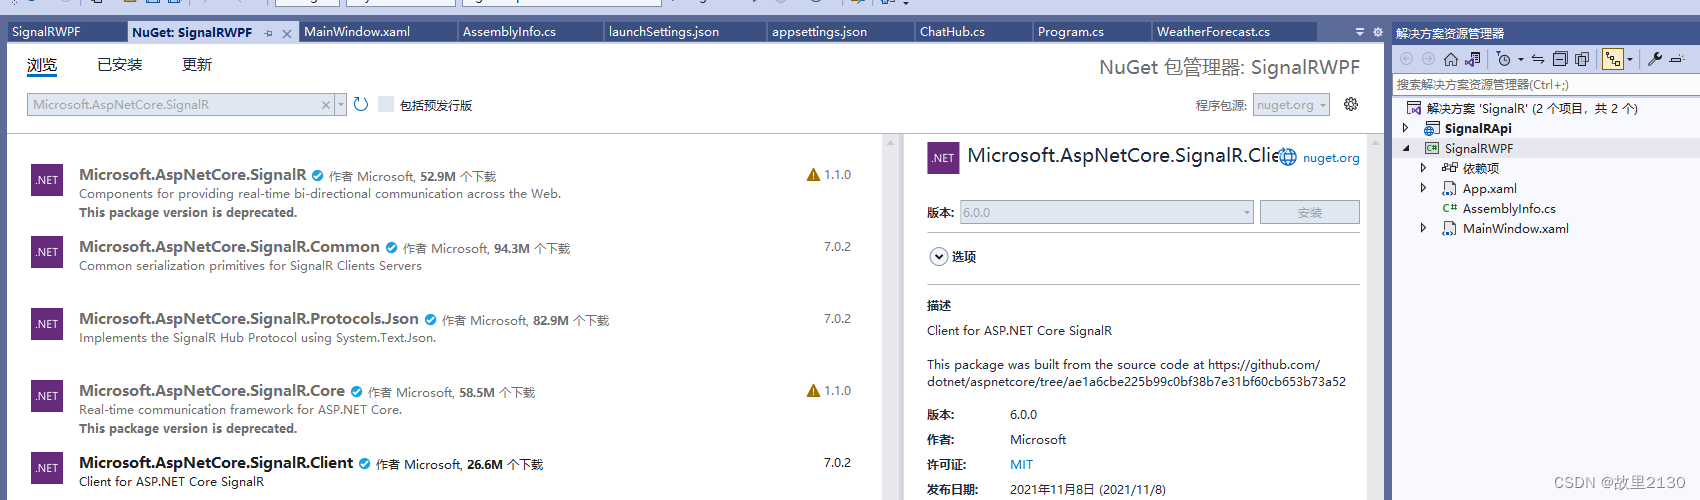
2.安装Microsoft.AspNetCore.SignalR.Client
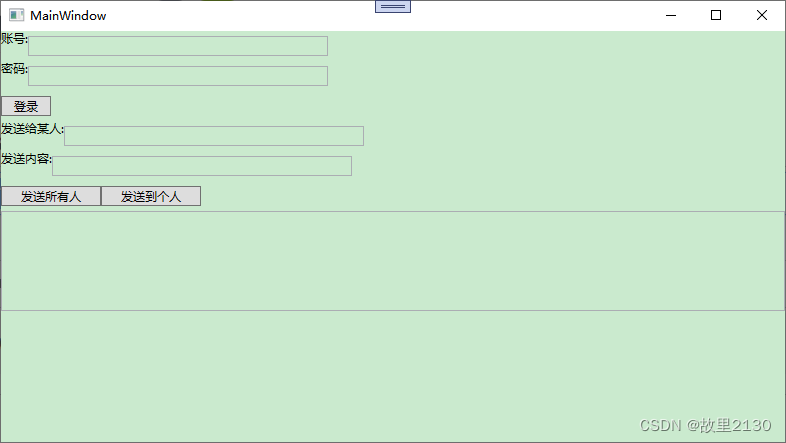
3.建立界面
为了方便简单,界面按照vue3的界面做
界面代码
- <Window x:Class="SignalRWPF.MainWindow"
- xmlns="http://schemas.microsoft.com/winfx/2006/xaml/presentation"
- xmlns:x="http://schemas.microsoft.com/winfx/2006/xaml"
- xmlns:d="http://schemas.microsoft.com/expression/blend/2008"
- xmlns:mc="http://schemas.openxmlformats.org/markup-compatibility/2006"
- xmlns:local="clr-namespace:SignalRWPF"
- mc:Ignorable="d"
- Title="MainWindow" Height="450" Width="800">
- <Grid>
- <StackPanel Orientation="Vertical">
- <StackPanel Orientation="Horizontal">
- <TextBlock>账号:</TextBlock>
- <TextBox Name="user" Width="300" Height="20" Margin="0,5"></TextBox>
- </StackPanel>
- <StackPanel Orientation="Horizontal">
- <TextBlock>密码:</TextBlock>
- <TextBox Name="password" Width="300" Height="20" Margin="0,5"></TextBox>
- </StackPanel>
- <StackPanel Orientation="Horizontal" >
- <Button Name="btnLogin" Width="50" Height="20" Margin="0,5" Click="btnLogin_Click">登录</Button>
- </StackPanel>
- <StackPanel Orientation="Horizontal">
- <TextBlock>发送给某人:</TextBlock>
- <TextBox Name="toUser" Width="300" Height="20" Margin="0,5" ></TextBox>
- </StackPanel>
- <StackPanel Orientation="Horizontal">
- <TextBlock>发送内容:</TextBlock>
- <TextBox Name="content" Width="300" Height="20" Margin="0,5"></TextBox>
- </StackPanel>
- <StackPanel Orientation="Horizontal">
- <Button Name="btnSendAll" Width="100" Height="20" Margin="0,5" Click="btnSendAll_Click">发送所有人</Button>
- <Button Name="btnSendOne" Width="100" Height="20" Margin="0,5" Click="btnSendOne_Click">发送到个人</Button>
- </StackPanel>
- <RichTextBox Height="100" Name="rtbtxt">
- <FlowDocument>
- <Paragraph>
- <Run Text=""/>
- </Paragraph>
- </FlowDocument>
- </RichTextBox>
- </StackPanel>
- </Grid>
- </Window>
后台代码,此处代码可以看vue3怎么调用的就行了,照猫画虎即可,这只是普通的写法,还可以使用属性变化,加上MVVM。
- using Microsoft.AspNetCore.SignalR.Client;
- using System;
- using System.Collections.Generic;
- using System.Linq;
- using System.Text;
- using System.Threading.Tasks;
- using System.Windows;
- using System.Windows.Controls;
- using System.Windows.Data;
- using System.Windows.Documents;
- using System.Windows.Input;
- using System.Windows.Interop;
- using System.Windows.Media;
- using System.Windows.Media.Imaging;
- using System.Windows.Navigation;
- using System.Windows.Shapes;
-
- namespace SignalRWPF
- {
- /// <summary>
- /// Interaction logic for MainWindow.xaml
- /// </summary>
- public partial class MainWindow : Window
- {
- private HubConnection hubConnection;
- public MainWindow()
- {
- InitializeComponent();
- //rtbtxt.AppendText("4444");
- }
-
- private void btnLogin_Click(object sender, RoutedEventArgs e)
- {
- //此处和VUE3界面是一样的,参照写就行了。
- //1.初始化
- InitInfo();
- //2.连接
- Link();
- //3.监听
- Listen();
- //4.登录
- Login();
-
-
- }
- /// <summary>
- /// 初始化
- /// </summary>
- private void InitInfo()
- {
- hubConnection = new HubConnectionBuilder().WithUrl("http://127.0.0.1:5196/api/chat").WithAutomaticReconnect().Build();
- hubConnection.KeepAliveInterval = TimeSpan.FromSeconds(5);
- }
- List<string> LoginUser;
- string msgContent;
-
- /// <summary>
- /// 监听数据的变化
- /// </summary>
- private void Listen()
- {
- hubConnection.On<List<string>>("dicUsers", msg =>
- {
- LoginUser = msg;
- string s = string.Empty;
- foreach (string item in msg)
- {
- s += item + "用户登录" + Environment.NewLine;
- }
- rtbtxt.AppendText(s);
-
-
- }); //匿名方法 真实环境中,此处使用的是属性变化,不要使用赋值的方式
- hubConnection.On<string>("ReceivePublicMessageLogin", msg => { msgContent = msg; rtbtxt.AppendText(msg + Environment.NewLine); });
- hubConnection.On<string, string>("ReceivePublicMessage", (user, msg) => { msgContent = msg; rtbtxt.AppendText(user + "说:" + msg + Environment.NewLine); }); //匿名方法
- hubConnection.On<string>("ChatInfo", msg => { msgContent = msg; rtbtxt.AppendText(msg + Environment.NewLine); });
- }
-
- /// <summary>
- /// 连接
- /// </summary>
- private async void Link()
- {
- try
- {
- await hubConnection.StartAsync();
- }
- catch (Exception ex)
- {
- MessageBox.Show(ex.Message);
- }
- }
-
- private void Login()
- {
- hubConnection.InvokeAsync("Login", user.Text);
- }
- private void btnSendAll_Click(object sender, RoutedEventArgs e)
- {
- hubConnection.InvokeAsync("SendPublicMessage", user.Text, content.Text);
- }
-
- private void btnSendOne_Click(object sender, RoutedEventArgs e)
- {
- hubConnection.InvokeAsync("ChatOne", user.Text, toUser.Text, content.Text);
- }
- }
- }
4.效果
同时打开api,打开2个窗体,然后进行对话。
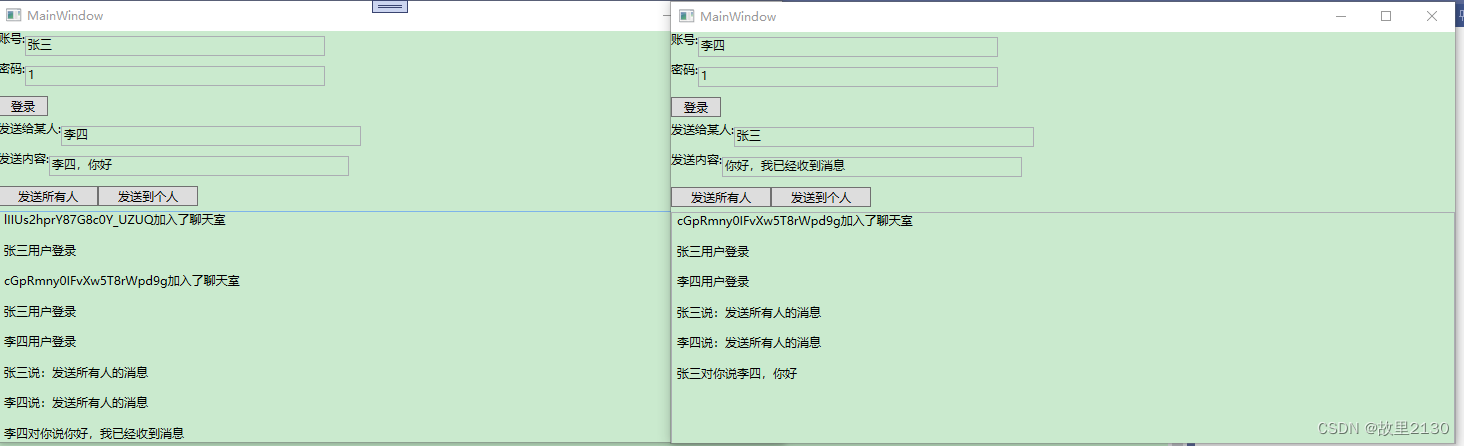
至此,所有代码就完成了,那么我们把api,vue,wpf都运行起来,然后进行聊天演示。
源码:
https://gitee.com/602874946/signal-rs
来源:

