
- 1十大经典排序算法与算法复杂度_十大排序算法时间复杂度
- 2再也不用手写爬虫了!推荐5款自动爬取数据的神器!_自动爬取工具(1)_you-get python
- 3Ubuntu设置动态壁纸(background)_ubuntu设置 代码雨动态壁纸
- 4You may use special comments to disable some warnings. Use // eslint-disable-next-line to ignore the_eslint-disable-next-line to ignore the next line.
- 5golang生成c-shared so供c语言或者golang调用到例子_golang 打包so
- 6用博奥如何导入单项工程电子表_如何做好建筑工程预算?一步一步教会你!
- 7如何使用Spring Boot实现分页和排序?_如何使用 spring boot 实现分页和排序?
- 8十大编程算法助程序员走上高手之路
- 9Spring Cloud Alibaba 接入AI,3分钟搞定一个 AI 项目!_spring cloud alibaba ai
- 10考官面对面:我是如何面试程序员的?_程序员考核考官
【Vue3】源码解析-Runtime_vue3 源码分析
赞
踩
系列文章
【前端】Typescript入门
【Vue3】源码解析-前置
【Vue3】源码解析-响应式原理
【Vue3】源码解析-虚拟DOM
【Vue3】源码解析-编绎模块
【Vue3】源码解析-Runtime
packages/runtime-dom/src/index.ts
初始化
vue主入口文件中,引入导出了runtime-dom和compiler,而createApp就是来自runtime-dom
// packages/runtime-dom/src/index.ts

export const createApp = ((...args) => {
  const app = ensureRenderer().createApp(...args)

  if (__DEV__) {
    injectNativeTagCheck(app) // 在dev环境***册一个方法isNativeTag,挂载到app.config下面
  }

  const { mount } = app
  app.mount = (containerOrSelector: Element | ShadowRoot | string): any => {
    // ...
  }

  return app
}) as CreateAppFunction<Element>

- 1
- 2
- 3
- 4
- 5
- 6
- 7
- 8
- 9
- 10
- 11
- 12
- 13
- 14
- 15
- 16
在该函数内部中通过调用ensureRenderer()和createApp(…args)创建了app实例并把实例返回出去,因此我们可以在app实例中安装插件,设置全局指令等等。这其中又是怎么实现的呢?
创建renderer
ensureRenderer()函数的用途是什么呢?
// packages/runtime-dom/src/index.ts

function ensureRenderer() {
  return renderer || (renderer = createRenderer<Node, Element>(rendererOptions))
- 1
- 2
- 3
- 4
- 5
我们可以看到调用该函数后返回一个renderer,若没有renderer则调用createRenderer来进行创建。
而这边的createRenderer则是来自runtime-core
// packages/runtime-core/src/index.ts

export function createRenderer<
  HostNode = RendererNode,
  HostElement = RendererElement
>(options: RendererOptions<HostNode, HostElement>) {
  return baseCreateRenderer<HostNode, HostElement>(options)
}
- 1
- 2
- 3
- 4
- 5
- 6
- 7
- 8
该函数接收一个RendererOptions作为参数,其实际是调用了baseCreateRenderer并将options传入
传入的RendererOptions是什么?为什么在runtime-dom传入,又在runtime-core拆解。
// packages/runtime-dom/src/index.ts

const rendererOptions = extend({ patchProp, forcePatchProp }, nodeOps)
- 1
- 2
- 3
mount
当创建完app实例后,现在让我们开始进行mount(‘#app’),让我们重新进入createApp
// packages/runtime-dom/src/index.ts

export const createApp = ((...args) => {
  const app = ensureRenderer().createApp(...args)

  if (__DEV__) {
    injectNativeTagCheck(app)
  }

  const { mount } = app // 保存app实例上原本的mount
  // 重写mount
  app.mount = (containerOrSelector: Element | ShadowRoot | string): any => {
    const container = normalizeContainer(containerOrSelector) // 获取根元素容器
    if (!container) return
    const component = app._component // 获取根组件,即App
    if (!isFunction(component) && !component.render && !component.template) {
      component.template = container.innerHTML // 使用根元素来作为模板
    }
    // clear content before mounting
    container.innerHTML = ''
    const proxy = mount(container) // 调用实例中的mount方法
    if (container instanceof Element) {
      container.removeAttribute('v-cloak') // 删除v-cloak属性
      container.setAttribute('data-v-app', '') // 添加data-v-app属性
    }
    return proxy
  }

  return app
}) as CreateAppFunction<Element>
- 1
- 2
- 3
- 4
- 5
- 6
- 7
- 8
- 9
- 10
- 11
- 12
- 13
- 14
- 15
- 16
- 17
- 18
- 19
- 20
- 21
- 22
- 23
- 24
- 25
- 26
- 27
- 28
- 29
- 30
我们可以看到在上面的代码中,在创建完app之后,先对app实例中的mount方法进行了保存,接着又对mount进行了重写。
重写的mount方法中,先是调用了normalizeContainer(containerOrSelector)来获取根元素容器,containerOrSelector即我们传入的#app
// packages/runtime-dom/src/index.ts

function normalizeContainer(
  container: Element | ShadowRoot | string
): Element | null {
  if (isString(container)) {
    const res = document.querySelector(container) // 进行dom操作选中容器
    if (__DEV__ && !res) {
      // ...
    }
    return res
  }
 // ...
  return container as any
}
- 1
- 2
- 3
- 4
- 5
- 6
- 7
- 8
- 9
- 10
- 11
- 12
- 13
- 14
- 15
在获取到根元素的容器之后,进行判断,将容器原本的html作为根组件的模板,然后清除了容器中原本的html
\src\runtime-core\component.js
// 创建组件实例
export function createComponentInstance(vnode) {
  const component = {
    vnode,
    type:vnode.type
  }
  return component
}

// 初始化组件
export function setupComponent(instance) {
  // TODO
  // initProps()
  // initSlots()

  setupStatefulComponent(instance)


}

// 设置组件状态
function setupStatefulComponent(instance) {
  const Component = instance.type

  const { setup } = Component

  if (setup) {
    const setupResult = setup()

    handleSetupResult(instance, setupResult)
  }

}

// 处理setup的结果
function handleSetupResult(instance, setupResult) {
  // function object
  // TODO funciton

  if (typeof setupResult === "object") {
    instance.setupState = setupResult
  }

  finishComponentSetup(instance)
}

// 完成组件设置
function finishComponentSetup(instance) {
  const Component = instance.render

  if(!Component.render) {
    instance.render = Component.render
  }
}
- 1
- 2
- 3
- 4
- 5
- 6
- 7
- 8
- 9
- 10
- 11
- 12
- 13
- 14
- 15
- 16
- 17
- 18
- 19
- 20
- 21
- 22
- 23
- 24
- 25
- 26
- 27
- 28
- 29
- 30
- 31
- 32
- 33
- 34
- 35
- 36
- 37
- 38
- 39
- 40
- 41
- 42
- 43
- 44
- 45
- 46
- 47
- 48
- 49
- 50
- 51
- 52
- 53
- 54
- 55
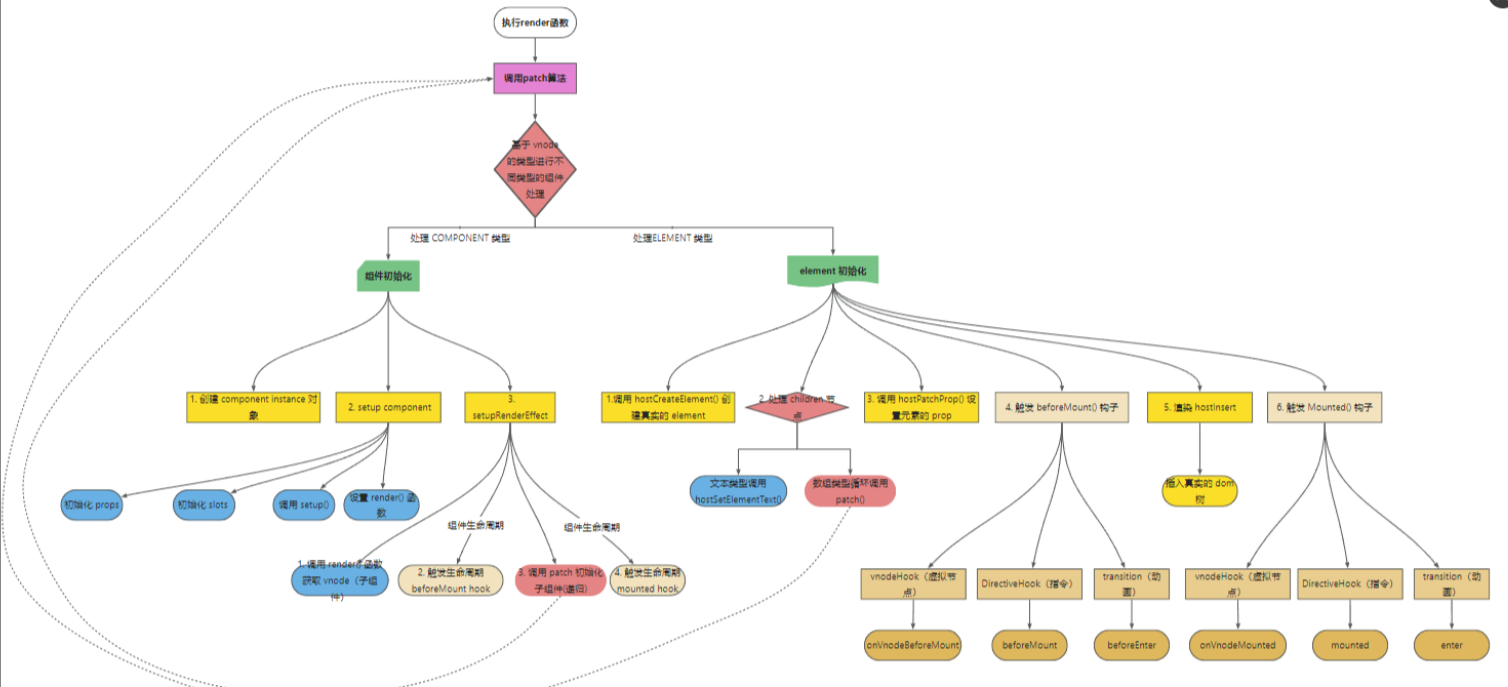
完成源码初始化组件的逻辑,可以对照着这张流程图看一看代码的运行过程:
h.ts
/*
// type only
h('div')

// type + props
h('div', {})

// type + omit props + children
// Omit props does NOT support named slots
h('div', []) // array
h('div', 'foo') // text
h('div', h('br')) // vnode
h(Component, () => {}) // default slot

// type + props + children
h('div', {}, []) // array
h('div', {}, 'foo') // text
h('div', {}, h('br')) // vnode
h(Component, {}, () => {}) // default slot
h(Component, {}, {}) // named slots

// named slots without props requires explicit `null` to avoid ambiguity
h(Component, null, {})
**/

import { isArray, isObject } from '@vue/shared';
import { createVNode, isVNode } from './vnode';

export function h(type, propsOrChildren?, children?) {
  const l = arguments.length;

  if (l === 2) {
    if (isObject(propsOrChildren) && !isArray(propsOrChildren)) {
      if (isVNode(propsOrChildren)) {
        return createVNode(type, null, [propsOrChildren]);
      }
      return createVNode(type, propsOrChildren);
    } else {
      return createVNode(type, null, propsOrChildren);
    }
  } else {
    if (l > 3) {
      children = Array.prototype.slice.call(arguments, 2);
    } else if (l === 3 && isVNode(children)) {
      children = [children];
    }
    return createVNode(type, propsOrChildren, children);
  }
}
- 1
- 2
- 3
- 4
- 5
- 6
- 7
- 8
- 9
- 10
- 11
- 12
- 13
- 14
- 15
- 16
- 17
- 18
- 19
- 20
- 21
- 22
- 23
- 24
- 25
- 26
- 27
- 28
- 29
- 30
- 31
- 32
- 33
- 34
- 35
- 36
- 37
- 38
- 39
- 40
- 41
- 42
- 43
- 44
- 45
- 46
- 47
- 48
- 49
h方法对创建虚拟节点操作进行了二次封装,使用法变得多种多样
packages/runtime-core/src/renderer.ts
挂载及卸载DOM节点
import { isString, ShapeFlags } from '@vue/shared';
import { createVNode, isSameVNode, Text } from './vnode';

export function createRenderer(renderOptions) {
  let {
    insert: hostInsert,
    createElement: hostCreateElement,
    createText: hostCreateText,
    remove: hostRemove,
    setElementText: hostSetElementText,
    setText: hostSetText,
    querySelector: hostQuerySelector,
    parentNode: hostParentNode,
    nextSibling: hostNextSibling,
    patchProp: hostPatchProp,
  } = renderOptions;

  const normalize = (child, i) => {
    if (isString(child[i])) {
      let vnode = createVNode(Text, null, child[i]);
      child[i] = vnode;
      return child[i];
    }
    return child[i];
  };

  // 递归挂载子节点
  const mountChildren = (children, container) => {
    for (let i = 0; i < children.length; i++) {
      let child = normalize(children, i);
      patch(null, child, container);
    }
  };

  const mountElement = (vnode, container) => {
    let { type, props, children, shapeFlag } = vnode;
    // 挂载真实dom到vnode上
    let el = (vnode.el = hostCreateElement(type));
    // 属性
    if (props) {
      for (const key in props) {
        hostPatchProp(el, key, null, props[key]);
      }
    }
    // 子节点处理,& 预算判断是否为某一个类型
    if (shapeFlag & ShapeFlags.TEXT_CHILDREN) {
      // 文本
      hostSetElementText(el, children);
    } else if (shapeFlag & ShapeFlags.ARRAY_CHILDREN) {
      mountChildren(children, el);
    }

    // 插入真实dom到容器中
    hostInsert(el, container);
  };

  const processText = (n1, n2, container) => {
    if (n1 === null) {
      hostInsert((n2.el = hostCreateText(n2.children)), container);
    } else {
      // 文本内容变化,节点复用
      const el = (n2.el = n1.el);
      if (n1.children !== n2.children) {
        // 更新文本
        hostSetText(el, n2.children);
      }
    }
  };

  const patchProps = (oldProps, newProps, el) => {
    for (let key in newProps) {
      hostPatchProp(el, key, oldProps[key], newProps[key]);
    }
    for (let key in oldProps) {
      if (!newProps[key]) {
        hostPatchProp(el, key, oldProps[key], undefined);
      }
    }
  };

  const unmountChildren = (children) => {
    for (let i = 0; i < children.length; i++) {
      unmount(children[i]);
    }
  };

  // 比较两个节点的差异
  const patchKeyChildren = (c1, c2, el) => {

  };

  // 比较两个节点的子节点,el为当前父节点
  const patchChildren = (n1, n2, el) => {
    const c1 = n1.children;
    const c2 = n2.children;
    const prevShapeFlag = n1.shapeFlag;
    const shapeFlag = n2.shapeFlag;

    // 新值为文本
    if (shapeFlag & ShapeFlags.TEXT_CHILDREN) {
      // 旧值为数组
      if (prevShapeFlag & ShapeFlags.ARRAY_CHILDREN) {
        // 文本 数组
        unmountChildren(c1);
      }
      if (c1 !== c2) {
        // 文本 文本
        hostSetElementText(el, c2);
      }
    } else {
      // 旧值为数组
      if (prevShapeFlag & ShapeFlags.ARRAY_CHILDREN) {
        // 新值为数组
        if (shapeFlag & ShapeFlags.ARRAY_CHILDREN) {
          // 数组 数组 diff
          patchKeyChildren(c1, c2, el); // 全量更新,同级比较
        } else {
          // 空   数组
          unmountChildren(c1);
        }
      } else {
        if (prevShapeFlag & ShapeFlags.TEXT_CHILDREN) {
          // 空   文本
          // 数组 文本
          hostSetElementText(el, '');
        }
        if (shapeFlag & ShapeFlags.ARRAY_CHILDREN) {
          // 数组 空
          // 数组 文本
          mountChildren(c2, el);
        }
      }
    }
  };

  // 先复用节点,然后比较属性,再比较子节点
  const patchElement = (n1, n2) => {
    // 复用节点
    let el = (n2.el = n1.el);
    let oldProps = n1.props || {};
    let newProps = n2.props || {};

    patchProps(oldProps, newProps, el);

    patchChildren(n1, n2, el);
  };

  const processElement = (n1, n2, container) => {
    if (n1 === null) {
      mountElement(n2, container);
    } else {
      // 对比元素
      patchElement(n1, n2);
    }
  };

  const patch = (n1, n2, container) => {
    if (n1 === n2) {
      return;
    }

    // 如果新值与老值完全没有可比性,删除老值,创建新值
    if (n1 && !isSameVNode(n1, n2)) {
      unmount(n1);
      n1 = null;
    }

    const { type, shapeFlag } = n2;

    switch (type) {
      case Text: // 文本
        processText(n1, n2, container);
        break;

      default:
        if (shapeFlag & ShapeFlags.ELEMENT) {
          // 元素
          processElement(n1, n2, container);
        }
        break;
    }
  };

  const unmount = (vnode) => {
    hostRemove(vnode.el);
  };

  const render = (vnode, container) => {
    if (vnode === null) {
      // 卸载dom
      if (container._vnode) {
        unmount(container._vnode);
      }
    } else {
      // 初始化及更新
      patch(container._vnode || null, vnode, container);
    }

    // 缓存下次直接更新
    container._vnode = vnode;
  };

  return { render };
}
- 1
- 2
- 3
- 4
- 5
- 6
- 7
- 8
- 9
- 10
- 11
- 12
- 13
- 14
- 15
- 16
- 17
- 18
- 19
- 20
- 21
- 22
- 23
- 24
- 25
- 26
- 27
- 28
- 29
- 30
- 31
- 32
- 33
- 34
- 35
- 36
- 37
- 38
- 39
- 40
- 41
- 42
- 43
- 44
- 45
- 46
- 47
- 48
- 49
- 50
- 51
- 52
- 53
- 54
- 55
- 56
- 57
- 58
- 59
- 60
- 61
- 62
- 63
- 64
- 65
- 66
- 67
- 68
- 69
- 70
- 71
- 72
- 73
- 74
- 75
- 76
- 77
- 78
- 79
- 80
- 81
- 82
- 83
- 84
- 85
- 86
- 87
- 88
- 89
- 90
- 91
- 92
- 93
- 94
- 95
- 96
- 97
- 98
- 99
- 100
- 101
- 102
- 103
- 104
- 105
- 106
- 107
- 108
- 109
- 110
- 111
- 112
- 113
- 114
- 115
- 116
- 117
- 118
- 119
- 120
- 121
- 122
- 123
- 124
- 125
- 126
- 127
- 128
- 129
- 130
- 131
- 132
- 133
- 134
- 135
- 136
- 137
- 138
- 139
- 140
- 141
- 142
- 143
- 144
- 145
- 146
- 147
- 148
- 149
- 150
- 151
- 152
- 153
- 154
- 155
- 156
- 157
- 158
- 159
- 160
- 161
- 162
- 163
- 164
- 165
- 166
- 167
- 168
- 169
- 170
- 171
- 172
- 173
- 174
- 175
- 176
- 177
- 178
- 179
- 180
- 181
- 182
- 183
- 184
- 185
- 186
- 187
- 188
- 189
- 190
- 191
- 192
- 193
- 194
- 195
- 196
- 197
- 198
- 199
- 200
- 201
- 202
- 203
- 204
// packages/runtime-core/src/renderer.ts

function baseCreateRenderer(
    options: RendererOptions,
    createHydrationFns?: typeof createHydrationFunctions
): any {
	const {
    insert: hostInsert,
    remove: hostRemove,
    patchProp: hostPatchProp,
    forcePatchProp: hostForcePatchProp,
    createElement: hostCreateElement,
    createText: hostCreateText,
    createComment: hostCreateComment,
    setText: hostSetText,
    setElementText: hostSetElementText,
    parentNode: hostParentNode,
    nextSibling: hostNextSibling,
    setScopeId: hostSetScopeId = NOOP,
    cloneNode: hostCloneNode,
    insertStaticContent: hostInsertStaticContent
  } = options

    // 声明了许多操作函数,约2000行

	return {
        render,
        hydrate,
        createApp: createAppAPI(render, hydrate)
    }
}
- 1
- 2
- 3
- 4
- 5
- 6
- 7
- 8
- 9
- 10
- 11
- 12
- 13
- 14
- 15
- 16
- 17
- 18
- 19
- 20
- 21
- 22
- 23
- 24
- 25
- 26
- 27
- 28
- 29
- 30
- 31
在调用完baseCreateRenderer后主要返回了三个函数:render,hydrate,createApp。
此时renderer便创建完成了
render
当我们拥有这个vnode后,就开始进入渲染阶段了。render(vnode, rootContainer),可以看到传入的参数为vnode以及根元素的容器,接下来让我们继续深入。
不知道你是否还记得,这个render函数是在调用createAPI时传入的第一个参数,因此这个函数来源于runtime-core中的baseCreateRenderer
// packages/runtime-core/src/renderer.ts

const render: RootRenderFunction = (vnode, container) => {
    // (判断进行卸载还是渲染
    if (vnode == null) {
      if (container._vnode) {
        unmount(container._vnode, null, null, true) // 卸载
      }
    } else {
      patch(container._vnode || null, vnode, container) // 创建或更新组件,进行dom diff和渲染
    }
    flushPostFlushCbs() // 回调调度器,使用Promise实现,与Vue2的区别是Vue2是宏任务或微任务来处理的
    container._vnode = vnode // 缓存vnode节点,证明已经渲染完成,方便后续diff操作
  }
- 1
- 2
- 3
- 4
- 5
- 6
- 7
- 8
- 9
- 10
- 11
- 12
- 13
- 14
在render函数中,对vnode的存在进行了判断,如果为空,则对组件进行销毁,否则将调用patch,创建组件。
接下来让我们继续进入patch函数
// packages/runtime-core/src/renderer.ts

const patch: PatchFn = (
    n1, // 旧
    n2, // 新
    container, // 容器
    anchor = null,
    parentComponent = null,
    parentSuspense = null,
    isSVG = false,
    optimized = false
  ) => {

    // 如果两者类型不同,则直接卸载n1
    if (n1 && !isSameVNodeType(n1, n2)) {
      anchor = getNextHostNode(n1)
      unmount(n1, parentComponent, parentSuspense, true)
      n1 = null
    }

    if (n2.patchFlag === PatchFlags.BAIL) {
      optimized = false
      n2.dynamicChildren = null
    }

    const { type, ref, shapeFlag } = n2
    // 根据不同的节点类型来进行不同的process方法
    switch (type) {
      case Text: // 文本
        processText(n1, n2, container, anchor)
        break
      case Comment: // 注释
        processCommentNode(n1, n2, container, anchor)
        break
      case Static: // 静态
        if (n1 == null) {
          mountStaticNode(n2, container, anchor, isSVG)
        } else if (__DEV__) {
          patchStaticNode(n1, n2, container, isSVG)
        }
        break
      case Fragment: // 片段(dom数组)
        processFragment(
        	// ...
        )
        break
    default:
         if (shapeFlag & ShapeFlags.ELEMENT) { // 原生节点(div)
          processElement(
           // ...
          )
        } else if (shapeFlag & ShapeFlags.COMPONENT) { // 组件,根组件即通过processComponent处理
          processComponent(
           // ...
          )
        } else if (shapeFlag & ShapeFlags.TELEPORT) { // 传送组件
          ;(type as typeof TeleportImpl).process(
            // ...
          )
        } else if (__FEATURE_SUSPENSE__ && shapeFlag & ShapeFlags.SUSPENSE) { // 挂起组件-异步渲染
          ;(type as typeof SuspenseImpl).process(
            // ...
          )
        } else if (__DEV__) {
          warn('Invalid VNode type:', type, `(${typeof type})`)
        }
    }

   // 处理节点之后处理ref
    if (ref != null && parentComponent) {
      setRef(ref, n1 && n1.ref, parentSuspense, n2)
    }
}
- 1
- 2
- 3
- 4
- 5
- 6
- 7
- 8
- 9
- 10
- 11
- 12
- 13
- 14
- 15
- 16
- 17
- 18
- 19
- 20
- 21
- 22
- 23
- 24
- 25
- 26
- 27
- 28
- 29
- 30
- 31
- 32
- 33
- 34
- 35
- 36
- 37
- 38
- 39
- 40
- 41
- 42
- 43
- 44
- 45
- 46
- 47
- 48
- 49
- 50
- 51
- 52
- 53
- 54
- 55
- 56
- 57
- 58
- 59
- 60
- 61
- 62
- 63
- 64
- 65
- 66
- 67
- 68
- 69
- 70
- 71
- 72
- 73
我们可以看到在创建vnode时定义的shapeFlag,在这里发挥了作用。根组件经过逻辑流程之后也进入了processComponent之中。
packages/runtime-dom/src/nodeOps.ts
// packages/runtime-dom/src/nodeOps.ts

export const nodeOps: Omit<RendererOptions<Node, Element>, 'patchProp'> = {
  insert: (child, parent, anchor) => {
    parent.insertBefore(child, anchor || null)
  },

  remove: child => {
    const parent = child.parentNode
    if (parent) {
      parent.removeChild(child)
    }
  },
	// ...
}
- 1
- 2
- 3
- 4
- 5
- 6
- 7
- 8
- 9
- 10
- 11
- 12
- 13
- 14
- 15
其实就是对于dom操作的封装。那为什么要在runtime-dom中传入,runtime-core拆解?
其实是因为在Vue3中runtime-core和runtime-dom的拆分,runtime-core不应该关心实际的操作,这样当新平台要接入时(比如weex)就可以只实现属于自己平台的nodeOps。
总结:创建renderer的函数调用顺序为
- ensureRenderer()
- createRenderer()
- baseCreateRenderer()
packages/runtime-core/src/apiCreateApp.ts
创建app
当创建完renderer后返回了3个函数,我们可以看到其中createApp实际上是引用了createAppAPI(render, hydrate),所以其实const app = ensureRenderer().createApp(…args)创建app实例时,调用的是createAppAPI的返回值(运用柯里化,返回的是一个函数)
// packages/runtime-core/src/apiCreateApp.ts

export function createAppContext(): AppContext {
  return {
    app: null as any, // 刚创建时为空
    config: {
      isNativeTag: NO,
      performance: false,
      globalProperties: {},
      optionMergeStrategies: {},
      isCustomElement: NO,
      errorHandler: undefined,
      warnHandler: undefined
    },
    mixins: [],
    components: {},
    directives: {},
    provides: Object.create(null)
  }
}

export function createAppAPI<HostElement>(
  render: RootRenderFunction,
  hydrate?: RootHydrateFunction
): CreateAppFunction<HostElement> {
  return function createApp(rootComponent, rootProps = null) {
   	// 检验root props
    if (rootProps != null && !isObject(rootProps)) {
      __DEV__ && warn(`root props passed to app.mount() must be an object.`)
      rootProps = null
    }

    const context = createAppContext(); // 创建context
    const installedPlugins = new Set(); // 创建插件列表集合,储存已安装的插件

    let isMounted = false;

    const app: App = (context.app = {
      _component: rootComponent as Component,
      _props: rootProps,
      _container: null,
      _context: context,

      version,

      get config() {},
      set config() {}

      use() {},
      mixin() {},
      component() {},
      mount() {}
      // ...

    })

		return app // 返回创建的app实例
  };
}
- 1
- 2
- 3
- 4
- 5
- 6
- 7
- 8
- 9
- 10
- 11
- 12
- 13
- 14
- 15
- 16
- 17
- 18
- 19
- 20
- 21
- 22
- 23
- 24
- 25
- 26
- 27
- 28
- 29
- 30
- 31
- 32
- 33
- 34
- 35
- 36
- 37
- 38
- 39
- 40
- 41
- 42
- 43
- 44
- 45
- 46
- 47
- 48
- 49
- 50
- 51
- 52
- 53
- 54
- 55
- 56
- 57
- 58
- 59
看完上面的代码后结果就很清楚了,当我们调用createApp时,返回的app上有着许多函数方法和属性,相信你对这些函数方法并不陌生,这些就是vue2.x中在Vue上的那些API:use、mixin、component,在vue3则是被挂载到了app实例上
需要注意的是:我们在应用中调用的createApp(App),其中的APP就是第一个参数,作为根组件
mount
// packages/runtime-core/src/apiCreateApp.ts

mount(rootContainer: HostElement, isHydrate?: boolean): any {
        if (!isMounted) {
          // 1.创建vnode
          const vnode = createVNode(
            rootComponent as ConcreteComponent, // App组件
            rootProps
          )

          vnode.appContext = context // 保存context在根节点上

          // HMR root reload
          if (__DEV__) {
            // ...
          }

          if (isHydrate && hydrate) {
            hydrate(vnode as VNode<Node, Element>, rootContainer as any)
          } else {
            render(vnode, rootContainer) // 2.进入render,函数来源于runtime-core
          }

          isMounted = true // 修改状态
          app._container = rootContainer
          // for devtools and telemetry
          ;(rootContainer as any).__vue_app__ = app

          if (__DEV__ || __FEATURE_PROD_DEVTOOLS__) {
            devtoolsInitApp(app, version)
          }

          return vnode.component!.proxy // 返回vnode.component的代理
        } else if (__DEV__) {
         // ...
        }
      },
- 1
- 2
- 3
- 4
- 5
- 6
- 7
- 8
- 9
- 10
- 11
- 12
- 13
- 14
- 15
- 16
- 17
- 18
- 19
- 20
- 21
- 22
- 23
- 24
- 25
- 26
- 27
- 28
- 29
- 30
- 31
- 32
- 33
- 34
- 35
- 36
- 37
runtime-core中mount方法主要做了两件事:创建vnode和调用render进入渲染。这里我们先简略的介绍一下这两个函数的作用。
在创建vnode时调用了createVNode(),并将根组件作为参数传入。
在得到vnode之后又调用了render()开始进行渲染。
最后mount函数的返回值为vnode.component的代理。
packages/runtime-core/src/vnode.ts
创建虚拟节点
import { isArray, isString, ShapeFlags } from '@vue/shared';

export const Text = Symbol('Text');

export function isVNode(value) {
  return !!(value && value.__v_isVnode);
}

/**
 * 创建虚拟节点
 * @param type 虚拟节点类型
 * @param props 属性
 * @param children 子节点
 */
export function createVNode(type, props, children = null) {
  let shapeFlag = isString(type) ? ShapeFlags.ELEMENT : 0;

  // 虚拟dom,可以跨平台,性能好
  const vnode = {
    __v_isVnode: true, // 是否是虚拟节点
    shapeFlag, // 类型标识
    type, // 节点类型
    props, // 属性
    children, // 子节点
    key: props?.key, // key
    /**
     * 对应的真实节点,后续diff算法比对两个vnode时会替换新的属性值,并更新el
     */
    el: null,
  };

  if (children) {
    let type = 0;

    if (isArray(children)) {
      type = ShapeFlags.ARRAY_CHILDREN;
    } else {
      children = String(children);
      type = ShapeFlags.TEXT_CHILDREN;
    }

    // 通过位运算将当前vnode类型及子节点类型存储起来
    vnode.shapeFlag |= type;
  }

  return vnode;
}
- 1
- 2
- 3
- 4
- 5
- 6
- 7
- 8
- 9
- 10
- 11
- 12
- 13
- 14
- 15
- 16
- 17
- 18
- 19
- 20
- 21
- 22
- 23
- 24
- 25
- 26
- 27
- 28
- 29
- 30
- 31
- 32
- 33
- 34
- 35
- 36
- 37
- 38
- 39
- 40
- 41
- 42
- 43
- 44
- 45
- 46
- 47
虚拟节点不用考虑平台兼容,并且可以将虚拟节点利用js存储并进行比对后再渲染真实dom,不用频繁操作dom元素,性能更好
createVNode
// packages/runtime-core/src/vnode.ts

export const createVNode = (__DEV__
  ? createVNodeWithArgsTransform
  : _createVNode) as typeof _createVNode

// 实际调用
function _createVNode(
  type: VNodeTypes | ClassComponent | typeof NULL_DYNAMIC_COMPONENT,
  props: (Data & VNodeProps) | null = null,
  children: unknown = null,
  patchFlag: number = 0, // patch flag默认为0
  dynamicProps: string[] | null = null,
  isBlockNode = false
): VNode {
  // ...

  // ...

  // class & style normalization
  // 处理props,标准化calss和style
  if (props) {
    // for reactive or proxy objects, we need to clone it to enable mutation.
    if (isProxy(props) || InternalObjectKey in props) {
      props = extend({}, props)
    }
    let { class: klass, style } = props
    if (klass && !isString(klass)) {
      props.class = normalizeClass(klass) // 标准化class
    }
    if (isObject(style)) {
      // reactive state objects need to be cloned since they are likely to be
      // mutated
      if (isProxy(style) && !isArray(style)) {
        style = extend({}, style)
      }
      props.style = normalizeStyle(style) // 标准化style
    }
  }

  // 定义shapeFlag
  // encode the vnode type information into a bitmap
  const shapeFlag = isString(type)
    ? ShapeFlags.ELEMENT
    : __FEATURE_SUSPENSE__ && isSuspense(type)
      ? ShapeFlags.SUSPENSE
      : isTeleport(type)
        ? ShapeFlags.TELEPORT
        : isObject(type)
          ? ShapeFlags.STATEFUL_COMPONENT // 根组件shapeFlag
          : isFunction(type)
            ? ShapeFlags.FUNCTIONAL_COMPONENT
            : 0

  // ...

  // 创建vnode对象
  const vnode: VNode = {
    __v_isVNode: true,
    [ReactiveFlags.SKIP]: true,
    type,
    props,
    key: props && normalizeKey(props),
    ref: props && normalizeRef(props),
    scopeId: currentScopeId,
    children: null,
    component: null,
    suspense: null,
    ssContent: null,
    ssFallback: null,
    dirs: null,
    transition: null,
    el: null,
    anchor: null,
    target: null,
    targetAnchor: null,
    staticCount: 0,
    shapeFlag,
    patchFlag,
    dynamicProps,
    dynamicChildren: null,
    appContext: null
  }

  // ...

  normalizeChildren(vnode, children) // 标准化子节点
 // ...

  return vnode // 返回创建完的vnode
}
- 1
- 2
- 3
- 4
- 5
- 6
- 7
- 8
- 9
- 10
- 11
- 12
- 13
- 14
- 15
- 16
- 17
- 18
- 19
- 20
- 21
- 22
- 23
- 24
- 25
- 26
- 27
- 28
- 29
- 30
- 31
- 32
- 33
- 34
- 35
- 36
- 37
- 38
- 39
- 40
- 41
- 42
- 43
- 44
- 45
- 46
- 47
- 48
- 49
- 50
- 51
- 52
- 53
- 54
- 55
- 56
- 57
- 58
- 59
- 60
- 61
- 62
- 63
- 64
- 65
- 66
- 67
- 68
- 69
- 70
- 71
- 72
- 73
- 74
- 75
- 76
- 77
- 78
- 79
- 80
- 81
- 82
- 83
- 84
- 85
- 86
- 87
- 88
- 89
- 90
- 91
可以看到createVNode主要做了四件事:
- 处理props:标准化class和style,如果是响应式元素则会被克隆
- 定义shapeFlag:shapeFlag用于对元素进行标记,比如文本、注释、组件等等。主要是为了在render的时候可以根据不同的元素类型来进行不同的patch操作。
- 创建vnode对象
- 标准化子节点:把不同数据类型的 children 转成数组或者文本类型
shapeFlag的定义如下:
// packages/runtime-core/src/renderer.ts

const patch: PatchFn = (
    n1, // 旧
    n2, // 新
    container, // 容器
    anchor = null,
    parentComponent = null,
    parentSuspense = null,
    isSVG = false,
    optimized = false
  ) => {

    // 如果两者类型不同,则直接卸载n1
    if (n1 && !isSameVNodeType(n1, n2)) {
      anchor = getNextHostNode(n1)
      unmount(n1, parentComponent, parentSuspense, true)
      n1 = null
    }

    if (n2.patchFlag === PatchFlags.BAIL) {
      optimized = false
      n2.dynamicChildren = null
    }

    const { type, ref, shapeFlag } = n2
    // 根据不同的节点类型来进行不同的process方法
    switch (type) {
      case Text: // 文本
        processText(n1, n2, container, anchor)
        break
      case Comment: // 注释
        processCommentNode(n1, n2, container, anchor)
        break
      case Static: // 静态
        if (n1 == null) {
          mountStaticNode(n2, container, anchor, isSVG)
        } else if (__DEV__) {
          patchStaticNode(n1, n2, container, isSVG)
        }
        break
      case Fragment: // 片段(dom数组)
        processFragment(
        	// ...
        )
        break
    default:
         if (shapeFlag & ShapeFlags.ELEMENT) { // 原生节点(div)
          processElement(
           // ...
          )
        } else if (shapeFlag & ShapeFlags.COMPONENT) { // 组件,根组件即通过processComponent处理
          processComponent(
           // ...
          )
        } else if (shapeFlag & ShapeFlags.TELEPORT) { // 传送组件
          ;(type as typeof TeleportImpl).process(
            // ...
          )
        } else if (__FEATURE_SUSPENSE__ && shapeFlag & ShapeFlags.SUSPENSE) { // 挂起组件-异步渲染
          ;(type as typeof SuspenseImpl).process(
            // ...
          )
        } else if (__DEV__) {
          warn('Invalid VNode type:', type, `(${typeof type})`)
        }
    }

   // 处理节点之后处理ref
    if (ref != null && parentComponent) {
      setRef(ref, n1 && n1.ref, parentSuspense, n2)
    }
}
- 1
- 2
- 3
- 4
- 5
- 6
- 7
- 8
- 9
- 10
- 11
- 12
- 13
- 14
- 15
- 16
- 17
- 18
- 19
- 20
- 21
- 22
- 23
- 24
- 25
- 26
- 27
- 28
- 29
- 30
- 31
- 32
- 33
- 34
- 35
- 36
- 37
- 38
- 39
- 40
- 41
- 42
- 43
- 44
- 45
- 46
- 47
- 48
- 49
- 50
- 51
- 52
- 53
- 54
- 55
- 56
- 57
- 58
- 59
- 60
- 61
- 62
- 63
- 64
- 65
- 66
- 67
- 68
- 69
- 70
- 71
- 72
- 73
我们可以看到在创建vnode时定义的shapeFlag,在这里发挥了作用。根组件经过逻辑流程之后也进入了processComponent之中。
来源
Vue3源码学习之路-实现runtime-core
【Vue3源码Runtime-core篇】 第二章初始化Component
代码先锋网


