- 1详解IP安全:IPSec协议簇 | AH协议 | ESP协议 | IKE协议
- 2数学基础--均值、方差、标准差、协方差_均值和标准差
- 3re:Invent 2023:如何利用云计算塑造金融服务的明天
- 4Error: Could not create the Java Virtual Machine. Error: A fatal exception has occurred……
- 5【Python 零基础入门】 函数
- 6大一作业习题
- 7基于SpringBoot的ElasticSearch操作(超详细教程)_springboot配置elasticsearch
- 8[点云学习] 一、点云相关知识了解
- 9121:leaflet多功能集成(位置、搜索、切换地图、全屏、鹰眼等)_leaflet 地图切换
- 10【K8S认证】2023年CKA考题汇总(解析+答案)
(2)vue-element-admin使用:动态路由_vue-element-admin动态路由
赞
踩
vue-element-admin的登录退出,可以看上一篇。后端代码不做讲解,会说明需要返回的数据格式。
本篇章参考:https://ke.qq.com/course/3323814?taid=10963075825055654
想要源码的可以联系视频里的老师或者加我qq814216044。
主要修改文件为src/store/modules/permission.js把其中的generateRoutes方法改为如下所示
- const actions = {
- generateRoutes: async function({ commit }, roles) {
- // 从后台请求所有的路由信息
- const res = await getRoutes()
- // 定义一个变量,用来存放可以访问的路由表
- const dbAsyncRoutes = res.data
- // 过滤掉空的children和把component字符改编为对象
- const myAsyncRoutes = dbAsyncRoutes.filter(curr => {
- if (curr.children == null || curr.children.length === 0) {
- delete curr.children
- }
- return replaceComponent(curr)
- })
-
- let accessedRoutes
- // 判断当前的角色列表中,是否有包含admin
- if (roles.includes('admin')) {
- // 所有路由都可以被访问,将ansyncRoutes改造成从数据库中获取
- accessedRoutes = myAsyncRoutes || []
- } else {
- // 根据角色,过滤掉不能访问的路由表
- accessedRoutes = filterAsyncRoutes(myAsyncRoutes, roles)
- }
- // commit
- commit('SET_ROUTES', accessedRoutes)
- // 成功返回
- // resolve(accessedRoutes)
- return accessedRoutes
- }
- }

由于方法中replaceComponent方法是新增,方法如下所部,并附上修改有import需要导入的文件。
- import { constantRoutes, componentMap } from '@/router'
- import { getRoutes } from '@/api/auth'
-
- // 替换route对象中的component
- function replaceComponent(comp) {
- if (comp.component && typeof (comp.component) === 'string') {
- comp.component = componentMap[comp.component]
- }
-
- if (comp.children && comp.children.length > 0) {
- for (let i = 0; i < comp.children.length; i++) {
- comp.children[i] = replaceComponent(comp.children[i])
- }
- }
- return comp
- }
到此src/store/modules/permission.js已经修改完,由于后端代码已经是确定的,也就是说登录后会返回一个我们已经写好的路由页面,所以我们要复制已经写好的页面过来。如下图所示
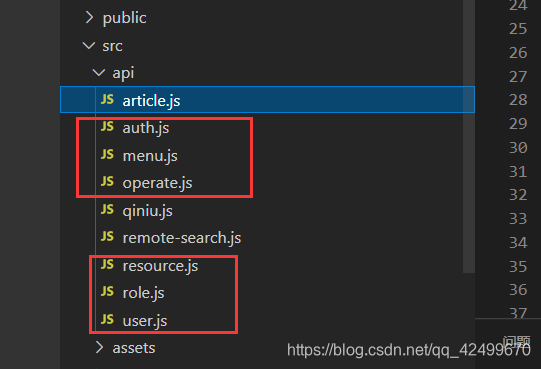
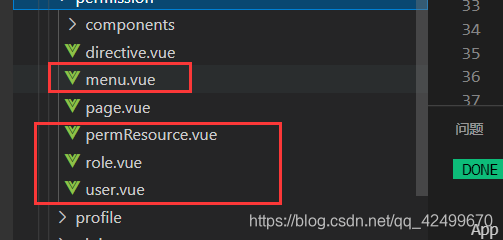
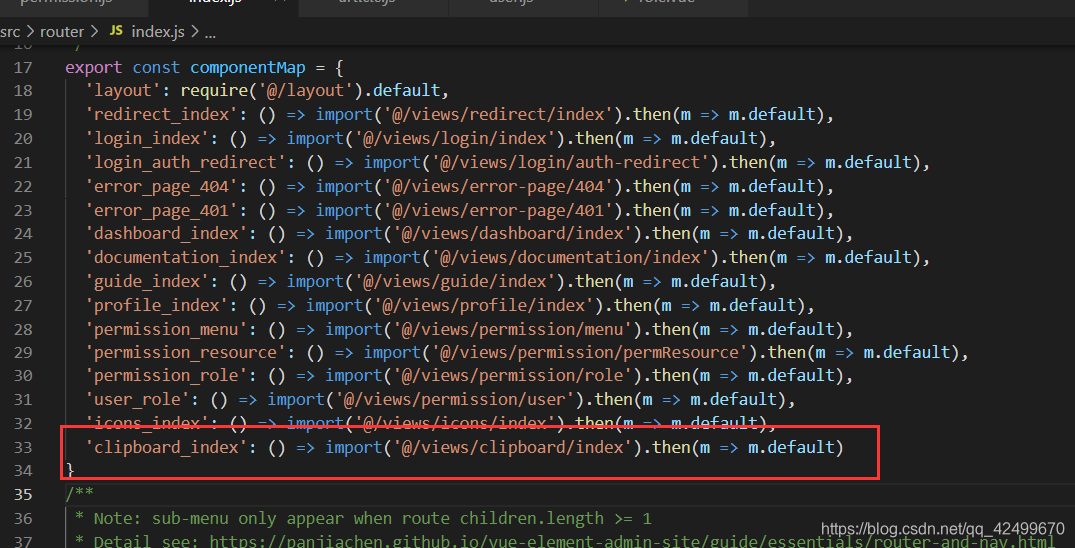
没有的文件就复制过去,已经有的文件就把所有内容复制粘贴。在上面的方法中有一个componentMap值,他是在router/index.vue中配置的如下所示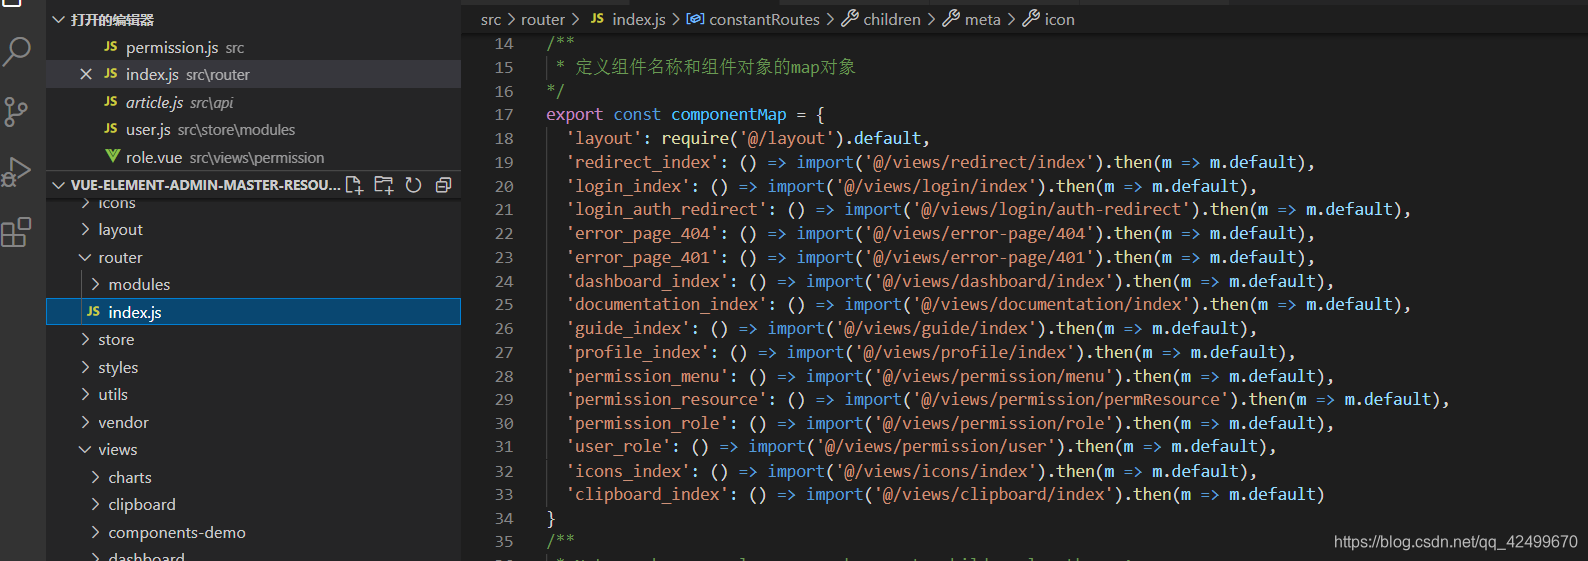
源代码:
- /**
- * 定义组件名称和组件对象的map对象
- */
- export const componentMap = {
- 'layout': require('@/layout').default,
- 'redirect_index': () => import('@/views/redirect/index').then(m => m.default),
- 'login_index': () => import('@/views/login/index').then(m => m.default),
- 'login_auth_redirect': () => import('@/views/login/auth-redirect').then(m => m.default),
- 'error_page_404': () => import('@/views/error-page/404').then(m => m.default),
- 'error_page_401': () => import('@/views/error-page/401').then(m => m.default),
- 'dashboard_index': () => import('@/views/dashboard/index').then(m => m.default),
- 'documentation_index': () => import('@/views/documentation/index').then(m => m.default),
- 'guide_index': () => import('@/views/guide/index').then(m => m.default),
- 'profile_index': () => import('@/views/profile/index').then(m => m.default),
- 'permission_menu': () => import('@/views/permission/menu').then(m => m.default),
- 'permission_resource': () => import('@/views/permission/permResource').then(m => m.default),
- 'permission_role': () => import('@/views/permission/role').then(m => m.default),
- 'user_role': () => import('@/views/permission/user').then(m => m.default),
- 'icons_index': () => import('@/views/icons/index').then(m => m.default),
- 'clipboard_index': () => import('@/views/clipboard/index').then(m => m.default)
- }
此时动态路由配置成功,登录后显示如下
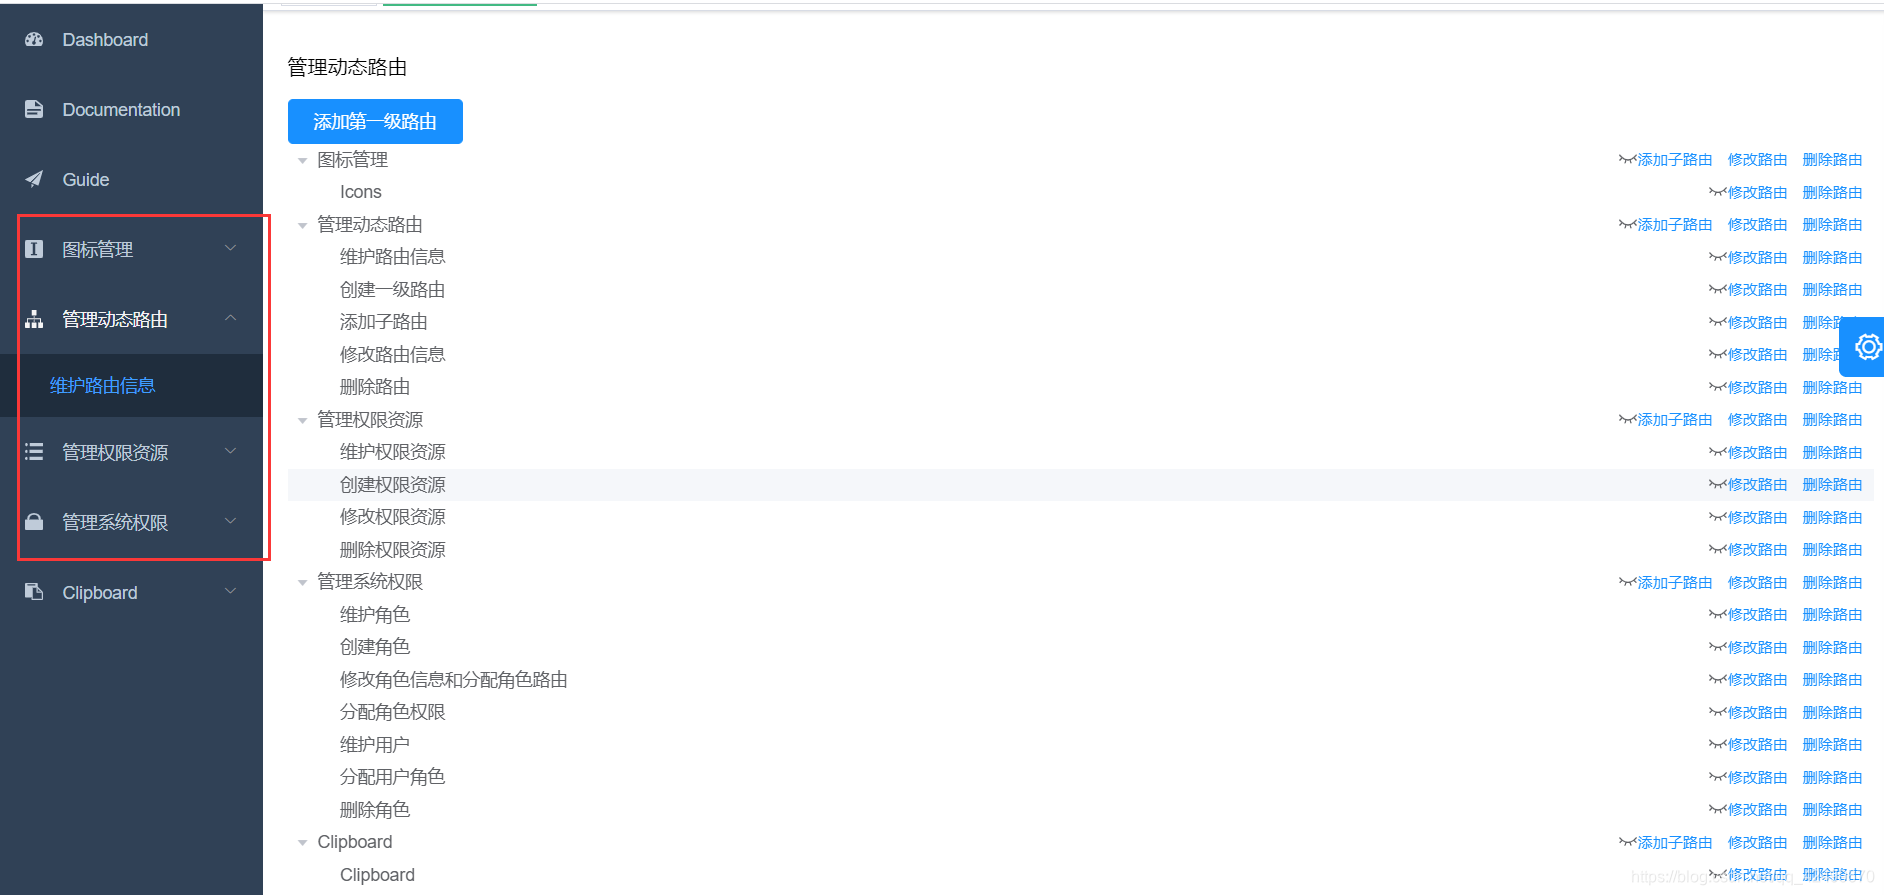
红色框中为自己添加的页面,如果代码中已经写好了页面,想在添加到动态路由中可以根据我下面的操作来,我以框架自带的页面进行配置,下面这个为一级菜单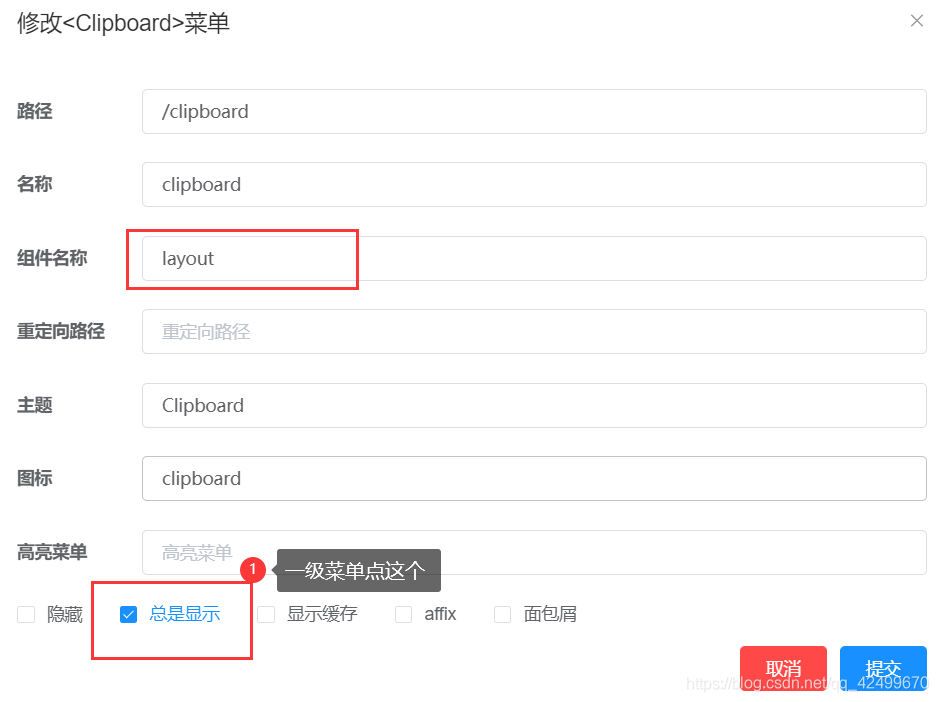
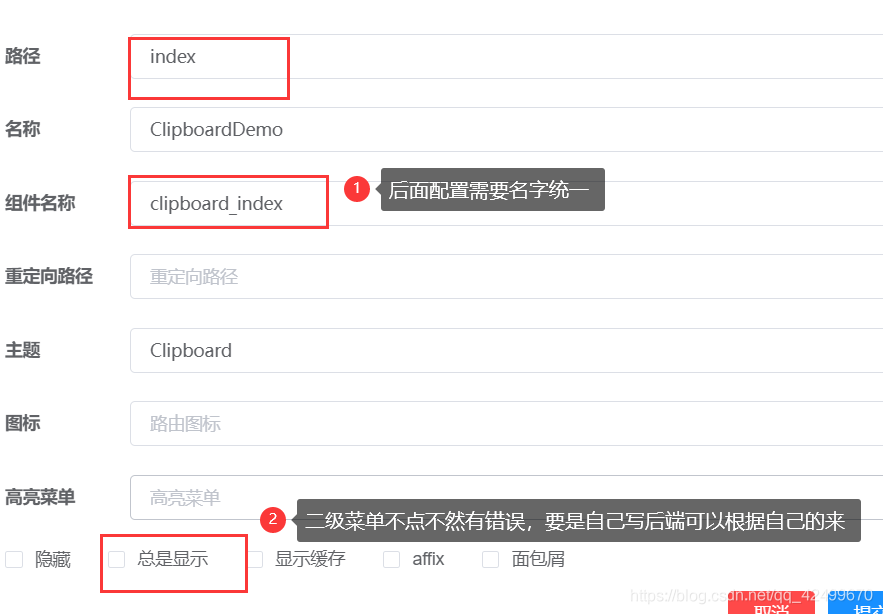
二级菜单如下
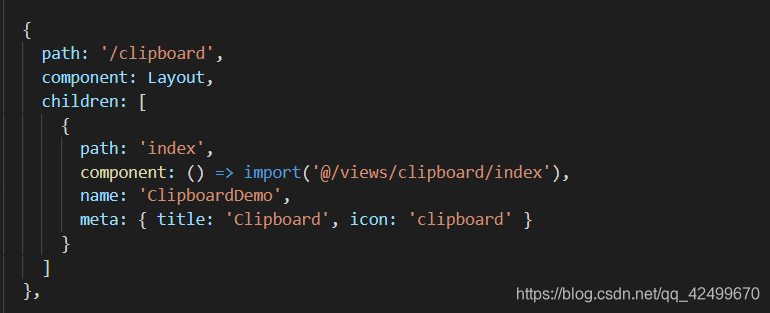
代码中需要在router/index添加一段代码,每增加一个页面都要有添加,指明组件在哪。
可以根据框架原配的路由进行参考,如下所示
得到路由返回的数据如下所示 到此,动态路由前端添加完成。我会在第三篇权限管理中讲解该框架登录、注册、动态路由和权限管理的过程和参考视频的思路。
(如有不对的地方可以留言私信指出谢谢)