
热门标签
热门文章
- 12023年软件测试就业现状分析,到底是卷还是润?_2023年软件测试就业趋势
- 2如何用Stable Diffusion模型生成个人专属创意名片?_使用stable-diffusion生成创意名片
- 3OC面向对象,面向过程_oc可以面向过程嘛?
- 4python批量计算cosine distance_cosine python
- 5MySql分表后如何进行分页查询_mysql分表后如何分页
- 65T的资源大礼包整合,总有你想要的!_vip aqdk300
- 7使用 Python 实现一个简单的智能聊天机器人(附完整代码)_python聊天机器人代码
- 8OKHttp从入门到放弃(自己编写测试服务端)_okhttp服务端
- 9STM32F4读写内部FLASH【使用库函数】_stm32f407 flash读写
- 10Grounding DINO:开放集目标检测,将基于Transformer的检测器DINO与真值预训练相结合
当前位置: article > 正文
vue-element-admin实现后台接口返回路由,前端动态生成路由菜单_vue路由后端返回
作者:编程革命者 | 2024-02-04 13:57:37
赞
踩
vue路由后端返回
最近要开发新项目,与以往不同的是,路由菜单的生成都是需要后台管理的,接口直接返回给前端,前端根据接口的返回实现菜单及页面的显示。
在菜单还没有给数据的时候,前端先自己在mock中模拟实现一下功能。
实现后的效果如下图所示:
 接下来就是实现过程:
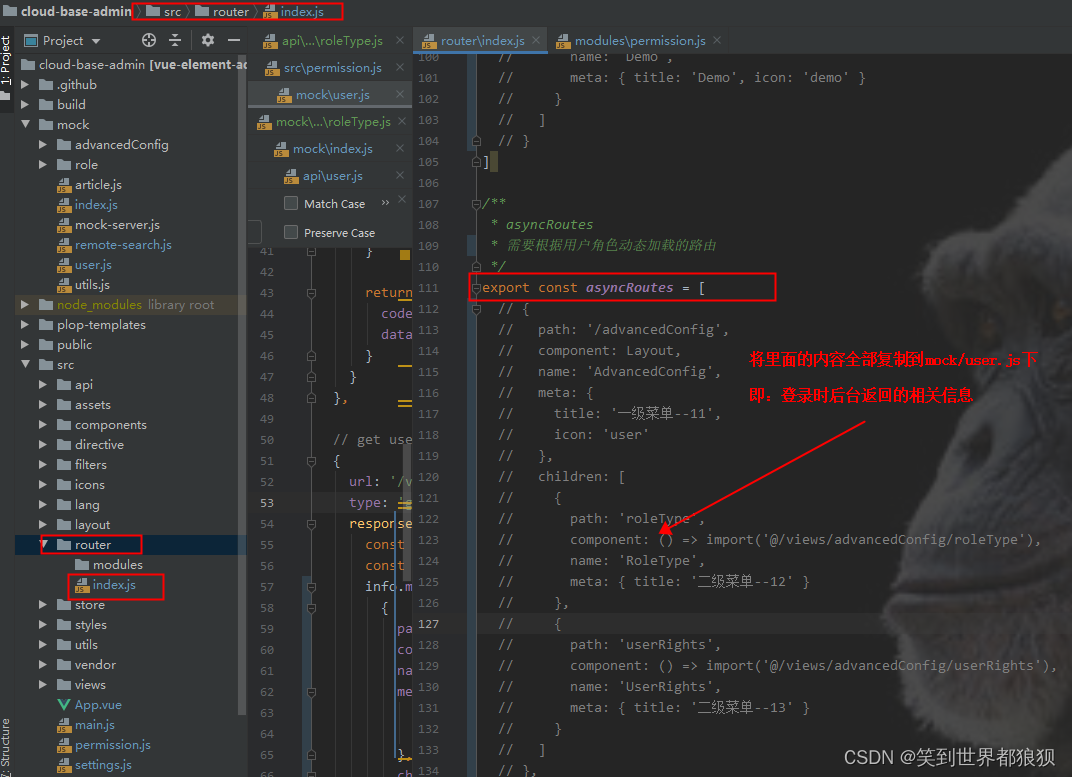
1、修改router/index.js
首先找到router/index.js,需要对asyncRoutes进行修改,将asyncRoutes中原本的菜单全部复制并删掉,这部分内容要换到接口返回的数据中。
 正常如果我们直接在前端页面写路由的话是如下写法:
/**
* asyncRoutes
* 需要根据用户角色动态加载的路由
*/
export const asyncRoutes = [
  {
    path: '/advancedConfig',
    component: Layout,
    name: 'AdvancedConfig',
    meta: {
      title: '一级菜单--11',
      icon: 'user'
    },
    children: [
      {
        path: 'roleType',
        component: () => import('@/views/advancedConfig/roleType'),
        name: 'RoleType',
        meta: { title: '二级菜单--12' }
      },
      {
        path: 'userRights',
        component: () => import('@/views/advancedConfig/userRights'),
        name: 'UserRights',
        meta: { title: '二级菜单--13' }
      }
    ]
  },
  {
    path: '/advancedConfig1',
    component: Layout,
    name: 'AdvancedConfig1',
    meta: {
      title: '一级菜单--11',
      icon: 'user'
    },
    children: [
      {
        path: 'employeeAuthority',
        component: () => import('@/views/advancedConfig/employeeAuthority'),
        name: 'EmployeeAuthority',
        meta: { title: '二级菜单--221' }
      },
      {
        path: 'userFunction',
        component: () => import('@/views/advancedConfig/userFunction'),
        name: 'UserFunction',
        meta: { title: '二级菜单--221' }
      }
    ]
  },
  /** when your routing map is too long, you can split it into small modules **/
  // 404 page must be placed at the end !!!
  { path: '*', redirect: '/404', hidden: true }
]
- 1
- 2
- 3
- 4
- 5
- 6
- 7
- 8
- 9
- 10
- 11
- 12
- 13
- 14
- 15
- 16
- 17
- 18
- 19
- 20
- 21
- 22
- 23
- 24
- 25
- 26
- 27
- 28
- 29
- 30
- 31
- 32
- 33
- 34
- 35
- 36
- 37
- 38
- 39
- 40
- 41
- 42
- 43
- 44
- 45
- 46
- 47
- 48
- 49
- 50
- 51
- 52
- 53
- 54
- 55
将上面asyncRoutes中的代码全部复制到mock/user.js中,剩余asyncRoutes如下:
export const asyncRoutes = []
- 1
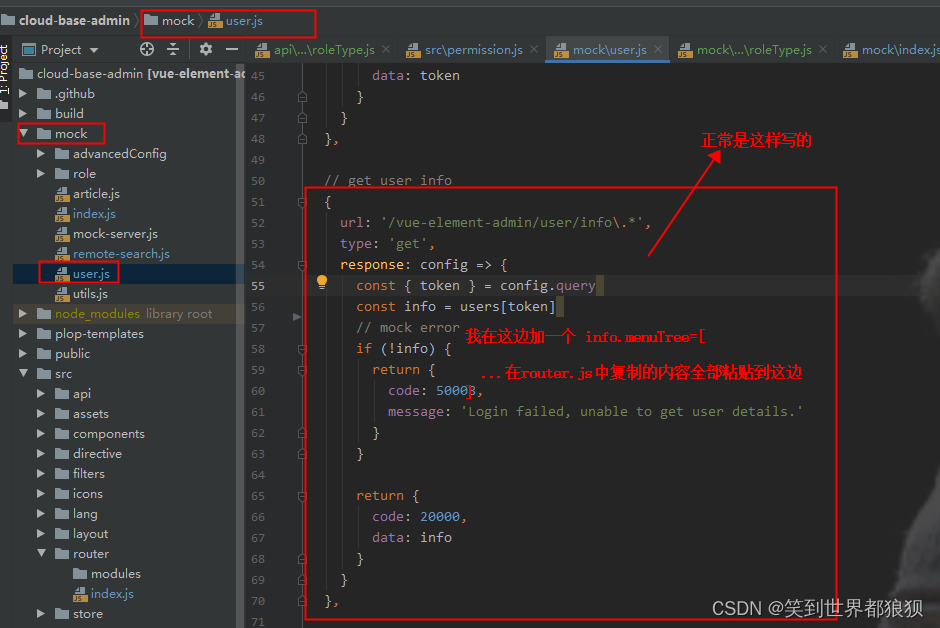
2、修改mock/user.js
找到 url: ‘/vue-element-admin/user/info.*’,将刚刚第一步那边删除的路由放到这边来,放置位置如下图所示:
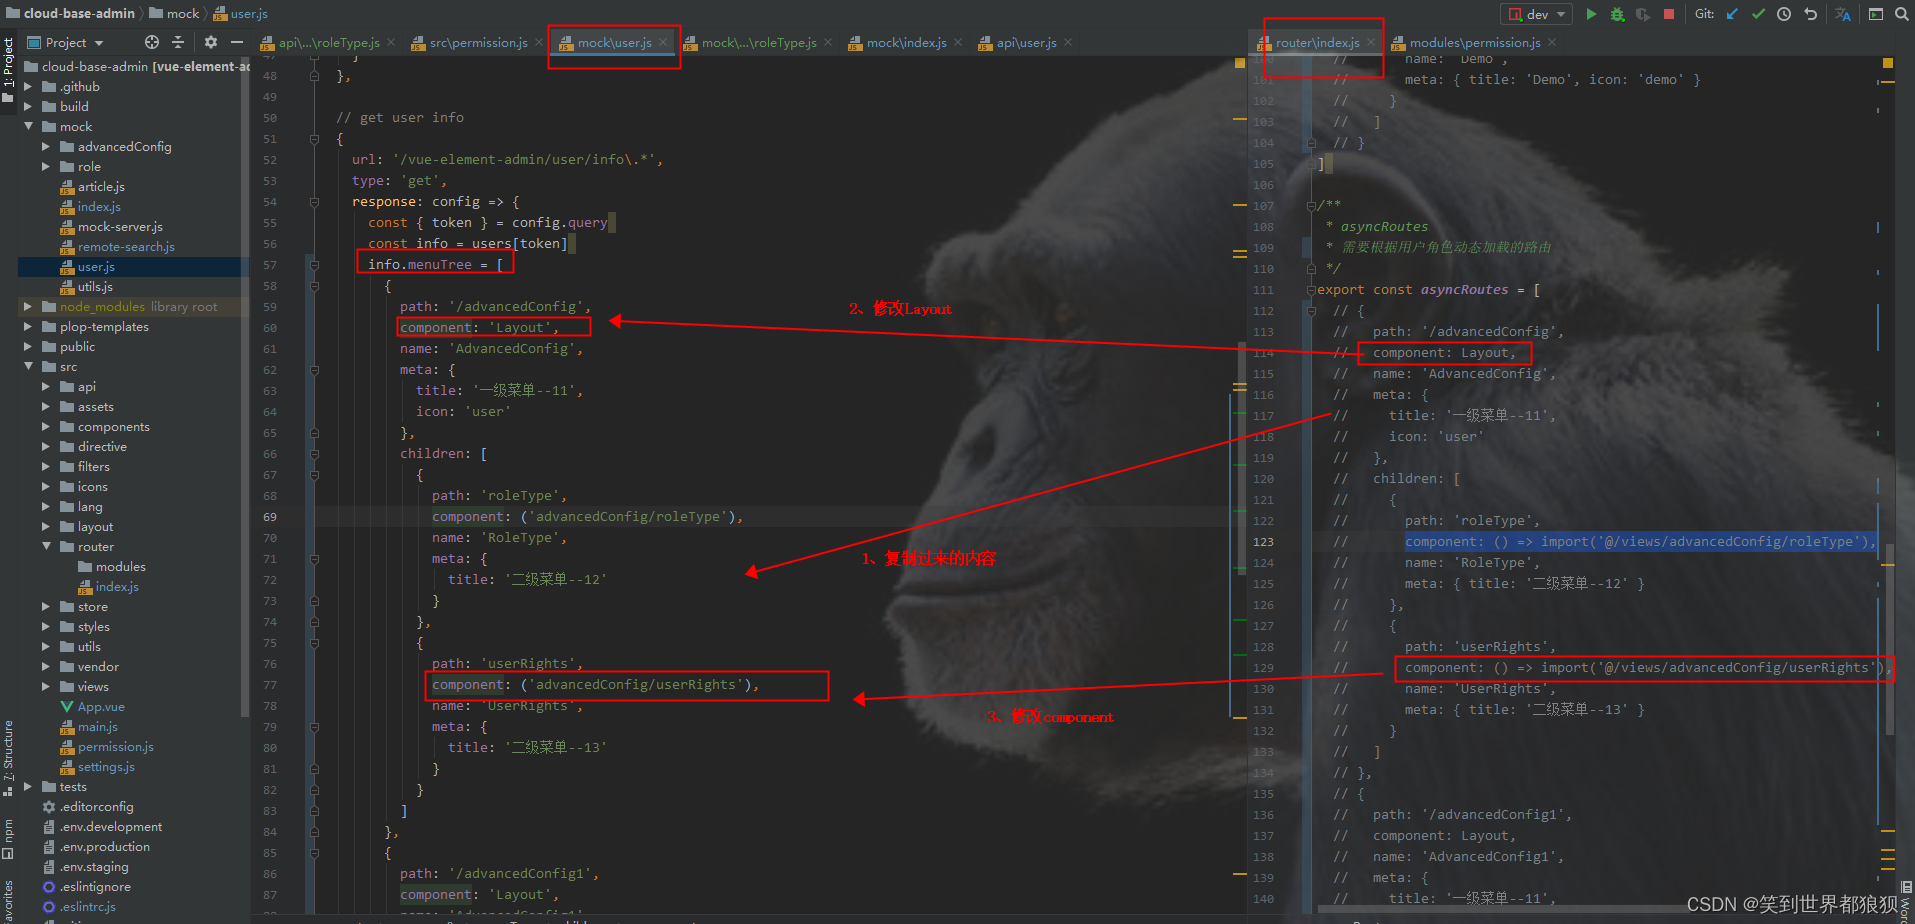
 注意:直接粘贴过来肯定会报错,所以这边粘贴完成后要对路由中的layout和component进行修改,具体修改如下:
component: Layout  改为:  component:'Layout'
component: () => import('@/views/advancedConfig/roleType'),   改为:component: ('advancedConfig/roleType'),
- 1
- 2
修改后的效果图下图所示,可以对比router/index.js中删除的内容看看,就是做了一些微调。
 mock/user.js代码:
// get user info
{
  url: '/vue-element-admin/user/info\.*',
  type: 'get',
  response: config => {
    const { token } = config.query
    const info = users[token]
    info.menuTree = [
      {
        path: '/advancedConfig',
        component: 'Layout',
        name: 'AdvancedConfig',
        meta: {
          title: '一级菜单--11',
          icon: 'user'
        },
        children: [
          {
            path: 'roleType',
            component: ('advancedConfig/roleType'),
            name: 'RoleType',
            meta: {
              title: '二级菜单--12'
            }
          },
          {
            path: 'userRights',
            component: ('advancedConfig/userRights'),
            name: 'UserRights',
            meta: {
              title: '二级菜单--13'
            }
          }
        ]
      },
      {
        path: '/advancedConfig1',
        component: 'Layout',
        name: 'AdvancedConfig1',
        meta: {
          title: '一级菜单--22',
          icon: 'user'
        },
        children: [
          {
            path: 'employeeAuthority',
            component: ('advancedConfig/employeeAuthority'),
            name: 'EmployeeAuthority',
            meta: { title: '二级菜单--21' }
          },
          {
            path: 'userFunction',
            component: ('advancedConfig/userFunction'),
            name: 'UserFunction',
            meta: { title: '二级菜单--22' }
          }
        ]
      },
      {
        path: '*',
        redirect: '/404',
        hidden: true
      }
    ]
    // mock error
    if (!info) {
      return {
        code: 50008,
        message: 'Login failed, unable to get user details.'
      }
    }


    return {
      code: 20000,
      data: info
    }
  }
},
- 1
- 2
- 3
- 4
- 5
- 6
- 7
- 8
- 9
- 10
- 11
- 12
- 13
- 14
- 15
- 16
- 17
- 18
- 19
- 20
- 21
- 22
- 23
- 24
- 25
- 26
- 27
- 28
- 29
- 30
- 31
- 32
- 33
- 34
- 35
- 36
- 37
- 38
- 39
- 40
- 41
- 42
- 43
- 44
- 45
- 46
- 47
- 48
- 49
- 50
- 51
- 52
- 53
- 54
- 55
- 56
- 57
- 58
- 59
- 60
- 61
- 62
- 63
- 64
- 65
- 66
- 67
- 68
- 69
- 70
- 71
- 72
- 73
- 74
- 75
- 76
- 77
- 78
- 79
这边需要注意的是,路由最下面一堆要加上404配置,上面的代码中就是加在路由最下方
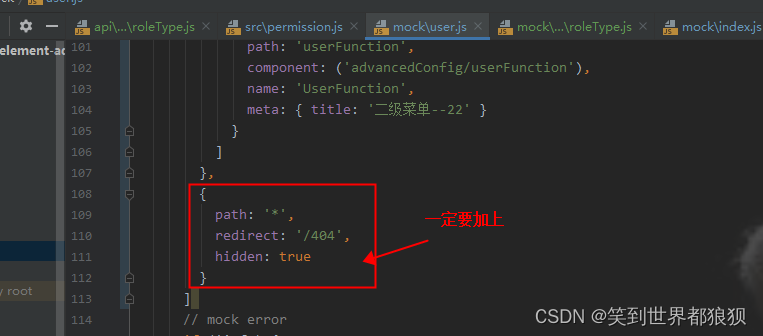 如果不配置404,会报错。
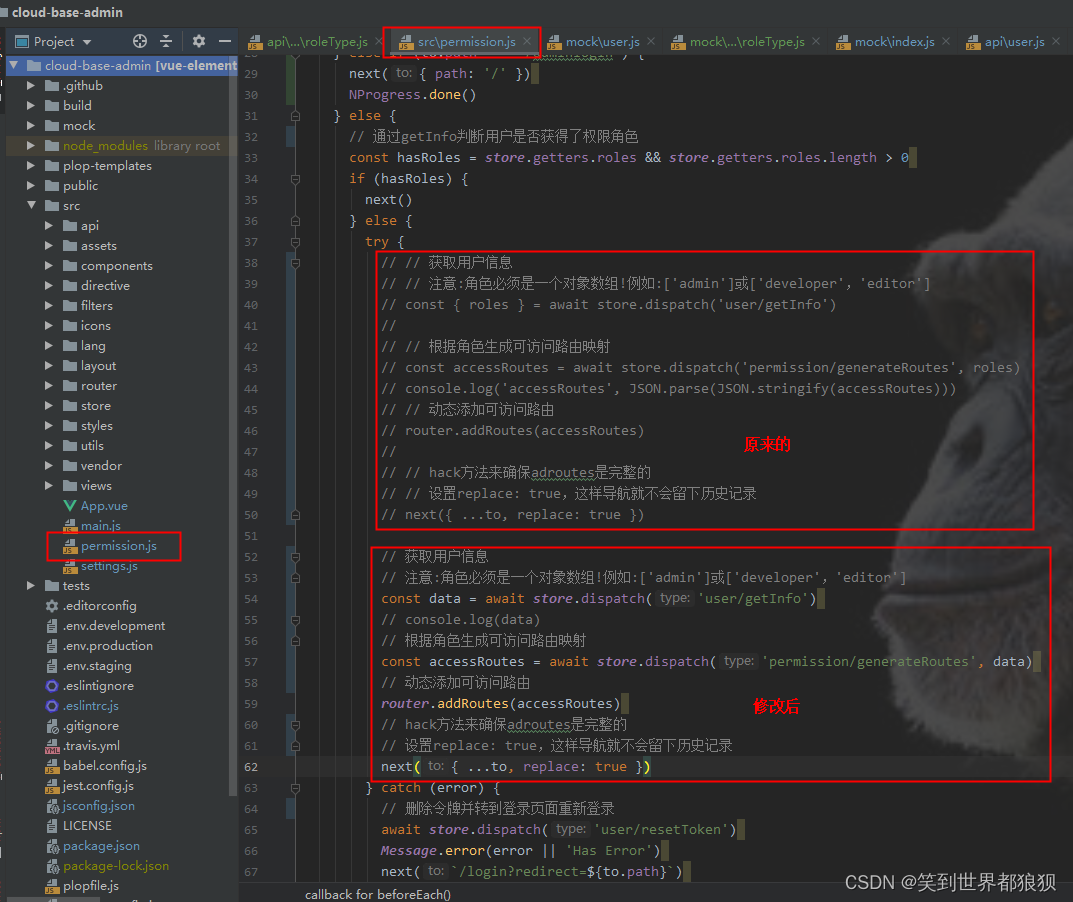
3、修改src/permission.js
需要修改的地方如下图所示,只要将我下方的代码粘贴进去替换原有即可。
 代码如下:
代码如下:
try {
  // 获取用户信息
  // 注意:角色必须是一个对象数组!例如:['admin']或['developer','editor']
  const data = await store.dispatch('user/getInfo')
  // console.log(data)
  // 根据角色生成可访问路由映射
  const accessRoutes = await store.dispatch('permission/generateRoutes', data)
  // 动态添加可访问路由
  router.addRoutes(accessRoutes)
  // hack方法来确保adroutes是完整的
  // 设置replace: true,这样导航就不会留下历史记录
  next({ ...to, replace: true })
}
- 1
- 2
- 3
- 4
- 5
- 6
- 7
- 8
- 9
- 10
- 11
- 12
- 13
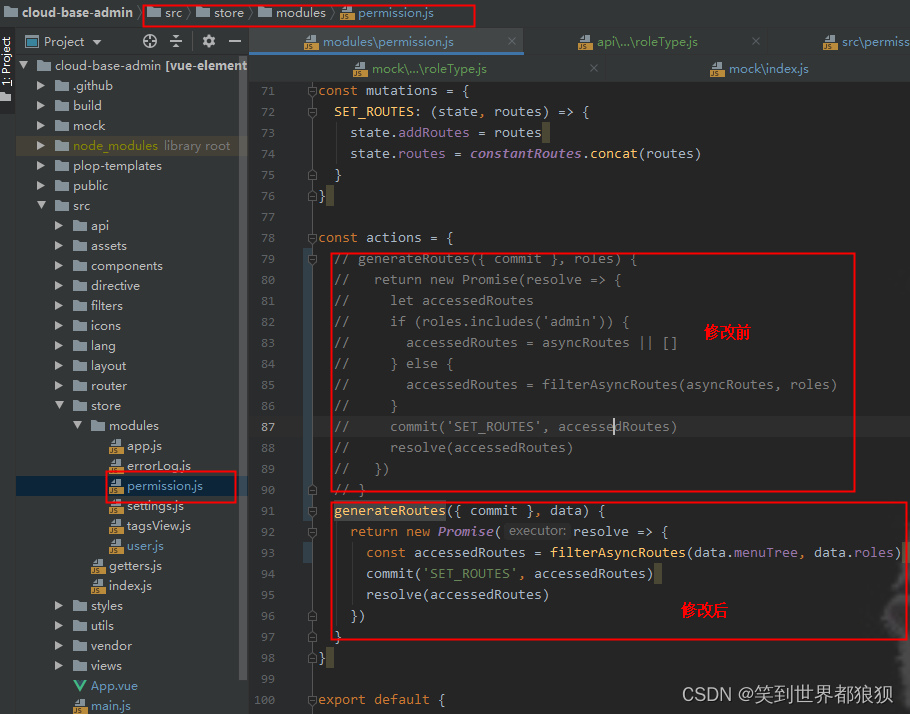
4、修改src/store/modules/permission.js
4-1、修改 generateRoutes方法
如下图所示,对代码进行修改:
 代码如下:
代码如下:
const actions = {
  generateRoutes({ commit }, data) {
    return new Promise(resolve => {
      const accessedRoutes = filterAsyncRoutes(data.menuTree, data.roles)
      commit('SET_ROUTES', accessedRoutes)
      resolve(accessedRoutes)
    })
  }
}
- 1
- 2
- 3
- 4
- 5
- 6
- 7
- 8
- 9
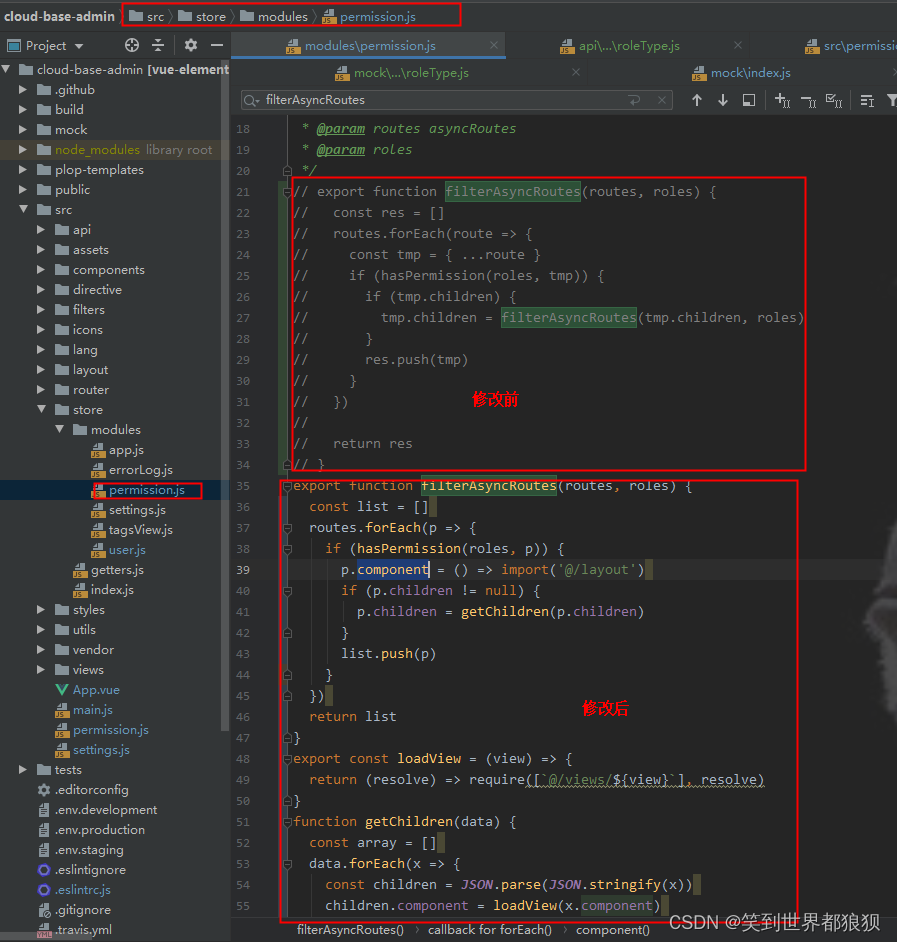
4-2、修改 filterAsyncRoutes方法
在修改 filterAsyncRoutes方法的时候还加了对layout和component的处理,具体修改如下图所示:
 代码如下:
代码如下:
/**
* Filter asynchronous routing tables by recursion
* @param routes asyncRoutes
* @param roles
*/
export function filterAsyncRoutes(routes, roles) {
  const list = []
  routes.forEach(p => {
    if (hasPermission(roles, p)) {
      p.component = () => import('@/layout')
      if (p.children != null) {
        p.children = getChildren(p.children)
      }
      list.push(p)
    }
  })
  return list
}
export const loadView = (view) => {
  return (resolve) => require([`@/views/${view}`], resolve)
}
function getChildren(data) {
  const array = []
  data.forEach(x => {
    const children = JSON.parse(JSON.stringify(x))
    children.component = loadView(x.component)
    if (x.children != null) {
      children.children = getChildren(x.children)
    }
    array.push(children)
  })
  return array
}
- 1
- 2
- 3
- 4
- 5
- 6
- 7
- 8
- 9
- 10
- 11
- 12
- 13
- 14
- 15
- 16
- 17
- 18
- 19
- 20
- 21
- 22
- 23
- 24
- 25
- 26
- 27
- 28
- 29
- 30
- 31
- 32
- 33
- 34
- 35
到此就可以实现动态路由的效果了,参考地址
声明:本文内容由网友自发贡献,不代表【wpsshop博客】立场,版权归原作者所有,本站不承担相应法律责任。如您发现有侵权的内容,请联系我们。转载请注明出处:https://www.wpsshop.cn/article/detail/58893
推荐阅读


相关标签

