
- 1Pytest测试用例参数化
- 2【目标检测】评价指标:mAP概念及其代码实现(yolo源码/pycocotools)
- 3分类预测 | OOA-SVM鱼鹰算法优化支持向量机的多变量输入数据分类预测
- 4PyTorch的ONNX结合MNIST手写数字数据集的应用(.pth和.onnx的转换与onnx运行时)_invalid_argument : invalid feed input name:input
- 5vue基础——自定义按键修饰符_vue全局按键修饰报错
- 6Eclipse中Web项目找不到类解决办法_eclipse看不到ibatis.basedao类
- 7灰度图恢复(100%用例)C卷(Java&&Python&&C++&&Node.js&&C语言)
- 8示例程序001--模板匹配_模板匹配c语言代码
- 9分奖金(python)_分奖金问题算法python
- 10Egret使用心得_egret cost
SpringBoot开发
赞
踩
SpringBoot
介绍
- springboot是简化spring项目搭建和开发的框架
- 特点
- 简化maven,管理了大量的基础依赖
- 基于注解配置,自动装配简化配置
- 内嵌tomcat,启动便捷
- 方便与其他框架集成-mybatis
- 可进行其他外部的配置
创建项目
- 导入依赖(父项目和子module)
- 父项目 spring-boot-starter-parent
- 子项目 导入具体需要的包如:spring-boot-starter-web,spring-boot-starter-jdbc
- 写启动类 一般以App或Start结尾,使用SpringBootApplication注解
- 写测试类
maven打包
-
导入依赖
<plugin> <groupId>org.springframework.boot</groupId> <artifactId>spring-boot-maven-plugin</artifactId> </plugin>- 1
- 2
- 3
- 4
-
使用maven的package进行打包

-
运行jar包,从项目文件夹进入cmd,运行命令 java -jar xx.jar
配置文件
分类
3种: application.properties application.yml bootstrap.yml(优先级最高,多用于中心化配置)
获取配置参数
-
读取yml
user: username: root password: 123- 1
- 2
- 3
-
使用@Value注解
@Value("${user.username}") private String username;- 1
- 2
-
使用对象接收
将对象交给spring管理(@component),使用@ConfigurationProperties(prefix=“”),然后自动注入获取值
@Component @ConfigurationProperties(prefix = "user") @Data @AllArgsConstructor @NoArgsConstructor /** * 读取配置文件参数方式二: 使用对象接收,需要有构造方法和get,set方法 * 将对象交给spring管理(@component),使用@ConfigurationProperties(prefix="") 然后自动注入获取值 */ public class User { private String username; private String password; private List<String> hobby; }- 1
- 2
- 3
- 4
- 5
- 6
- 7
- 8
- 9
- 10
- 11
- 12
- 13
- 14
- 15
-
读取properties文件
jdbc.driver=com.mysql.jdbc.Driver jdbc.url=jdbc:mysql///young jdbc.username=root jdbc.password=root- 1
- 2
- 3
- 4
使用对象接收: 使用PropertySource和ConfigurationPropertis注解,使用@Autowired注入值
@Component @Data @PropertySource(value = "classpath:jdbc.properties") @ConfigurationProperties(prefix = "jdbc") public class JdbcProperty { private String driver; private String url; private String username; private String password; }- 1
- 2
- 3
- 4
- 5
- 6
- 7
- 8
- 9
- 10
- 11
3.读取xml文件
新建类,使用@ConfigurationPropertis(prefix=“”),@ImportResource(“classpath:application-context.xml”)注解
多环境切换
1.在yml中用active指定环境
-
在一个文件中配置
多环境之间用 - - - 分隔,使用active激活指定环境
spring:
  profiles:
    active: test #激活环境

#多环境之间用 --- 分隔
#开发环境 dev
---
server:
  port: 8081
spring:
  profiles: dev #环境名称
  application:
    name: spring-boot-dev

#测试环境 test
---
server:
  port: 8082
spring:
  profiles: test
  application:
    name: spring-boot-test
- 1
- 2
- 3
- 4
- 5
- 6
- 7
- 8
- 9
- 10
- 11
- 12
- 13
- 14
- 15
- 16
- 17
- 18
- 19
- 20
- 21
- 22
-
使用多文件配置
application.yml
spring:
  profiles:
    active: dev #激活环境
- 1
- 2
- 3
application-dev.yml
server:
  port: 8081
spring:
  profiles: dev #环境名称
  application:
    name: spring-boot-dev
- 1
- 2
- 3
- 4
- 5
- 6
application-test.yml
#测试环境 test
server:
  port: 8082
spring:
  profiles: test
  application:
    name: spring-boot-test
- 1
- 2
- 3
- 4
- 5
- 6
- 7
在idea中配置
-Dspring.profiles.active=dev
在运行时指定
java -jar xx.jar --spring.profiles.active=prod
测试
-
springboot2.4及之前,spring-boot-starter-test中是Junit4
测试类上注解:@RunWith(SpringRunner.class),@SpringBootTest(classes = 启动类.class)
-
springboot2.4之后,为Junit5
注解为:@ExtendWith(SpringExtension.class),@SpringBootTest(classes = 启动类…class)
lombok
@Data
包含了@Setter @Getter @EqualsAndHashCode @ToString
@Slf4j
日志注解,使用 log.info(“info打印”);
Thymeleaf
thymeleaf是springboot提供的前端页面模板技术,其实是templates下的html,需要引入头文件,用th:text=${}获取值
<!DOCTYPE html>
<!--引入头文件-->
<html lang="en" xmlns:th="http://www.thymeleaf.org">
<head>
    <meta charset="UTF-8">
    <title>接收数据</title>
</head>
<body>
    <!--使用thymeleaf语法 th:text=${} 将div中的innerText为获取的值:${}-->
    <div th:text="${msg}">显示默认数据</div>
</body>
</html>
- 1
- 2
- 3
- 4
- 5
- 6
- 7
- 8
- 9
- 10
- 11
- 12
springboot默认配置了视图解析器 前缀 /templates/ 后缀 .html
可以在yml中写配置并在ThymeleafProperties中配合修改
拦截器
-
编写类实现HandlerInterceptor接口,实现对应的方法
@Component public class MyInterceptor implements HandlerInterceptor { @Override public boolean preHandle(HttpServletRequest request, HttpServletResponse response, Object handler) throws Exception { System.out.println(request.getRequestURI()+" 通过了拦截器检查..."); return true; } }- 1
- 2
- 3
- 4
- 5
- 6
- 7
- 8
- 9
-
写配置类(@Configuration)实现WebMvcConfigurer接口,并重写addInterceptors方法
@Configuration public class WebConfig implements WebMvcConfigurer { @Autowired private MyInterceptor interceptor; @Override public void addInterceptors(InterceptorRegistry registry) { registry.addInterceptor(interceptor) .addPathPatterns("/**") .excludePathPatterns("/login", "/logout"); } }- 1
- 2
- 3
- 4
- 5
- 6
- 7
- 8
- 9
- 10
- 11
- 12
- 13
整合Mybatis
-
导包
<dependency> <groupId>org.mybatis.spring.boot</groupId> <artifactId>mybatis-spring-boot-starter</artifactId> <version>2.2.1</version> </dependency> <dependency> <groupId>mysql</groupId> <artifactId>mysql-connector-java</artifactId> </dependency>- 1
- 2
- 3
- 4
- 5
- 6
- 7
- 8
- 9
-
配置数据源
spring: datasource: driver-class-name: com.mysql.cj.jdbc.Driver url: jdbc:mysql:///young username: root password: root- 1
- 2
- 3
- 4
- 5
- 6
-
Mapper映射文件路径和别名配置
mybatis: mapper-locations: classpath:com/zhc/mapper/*Mapper.xml type-aliases-package: com.zhc.domain- 1
- 2
- 3
-
编写Mapper和Service(@Service)
-
启动类添加映射器扫描注解 @MapperScan(“com.zhc.mapper”)
@SpringBootApplication @MapperScan("com.zhc.mapper") public class MybatisApp { public static void main(String[] args) { SpringApplication.run(MybatisApp.class, args); } }- 1
- 2
- 3
- 4
- 5
- 6
- 7
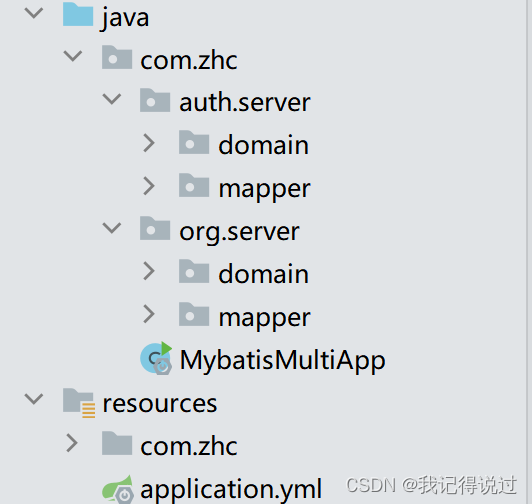
Mapper多模块开发
-
别名配置,多个包路径之间有,隔开
mybatis: # Mapper.java 和 Mapper.xml在相同对应的包下(编译之后在同一个包),可以不配置 # mapper-locations: classpath:com/zhc/mapper/*Mapper.xml type-aliases-package: com.zhc.auth.server.domain,com.zhc.org.server.domain- 1
- 2
- 3
- 4
-
MapperScan中的不同包用 * 表示,一个 * 表示一个层级
@MapperScan("com.zhc.*.*.mapper")- 1


![[ 云计算 | AWS 实践 ] Java 如何重命名 Amazon S3 中的文件和文件夹_jav](https://img-blog.csdnimg.cn/direct/f6b4b45ef01445aa9a147e7c5f1a8f15.png?x-oss-process=image/resize,m_fixed,h_300,image/format,png)

