
- 1搭建Redis集群
- 2RocketMQ Dashboard 详解
- 3QT Progress Bar 进度条_qt progressbar
- 4linux下的umask()函数,Linux----centos下的umask详解(翻译)
- 5国密算法 SM2 公钥加密 非对称加密 数字签名 密钥协商 python实现完整代码_python sm2加密
- 6卡耐基人际关系学5
- 7效率交响曲:AIOps 协调卓越运营
- 8Python之pdf内容读取_python读取pdf内容
- 9SpringBoot 学习笔记(3) -- [spring Boot集成阿里Druid数据源,整合Mybatis搭建一个案例试试]_spring4集成阿里数据源
- 10idea 创建 spring boot
PyTorch的ONNX结合MNIST手写数字数据集的应用(.pth和.onnx的转换与onnx运行时)_invalid_argument : invalid feed input name:input
赞
踩
在PyTorch以前的模型都是.pth格式,后面Meta跟微软一起做了一个.onnx的通用格式。这里对这两种格式文件,分别做一个介绍,依然使用MNIST数据集来做示例
1、CUDA下的pth文件
那pth文件里面是什么结构呢?其实在以前的文章就有介绍过,属于字典类型,而且是有序字典类型,这样就可以按照一定的顺序进行处理。
1.1、了解pth结构
先来查看一下pth文件的内容:
MNIST预训练模型.pth文件
- import torch
- model=torch.load("lenet_mnist_model.pth",map_location=torch.device('cpu'))
- print(type(model),len(model))
- for k,v in model.items():
- print(k,v.size())
- '''
- <class 'collections.OrderedDict'> 8
- conv1.weight torch.Size([10, 1, 5, 5])
- conv1.bias torch.Size([10])
- conv2.weight torch.Size([20, 10, 5, 5])
- conv2.bias torch.Size([20])
- fc1.weight torch.Size([50, 320])
- fc1.bias torch.Size([50])
- fc2.weight torch.Size([10, 50])
- fc2.bias torch.Size([10])
- '''
可以看到类型是OrderedDict,两个卷积层加上两个全连接层。每个层都带有权重和偏置,简单显示了它们的形状。
1.2、torch.device
这里有一个需要注意的地方就是,如果将
model=torch.load("lenet_mnist_model.pth",map_location=torch.device('cpu'))
修改为
model=torch.load("lenet_mnist_model.pth")
就会报如下错误:
RuntimeError: Attempting to deserialize object on a CUDA device but torch.cuda.is_available() is False. If you are running on a CPU-only machine, please use torch.load with map_location=torch.device('cpu') to map your storages to the CPU.
也就是说想在CUDA中做反序列化操作,而CUDA是不可用的,从这里可以看到这个模型的训练是在有CUDA的环境下进行的,所以我们这里指定到CPU设备上。
2、CPU下的pth文件
我们来看一个在CPU的环境下的加载方法,mnist.pth文件下载地址:mnist.pth
- import torch
- model=torch.load("mnist.pth")
- print(type(model['net']),len(model['net']))
- for k,v in model['net'].items():
- print(k,v.size())
-
- '''
- <class 'collections.OrderedDict'> 10
- conv1.weight torch.Size([6, 1, 3, 3])
- conv1.bias torch.Size([6])
- conv2.weight torch.Size([16, 6, 3, 3])
- conv2.bias torch.Size([16])
- fc1.weight torch.Size([120, 400])
- fc1.bias torch.Size([120])
- fc2.weight torch.Size([84, 120])
- fc2.bias torch.Size([84])
- fc3.weight torch.Size([10, 84])
- fc3.bias torch.Size([10])
- '''
这里可以不指定map_location参数,默认是cpu设备,可以看到这个pth文件结构是两个卷积层加三个全连接层。
3、pth转onnx
我们根据上面的mnist.pth结构,自己来构造一个模型:
- import torch
- import torch.nn as nn
- import torch.nn.functional as F
-
- class LeNet(nn.Module):
- def __init__(self):
- super(LeNet, self).__init__()
- self.conv1 = nn.Conv2d(in_channels=1,out_channels=6,kernel_size=3,stride=1,padding=0)
- self.conv2 = nn.Conv2d(in_channels=6,out_channels=16,kernel_size=3,stride=1,padding=0)
- self.fc1 = nn.Linear(400, 120)
- self.fc2 = nn.Linear(120, 84)
- self.fc3 = nn.Linear(84, 10)
-
- def forward(self, x):
- out = self.conv1(x) # torch.Size([1, 6, 26, 26])
- out = F.max_pool2d(F.relu(out), 2) # [1, 6, 13, 13]
- out = self.conv2(out) # [1, 16, 11, 11]
- out = F.max_pool2d(F.relu(out), 2) # [1, 16, 5, 5]
- out = out.view(out.size(0), -1) # [1, 400]
- out = self.fc1(out) # [1, 120]
- out = self.fc2(F.relu(out)) # [1, 84]
- out = self.fc3(F.relu(out)) # [1, 10]
- return out
-
- net = LeNet()
- net = net.to('cpu')
- checkpoint = torch.load('mnist.pth')
- net.load_state_dict(checkpoint['net'])
- batch_size = 1
- input_shape = (1,28,28)
- x = torch.randn(batch_size,*input_shape)
- net.eval()
- torch.onnx.export(net,x,"mnist.onnx")
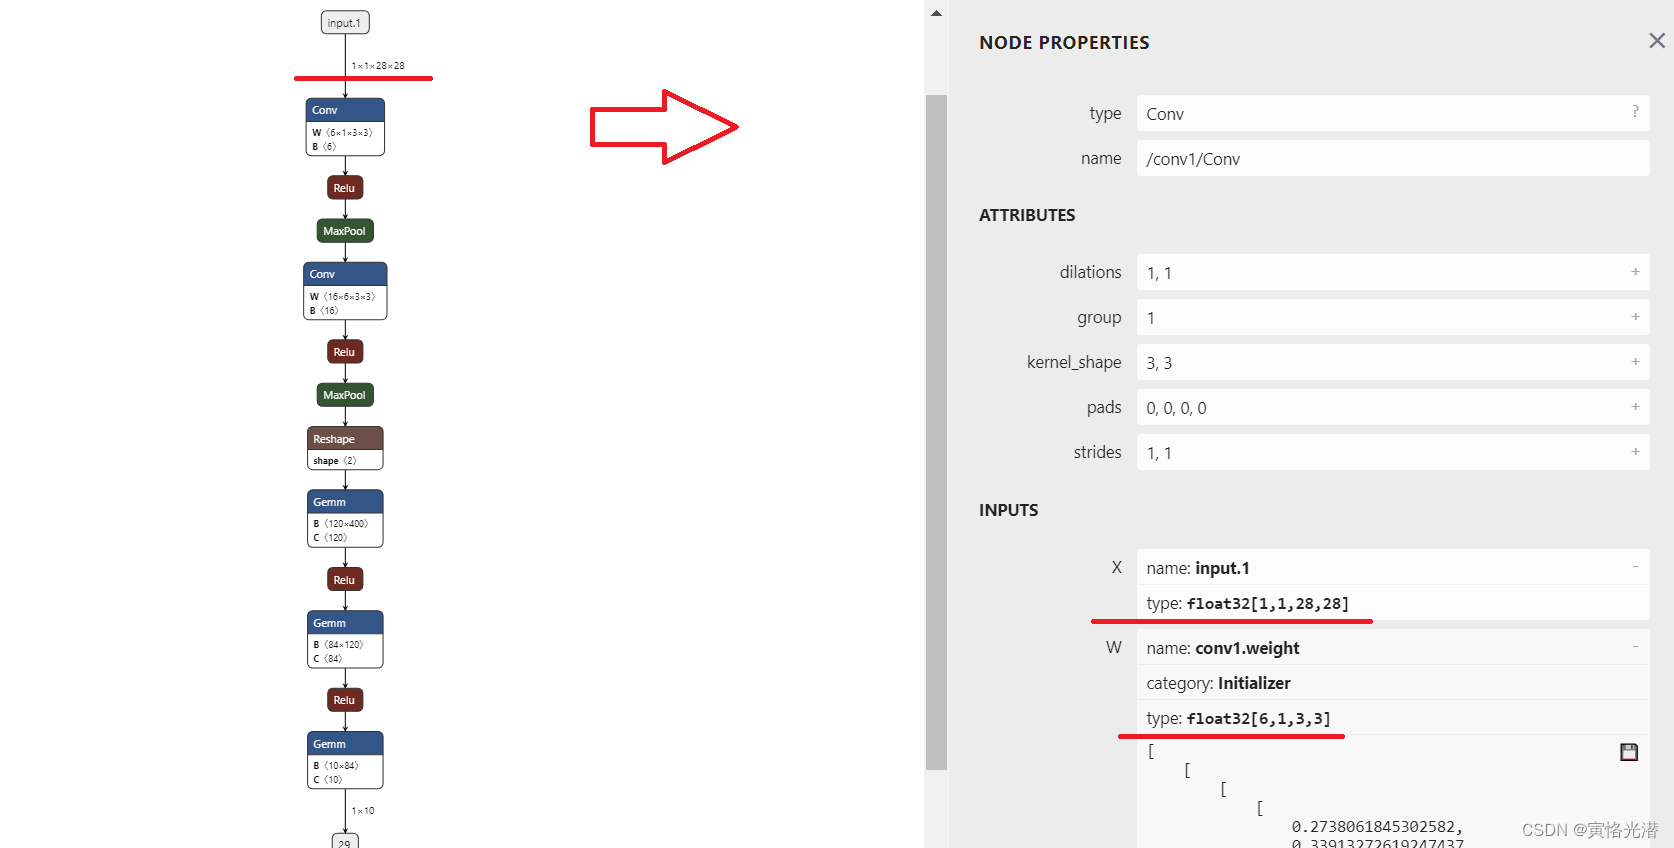
构造一样的结构,加载mnist.pth,然后就可以通过export转换成onnx格式的文件了。我们上传到https://netron.app/ 站点,可视化整个模型图,然后点击每个节点,将在右边出现它们的属性值:
4、onnx运行时
onnxruntime主要是拿来推理,当然在ir7的版本也增加了训练等功能,我们来了解下这个东西
4.1、安装模块
如果缺少onnxruntime模块,就会报错:
ModuleNotFoundError: No module named 'onnxruntime'
这里在JupyterLab中,所以在前面加一个叹号安装
!pip install onnxruntime -i http://pypi.douban.com/simple/ --trusted-host pypi.douban.com
- import torch
- import onnxruntime as ort
- import numpy as np
-
- session = ort.InferenceSession("mnist.onnx")
- x = np.random.rand(1, 1, 28, 28).astype(np.float32)
- outputs = session.run(None, {"input": x})
- print(outputs[0])
4.2、名称一致
这里容易出错:InvalidArgument: [ONNXRuntimeError] : 2 : INVALID_ARGUMENT : Invalid Feed Input Name:input
也就是说这个sess.run([output_name], {input_name: x})中的输入名称错误,所以名称要一样,这里的输入名称是input.1,修改成outputs = session.run(None, {"input.1": x})就可以了
怎么查看名称,可以通过上面站点可视化直接看到名称,也可以使用下面代码获取
- input_name = session.get_inputs()
- print(input_name[0].name)#input.1
同样的,如果输出名称也想指定,可以使用下面代码获取
out_name = session.get_outputs()[0].name4.3、三通道转一通道
彩色三通道的图片转成灰色的单通道图片:
- import cv2
- import numpy as np
- img = cv2.imread('1.png', cv2.IMREAD_GRAYSCALE)
- cv2.imwrite('1.jpg',img)
- print(img.shape)#(28, 28)
5、转成json格式
有时候的需求需要可读文件,一般json是很常见的,也可以进行转换:
- import onnx
- import json
- from google.protobuf.json_format import MessageToJson
-
- onnx_model = onnx.load("mnist.onnx")
- s = MessageToJson(onnx_model)
- onnx_json = json.loads(s)
-
- output_json_path = 'mnist2.json'
-
- with open(output_json_path, 'w') as f:
- json.dump(onnx_json, f, indent=2)
这样就将onnx文件转成了json格式的文件了
引用来源
github:https://github.com/onnx/onnx
可视化模型:https://netron.app/
ONNX实践:http://www.icfgblog.com/index.php/software/227.html

