
- 1Windows10 Docker 容器使用,每个步骤作者亲测,细节记录最全教程_win10系统的容器
- 2⭐算法入门⭐《递推 - 二维》简单01 —— LeetCode 118. 杨辉三角_二维递推
- 3springboot014校园管理系统的设计与实现_基于springboot的班级管理系统的设计与实现
- 4Java MongoDB:(十三)MongoDB 的文档操作-Limit 函数与 Skip 函数_java集成mongo分页查询的skip和limit有什么区别
- 5Matlab常用求解数学规划模型代码_matlab数学模型代码
- 6基于树莓派4B与STM32的UART串口通信实验(代码开源)_树莓派4b串口波特率
- 7【图论·习题】走廊泼水节(Kruscal算法逆推)
- 8力扣hot100 柱状图中最大的矩形 单调栈
- 9MSB 和 LSB_spi msb
- 10Spring-Boot导入配置文件与取值
【Java】Springboot整合多数据源配置_java springboot 配置多数据源 mysql 为默认数据源
赞
踩
本文目录
2.1 springboot + druid + mybatis-plus 使用注解整合
2.2 springboot + mybatis 使用分包方式整合
一、背景描述
本文主要介绍两种整合方式,分别是 springboot + druid + mybatis-plus 使用注解方式整合和 springboot + mybatis 使用分包方式整合。
在本地新建两个数据库,名称分别为 db1 和 db2,新建一张user表,表结构如下:
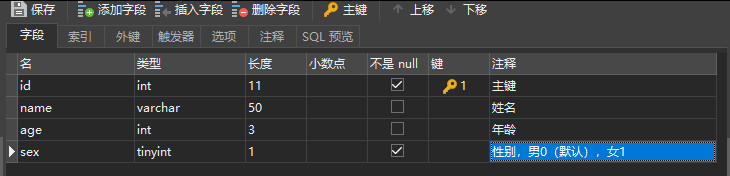
SQL语句如下:
- CREATE TABLE `iot_daily`.`User` (
- `id` int(11) NOT NULL AUTO_INCREMENT COMMENT '主键',
- `name` varchar(50) NULL COMMENT '姓名',
- `age` int(3) NULL COMMENT '年龄',
- `sex` tinyint(1) NOT NULL DEFAULT 0 COMMENT '性别,男0(默认),女1',
- PRIMARY KEY (`id`)
- );
二、多数据源配置
2.1 springboot + druid + mybatis-plus 使用注解整合
2.1.1 主要依赖的包
- spring-boot-starter-web
- mybatis-plus-boot-starter
- dynamic-datasource-spring-boot-starter # 配置动态数据源
- druid-spring-boot-starter # 阿里的数据库连接池
- mysql-connector-java
- lombok
2.1.2 pom.xml文件配置
pom.xml文件配置如下:
- <?xml version="1.0" encoding="UTF-8"?>
- <project xmlns="http://maven.apache.org/POM/4.0.0" xmlns:xsi="http://www.w3.org/2001/XMLSchema-instance"
- xsi:schemaLocation="http://maven.apache.org/POM/4.0.0 https://maven.apache.org/xsd/maven-4.0.0.xsd">
- <modelVersion>4.0.0</modelVersion>
- <parent>
- <groupId>org.springframework.boot</groupId>
- <artifactId>spring-boot-starter-parent</artifactId>
- <version>2.1.9.RELEASE</version>
- <relativePath/> <!-- lookup parent from repository -->
- </parent>
- <groupId>com.example</groupId>
- <artifactId>mutiple.datasource1</artifactId>
- <version>0.0.1-SNAPSHOT</version>
- <description>Demo project for Spring Boot</description>
-
- <properties>
- <java.version>1.8</java.version>
- </properties>
-
- <dependencies>
- <dependency>
- <groupId>org.springframework.boot</groupId>
- <artifactId>spring-boot-starter-web</artifactId>
- </dependency>
- <dependency>
- <groupId>com.baomidou</groupId>
- <artifactId>mybatis-plus-boot-starter</artifactId>
- <version>3.2.0</version>
- </dependency>
- <dependency>
- <groupId>com.baomidou</groupId>
- <artifactId>dynamic-datasource-spring-boot-starter</artifactId>
- <version>2.5.6</version>
- </dependency>
- <dependency>
- <groupId>mysql</groupId>
- <artifactId>mysql-connector-java</artifactId>
- <scope>runtime</scope>
- </dependency>
- <dependency>
- <groupId>com.alibaba</groupId>
- <artifactId>druid-spring-boot-starter</artifactId>
- <version>1.1.20</version>
- </dependency>
- <dependency>
- <groupId>org.projectlombok</groupId>
- <artifactId>lombok</artifactId>
- <optional>true</optional>
- </dependency>
- <dependency>
- <groupId>org.springframework.boot</groupId>
- <artifactId>spring-boot-starter-test</artifactId>
- <scope>test</scope>
- </dependency>
- </dependencies>
-
- <build>
- <plugins>
- <plugin>
- <groupId>org.springframework.boot</groupId>
- <artifactId>spring-boot-maven-plugin</artifactId>
- </plugin>
- </plugins>
- </build>
-
- </project>

2.1.3 application.yml 文件配置
application.yml 配置文件内容如下:
- server:
- port: 50100
- servlet:
- context-path: /
-
- spring:
- application:
- name: back-brain-platform
- system: smarthome
- cache:
- type: generic
- datasource:
- dynamic:
- primary: db2 #设置默认的数据源或者数据源组,默认值即为master
- strict: false #设置严格模式,默认false不启动. 启动后在未匹配到指定数据源时候回抛出异常,不启动会使用默认数据源.
- datasource:
- db1:
- url: jdbc:mysql://test.iot.com:3306/iot_db1?useUnicode=true&characterEncoding=UTF-8&zeroDateTimeBehavior=convertToNull
- username: root
- password: 123456
- type: com.alibaba.druid.pool.DruidDataSource
- driver-class-name: com.mysql.jdbc.Driver
- db2:
- url: jdbc:mysql://devl.iot.com:3306/iot_db2?autoReconnect=true&characterEncoding=utf-8&rewriteBatchedStatements=true&allowMultiQueries=true
- username: root
- password: 123456
- type: com.alibaba.druid.pool.DruidDataSource
- driver-class-name: com.mysql.jdbc.Driver
- druid:
- # 初始化连接数
- initialSize: 10
- # 最小连接池数量
- minIdle: 20
- # 最大连接池数量
- maxActive: 100
- # 配置连接等待超时的时间,单位为毫秒
- maxWait: 60000
- # 配置间隔多久才进行一次检测,检测需要关闭的空闲连接,单位是毫秒
- timeBetweenEvictionRunsMillis: 60000
- # 配置一个连接在池中最小生存的时间,单位是毫秒
- minEvictionIdleTimeMillis: 300000
- # 配置一个连接在池中最大生存的时间,单位是毫秒
- maxEvictionIdleTimeMillis: 900000
- # 配置检测连接是否有效
- validationQuery: SELECT 1 FROM DUAL
- # testOnBorrow 能够确保我们每次都能获取到可用的连接,但是如果设置为 true,则每次获取连接时候都要到数据库验证连接有效性,这在高并发的时候会造成性能下降,
- # 可以将 testOnBorrow 设置成 false,testWhileIdle 设置成 true 这样能获得比较好的性能
- testWhileIdle: true
- testOnBorrow: false
- # testOnBorrow 和 testOnReturn 在生产环境一般是不开启的,主要是性能考虑。
- testOnRetrun: false
- webStatFilter:
- enabled: true
- # Druid StatViewServlet配置
- stat-view-servlet:
- # 默认 true 内置监控页面首页/druid/index.html
- enabled: true
- url-pattern: /druid/*
- # 允许清空统计数据
- reset-enable: true
- login-username: iot
- login-password: iot
- # IP 白名单,多个用逗号分隔
- allow:
- # IP 黑名单
- deny:
- filter:
- stat:
- enabled: true
- # 慢SQL记录
- log-slow-sql: true
- slow-sql-millis: 1500
- merge-sql: true
- wall:
- config:
- multi-statement-allow: true
- autoconfigure:
- exclude: com.alibaba.druid.spring.boot.autoconfigure.DruidDataSourceAutoConfigure #去除druid配置
因为Springboot的强大的自动配置,让我们省去了很多功夫,但同时,如果你不需要使用自动配置,那么需要取消加载对应的自动配置类。
而DruidDataSourceAutoConfigure会注入一个DataSourceWrapper,其会在原生的spring.datasource下找 url, username, password 等。动态数据源 URL 等配置是在 dynamic 下,因此需要排除,否则会报错。排除方式有两种,一种是上述配置文件排除,还有一种可以在项目启动类排除:
- @SpringBootApplication(exclude = DruidDataSourceAutoConfigure.class)
- public class Application {
- public static void main(String[] args) {
- SpringApplication.run(Application.class, args);
- }
- }
2.1.4 给使用非默认数据源添加注解@DS
@DS 可以注解在方法上和类上,同时存在方法注解优先于类上注解。
注解在 service 实现或 mapper 接口方法上,不要同时在 service 和 mapper 注解。
- @DS("db2")
- public interface UserMapper extends BaseMapper<User> {
- }
-
- @Service
- @DS("db2")
- public class ModelServiceImpl extends ServiceImpl<ModelMapper, Model> implements IModelService {
-
- @Select("SELECT * FROM user")
- @DS("db2")
- List<User> selectAll();
- }
2.2 springboot + mybatis 使用分包方式整合
2.2.1 主要依赖包
- spring-boot-starter-web
- mybatis-spring-boot-starter
- mysql-connector-java
- lombok
2.2.2 pom.xml文件配置
pom.xml文件配置如下:
- <?xml version="1.0" encoding="UTF-8"?>
- <project xmlns="http://maven.apache.org/POM/4.0.0" xmlns:xsi="http://www.w3.org/2001/XMLSchema-instance"
- xsi:schemaLocation="http://maven.apache.org/POM/4.0.0 https://maven.apache.org/xsd/maven-4.0.0.xsd">
- <modelVersion>4.0.0</modelVersion>
- <parent>
- <groupId>org.springframework.boot</groupId>
- <artifactId>spring-boot-starter-parent</artifactId>
- <version>2.1.9.RELEASE</version>
- <relativePath/> <!-- lookup parent from repository -->
- </parent>
- <groupId>com.example</groupId>
- <artifactId>mutiple.datasource2</artifactId>
- <version>0.0.1-SNAPSHOT</version>
- <description>Demo project for Spring Boot</description>
-
- <properties>
- <java.version>1.8</java.version>
- </properties>
-
- <dependencies>
- <!-- spring 依赖 -->
- <dependency>
- <groupId>org.springframework.boot</groupId>
- <artifactId>spring-boot-starter-web</artifactId>
- </dependency>
- <!-- mysql 依赖 -->
- <dependency>
- <groupId>org.mybatis.spring.boot</groupId>
- <artifactId>mybatis-spring-boot-starter</artifactId>
- <version>2.1.0</version>
- </dependency>
- <dependency>
- <groupId>mysql</groupId>
- <artifactId>mysql-connector-java</artifactId>
- <scope>runtime</scope>
- </dependency>
- <dependency>
- <groupId>org.projectlombok</groupId>
- <artifactId>lombok</artifactId>
- <optional>true</optional>
- </dependency>
- <dependency>
- <groupId>org.springframework.boot</groupId>
- <artifactId>spring-boot-starter-test</artifactId>
- <scope>test</scope>
- </dependency>
- </dependencies>
-
- <build>
- <plugins>
- <plugin>
- <groupId>org.springframework.boot</groupId>
- <artifactId>spring-boot-maven-plugin</artifactId>
- </plugin>
- </plugins>
- </build>
-
- </project>
2.2.3 application.yml 文件配置
application.yml 配置文件内容如下(和配置差不多,下面只展示不同的地方):
- server:
- port: 50100 # 启动端口
- servlet:
- context-path: /
-
- spring:
- datasource:
- db1: # 数据源1
- jdbc-url: jdbc:mysql://test.iot.com:3306/iot_db1?useUnicode=true&characterEncoding=UTF-8&zeroDateTimeBehavior=convertToNull
- username: root
- password: 123456
- driver-class-name: com.mysql.cj.jdbc.Driver
- db2: # 数据源2
- jdbc-url: jdbc:mysql://devl.iot.com:3306/iot_db2?autoReconnect=true&characterEncoding=utf-8&rewriteBatchedStatements=true&allowMultiQueries=true
- username: root
- password: 123456
- driver-class-name: com.mysql.cj.jdbc.Driver
- 注意事项
各个版本的 springboot 配置 datasource 时参数有所变化,例如低版本配置数据库 url 时使用 url 属性,高版本使用 jdbc-url 属性,请注意区分。
2.2.4 建立连接数据源的配置文件
第一个配置文件
- @Configuration
- @MapperScan(basePackages = "com.example.multiple.datasource.mapper.db1", sqlSessionFactoryRef = "db1SqlSessionFactory")
- public class DataSourceConfig1 {
-
- @Primary // 表示这个数据源是默认数据源, 这个注解必须要加,因为不加的话spring将分不清楚那个为主数据源(默认数据源)
- @Bean("db1DataSource")
- @ConfigurationProperties(prefix = "spring.datasource.db1") //读取application.yml中的配置参数映射成为一个对象
- public DataSource getDb1DataSource(){
- return DataSourceBuilder.create().build();
- }
-
- @Primary
- @Bean("db1SqlSessionFactory")
- public SqlSessionFactory db1SqlSessionFactory(@Qualifier("db1DataSource") DataSource dataSource) throws Exception {
- SqlSessionFactoryBean bean = new SqlSessionFactoryBean();
- bean.setDataSource(dataSource);
- // mapper的xml形式文件位置必须要配置,不然将报错:no statement (这种错误也可能是mapper的xml中,namespace与项目的路径不一致导致)
- bean.setMapperLocations(new PathMatchingResourcePatternResolver().getResources("classpath*:mapping/db1/*.xml"));
- return bean.getObject();
- }
-
- @Primary
- @Bean("db1SqlSessionTemplate")
- public SqlSessionTemplate db1SqlSessionTemplate(@Qualifier("db1SqlSessionFactory") SqlSessionFactory sqlSessionFactory){
- return new SqlSessionTemplate(sqlSessionFactory);
- }
- }
第二个配置文件
- @Configuration
- @MapperScan(basePackages = "com.example.multiple.datasource.mapper.db2", sqlSessionFactoryRef = "db2SqlSessionFactory")
- public class DataSourceConfig2 {
-
- @Bean("db2DataSource")
- @ConfigurationProperties(prefix = "spring.datasource.db2")
- public DataSource getDb1DataSource(){
- return DataSourceBuilder.create().build();
- }
-
- @Bean("db2SqlSessionFactory")
- public SqlSessionFactory db1SqlSessionFactory(@Qualifier("db2DataSource") DataSource dataSource) throws Exception {
- SqlSessionFactoryBean bean = new SqlSessionFactoryBean();
- bean.setDataSource(dataSource);
- bean.setMapperLocations(new PathMatchingResourcePatternResolver().getResources("classpath*:mapping/db2/*.xml"));
- return bean.getObject();
- }
-
- @Bean("db2SqlSessionTemplate")
- public SqlSessionTemplate db1SqlSessionTemplate(@Qualifier("db2SqlSessionFactory") SqlSessionFactory sqlSessionFactory){
- return new SqlSessionTemplate(sqlSessionFactory);
- }
- }
2.2.5 具体实现图
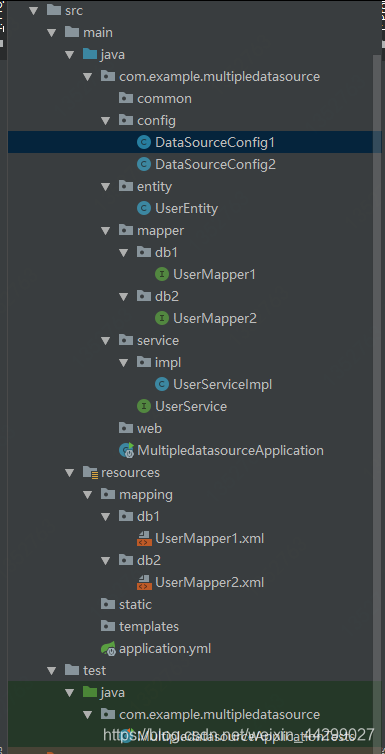
- 注意事项
在 service 层中根据不同的业务注入不同的 dao 层
如果是主从复制- -读写分离:比如 db1 中负责增删改,db2 中负责查询。但是需要注意的是负责增删改的数据库必须是主库(master)
完结!


