
热门标签
热门文章
- 1接口自动化和UI自动化:定义、区别及示例代码_ui自动化和接口自动化的区别
- 2Oracle B-tree、位图、全文索引三大索引性能比较及优缺点汇总(引用)_oracle主键和唯一键索引为什么效率高于b树索引
- 3全网最详细金融APP测试功能点-测试用例,详细整理(全)
- 4【12321骚扰电话举报受理中心-短信验证安全分析报告】
- 5渗透安全测试_投毒测试规划
- 6Android Recovery升级原理
- 7【转载】如何在Macbook上把Ubuntu安装到移动硬盘里_mac 移动硬盘 ubuntu
- 8【大数据管理】数据组织与存储(四)_大数据的数据组织与处理方法
- 9Windows怎么把视频变成GIF,动态图怎么制作_windows10自带视频制作gif
- 10Yoga14s 2021锐龙集显版蓝牙失效问题的解决方法
当前位置: article > 正文
JDBC基本概念、JDBC中各个接口和类详解、JDBCUtils_jdbc规范定义了8个接口和10个类,每个类和接口定义相应的api
作者:酷酷是懒虫 | 2024-07-18 21:47:30
赞
踩
jdbc规范定义了8个接口和10个类,每个类和接口定义相应的api
JDBC概念
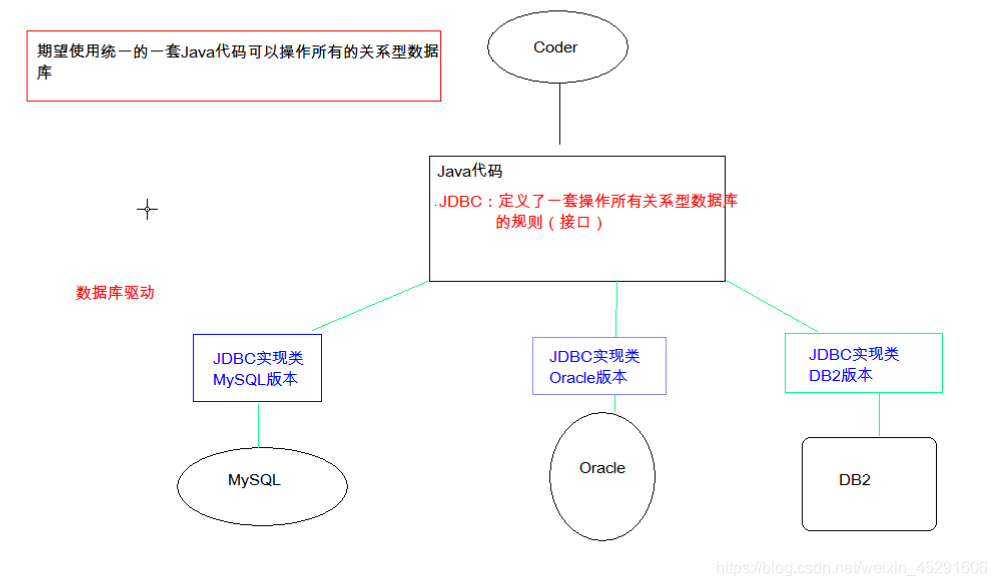
1. 概念:Java DateBase Connectivity (Java 数据库连接), Java语言操作数据库
	* JDBC 本质:其实是官方(sun公司)定义的一套操作所有关系型数据库的规则,即接口。各个数据库厂商去实现这套接口,提供数据库驱动jar包。我们可以使用这套(JDBC)编程,真正执行的代码是驱动jar包中的实现类。
- 1
- 2
快速入门
2. 快速入门:
* 使用JDBC开发使用的的包:
	* java.sql:所有与 JDBC 访问数据库相关的接口和类
	* javax.sql:数据库扩展包,提供数据库额外的功能。如:连接池
	* 数据库的驱动:由各大数据库厂商提供,需要额外去下载,是对 JDBC 接口实现的类

* 步骤:
	1. 导入jar包    mysql-connector-java-5.1.37-bin.jar
		1. 复制mysql - connector - java - 5.1.37-bin.jar 文件到项目的 libs目录下
		2. 项目文件夹 右键 --> Add As Library
	2. 注册驱动(让程序知道导入的是哪一个版本的jar包),Class.forName(数据库驱动实现类)
	3. 获取数据库连接对象 Connection (本地java代码和数据库之间的一个桥梁对象)
	4. 定义sql语句
	5. (Connection不能直接执行)获取执行sql语句的对象 Statement
	6. 执行sql,接受返回结果
	7. 处理结果
	8. 释放资源

- 1
- 2
- 3
- 4
- 5
- 6
- 7
- 8
- 9
- 10
- 11
- 12
- 13
- 14
- 15
- 16
- 17
import java.sql.Connection;
import java.sql.DriverManager;
import java.sql.Statement;

/**
 * JDBC快速入门
 */
public class JdbcDemo1 {
    public static void main(String[] args) throws Exception {

        //1. 导入驱动jar包
        //2. 注册驱动
        Class.forName("com.mysql.jdbc.Driver");
	        /*
	        	Class.forName()
					装载一个类并且对其进行实例化的操作。
					装载过程中使用到的类加载器是当前类
			*/
        //3. 获取数据库连接对象
        Connection conn = DriverManager.getConnection("jdbc:mysql://localhost:3306/db3", "root", "root");
			/*
				DriverManager:驱动管理对象
				Connection:数据库连接对象
				Java DriverManager.getConnection() 方法用于获得试图建立到指定数据库 URL 的连接。 里面的参数为:数据库的url、用户名、密码
			*/
        //4. 定义sql语句
        String sql = "update account set balance = 500 where id = 1";
        //5. 获取一个可执行的sql的对象 Statement
        Statement stmt = conn.createStatement();
	        /*
				Statement:执行sql的对象
			*/
        //6. execute执行sql语句
        int count = stmt.executeUpdate(sql);
        //7. 处理结果
        System.out.println(count);
        //8. 释放资源
        stmt.close();
        conn.close();
    }
}
- 1
- 2
- 3
- 4
- 5
- 6
- 7
- 8
- 9
- 10
- 11
- 12
- 13
- 14
- 15
- 16
- 17
- 18
- 19
- 20
- 21
- 22
- 23
- 24
- 25
- 26
- 27
- 28
- 29
- 30
- 31
- 32
- 33
- 34
- 35
- 36
- 37
- 38
- 39
- 40
- 41
详解各个对象(一)
1. DriverManager:驱动管理对象
Class.forName("com.mysql.jdbc.Driver");
* 功能:
1. 注册驱动:告诉程序该使用哪一个数据库驱动 jar
	静态方法:static void registerDriver(Driver driver) : 注册与给定的驱动程序 DriverManager 。
	写代码使用:Class.forName("com.mysql.jdbc.Driver");
		通过查看源码发现:在com.mysql.jdbc.Driver类中存在静态代码块,此代码块实现了DriverManager 中的方法
			static {
				try {
					java.sql.DriverManager.registerDriver(new Driver());
					}catch (SQLException E){
					throw new RuntimeException("Can't register driver!");
                          }
				}
2. 获取数据库连接:
	* 方法:static Commection getConnection(String url, String user, String password)
	* 参数:
		* url:指定连接的路径
			* 语法:jdbc:mysql://ip地址(域名):端口号/数据库名称
			* 例子:jdbc:mysql://localhost : 3306/db3
			* 细节:如果连接的是本机mysql服务器,并且mysql服务默认端口是3306,则ip地址和端口号可以省略不写,即url可以简写为:jdbc:mysql:///数据库名称
		* user:用户名
		* password:密码
- 1
- 2
- 3
- 4
- 5
- 6
- 7
- 8
- 9
- 10
- 11
- 12
- 13
- 14
- 15
- 16
- 17
- 18
- 19
- 20
- 21
2. Connection:数据库连接对象
Connection conn = DriverManager.getConnection("jdbc:mysql://localhost:3306/db3", "root", "root");
* 功能:
	1.获取执行sql的对象
		* Statement createStatement( )
		* PrepareStatement prepareStatement(String sql)
	2. 管理事务:
		* 开启事务:setAutoCommit(boolean autoCommit);  //调用该方法设置参数为false,即开启事务
		* 提交事务:commit( )
		* 回滚事物:rollback( )
- 1
- 2
- 3
- 4
- 5
- 6
- 7
- 8
3. Statement:执行sql的对象
Statement stmt = conn.createStatement();
1. 执行sql
	1. boolean execute(String sql) : 可以执行任意的sql
	2. int executeUpdate(String sql) : 执行DML(insert、update、dalete)语句、DDL(create、alter、drop)语句
		* 返回值:影响的行数,可以通过这个影响的行数判断DML语句是否执行成功  返回值>0 则执行成功,反之,则失败。
	3. ResultSet executQuery(String sql) :执行DQL语句(selet)语句
- 1
- 2
- 3
- 4
- 5
练习
1. account表 添加一条记录
import java.sql.Connection;
import java.sql.DriverManager;
import java.sql.SQLException;
import java.sql.Statement;

/**
 * account表 添加一条记录 insert语句
 */
public class JdbcDemo2 {
    public static void main(String[] args) {
        Statement stmt = null;
        Connection conn = null;

        try {
            //1.注册驱动
            Class.forName("com.mysql.jdbc.Driver");
            //2.定义sql
            String sql = "insert into account values(null,'王五',3000)";
            //3.获取Connection对象
            conn = DriverManager.getConnection("jdbc:mysql:///db3", "root", "root");
            //4.获取执行sql的对象 Statement
            stmt = conn.createStatement();
            //5.执行sql
            int count = stmt.executeUpdate(sql);    //返回影响的行数
            //6.处理结果
            System.out.println(count);
            if(count > 0){
                System.out.println("添加成功!");
            }else {
                System.out.println("添加失败!");
            }

        } catch (ClassNotFoundException e) {
            e.printStackTrace();
        } catch (SQLException e) {
            e.printStackTrace();
        }finally {
            //stmt.close();释放资源,由于stmt调用与conn,所以先释放stmt
            //7.释放资源
            //避免空指针异常
            if(stmt != null){
                try {
                    stmt.close();//释放资源
                } catch (SQLException e) {
                    e.printStackTrace();
                }
            }

            if(conn != null){
                try {
                    conn.close();//释放资源
                } catch (SQLException e) {
                    e.printStackTrace();
                }
            }
        }
    }
}
- 1
- 2
- 3
- 4
- 5
- 6
- 7
- 8
- 9
- 10
- 11
- 12
- 13
- 14
- 15
- 16
- 17
- 18
- 19
- 20
- 21
- 22
- 23
- 24
- 25
- 26
- 27
- 28
- 29
- 30
- 31
- 32
- 33
- 34
- 35
- 36
- 37
- 38
- 39
- 40
- 41
- 42
- 43
- 44
- 45
- 46
- 47
- 48
- 49
- 50
- 51
- 52
- 53
- 54
- 55
- 56
- 57
- 58
2. account表 修改一条记录
import java.sql.Connection;
import java.sql.DriverManager;
import java.sql.SQLException;
import java.sql.Statement;

/**
 * account表 修改数据
 */
public class JdbcDemo3 {
    public static void main(String[] args) {
        Connection conn = null;
        Statement stmt = null;
        //1.注册驱动
        try {
            //1.注册驱动
            Class.forName("com.mysql.jdbc.Driver");
            //2.获取连接对象
            conn = DriverManager.getConnection("jdbc:mysql:///db3", "root", "root");
            //3. 定义sql
            String sql = "update account set balance = 1500 where id = 3";
            //4. 获取执行sql对象
            stmt = conn.createStatement();
            //5. 执行sql
            int count = stmt.executeUpdate(sql);
            //6. 处理结果
            System.out.println(count);
            if(count > 0){
                System.out.println("修改成功");
            }else{
                System.out.println("修改失败");
            }
        } catch (ClassNotFoundException e) {
            e.printStackTrace();
        } catch (SQLException e) {
            e.printStackTrace();
        }finally{
            //7. 释放资源
            if(stmt != null){
                try {
                    stmt.close();
                } catch (SQLException e) {
                    e.printStackTrace();
                }
            }
            if(conn != null){
                try {
                    conn.close();
                } catch (SQLException e) {
                    e.printStackTrace();
                }
            }
        }
    }
}
- 1
- 2
- 3
- 4
- 5
- 6
- 7
- 8
- 9
- 10
- 11
- 12
- 13
- 14
- 15
- 16
- 17
- 18
- 19
- 20
- 21
- 22
- 23
- 24
- 25
- 26
- 27
- 28
- 29
- 30
- 31
- 32
- 33
- 34
- 35
- 36
- 37
- 38
- 39
- 40
- 41
- 42
- 43
- 44
- 45
- 46
- 47
- 48
- 49
- 50
- 51
- 52
- 53
- 54
- 55
3. account表 删除一条记录
import java.sql.Connection;
import java.sql.DriverManager;
import java.sql.SQLException;
import java.sql.Statement;

/**
 * account表  删除一条记录
 */
public class JdbcDemo4 {
    public static void main(String[] args) {
        Connection conn = null;
        Statement stmt = null;
        //1.注册驱动
        try {
            //1.注册驱动
            Class.forName("com.mysql.jdbc.Driver");
            //2.获取连接对象
            conn = DriverManager.getConnection("jdbc:mysql:///db3", "root", "root");
            //3. 定义sql
            String sql = "DELETE FROM account WHERE id = 3";
            //4. 获取执行sql对象
            stmt = conn.createStatement();
            //5. 执行sql
            int count = stmt.executeUpdate(sql);
            //6. 处理结果
            System.out.println(count);
            if(count > 0){
                System.out.println("删除成功");
            }else{
                System.out.println("删除失败");
            }
        } catch (ClassNotFoundException e) {
            e.printStackTrace();
        } catch (SQLException e) {
            e.printStackTrace();
        }finally{
            //7. 释放资源
            if(stmt != null){
                try {
                    stmt.close();
                } catch (SQLException e) {
                    e.printStackTrace();
                }
            }
            if(conn != null){
                try {
                    conn.close();
                } catch (SQLException e) {
                    e.printStackTrace();
                }
            }
        }
    }
}
- 1
- 2
- 3
- 4
- 5
- 6
- 7
- 8
- 9
- 10
- 11
- 12
- 13
- 14
- 15
- 16
- 17
- 18
- 19
- 20
- 21
- 22
- 23
- 24
- 25
- 26
- 27
- 28
- 29
- 30
- 31
- 32
- 33
- 34
- 35
- 36
- 37
- 38
- 39
- 40
- 41
- 42
- 43
- 44
- 45
- 46
- 47
- 48
- 49
- 50
- 51
- 52
- 53
- 54
详解各个对象(二)
4. ResultSet:结果集对象,封装查询结果
* boolean next() : 游标向下移动一行,判断当前行是否是最后一行末尾(是否有数据),如果是,则返回false,如果不是则返回true
* getXxx(参数) : 获取数据
	* Xxx : 代表数据类型   如:int getInt()   ,   String getString()
	* 参数:
		1. int : 代表表中列的编号 ,从1开始   如: getString(1)
		2. String : 代表列名称。 如: getDouble("balance")
* 注意:
	* 使用步骤
		1. 游标向下移动一行
		2. 判断是否有数据
		3. 获取数据
- 1
- 2
- 3
- 4
- 5
- 6
- 7
- 8
- 9
- 10
- 11
import java.sql.*;

public class JdbcDemo7 {
    public static void main(String[] args) {
        Connection conn = null;
        Statement stmt = null;
        ResultSet rs = null;
        //1.注册驱动
        try {
            //1.注册驱动
            Class.forName("com.mysql.jdbc.Driver");
            //2.获取连接对象
            conn = DriverManager.getConnection("jdbc:mysql:///db3", "root", "root");
            //3. 定义sql
            String sql = "select * from account";
            //4. 获取执行sql对象
            stmt = conn.createStatement();
            //5. 执行sql
            rs = stmt.executeQuery(sql);
            //6. 处理结果
            //6.1 让游标向下移动一行
            if(rs.next()) {
                //6.2 获取数据
                int id = rs.getInt(1);
                String name = rs.getString("name");
                double balance = rs.getDouble(3);

                System.out.println(id + "---" + name + "---" + balance);
            }

            while(rs.next()){
                //循环判断结果集是否有下一行
                int id = rs.getInt(1);
                String name = rs.getString("name");
                double balance = rs.getDouble(3);

                System.out.println(id + "---" + name + "---" + balance);
            }

            //6.1 让游标向下移动一行
           /* if(rs.next()) {
                //6.2 获取数据
                int id = rs.getInt(1);
                String name = rs.getString("name");
                double balance = rs.getDouble(3);

                System.out.println(id + "---" + name + "---" + balance);
            }*/


        } catch (ClassNotFoundException e) {
            e.printStackTrace();
        } catch (SQLException e) {
            e.printStackTrace();
        }finally{
            //7. 释放资源
            if(rs != null){
                try {
                    stmt.close();
                } catch (SQLException e) {
                    e.printStackTrace();
                }
            }
            if(conn != null){
                try {
                    conn.close();
                } catch (SQLException e) {
                    e.printStackTrace();
                }
            }
        }
    }
}
- 1
- 2
- 3
- 4
- 5
- 6
- 7
- 8
- 9
- 10
- 11
- 12
- 13
- 14
- 15
- 16
- 17
- 18
- 19
- 20
- 21
- 22
- 23
- 24
- 25
- 26
- 27
- 28
- 29
- 30
- 31
- 32
- 33
- 34
- 35
- 36
- 37
- 38
- 39
- 40
- 41
- 42
- 43
- 44
- 45
- 46
- 47
- 48
- 49
- 50
- 51
- 52
- 53
- 54
- 55
- 56
- 57
- 58
- 59
- 60
- 61
- 62
- 63
- 64
- 65
- 66
- 67
- 68
- 69
- 70
- 71
- 72
- 73
- 74
5. PreparedStatement:执行sql的对象
1. SQL注入问题:在拼接sql时,有一些sql特殊关键字参与字符串的拼接。会造成安全问题。
	1. 在拼接sql时,输入密码:a' or 'a' = 'a
	2. sql :select * from user where username = 'fhdsjkf' and password = 'a' or 'a' = 'a'; //password永远为true
2. 解决sql注入问题:使用PreparaedStatement对象来解决
3. 预编译SQL:参数使用?作为占位符
4. 步骤
	1. 导入jar包    mysql-connector-java-5.1.37-bin.jar
	2. 注册驱动
	3. 获取数据库连接对象 Connection
	4. 定义sql:
		* 注意:sql的参数使用?作为占位符。如:select * from user where username = ? and password = ?;
	5. 获取执行sql语句的对象   PreparedStatement Connection.prepareStatement(String sql)
	6. 给?赋值:
		* 方法:setXxx(参数1,参数2)
			* 参数1:?的位置编号  从1开始
			* 参数2:?的值
	7. 执行sql,接受返回结果。不需要传递sql语句。
	8. 处理结果
	9. 释放资源
5. 注意:后期都会使用PreparedStatement来完成增删改查的所有操作
	1. 可以防止SQL注入
	2. 效率更高
- 1
- 2
- 3
- 4
- 5
- 6
- 7
- 8
- 9
- 10
- 11
- 12
- 13
- 14
- 15
- 16
- 17
- 18
- 19
- 20
- 21
- 22
抽取JDBC工具类 :JDBCUtils
* 目的 :简化书写
* 分析:
	1. 注册驱动
	2. 抽取一个方法连接对象
		* 需求:不想传递参数(太麻烦),还得保证工具类的通用性。
		* 解决:配置文件
			jdbc.properties
				url =
				user =
				password =
	3. 抽取一个方法释放资源
- 1
- 2
- 3
- 4
- 5
- 6
- 7
- 8
- 9
- 10
- 11
import cn.itcast.domain.Emp;
import cn.itcast.util.JdbcUtils;

import java.sql.*;
import java.util.ArrayList;
import java.util.List;

/**
 * 定义一个方法,查询emp表的数据将其封装为对象,然后装载集合,返回。
 */
public class JdbcDemo8 {

    public static void main(String[] args) {
        List<Emp> list = new JdbcDemo8().findAll2();
        System.out.println(list);
    }

    /**
     * 查询所有emp对象
     *
     * @return
     */
    public List<Emp> findAll() {
        Connection conn = null;
        Statement stmt = null;
        ResultSet rs = null;
        List<Emp> list = null;
        try {
            //1.注册驱动
            Class.forName("com.mysql.jdbc.Driver");
            //2.获取连接
            conn = DriverManager.getConnection("jdbc:mysql:///db3", "root", "root");
            //3.定义sql
            String sql = "select * from emp";
            //4.获取执行sql的对象
            stmt = conn.createStatement();
            //5.执行sql
            rs = stmt.executeQuery(sql);
            //6.遍历结果集,封装对象,装载集合
            Emp emp = null;
            list = new ArrayList<>();
            while (rs.next()) {
                //获取数据
                int id = rs.getInt("id");
                String ename = rs.getString("ename");
                int job_id = rs.getInt("job_id");
                int mgr = rs.getInt("mgr");
                Date joindate = rs.getDate("joindate");
                double salary = rs.getDouble("salary");
                double bonus = rs.getDouble("bonus");
                int dep_id = rs.getInt("dept_id");
                //创建emp对象
                emp = new Emp();
                emp.setId(id);
                emp.setEname(ename);
                emp.setJob_id(job_id);
                emp.setMgr(mgr);
                emp.setJoindate(joindate);
                emp.setSalary(salary);
                emp.setBonus(bonus);
                emp.setDept_id(dep_id);

                //装载集合
                list.add(emp);

            }

        } catch (ClassNotFoundException e) {
            e.printStackTrace();
        } catch (SQLException e) {
            e.printStackTrace();
        } finally {
            if (rs!=null){
                try {
                    rs.close();
                } catch (SQLException e) {
                    e.printStackTrace();
                }
            }
            if (stmt != null){
                try {
                    stmt.close();
                } catch (SQLException e) {
                    e.printStackTrace();
                }
            }
            if (conn != null){
                try {
                    conn.close();
                } catch (SQLException e) {
                    e.printStackTrace();
                }
            }
        }
        return list;
    }


    /**
     * 演示JDBC工具类
     * @return
     */
    public List<Emp> findAll2() {
        Connection conn = null;
        Statement stmt = null;
        ResultSet rs = null;
        List<Emp> list = null;
        try {
            /*//1.注册驱动
            Class.forName("com.mysql.jdbc.Driver");
            //2.获取连接
            conn = DriverManager.getConnection("jdbc:mysql:///db3", "root", "root");*/
            conn = JdbcUtils.getConnection();

            //3.定义sql
            String sql = "select * from emp";
            //4.获取执行sql的对象
            stmt = conn.createStatement();
            //5.执行sql
            rs = stmt.executeQuery(sql);
            //6.遍历结果集,封装对象,装载集合
            Emp emp = null;
            list = new ArrayList<>();
            while (rs.next()) {
                //获取数据
                int id = rs.getInt("id");
                String ename = rs.getString("ename");
                int job_id = rs.getInt("job_id");
                int mgr = rs.getInt("mgr");
                Date joindate = rs.getDate("joindate");
                double salary = rs.getDouble("salary");
                double bonus = rs.getDouble("bonus");
                int dep_id = rs.getInt("dept_id");
                //创建emp对象
                emp = new Emp();
                emp.setId(id);
                emp.setEname(ename);
                emp.setJob_id(job_id);
                emp.setMgr(mgr);
                emp.setJoindate(joindate);
                emp.setSalary(salary);
                emp.setBonus(bonus);
                emp.setDept_id(dep_id);

                //装载集合
                list.add(emp);

            }

        } catch (SQLException e) {
            e.printStackTrace();
        } finally {
            /*if (rs!=null){
                try {
                    rs.close();
                } catch (SQLException e) {
                    e.printStackTrace();
                }
            }
            if (stmt != null){
                try {
                    stmt.close();
                } catch (SQLException e) {
                    e.printStackTrace();
                }
            }
            if (conn != null){
                try {
                    conn.close();
                } catch (SQLException e) {
                    e.printStackTrace();
                }
            }*/
            JdbcUtils.close(rs,stmt,conn);

        }
        return list;
    }
}
- 1
- 2
- 3
- 4
- 5
- 6
- 7
- 8
- 9
- 10
- 11
- 12
- 13
- 14
- 15
- 16
- 17
- 18
- 19
- 20
- 21
- 22
- 23
- 24
- 25
- 26
- 27
- 28
- 29
- 30
- 31
- 32
- 33
- 34
- 35
- 36
- 37
- 38
- 39
- 40
- 41
- 42
- 43
- 44
- 45
- 46
- 47
- 48
- 49
- 50
- 51
- 52
- 53
- 54
- 55
- 56
- 57
- 58
- 59
- 60
- 61
- 62
- 63
- 64
- 65
- 66
- 67
- 68
- 69
- 70
- 71
- 72
- 73
- 74
- 75
- 76
- 77
- 78
- 79
- 80
- 81
- 82
- 83
- 84
- 85
- 86
- 87
- 88
- 89
- 90
- 91
- 92
- 93
- 94
- 95
- 96
- 97
- 98
- 99
- 100
- 101
- 102
- 103
- 104
- 105
- 106
- 107
- 108
- 109
- 110
- 111
- 112
- 113
- 114
- 115
- 116
- 117
- 118
- 119
- 120
- 121
- 122
- 123
- 124
- 125
- 126
- 127
- 128
- 129
- 130
- 131
- 132
- 133
- 134
- 135
- 136
- 137
- 138
- 139
- 140
- 141
- 142
- 143
- 144
- 145
- 146
- 147
- 148
- 149
- 150
- 151
- 152
- 153
- 154
- 155
- 156
- 157
- 158
- 159
- 160
- 161
- 162
- 163
- 164
- 165
- 166
- 167
- 168
- 169
- 170
- 171
- 172
- 173
- 174
- 175
- 176
- 177
- 178
- 179
import java.io.FileReader;
import java.io.IOException;
import java.net.URL;
import java.sql.*;
import java.util.Properties;

/**
 * JDBC工具类
 */
public class JdbcUtils {
    private static String url;
    private static String user;
    private static String password;
    private static String driver;

    /**
     * 文件的读取,只需要读取一次即可拿到这些值。使用静态代码块(静态代码块会随着类的加载而执行)
     */
    static{
        //读取资源文件,获取值

        try {
            //1. 创建Properties集合类
            Properties pro = new Properties();

            //获取src路径下文件的方式-->ClassLoader 类加载器
            ClassLoader classLoader = JdbcUtils.class.getClassLoader();
            URL res = classLoader.getResource("jdbc.properties");
            String path = res.getPath();
            System.out.println(path);
            //2. 加载文件
            //pro.load(new FileReader("src/jdbc.properties"));  //文件找不到异常
            pro.load(new FileReader(path));

            //3.  获取数据,赋值
            url = pro.getProperty("url");
            user = pro.getProperty("user");
            password = pro.getProperty("password");
            driver = pro.getProperty("driver");

            //4. 注册驱动
            Class.forName(driver);

        } catch (IOException e) {
            e.printStackTrace();
        } catch (ClassNotFoundException e) {
            e.printStackTrace();
        }
    }

    /**
     * 获取连接
     * @return 连接对象
     */
    public static Connection getConnection() throws SQLException {
        return DriverManager.getConnection(url,user,password);
    }

    public static void close(Statement stmt,Connection conn){
        if (stmt != null){
            try {
                stmt.close();
            } catch (SQLException e) {
                e.printStackTrace();
            }
        }

        if (conn != null){
            try {
                conn.close();
            } catch (SQLException e) {
                e.printStackTrace();
            }
        }
    }

    public static void close(ResultSet rs, Statement stmt, Connection conn){
        if (rs != null){
            try {
                rs.close();
            } catch (SQLException e) {
                e.printStackTrace();
            }
        }

        if (stmt != null){
            try {
                stmt.close();
            } catch (SQLException e) {
                e.printStackTrace();
            }
        }

        if (conn != null){
            try {
                conn.close();
            } catch (SQLException e) {
                e.printStackTrace();
            }
        }
    }
}
- 1
- 2
- 3
- 4
- 5
- 6
- 7
- 8
- 9
- 10
- 11
- 12
- 13
- 14
- 15
- 16
- 17
- 18
- 19
- 20
- 21
- 22
- 23
- 24
- 25
- 26
- 27
- 28
- 29
- 30
- 31
- 32
- 33
- 34
- 35
- 36
- 37
- 38
- 39
- 40
- 41
- 42
- 43
- 44
- 45
- 46
- 47
- 48
- 49
- 50
- 51
- 52
- 53
- 54
- 55
- 56
- 57
- 58
- 59
- 60
- 61
- 62
- 63
- 64
- 65
- 66
- 67
- 68
- 69
- 70
- 71
- 72
- 73
- 74
- 75
- 76
- 77
- 78
- 79
- 80
- 81
- 82
- 83
- 84
- 85
- 86
- 87
- 88
- 89
- 90
- 91
- 92
- 93
- 94
- 95
- 96
- 97
- 98
- 99
- 100
- 101
- 102
url = jdbc:mysql:///db3
user = root
password = root
driver = com.mysql.jdbc.Driver
- 1
- 2
- 3
- 4
练习
键盘录入的用户名和密码是否与数据库匹配
* 需求:
	1. 通过键盘录入用户名和密码
	2. 判断用户是否登录成功
		* select * from user where username = "" and password = "";
		* 如果这个sql有查询结果,则成功,反之,则失败。
* 步骤:
	1.创建数据库 user
		CREATE TABLE USER(
		id INT PRIMARY KEY AUTO_INCREMENT,
		username VARCHAR(32),
		PASSWORD VARCHAR(32)
		 );

		INSERT INTO USER VALUE(NULL,'zhangsan','123');
		INSERT INTO USER VALUE(NULL,'lisi','234');
- 1
- 2
- 3
- 4
- 5
- 6
- 7
- 8
- 9
- 10
- 11
- 12
- 13
- 14
- 15
import cn.itcast.util.JdbcUtils;

import java.sql.*;
import java.util.Scanner;

public class JdbcDemo9 {
    public static void main(String[] args) {
        //1.键盘录入,接受用户名和密码
        Scanner sc = new Scanner(System.in);
        System.out.println("请输入用户名:");
        String username = sc.nextLine();
        System.out.println("请输入密码:");
        String password = sc.nextLine();
        //2.调用方法
        boolean flag = new JdbcDemo9().login2 (username, password);
        //3.判断结果,输出不同语句
        if(flag){
            //登录成功
            System.out.println("登录成功");
        }else{
            System.out.println("用户名或密码错误!");
        }
    }

    /**
     * 登录方法,不使用PrepareStatement
     */
    public boolean login(String username, String password){
        if(username == null || password == null){
            return false;
        }
        //连接数据库判断是否登录成功
        Connection conn = null;
        Statement stmt = null;
        ResultSet rs = null;
        //1. 获取连接
        try {
            conn = JdbcUtils.getConnection();
            //2.定义sql
            String sql = " select * from user where username = '"+password+"' and password = '"+password+"' ";
            //3.获取执行sql的对象
            stmt = conn.createStatement();
            //4.执行查询
            rs = stmt.executeQuery(sql);
            //5.判断
            /*if (rs.next()){
                return true;
            }else{
                return false;
            }*/
            return rs.next();

        } catch (SQLException e) {
            e.printStackTrace();
        }finally{
            JdbcUtils.close(rs,stmt,conn);
        }

        return false;
    }

    /**
     * 登录方法,使用PrepareStatement实现
     */
    public boolean login2(String username, String password){
        if(username == null || password == null){
            return false;
        }
        //连接数据库判断是否登录成功
        Connection conn = null;
        Statement stmt = null;
        ResultSet rs = null;
        PreparedStatement pstmt = null;
        //1. 获取连接
        try {
            conn = JdbcUtils.getConnection();
            //2.定义sql
            String sql = " select * from user where username = ? and password = ? ";
            //3.获取执行sql的对象
            pstmt = conn.prepareStatement(sql);
            //给?赋值
            pstmt.setString(1,username);
            pstmt.setString(2,password);
            //4.执行查询,不需要传递sql
            rs = pstmt.executeQuery();
            //5.判断
            /*if (rs.next()){
                return true;
            }else{
                return false;
            }*/
            return rs.next();

        } catch (SQLException e) {
            e.printStackTrace();
        }finally{
            JdbcUtils.close(rs,pstmt,conn);
        }

        return false;
    }
}
- 1
- 2
- 3
- 4
- 5
- 6
- 7
- 8
- 9
- 10
- 11
- 12
- 13
- 14
- 15
- 16
- 17
- 18
- 19
- 20
- 21
- 22
- 23
- 24
- 25
- 26
- 27
- 28
- 29
- 30
- 31
- 32
- 33
- 34
- 35
- 36
- 37
- 38
- 39
- 40
- 41
- 42
- 43
- 44
- 45
- 46
- 47
- 48
- 49
- 50
- 51
- 52
- 53
- 54
- 55
- 56
- 57
- 58
- 59
- 60
- 61
- 62
- 63
- 64
- 65
- 66
- 67
- 68
- 69
- 70
- 71
- 72
- 73
- 74
- 75
- 76
- 77
- 78
- 79
- 80
- 81
- 82
- 83
- 84
- 85
- 86
- 87
- 88
- 89
- 90
- 91
- 92
- 93
- 94
- 95
- 96
- 97
- 98
- 99
- 100
- 101
- 102
练习:
定义一个方法,查询emp表的数据将其封装为对象,然后装载集合,返回。
* 定义一个方法,查询emp表的数据将其封装为对象,然后装载集合,返回。
	1. 定义Emp类
	2. 定义方法 public List<Emp> findAll(){}
	3. 实现方法 select * from emp;
- 1
- 2
- 3
- 4
import java.sql.*;
import java.util.ArrayList;
import java.util.List;

/**
 * 定义一个方法,查询emp表的数据将其封装为对象,然后装载集合,返回。
 */
public class JdbcDemo8 {

    public static void main(String[] args) {
        List<Emp> list = new JdbcDemo8().findAll();
        System.out.println(list);
    }

    /**
     * 查询所有emp对象
     *
     * @return
     */
    public List<Emp> findAll() {
        Connection conn = null;
        Statement stmt = null;
        ResultSet rs = null;
        List<Emp> list = null;
        try {
            //1.注册驱动
            Class.forName("com.mysql.jdbc.Driver");
            //2.获取连接
            conn = DriverManager.getConnection("jdbc:mysql:///db3", "root", "root");
            //3.定义sql
            String sql = "select * from emp";
            //4.获取执行sql的对象
            stmt = conn.createStatement();
            //5.执行sql
            rs = stmt.executeQuery(sql);
            //6.遍历结果集,封装对象,装载集合
            Emp emp = null;
            list = new ArrayList<>();
            while (rs.next()) {
                //获取数据
                int id = rs.getInt("id");
                String ename = rs.getString("ename");
                int job_id = rs.getInt("job_id");
                int mgr = rs.getInt("mgr");
                Date joindate = rs.getDate("joindate");
                double salary = rs.getDouble("salary");
                double bonus = rs.getDouble("bonus");
                int dep_id = rs.getInt("dept_id");
                //创建emp对象
                emp = new Emp();
                emp.setId(id);
                emp.setEname(ename);
                emp.setJob_id(job_id);
                emp.setMgr(mgr);
                emp.setJoindate(joindate);
                emp.setSalary(salary);
                emp.setBonus(bonus);
                emp.setDept_id(dep_id);

                //装载集合
                list.add(emp);

            }

        } catch (ClassNotFoundException e) {
            e.printStackTrace();
        } catch (SQLException e) {
            e.printStackTrace();
        } finally {
            if (rs!=null){
                try {
                    rs.close();
                } catch (SQLException e) {
                    e.printStackTrace();
                }
            }
            if (stmt != null){
                try {
                    stmt.close();
                } catch (SQLException e) {
                    e.printStackTrace();
                }
            }
            if (conn != null){
                try {
                    conn.close();
                } catch (SQLException e) {
                    e.printStackTrace();
                }
            }
        }
        return list;
    }
}
- 1
- 2
- 3
- 4
- 5
- 6
- 7
- 8
- 9
- 10
- 11
- 12
- 13
- 14
- 15
- 16
- 17
- 18
- 19
- 20
- 21
- 22
- 23
- 24
- 25
- 26
- 27
- 28
- 29
- 30
- 31
- 32
- 33
- 34
- 35
- 36
- 37
- 38
- 39
- 40
- 41
- 42
- 43
- 44
- 45
- 46
- 47
- 48
- 49
- 50
- 51
- 52
- 53
- 54
- 55
- 56
- 57
- 58
- 59
- 60
- 61
- 62
- 63
- 64
- 65
- 66
- 67
- 68
- 69
- 70
- 71
- 72
- 73
- 74
- 75
- 76
- 77
- 78
- 79
- 80
- 81
- 82
- 83
- 84
- 85
- 86
- 87
- 88
- 89
- 90
- 91
- 92
- 93
- 94
import java.util.Date;

/**
 * 封装Emp表数据的JavaBean
 */
public class Emp {
    private int id;
    private String ename;
    private int job_id;
    private int mgr;
    private Date joindate;
    private double salary;
    private double bonus;
    private int dept_id;


    @Override
    public String toString() {
        return "Emp{" +
                "id=" + id +
                ", ename='" + ename + '\'' +
                ", job_id=" + job_id +
                ", mgr=" + mgr +
                ", joindate=" + joindate +
                ", salary=" + salary +
                ", bounds=" + bonus +
                ", dept_id=" + dept_id +
                '}';
    }

    public Emp() {
    }

    public Emp(int id, String ename, int job_id, int mgr, Date joindate, double salary, double bounds, int dept_id) {
        this.id = id;
        this.ename = ename;
        this.job_id = job_id;
        this.mgr = mgr;
        this.joindate = joindate;
        this.salary = salary;
        this.bonus = bounds;
        this.dept_id = dept_id;
    }

    public int getId() {
        return id;
    }

    public void setId(int id) {
        this.id = id;
    }

    public String getEname() {
        return ename;
    }

    public void setEname(String ename) {
        this.ename = ename;
    }

    public int getJob_id() {
        return job_id;
    }

    public void setJob_id(int job_id) {
        this.job_id = job_id;
    }

    public int getMgr() {
        return mgr;
    }

    public void setMgr(int mgr) {
        this.mgr = mgr;
    }

    public Date getJoindate() {
        return joindate;
    }

    public void setJoindate(Date joindate) {
        this.joindate = joindate;
    }

    public double getSalary() {
        return salary;
    }

    public void setSalary(double salary) {
        this.salary = salary;
    }

    public double getBonus() {
        return bonus;
    }

    public void setBonus(double bounds) {
        this.bonus =  bounds;
    }

    public int getDept_id() {
        return dept_id;
    }

    public void setDept_id(int dept_id) {
        this.dept_id = dept_id;
    }
}
- 1
- 2
- 3
- 4
- 5
- 6
- 7
- 8
- 9
- 10
- 11
- 12
- 13
- 14
- 15
- 16
- 17
- 18
- 19
- 20
- 21
- 22
- 23
- 24
- 25
- 26
- 27
- 28
- 29
- 30
- 31
- 32
- 33
- 34
- 35
- 36
- 37
- 38
- 39
- 40
- 41
- 42
- 43
- 44
- 45
- 46
- 47
- 48
- 49
- 50
- 51
- 52
- 53
- 54
- 55
- 56
- 57
- 58
- 59
- 60
- 61
- 62
- 63
- 64
- 65
- 66
- 67
- 68
- 69
- 70
- 71
- 72
- 73
- 74
- 75
- 76
- 77
- 78
- 79
- 80
- 81
- 82
- 83
- 84
- 85
- 86
- 87
- 88
- 89
- 90
- 91
- 92
- 93
- 94
- 95
- 96
- 97
- 98
- 99
- 100
- 101
- 102
- 103
- 104
- 105
- 106
- 107
- 108
JDBC控制事物
1. 事物:一个包含多个步骤的业务操作。如果这个业务操作被事物管理,则这多个步骤要么同时成功,要么同时失败。
2. 操作:
	1. 开启事物
	2. 提交事务
	3. 回滚事物
3.使用Connection对象来管理事物
	* 开启事物:setAutoCommit(boolean autoCommit) : 调用该方法设置参数为false,即开启事务
	* 提交事物:commit( )
	* 回滚事物:rollback( )
- 1
- 2
- 3
- 4
- 5
- 6
- 7
- 8
- 9
import cn.itcast.util.JdbcUtils;

import java.sql.Connection;
import java.sql.PreparedStatement;
import java.sql.SQLException;

/**
 * 事物操作
 */
public class JdbcDemo10 {

    public static void main(String[] args) {
        Connection conn = null;
        PreparedStatement pstmt1 = null;
        PreparedStatement pstmt2 = null;

        try {
            //1. 获取连接
            conn = JdbcUtils.getConnection();
            //开启事务
            conn.setAutoCommit(false);

            //2. 定义sql
            //2.1 张三 - 500
            String sql1 = "update account set balance = balance - ? where id = ?";
            //2.2 李四 + 500
            String sql2 = "update account set balance = balance + ? where id = ?";
            //3.获取执行sql的对象
            pstmt1 = conn.prepareStatement(sql1);
            pstmt2 = conn.prepareStatement(sql2);
            //4.设置参数
            pstmt1.setDouble(1, 200);
            pstmt1.setInt(2, 1);

            pstmt2.setDouble(1, 200);
            pstmt2.setInt(2, 2);
            //5. 执行sql
            pstmt1.executeUpdate();
            //手动制造异常
            int i = 3 / 0;

            pstmt2.executeUpdate();
            //提交事务
            conn.commit();
        } catch (Exception e) {
            //事务回滚
            try {
                if (conn != null) {
                    conn.rollback();
                }
            } catch (SQLException e1) {
                e1.printStackTrace();
            }

            e.printStackTrace();
        } finally {
            JdbcUtils.close(pstmt1, conn);
            JdbcUtils.close(pstmt2, null);
        }
    }
}
- 1
- 2
- 3
- 4
- 5
- 6
- 7
- 8
- 9
- 10
- 11
- 12
- 13
- 14
- 15
- 16
- 17
- 18
- 19
- 20
- 21
- 22
- 23
- 24
- 25
- 26
- 27
- 28
- 29
- 30
- 31
- 32
- 33
- 34
- 35
- 36
- 37
- 38
- 39
- 40
- 41
- 42
- 43
- 44
- 45
- 46
- 47
- 48
- 49
- 50
- 51
- 52
- 53
- 54
- 55
- 56
- 57
- 58
- 59
- 60
- 61
声明:本文内容由网友自发贡献,不代表【wpsshop博客】立场,版权归原作者所有,本站不承担相应法律责任。如您发现有侵权的内容,请联系我们。转载请注明出处:https://www.wpsshop.cn/w/酷酷是懒虫/article/detail/847900
推荐阅读
相关标签

