
热门标签
热门文章
- 1微信支付 商户号该产品权限未开通,请前往商户平台_微信商户号该产品权限未开通
- 2ctfmon是什么启动项_Win7启动项找不到ctfmon进程无法正常使用输入法的解决方法...
- 3【MySQL】SQL查询语句在MySQL中的执行过程_mysql中一条sql查询语句的执行流程
- 4uniapp 开发的H5 微信公众jssdk验签 invalid signature的问题_uniapp 微信公众号 签名失败
- 5使用opencv 进行图像美化_opencv窗口美化
- 6SpringBoot从入门到精通教程(二十六)- 全局header/body接口请求参数+Swagger2集成/接口规范用法_springboot header参数
- 7双侧检验的p值和单侧检验_单侧检验与双侧检验的区别
- 802-Kubernetes中的NameSpace与Pod
- 9axios详解以及完整封装方法_axios封装
- 10标准化(Normalization)和归一化实现_f.normalize 0-1
当前位置: article > 正文
flink源码阅读第一篇—入口
作者:羊村懒王 | 2024-03-18 22:34:41
赞
踩
flink源码阅读
前序
- 由于最近接触了flink相关项目,封装flink-table模块,这部分模块应该在flink官方1.9x版本进行发布,截止目前还是beta版本,等待最终的release版本发布。在开发期间,出于工作和兴趣的需求,就阅读了部分源码,阅读源码期间也是阅读了很多博客文章,发下文章写错的也比比皆是呀,哎有时也会误导人。先叙述第一篇总体轮廓篇。该篇总体思路是从flink任务提交开始,从本地提交代码逻辑,到服务端如果接收任务,最后运行的不同分支逻辑。了解这部分逻辑,需要一些基础知识,包括yarn, netty最基本的了解。
flink任务提交方式
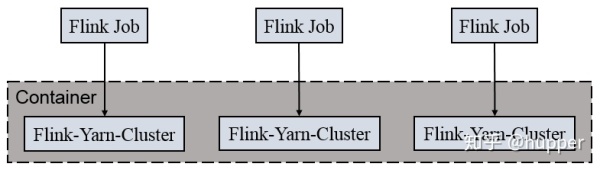
- flink提交方式和spark类似,比spark还略微复杂些。大体分这么几类 1、单机本地体检,2、多机集群提交,3、yarn-session提交,4、yarn-cluster per-job提交、5、还包括mesos和docker提交(这俩个略叙)。 生产环境中用第四种比就多,每个任务作为一个yarn application提交到集群,申请的资源和其他任务是隔离的,其他方式相对这个都略显简单。下面主要介绍第四种Per-Job-Cluster。
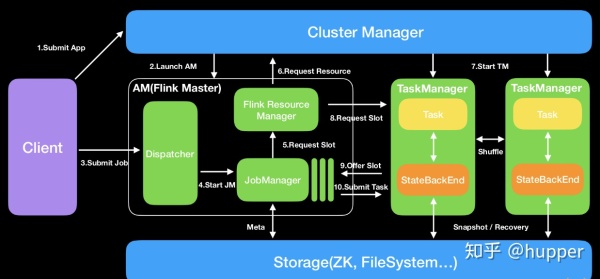
- 在看代码之前先对flink组件有个大概的初步认知:
- 1、Dispatcher(Application Master)提供REST接口来接收client的application提交,它负责启动JM和提交application,同时运行Web UI。
- 2、ResourceManager:一般是Yarn,当TM有空闲的slot就会告诉JM,没有足够的slot也会启动新的TM。kill掉长时间空闲的TM。
- 3、JobManager :接受application,包含StreamGraph(DAG)、JobGraph(logical dataflow graph,已经进过优化,如task chain)和JAR,将JobGraph转化为ExecutionGraph(physical dataflow graph,并行化),包含可以并发执行的tasks。其他工作类似Spark driver,如向RM申请资源、schedule tasks、保存作业的元数据,如checkpoints。如今JM可分为JobMaster和ResourceManager(和下面的不同),分别负责任务和资源,在Session模式下启动多个job就会有多个JobMaster。
- 4、TaskManager:类似Spark的executor,会跑多个线程的task、数据缓存与交换。
代码分析:
- Per-Job-Cluster模式也分为本地和远端。
- 本地模式:
本地流程
- 与Session-Cluster模式类似,入口也为CliFrontend#main
- 解析处理参数
- 根据用户jar、main、程序参数、savepoint信息生成PackagedProgram
- 根据PackagedProgram创建JobGraph(对于非分离模式还是和Session模式一样,模式Session-Cluster)
- 获取集群资源信息
- 部署集群YarnClusterDesriptor#deployJobCluster -> AbstractYarnClusterDescriptor#deployInternal;
- 进行资源校验(如内存大小、vcore大小、队列)
- 通过YarnClient创建Application
- 再次校验资源
- AbstractYarnClusterDescriptor#startAppMaster启动AppMaster
- 初始化文件系统(HDFS)
- 将log4j、logback、flink-conf.yaml、jar包上传至HDFS
- 构造AppMaster的Container(确定Container进程的入口类YarnSessionClusterEntrypoint),构造相应的Env
- YarnClient向Yarn提交Container申请
- 跟踪ApplicationReport状态(确定是否启动成功,可能会由于资源不够,一直等待)
- 启动成功后将对应的ip和port写入flinkConfiguration中
- 创建与将集群交互的ClusterClient
- 根据flink-conf的HA配置创建对应的服务(如StandaloneHaServices、ZooKeeperHaServices等)
- 创建基于Netty的RestClient;
- 创建/rest_server_lock、/dispatcher_lock节点(以ZK为例)
- 启动监听节点的变化(主备切换)
- 通过ClusterClient获取到appId信息并写入本地临时文件AbstractYarnClusterDescriptor#startAppMaster中与Session-Cluster有一个显著不同的就是其会将任务的JobGraph上传至Hdfs供后续服务端使用
经过上述步骤,客户端提交任务过程就完成了,主要涉及到文件(JobGraph和jar包)的上传。
远端流程
- 远端宿主在Container中的集群入口为YarnJobClusterEntrypoint#main
- ClusterEntrypoint#runClusterEntrypoint -> ClusterEntrypoint#startCluster启动集群
- 创建JobDispatcherResourceManagerComponentFactory(用于创建JobDispatcherResourceManagerComponent)
- 创建ResourceManager(YarnResourceManager)、Dispatcher(MiniDispatcher),其中在创建MiniDispatcher时会从之前的JobGraph文件中读取出JobGraph,并启动进行ZK选举
- 当为主时会调用Dispatcher#grantLeadership方法
- Dispatcher#recoverJobs恢复任务,获取JobGraph
- Dispatcher#tryAcceptLeadershipAndRunJobs确认获取主并开始运行任务
- Dispatcher#runJob开始运行任务(创建JobManagerRunner并启动进行ZK选举),
- 创建JobManagerRunner(处理leader选举)
- 创建JobMaster(实际执行任务入口,包含在JobManagerRunner)
- 启动JobManagerRunner(会进行leader选举,ZK目录为leader/${jobId}/job_manager_lock)
- 当为主时会调用JobManagerRunner#grantLeadership方法
- 启动JobMaster
- 将任务运行状态信息写入ZK(/${AppID}/running_job_registry/${jobId})
- 启动JobMaster的Endpoint
- 开始调度任务JobMaster#startJobExecution
- Dispatcher#runJob开始运行任务(创建JobManagerRunner并启动进行ZK选举),
接下来就进行任务具体调度(构造ExecutionGraph、申请Slot等)流程。
Flink On Yarn With dispatcher
主要结合一下yarn的执行流程,介绍一下任务调转执行流程。
- Dispatcher组件负责接收作业提交,持久化它们,生成JobManagers以执行作业并在Master故障时恢复它们。此外,它知道Flink会话群集的状态。
- 某些集群管理器需要一个集中的作业生成和监视实例
- 它包含独立JobManager的角色,等待提交作业
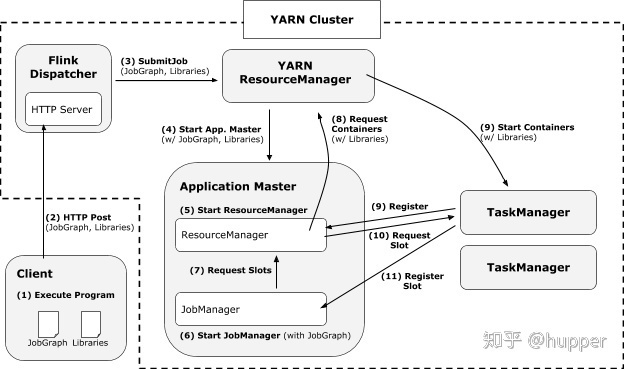
- 当开始一个新的Flink yarn 会话时,客户端首先检查所请求的资源(containers和内存)是否可用。如果资源够用,之后,上传一个jar包,包含Flink和HDFS的配置。
- 客户端向yarn resource manager发送请求,申请一个yarn container去启动ApplicationMaster。
- yarn resource manager会在nodemanager上分配一个container,去启动ApplicationMaster
- yarn nodemanager会将配置文件和jar包下载到对应的container中,进行container容器的初始化。
- 初始化完成后,ApplicationMaster构建完成。ApplicationMaster会为TaskManagers生成新的Flink配置文件(使得TaskManagers根据配置文件去连接到JobManager),配置文件会上传到HDFS。
- ApplicationMaster开始为该Flink应用的TaskManagers分配containers,这个过程会从HDFS上下载jar和配置文件(此处的配置文件是AM修改过的,包含了JobManager的一些信息,比如说JobManager的地址)
- 一旦上面的步骤完成,Flink已经建立并准备好接受jobs。
代码详细分析
./bin/flink run -m yarn-cluster -yn 2 -yjm 1024 -ytm 1024 ./examples/batch/WordCount.jar以这个执行脚本入口进行分析,入口函数org.apache.flink.client.cli.CliFrontend,此类中的Main方法是所有提交操作的开始
大体框架
- CliFrontend[Main] :Client提交任务的入口,AM创建,提交程序
- ClusterEntrypoint[Main] : 与Yarn集群交互,启动集群的基本服务,如Dispatcher,ResourceManager和WebMonitorEndpoint等
- YarnTaskExecutorRunner[Main] :TaskExecutor(即TaskManager)上的Task执行Main入口
- JobSubmitHandler与Dispatcher :处理Client端任务提交,启动JobMaster,构建ExecutionGraph,并deploy所有Task任务
- ResourceManager :资源管理器,卖游戏账号平台指明TaskExecutor入口类,启动TaskExecutor的Container
本地提交逻辑
CliFrontend[Main]调用栈
- CliFrontend[Main]
- -> cli.parseParameters(args)
- -> buildProgram(runOptions)
- -> runProgram(customCommandLine, commandLine, runOptions, program)
- (根据yarn提交模式,走不同分支,以Job小Session集群方式为例)
- -> customCommandLine.createClusterDescriptor
- -> clusterDescriptor.deploySessionCluster(clusterSpecification)
- deployInternal -- block,直到ApplicationMaster/JobManager在YARN上部署完毕
- startAppMaster
- setupApplicationMasterContainer
- startCommandValues.put("class", yarnClusterEntrypoint) -- 此处是 YarnJobClusterEntrypoint[Main]
- -> executeProgram(program, client, userParallelism);
- (执行程序就是优化得到JobGraph,远程提交的过程)
runProgram(customCommandLine, commandLine, runOptions, program)
- private <T> void runProgram(
- CustomCommandLine<T> customCommandLine,
- CommandLine commandLine,
- RunOptions runOptions,
- PackagedProgram program) throws ProgramInvocationException, FlinkException {
-
- // 获取yarnClusterDescriptor,用户创建集群
- final ClusterDescriptor<T> clusterDescriptor = customCommandLine.createClusterDescriptor(commandLine);
-
- try {
- // 此处clusterId如果不为null,则表示是session模式
- final T clusterId = customCommandLine.getClusterId(commandLine);
-
- final ClusterClient<T> client;
-
- /*
- * Yarn模式:
- * 1. Job模式:每个flink job 单独在yarn上声明一个flink集群
- * 2. Session模式:在集群中维护flink master,即一个yarn application master,运行多个job。
- */
-
- if (clusterId == null && runOptions.getDetachedMode()) {
- // job + DetachedMode模式
- int parallelism = runOptions.getParallelism() == -1 ? defaultParallelism : runOptions.getParallelism();
-
- // 从jar包中获取jobGraph
- final JobGraph jobGraph = PackagedProgramUtils.createJobGraph(program, configuration, parallelism);
-
- // clusterDescriptor.deployJobCluster
- // -> YarnClusterDescriptor.deployInternal
- // -> AbstractYarnClusterDescriptor.startAppMaster
- // -> AbstractYarnClusterDescriptor.yarnClient.submitApplication(appContext);
- // 新建一个RestClusterClient,在yarn集群中启动应用(ClusterEntrypoint)
- final ClusterSpecification clusterSpecification = customCommandLine.getClusterSpecification(commandLine);
- client = clusterDescriptor.deployJobCluster(
- clusterSpecification,
- jobGraph,
- runOptions.getDetachedMode());
-
- ......
- } else {
- final Thread shutdownHook;
- if (clusterId != null) {
- // session模式
- client = clusterDescriptor.retrieve(clusterId);
- shutdownHook = null;
- } else {
- // job + non-DetachedMode模式
- final ClusterSpecification clusterSpecification = customCommandLine.getClusterSpecification(commandLine);
- // 新建一个小session集群,会启动ClusterEntrypoint,提供Dispatcher,ResourceManager和WebMonitorEndpoint等服务
- client = clusterDescriptor.deploySessionCluster(clusterSpecification);
-
- // 进行资源清理的钩子
- if (!runOptions.getDetachedMode() && runOptions.isShutdownOnAttachedExit()) {
- shutdownHook = ShutdownHookUtil.addShutdownHook(client::shutDownCluster, client.getClass().getSimpleName(), LOG);
- } else {
- shutdownHook = null;
- }
- }
-
- try {
- ......
-
- // 优化图,执行程序的远程提交
- executeProgram(program, client, userParallelism);
- } finally {
- ......
- }
- }
- } finally {
- ......
- }
- }

clusterDescriptor.deploySessionCluster
- clusterDescriptor.deploySessionCluster(clusterSpecification)
- deployInternal -- block,直到ApplicationMaster/JobManager在YARN上部署完毕
- startAppMaster
- setupApplicationMasterContainer
- startCommandValues.put("class", yarnClusterEntrypoint) -- 此处是 YarnJobClusterEntrypoint[Main]
deployInternal方法,部署集群:
- protected ClusterClient<ApplicationId> deployInternal(
- ClusterSpecification clusterSpecification,
- String applicationName,
- String yarnClusterEntrypoint,
- @Nullable JobGraph jobGraph,
- boolean detached) throws Exception {
-
- // ------------------ Check if configuration is valid --------------------
- ......
-
- // ------------------ Check if the specified queue exists --------------------
-
- checkYarnQueues(yarnClient);
-
- // ------------------ Add dynamic properties to local flinkConfiguraton ------
- ......
-
- // ------------------ Check if the YARN ClusterClient has the requested resources --------------
-
- // Create application via yarnClient
- final YarnClientApplication yarnApplication = yarnClient.createApplication();
- ......
-
- // ------------------启动ApplicationMaster ----------------
- ApplicationReport report = startAppMaster(
- flinkConfiguration,
- applicationName,
- yarnClusterEntrypoint,
- jobGraph,
- yarnClient,
- yarnApplication,
- validClusterSpecification);
-
- ......
- // the Flink cluster is deployed in YARN. Represent cluster
- return createYarnClusterClient(
- this,
- validClusterSpecification.getNumberTaskManagers(),
- validClusterSpecification.getSlotsPerTaskManager(),
- report,
- flinkConfiguration,
- true);
- }
startAppMaster方法,启动ApplicationMaster:
- public ApplicationReport startAppMaster(
- Configuration configuration,
- String applicationName,
- String yarnClusterEntrypoint,
- JobGraph jobGraph,
- YarnClient yarnClient,
- YarnClientApplication yarnApplication,
- ClusterSpecification clusterSpecification) throws Exception {
-
- // ------------------ Initialize the file systems -------------------------
- ......
-
- // ------------- Set-up ApplicationSubmissionContext for the application -------------
- ApplicationSubmissionContext appContext = yarnApplication.getApplicationSubmissionContext();
- final ApplicationId appId = appContext.getApplicationId();
-
- // ------------------ Add Zookeeper namespace to local flinkConfiguraton ------
- ......
-
- // ------------------ 准备Yarn所需的资源和文件 ------
- // Setup jar for ApplicationMaster
- ......
-
- // 准备TaskManager的相关配置信息
- configuration.setInteger(
- TaskManagerOptions.NUM_TASK_SLOTS,
- clusterSpecification.getSlotsPerTaskManager());
-
- configuration.setString(
- TaskManagerOptions.TASK_MANAGER_HEAP_MEMORY,
- clusterSpecification.getTaskManagerMemoryMB() + "m");
-
- // Upload the flink configuration, write out configuration file
- ......
-
- // ------------------ 启动ApplicationMasterContainer ------
- final ContainerLaunchContext amContainer = setupApplicationMasterContainer(
- yarnClusterEntrypoint,
- hasLogback,
- hasLog4j,
- hasKrb5,
- clusterSpecification.getMasterMemoryMB());
-
- // --------- set user specified app master environment variables ---------
- ......
-
- // 提交App
- yarnClient.submitApplication(appContext);
-
- // --------- Waiting for the cluster to be allocated ---------
- ......
- }
远端逻辑ClusterEntrypoint[Main]
与yarn集群打交道(这里主要是resourcemananger和taskmamanager),ClusterEntrypoint 包含了 webMonitor、resourceManager、dispatcher 的服务。
- 封装了Cluster启停的逻辑
- 根据配置文件来创建RpcService
- HaService
- HeartbeatService
- MetricRegistry
- 提供了几个抽象方法给子类(createDispatcher,createResourceManager,createRestEndpoint,
- YarnJobClusterEntrypoint[Main]
- -> ClusterEntrypoint.runClusterEntrypoint(yarnJobClusterEntrypoint);
- -> clusterEntrypoint.startCluster();
- -> runCluster(configuration);
- -> clusterComponent = dispatcherResourceManagerComponentFactory.create();
- * 在同一进程中启动Dispatcher,ResourceManager和WebMonitorEndpoint组件服务
- create -> {
- webMonitorEndpoint.start();
- resourceManager.start();
- dispatcher.start();
- }
- * 重点关注ResourceManager,会创建TaskManager
- -> resourceManager = resourceManagerFactory.createResourceManager()
- -> YarnResourceManager.initialize()
- * 创建 resourceManagerClient 和 nodeManagerClient
- * YarnResourceManager 继承自 yarn 的 AMRMClientAsync.CallbackHandler接口,在Container分配完之后,回调如下接口:
- -> void onContainersAllocated(List<Container> containers)
- -> createTaskExecutorLaunchContext()
- -> Utils.createTaskExecutorContext() -- 参数 YarnTaskExecutorRunner.class, 指明TaskManager的Main入口
- -> nodeManagerClient.startContainer(container, taskExecutorLaunchContext);
dispatcherResourceManagerComponentFactory.create
- public DispatcherResourceManagerComponent<T> create(
- Configuration configuration,
- RpcService rpcService,
- HighAvailabilityServices highAvailabilityServices,
- BlobServer blobServer,
- HeartbeatServices heartbeatServices,
- MetricRegistry metricRegistry,
- ArchivedExecutionGraphStore archivedExecutionGraphStore,
- MetricQueryServiceRetriever metricQueryServiceRetriever,
- FatalErrorHandler fatalErrorHandler) throws Exception {
-
- // 创建服务后会启动部分服务
- webMonitorEndpoint.start();
- resourceManager.start(); -- 里面指明TaskExecutor(即TaskManager)的Main入口
- dispatcher.start(); -- Dispatcher服务会处理client 的 submitjob,促使TaskExecutor上的任务执行
-
- // 返回所有服务的封装类
- return createDispatcherResourceManagerComponent(
- dispatcher,
- resourceManager,
- dispatcherLeaderRetrievalService,
- resourceManagerRetrievalService,
- webMonitorEndpoint,
- jobManagerMetricGroup);
-
- } catch (Exception exception) {
- ......
- }
- }
ClusterEntrypoint会启动Dispatcher服务:
- Dispatcher
- --> onStart()
- --> startDispatcherServices()
- -> submittedJobGraphStore.start(this)
- -> leaderElectionService.start(this)
LeaderRetrievalHandler会从netty处理从Client发来的submitjob消息:
- LeaderRetrievalHandler
- -> channelRead0() -- 一个netty对象
- -> AbstractHandler.respondAsLeader()
- -> AbstractRestHandler.respondToRequest()
- -> JobSubmitHandler.handleRequest
- -> Dispatcher.submitJob
- -> Dispatcher.internalSubmitJob
- -> Dispatcher.persistAndRunJob
- -> Dispatcher.runJob
- -> Dispatcher.createJobManagerRunner -- 创建JobManagerRunner
- -> jobManagerRunnerFactory.createJobManagerRunner
- * 创建DefaultJobMasterServiceFactory
- * new JobManagerRunner()
- -> dispatcher.startJobManagerRunner -- 启动JobManagerRunner
- -> jobManagerRunner.start();
- -> ZooKeeperLeaderElectionService.start
- -> ZooKeeperLeaderElectionService.isLeader
- -> leaderContender.grantLeadership(issuedLeaderSessionID)
- -> jobManagerRunner.verifyJobSchedulingStatusAndStartJobManager
- -> startJobMaster(leaderSessionId) -- 启动JobMaster
- -> jobMasterService.start
- -> startJobExecution(newJobMasterId)
- -> startJobMasterServices -- 包括slotPool和scheduler的启动,告知flinkresourceManager leader的地址,当FlinkRM和JM建立好连接后,slot就可以开始requesting slots
- -> resetAndScheduleExecutionGraph -- 执行job
- --> createAndRestoreExecutionGraph -- 生成ExecutionGraph
- --> scheduleExecutionGraph
- --> executionGraph.scheduleForExecution()
- --> scheduleEager {
- * 给Execution 分配 slots
- --> allocateResourcesForAll()
- * 遍历 execution,调用其 deploy 方法
- --> execution.deploy()
- --> taskManagerGateway.submitTask
- --> [TaskExecutor] new Task()
- --> [TaskExecutor] task.startTaskThread() -- 至此,任务真正执行
- }
总结
- 运行 flink 脚本,从CliFrontend类开始提交流程;
- 创建 yarnClusterDescriptor,准备集群创建所需的信息;
- 部署Session集群,启动ApplicationMaster/JobManager,通过ClusterEntrypoint[Main]启动Flink所需的服务,如Dispatcher,ResourceManager和WebMonitorEndpoint等;
- ResourceManager会创建resourceManagerClient 和 nodeManagerClient,在Container分配完成,启动TaskExecutor的Container(同步指定TaskExecutor的Main入口);
- 3、4集群部署完毕,Client会进行任务提交,DIspatcher服务会接收到命令;
- Dispatcher通过JobManagerRunner启动JobMaster服务,构建ExecutionGraph,分配slot,通知TaskExecutor执行Task;
- 至此,任务真正执行。
后续安排.....
后续会继续分析
声明:本文内容由网友自发贡献,不代表【wpsshop博客】立场,版权归原作者所有,本站不承担相应法律责任。如您发现有侵权的内容,请联系我们。转载请注明出处:https://www.wpsshop.cn/w/羊村懒王/article/detail/265985
推荐阅读
相关标签

