
- 12024年最全Vue高频面试问题(含答案),面试官直呼好家伙~,零基础如何成为高级前端开发_vue大厂面试题
- 2IDEA的Maven工程构建Junit4的单元测试用例jar包并在Linux环境运行单元测试用例_如何运行jar包中的测试用例
- 3拉索回归(Lasso Regression)的原理是什么?
- 4一个普通的计算机专业专科生,毕业后想拿高薪,大学三年具体应该怎么做?_计算机专业毕业三年
- 5selenium爬虫|破解滑动验证码以极验为例_selenium滑块验证码
- 6【Web】WebHook详解
- 7nodejs利用JSTS提取Geometry中心点坐标_js获取geojson的区块中心点
- 8ODS层的数据清洗_拉取ods层数据的时候涉及到的清洗方式
- 9STM32F407使用内置DAC+DMA+TIM制作DDS信号源_stm32 dds
- 10UE5-AI_ue ai 设置 黑板 值
YoloV8部署:使用opencv的dnn模块部署在Linux平台上_cv2.dnn yolov8
赞
踩
前段时间做了Yolov5的部署,就想训练yolov8并且部署在Linux平台上,中间也踩了很多坑,花了两天时间终于部署完成了,在这里浅浅记录一下。
一、yolov8训练
yolov8是yolov5的作者写的,源码:https://github.com/ultralytics/ultralytics,但是新版的改动较yolov5较大,因为集成化程度较高,所以无法通过yolov5那样直接修改参数实现,一般都通过终端执行yolo命令来部署训练。至于环境配置,如果你之前搭建过yolov5的环境,那么yolov8环境搭建起来就很简单啦,只需要卸载torch,然后更新到支持GPU推理的版本即可,如果你的cuda版本太低的话,需要卸载原有的cuda版本,对于环境安装,这里不做过多讲述。
这里着重需要讲的是,对于opencv的dnn模块来说,目前还不支持动态的batch_size,所以在训练好了自己的网络模型后,在转onnx的时候需要注意以下几点:
1)关闭参数dynamic
这个参数代表了需不需要或者输出图像的batch可变,模型的输入输出有时是可变,因此可通过该参数设置。但是opencv目前是不支持动态推理的,所以dynamic需要设置为false。如果不设置为false,在读取模型的时候会报错。
2)关闭参数do_constant folding
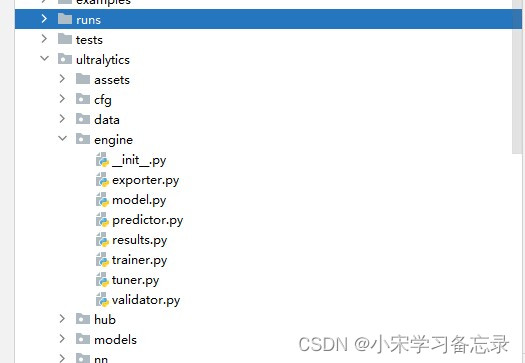
因为你要训练yolov8,那么就需要高版本的torch,如果torch版本高于2.0以上的话,不关闭此参数,也存在opencv读取不通过的情况,具体设置为:在yolov8的ultralytics文件夹下,找到engine文件夹,点击exporter.py,然后Ctrl+F搜索变量do_constant folding,然后将其值改为False。如下:

3)设置opset =12
将onnx的算子集版本设置为12,默认支持11,最好设置为12
讲完这几点之后,那么只需要在pytorch环境下的终端中输入如下代码:
yolo export model=path/to/model.pt format=onnx dynamic=False opset=12其中model就是你训练好的pth文件的路径,然后在终端执行即可,至此onnx的转换就完成啦。转换完成就可以在netron中查看一下自己的输出对不对,如下所示:
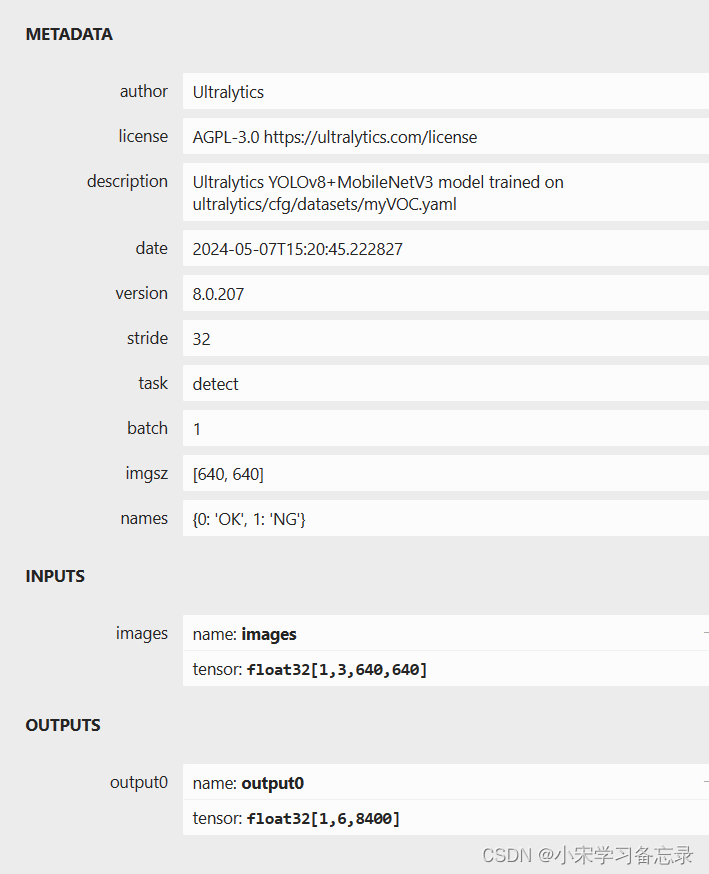
如果输入是1x3x640x640,输出是[1,84,8400](针对coco数据集)那就是对的, 因为yolov8的输出变了,将yolov5之前的置信度参数整合到了其他地方,因此这里无类别概率一项。至此转换为onnx就完成了,下一步就是基于opencv的推理了。
二、推理ONNX模型
(1)部署opencv
又到了老生常谈的问题,是的,opencv4.7.0以下版本不支持yolov8推理,重要的事情说三遍:
opencv4.7.0以下版本不支持yolov8推理
opencv4.7.0以下版本不支持yolov8推理
opencv4.7.0以下版本不支持yolov8推理
但是,我的ubuntu上4.7.0版本也读取模型失败,因此我换了4.8.1之后,问题解决,为了大家省事,直接上4.8.1版本:安装和之前是一样的,如果还未安装,请移至本人博客: yolov5的推理部署中有详细介绍opencv的安装,也可以在网盘里自行下载提取码:wert。
(2)yolov8.h文件
- #ifndef YOLOV8_H
- #define YOLOV8_H
- #pragma once
- #include<iostream>
- #include<opencv2/opencv.hpp>
- #include "yolov8_utils.h"
- using namespace cv;
- using namespace cv::dnn;
-
- class Yolov8 {
- public:
- Yolov8() {
- }
- ~Yolov8() {}
-
- bool ReadModel(cv::dnn::Net& net, std::string& netPath, bool isCuda);
- bool Detect(cv::Mat& srcImg, cv::dnn::Net& net, std::vector<OutputParams>& output);
- void DrawPred(cv::Mat& img,
- std::vector<OutputParams> result,
- std::vector<std::string> classNames,
- std::vector<cv::Scalar> color,
- bool isVideo = false
- );
-
- void LetterBox(const cv::Mat& image, cv::Mat& outImage,
- cv::Vec4d& params, //[ratio_x,ratio_y,dw,dh]
- const cv::Size& newShape = cv::Size(640, 640),
- bool autoShape = false,
- bool scaleFill = false,
- bool scaleUp = true,
- int stride = 32,
- const cv::Scalar& color = cv::Scalar(114, 114, 114));
- int _netWidth = 640; //ONNX图片输入宽度
- int _netHeight = 640; //ONNX图片输入高度
-
-
- //类别名,自己的模型需要修改此项
- std::vector<std::string> _className = { "OK","NG"};
- private:
- float _classThreshold = 0.25;
- float _nmsThreshold = 0.45;
- };
-
-
-
-
-
- #endif // YOLOV8_H

代码中的类别名根据自己的网络来修改,其他均不变,类似于yolov5
(3)yolov8.cpp
- #include"yolov8.h"
-
- //using namespace std;
- //using namespace cv;
- //using namespace cv::dnn;
-
- bool Yolov8::ReadModel(cv::dnn::Net& net, std::string& netPath, bool isCuda = false) {
- try {
-
- net = cv::dnn::readNetFromONNX(netPath);
- #if CV_VERSION_MAJOR==4 &&CV_VERSION_MINOR==7&&CV_VERSION_REVISION==0
- net.enableWinograd(false); //bug of opencv4.7.x in AVX only platform ,https://github.com/opencv/opencv/pull/23112 and https://github.com/opencv/opencv/issues/23080
- //net.enableWinograd(true); //If your CPU supports AVX2, you can set it true to speed up
- #endif
- }
- catch (const std::exception&) {
- return false;
- }
-
- if (isCuda) {
- //cuda
- net.setPreferableBackend(cv::dnn::DNN_BACKEND_CUDA);
- net.setPreferableTarget(cv::dnn::DNN_TARGET_CUDA); //or DNN_TARGET_CUDA_FP16
- }
- else {
- //cpu
- std::cout << "Inference device: CPU" << std::endl;
- net.setPreferableBackend(cv::dnn::DNN_BACKEND_DEFAULT);
- net.setPreferableTarget(cv::dnn::DNN_TARGET_CPU);
- }
- return true;
- }
-
- void Yolov8::LetterBox(const cv::Mat& image, cv::Mat& outImage, cv::Vec4d& params, const cv::Size& newShape,
- bool autoShape, bool scaleFill, bool scaleUp, int stride, const cv::Scalar& color)
- {
- if (false) {
- int maxLen = MAX(image.rows, image.cols);
- outImage = cv::Mat::zeros(cv::Size(maxLen, maxLen), CV_8UC3);
- image.copyTo(outImage(cv::Rect(0, 0, image.cols, image.rows)));
- params[0] = 1;
- params[1] = 1;
- params[3] = 0;
- params[2] = 0;
- }
-
- cv::Size shape = image.size();
- float r = std::min((float)newShape.height / (float)shape.height,
- (float)newShape.width / (float)shape.width);
- if (!scaleUp)
- r = std::min(r, 1.0f);
-
- float ratio[2]{ r, r };
- int new_un_pad[2] = { (int)std::round((float)shape.width * r),(int)std::round((float)shape.height * r) };
-
- auto dw = (float)(newShape.width - new_un_pad[0]);
- auto dh = (float)(newShape.height - new_un_pad[1]);
-
- if (autoShape)
- {
- dw = (float)((int)dw % stride);
- dh = (float)((int)dh % stride);
- }
- else if (scaleFill)
- {
- dw = 0.0f;
- dh = 0.0f;
- new_un_pad[0] = newShape.width;
- new_un_pad[1] = newShape.height;
- ratio[0] = (float)newShape.width / (float)shape.width;
- ratio[1] = (float)newShape.height / (float)shape.height;
- }
-
- dw /= 2.0f;
- dh /= 2.0f;
-
- if (shape.width != new_un_pad[0] && shape.height != new_un_pad[1])
- {
- cv::resize(image, outImage, cv::Size(new_un_pad[0], new_un_pad[1]));
- }
- else {
- outImage = image.clone();
- }
-
- int top = int(std::round(dh - 0.1f));
- int bottom = int(std::round(dh + 0.1f));
- int left = int(std::round(dw - 0.1f));
- int right = int(std::round(dw + 0.1f));
- params[0] = ratio[0];
- params[1] = ratio[1];
- params[2] = left;
- params[3] = top;
- cv::copyMakeBorder(outImage, outImage, top, bottom, left, right, cv::BORDER_CONSTANT, color);
- }
-
-
-
- bool Yolov8::Detect(cv::Mat& srcImg, cv::dnn::Net& net, std::vector<OutputParams>& output) {
- cv::Mat blob;
- output.clear();
- int col = srcImg.cols;
- int row = srcImg.rows;
- cv::Mat netInputImg;
- cv::Vec4d params;
- LetterBox(srcImg, netInputImg, params, cv::Size(_netWidth, _netHeight));
- cv::dnn::blobFromImage(netInputImg, blob, 1 / 255.0, cv::Size(_netWidth, _netHeight), cv::Scalar(0, 0, 0), true, false);
- //**************************************************************************************************************************************************/
- //如果在其他设置没有问题的情况下但是结果偏差很大,可以尝试下用下面两句语句
- // If there is no problem with other settings, but results are a lot different from Python-onnx , you can try to use the following two sentences
- //
- //$ cv::dnn::blobFromImage(netInputImg, blob, 1 / 255.0, cv::Size(_netWidth, _netHeight), cv::Scalar(104, 117, 123), true, false);
- //$ cv::dnn::blobFromImage(netInputImg, blob, 1 / 255.0, cv::Size(_netWidth, _netHeight), cv::Scalar(114, 114,114), true, false);
- //****************************************************************************************************************************************************/
- net.setInput(blob);
- std::vector<cv::Mat> net_output_img;
- net.enableWinograd(false);
- net.forward(net_output_img, net.getUnconnectedOutLayersNames()); //get outputs
-
- //net.forward(net_output_img, "output0"); //获取output的输出
- std::vector<int> class_ids;// res-class_id
- std::vector<float> confidences;// res-conf
- std::vector<cv::Rect> boxes;// res-box
- cv::Mat output0=cv::Mat( cv::Size(net_output_img[0].size[2], net_output_img[0].size[1]), CV_32F, (float*)net_output_img[0].data).t(); //[bs,116,8400]=>[bs,8400,116]
- int net_width = output0.cols;
- int rows = output0.rows;
- int socre_array_length = net_width - 4;
- float* pdata = (float*)output0.data;
- for (int r = 0; r < rows; ++r) {
- cv::Mat scores(1, socre_array_length, CV_32FC1, pdata + 4);
- cv::Point classIdPoint;
- double max_class_socre;
- minMaxLoc(scores, 0, &max_class_socre, 0, &classIdPoint);
- max_class_socre = (float)max_class_socre;
- if (max_class_socre >= _classThreshold) {
- //rect [x,y,w,h]
- float x = (pdata[0] - params[2]) / params[0];
- float y = (pdata[1] - params[3]) / params[1];
- float w = pdata[2] / params[0];
- float h = pdata[3] / params[1];
- int left = MAX(int(x - 0.5 * w + 0.5), 0);
- int top = MAX(int(y - 0.5 * h + 0.5), 0);
- class_ids.push_back(classIdPoint.x);
- confidences.push_back(max_class_socre);
- boxes.push_back(cv::Rect(left, top, int(w + 0.5), int(h + 0.5)));
- }
- pdata += net_width;//next line
- }
- //NMS
- std::vector<int> nms_result;
- cv::dnn::NMSBoxes(boxes, confidences, _classThreshold, _nmsThreshold, nms_result);
- std::vector<std::vector<float>> temp_mask_proposals;
- cv::Rect holeImgRect(0, 0, srcImg.cols, srcImg.rows);
- for (int i = 0; i < nms_result.size(); ++i) {
- int idx = nms_result[i];
- OutputParams result;
- result.id = class_ids[idx];
- result.confidence = confidences[idx];
- result.box = boxes[idx] & holeImgRect;
- output.push_back(result);
- }
- if (output.size())
- return true;
- else
- return false;
- }
-
-
- void Yolov8::DrawPred(cv::Mat& img, std::vector<OutputParams> result, std::vector<std::string> classNames, std::vector<cv::Scalar> color, bool isVideo) {
- cv::Mat mask = img.clone();
- for (int i = 0; i < result.size(); i++) {
- int left=0, top=0;
-
- int color_num = i;
- if (result[i].box.area() > 0) {
- rectangle(img, result[i].box, color[result[i].id], 2, 8);
- left = result[i].box.x;
- top = result[i].box.y;
- }
- if (result[i].rotatedBox.size.width * result[i].rotatedBox.size.height > 0) {
- DrawRotatedBox(img, result[i].rotatedBox, color[result[i].id], 2);
- left = result[i].rotatedBox.center.x;
- top = result[i].rotatedBox.center.y;
- }
- if (result[i].boxMask.rows && result[i].boxMask.cols > 0)
- mask(result[i].box).setTo(color[result[i].id], result[i].boxMask);
- std::string label = classNames[result[i].id] + ":" + std::to_string(result[i].confidence);
- int baseLine;
- cv::Size labelSize = cv::getTextSize(label, cv::FONT_HERSHEY_SIMPLEX, 0.5, 1, &baseLine);
- top = MAX(top, labelSize.height);
- //rectangle(frame, cv::Point(left, top - int(1.5 * labelSize.height)), cv::Point(left + int(1.5 * labelSize.width), top + baseLine), cv::Scalar(0, 255, 0), FILLED);
- putText(img, label, cv::Point(left, top), cv::FONT_HERSHEY_SIMPLEX, 1, color[result[i].id], 2);
- }
- cv::addWeighted(img, 0.5, mask, 0.5, 0, img); //add mask to src
- cv::imshow("1", img);
- if (!isVideo)
- cv::waitKey();
- //destroyAllWindows();
-
- }
如果模型加载成功的话,那么运行代码是完全没有问题的,如果报错,那就是你的模型问题,没有按照第一节的设置来弄。
(4)main函数
main函数中就很简单了,只需要先实例化一个yolov8的对象,然后先调用detect函数,在调用drawPred函数,最后就可以看到预测结果了,当然作者是基于qt开发的,不局限于平台,都可以的。
- int main()
- {
- Yolov8 yolov8;
- Net net;
- std::string model_path = "./models/yolov8n.onnx"; //onnx的路径,填绝对路径
- if (yolov8.ReadModel(net, model_path, false)) {
- std::cout << "read net ok!" << std::endl;
- }
- else {
- return -1;
- }
- //生成随机颜色
- std::vector<cv::Scalar> color;
- srand(time(0));
- for (int i = 0; i < 80; i++) {
- int b = rand() % 256;
- int g = rand() % 256;
- int r = rand() % 256;
- color.push_back(cv::Scalar(b, g, r));
- }
- std::vector<OutputParams> result;
-
- if (yolov8.Detect(img, net, result)) {
-
- DrawPred(img, result, yolov8._className, color);
-
- }
- else {
- std::cout << "Detect Failed!" << std::endl;
- }
- system("pause");
- return 0;
- }
部署到这里就完成啦,其实大家如果之前部署过yolov5的话,对于yolov8变化不大,部署起来也很简单,希望能帮到大家,写的比较仓促,错误之处希望大家及时批评指正!!!

