
人体姿态估计——Python+OpenCV+OpenPose_人体姿态估计及动作识别
赞
踩
前言
人体姿态估计(Human Pose estimation),几十年来备受计算机视觉界关注,其实在计算机视觉中是一个是很基础的问题,其实通俗化理解就是对“人体”的姿态(部分关键点:头,手,脚等具有象征性的关键部位)的位置估计。姿态估计可以应用在很多领域,比如说可以实现类似于格灵深瞳的各种游戏应用,当然,我们可以利用人体姿态估计,去完成某些生活需要!
技术难点
基于关键点的人体姿态识别可分为两个方面,即静态的人体姿态识别与动态的人体姿态识别,总的来说,人体关键点姿态识别技术主要面临的几方面技术难点如下:
(1) 姿态位移尺度变换
不同相机角度下捕获到的姿态关键点的空间位置、视角方向各不相同
(2) 姿态大小尺度变换
不同行为个体的差异造成相同人体姿态的尺寸大小、表观形状不完全相同。
(3) 关键点噪声与关键点缺失
人体姿态检测的造成的人体骨骼关键点丢失,或者关键点漂移等。
(4) 人体姿态表达的视频区域分割
对运动人体姿态语义视频的有效分割。比如,喝水动作,需要分割出人体从拿起水杯喝水,到喝完水放下水杯的过程。
人体姿态估计方法类别
虽然人体姿态估计是计算机视觉中一个很基础的问题,但是这个问题目前还是可以再具体化地分为4个不同的方面:单人姿态估计(Single-Person Skeleton Estimation)、多人姿态估计 (Multi-person Pose Estimation)、人体姿态跟踪(Video Pose Tracking)、3D人体姿态估计(3D Skeleton Estimation)。接下来就是对这四个方面的问题进行简略的说明。
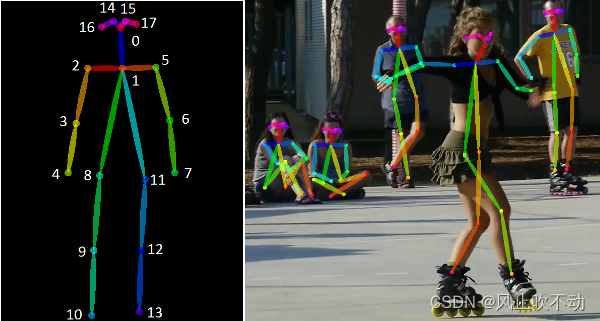 (人体姿态估计其实就是将各个关键点两两连接组成有效肢体)
单人姿态估计
单人姿态估计是最早的一种人体姿态估计方法,意思当然就是只是针对图像或场景中只有一个人的情景,只估计单个人的姿态,目前来说,单人姿态估计已经不适用了,因为在现实生活中,一个人的情景少之又少,往往一个图像中会存在很多个人,如果应用单人姿态估计的话,就会存在很多的误差。对于解决单人姿态估计和下面的多人姿态估计问题时,一般有两种做法,分别是top-down和bottom-up的方法:top-down的方法,就可以简单理解为“从大到小”,先找到图片中行人,然后对每个行人做姿态估计,寻找每个人的关键点。单人姿态估计一般是使用top-down的方法来进行估计;bottom-up的方法,运行思路恰恰与top-down相反,它先是找图片中所有关键点(parts),比如所有头部,手,脚,膝盖等。然后把这些关键点相连组装成一个个行人。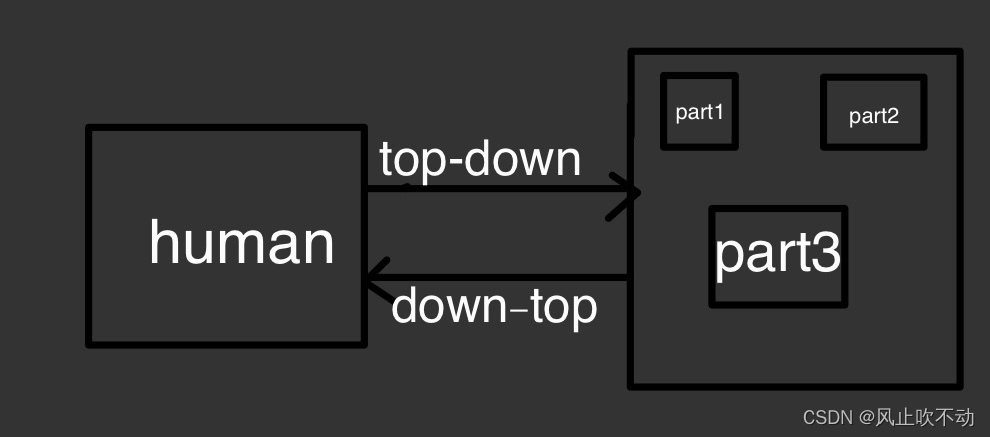
(top-down和down-top运行原理)
多人姿态估计
多人姿态估计其实就是在单人姿态估计算法的基础上,进一步优化,从而能够做到对一张图上的多个人体姿态进行估计,估计方法就不再多言了,在上面的单人姿态估计中已经简略地介绍了方法,主要就是运用down-top的方法来进行估计。
人体姿态跟踪
人体姿态跟踪主要是针对视频场景中的每一个行人(运动中的人物),进行人体以及每个关键点的跟踪。这个问题本身其实难度是很大的。相比行人跟踪来讲,人体关键点在视频中的temporal motion可能比较大,比如一个行走的行人,手跟脚会不停的摆动,所以跟踪难度会比跟踪人体框大。目前主要有的数据集是PoseTrack。
3D人体姿态估计
3D人体姿态估计,就是通过输入人体RGB图像,输出3D的人体关键点。从而使人体姿态估计更加完善,如下图: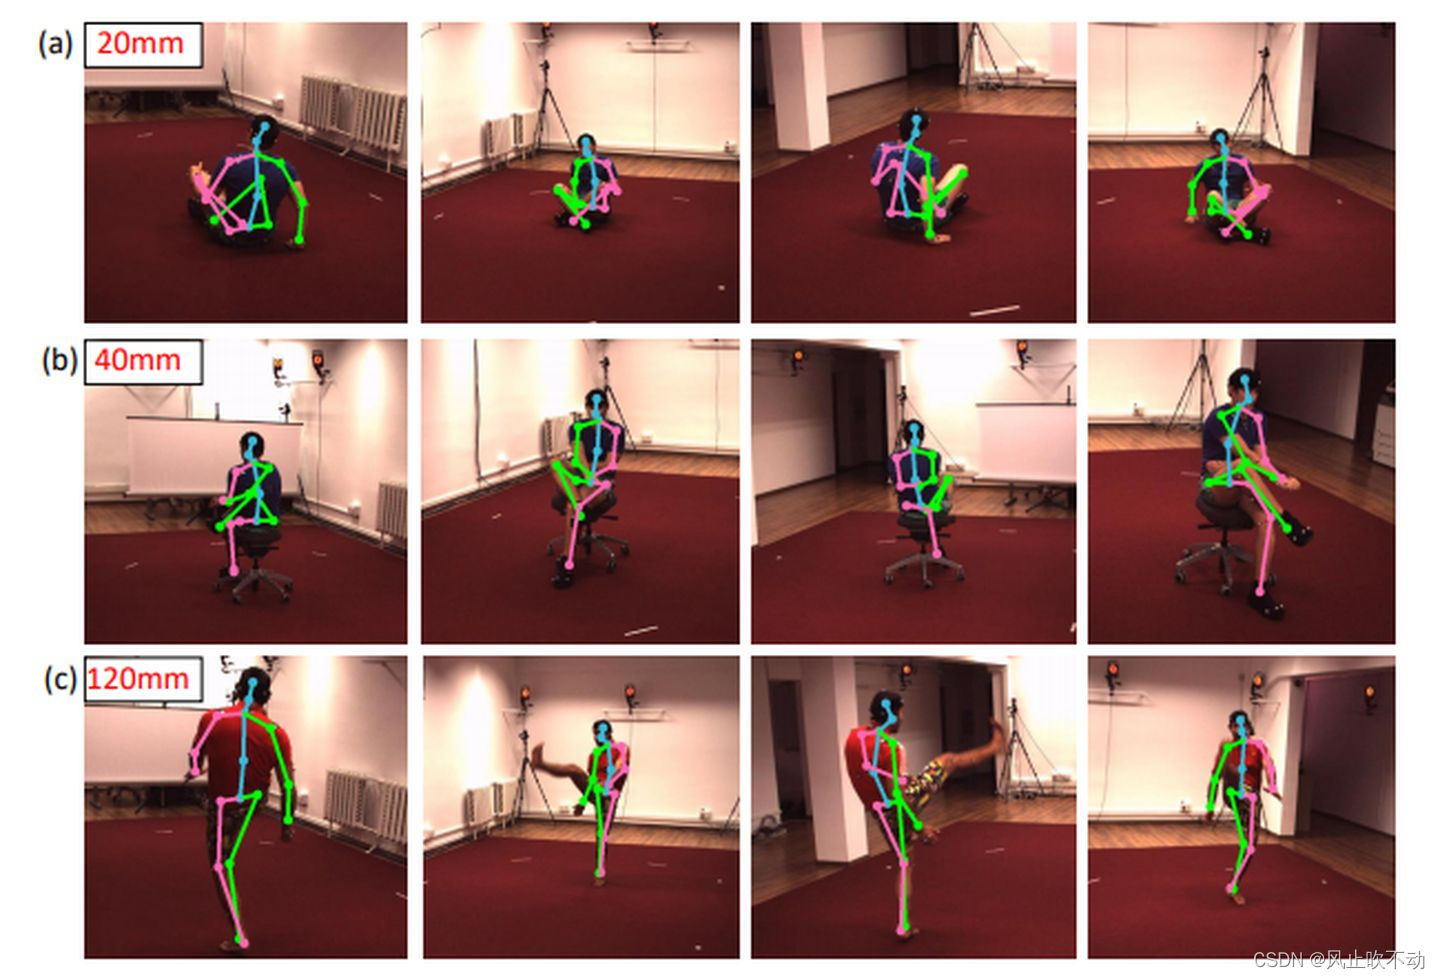
技术原理
需要运用到OpenPose,OpenPose人体姿态识别项目是美国卡耐基梅隆大学(CMU)基于卷积神经网络和监督学习并以Caffe为框架开发的开源库。可以实现人体动作、面部表情、手指运动等姿态估计。适用于单人和多人,具有极好的鲁棒性。是世界上首个基于深度学习的实时多人二维姿态估计应用,基于它的实例如雨后春笋般涌现。
输入一幅图像,经过卷积网络提取特征,得到一组特征图,然后分成两个岔路,分别使用 CNN网络提取Part Confidence Maps 和 Part Affinity Fields;

得到这两个信息后,我们使用图论中的 Bipartite Matching(偶匹配) 求出Part Association,将同一个人的关节点连接起来,由于PAF自身的矢量性,使得生成的偶匹配很正确,最终合并为一个人的整体骨架;
最后基于PAFs求Multi-Person Parsing—>把Multi-person parsing问题转换成graphs问题—>Hungarian Algorithm(匈牙利算法)
(匈牙利算法是部图匹配最常见的算法,该算法的核心就是寻找增广路径,它是一种用增广路径求二分图最大匹配的算法。)
神经网络的实现
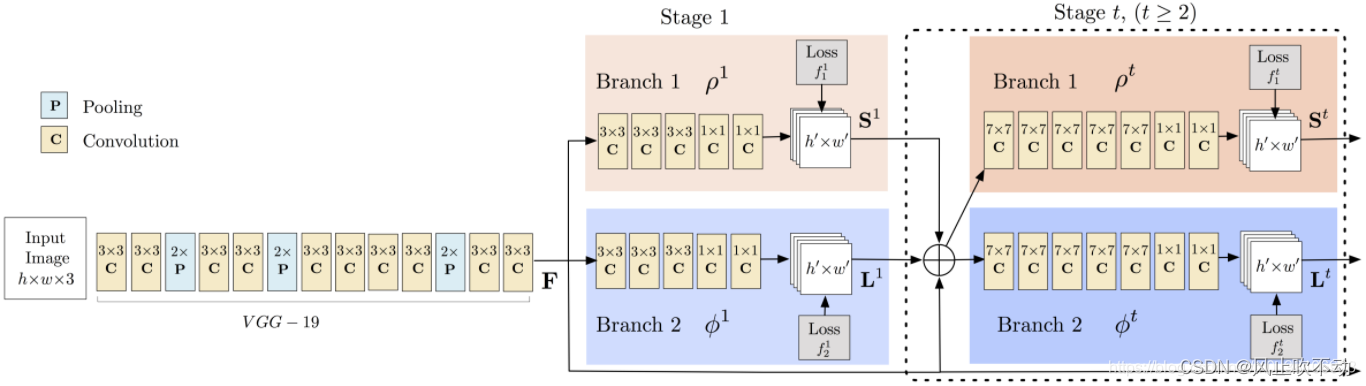
阶段一:VGGNet的前10层用于为输入图像创建特征映射。

阶段二:使用2分支多阶段CNN,其中第一分支预测身体部位位置(例如肘部,膝部等)的一组2D置信度图(S)。 如下图所示,给出关键点的置信度图和亲和力图 - 左肩。
第二分支预测一组部分亲和度的2D矢量场(L),其编码部分之间的关联度。 如下图所示,显示颈部和左肩之间的部分亲和力。
阶段三: 通过贪心推理解析置信度和亲和力图,对图像中的所有人生成2D关键点。
相关代码
import argparse

import cv2
import numpy as np
import torch

from models.with_mobilenet import PoseEstimationWithMobileNet
from modules.keypoints import extract_keypoints, group_keypoints
from modules.load_state import load_state
from modules.pose import Pose, track_poses
from val import normalize, pad_width


class ImageReader(object):
    def __init__(self, file_names):
        self.file_names = file_names
        self.max_idx = len(file_names)

    def __iter__(self):
        self.idx = 0
        return self

    def __next__(self):
        if self.idx == self.max_idx:
            raise StopIteration
        img = cv2.imread(self.file_names[self.idx], cv2.IMREAD_COLOR)
        if img.size == 0:
            raise IOError('Image {} cannot be read'.format(self.file_names[self.idx]))
        self.idx = self.idx + 1
        return img


class VideoReader(object):
    def __init__(self, file_name):
        self.file_name = file_name
        try:  # OpenCV needs int to read from webcam
            self.file_name = int(file_name)
        except ValueError:
            pass

    def __iter__(self):
        self.cap = cv2.VideoCapture(self.file_name)
        if not self.cap.isOpened():
            raise IOError('Video {} cannot be opened'.format(self.file_name))
        return self

    def __next__(self):
        was_read, img = self.cap.read()
        if not was_read:
            raise StopIteration
        return img


def infer_fast(net, img, net_input_height_size, stride, upsample_ratio, cpu,
               pad_value=(0, 0, 0), img_mean=np.array([128, 128, 128], np.float32), img_scale=np.float32(1/256)):
    height, width, _ = img.shape
    scale = net_input_height_size / height

    scaled_img = cv2.resize(img, (0, 0), fx=scale, fy=scale, interpolation=cv2.INTER_LINEAR)
    scaled_img = normalize(scaled_img, img_mean, img_scale)
    min_dims = [net_input_height_size, max(scaled_img.shape[1], net_input_height_size)]
    padded_img, pad = pad_width(scaled_img, stride, pad_value, min_dims)

    tensor_img = torch.from_numpy(padded_img).permute(2, 0, 1).unsqueeze(0).float()
    if not cpu:
        tensor_img = tensor_img.cuda()

    stages_output = net(tensor_img)

    stage2_heatmaps = stages_output[-2]
    heatmaps = np.transpose(stage2_heatmaps.squeeze().cpu().data.numpy(), (1, 2, 0))
    heatmaps = cv2.resize(heatmaps, (0, 0), fx=upsample_ratio, fy=upsample_ratio, interpolation=cv2.INTER_CUBIC)

    stage2_pafs = stages_output[-1]
    pafs = np.transpose(stage2_pafs.squeeze().cpu().data.numpy(), (1, 2, 0))
    pafs = cv2.resize(pafs, (0, 0), fx=upsample_ratio, fy=upsample_ratio, interpolation=cv2.INTER_CUBIC)

    return heatmaps, pafs, scale, pad


def run_demo(net, image_provider, height_size, cpu, track, smooth):
    net = net.eval()
    if not cpu:
        net = net.cuda()

    stride = 8
    upsample_ratio = 4
    num_keypoints = Pose.num_kpts
    previous_poses = []
    delay = 1
    for img in image_provider:
        orig_img = img.copy()
        heatmaps, pafs, scale, pad = infer_fast(net, img, height_size, stride, upsample_ratio, cpu)

        total_keypoints_num = 0
        all_keypoints_by_type = []
        for kpt_idx in range(num_keypoints):  # 19th for bg
            total_keypoints_num += extract_keypoints(heatmaps[:, :, kpt_idx], all_keypoints_by_type, total_keypoints_num)

        pose_entries, all_keypoints = group_keypoints(all_keypoints_by_type, pafs)
        for kpt_id in range(all_keypoints.shape[0]):
            all_keypoints[kpt_id, 0] = (all_keypoints[kpt_id, 0] * stride / upsample_ratio - pad[1]) / scale
            all_keypoints[kpt_id, 1] = (all_keypoints[kpt_id, 1] * stride / upsample_ratio - pad[0]) / scale
        current_poses = []
        for n in range(len(pose_entries)):
            if len(pose_entries[n]) == 0:
                continue
            pose_keypoints = np.ones((num_keypoints, 2), dtype=np.int32) * -1
            for kpt_id in range(num_keypoints):
                if pose_entries[n][kpt_id] != -1.0:  # keypoint was found
                    pose_keypoints[kpt_id, 0] = int(all_keypoints[int(pose_entries[n][kpt_id]), 0])
                    pose_keypoints[kpt_id, 1] = int(all_keypoints[int(pose_entries[n][kpt_id]), 1])
            pose = Pose(pose_keypoints, pose_entries[n][18])
            current_poses.append(pose)

        if track:
            track_poses(previous_poses, current_poses, smooth=smooth)
            previous_poses = current_poses
        for pose in current_poses:
            pose.draw(img)
        img = cv2.addWeighted(orig_img, 0.6, img, 0.4, 0)
        for pose in current_poses:
            cv2.rectangle(img, (pose.bbox[0], pose.bbox[1]),
                          (pose.bbox[0] + pose.bbox[2], pose.bbox[1] + pose.bbox[3]), (0, 255, 0))
            if track:
                cv2.putText(img, 'id: {}'.format(pose.id), (pose.bbox[0], pose.bbox[1] - 16),
                            cv2.FONT_HERSHEY_COMPLEX, 0.5, (0, 0, 255))
        cv2.imshow('Lightweight Human Pose Estimation Python Demo', img)
        key = cv2.waitKey(delay)
        if key == 27:  # esc
            return
        elif key == 112:  # 'p'
            if delay == 1:
                delay = 0
            else:
                delay = 1


if __name__ == '__main__':
    parser = argparse.ArgumentParser(
        description='''Lightweight human pose estimation python demo.
                       This is just for quick results preview.
                       Please, consider c++ demo for the best performance.''')
    parser.add_argument('--checkpoint-path', type=str, required=True, help='path to the checkpoint')
    parser.add_argument('--height-size', type=int, default=256, help='network input layer height size')
    parser.add_argument('--video', type=str, default='', help='path to video file or camera id')
    parser.add_argument('--images', nargs='+', default='', help='path to input image(s)')
    parser.add_argument('--cpu', action='store_true', help='run network inference on cpu')
    parser.add_argument('--track', type=int, default=1, help='track pose id in video')
    parser.add_argument('--smooth', type=int, default=1, help='smooth pose keypoints')
    args = parser.parse_args()

    if args.video == '' and args.images == '':
        raise ValueError('Either --video or --image has to be provided')

    net = PoseEstimationWithMobileNet()
    checkpoint = torch.load(args.checkpoint_path, map_location='cpu')
    load_state(net, checkpoint)

    frame_provider = ImageReader(args.images)
    if args.video != '':
        frame_provider = VideoReader(args.video)
    else:
        args.track = 0

    run_demo(net, frame_provider, args.height_size, args.cpu, args.track, args.smooth)

- 1
- 2
- 3
- 4
- 5
- 6
- 7
- 8
- 9
- 10
- 11
- 12
- 13
- 14
- 15
- 16
- 17
- 18
- 19
- 20
- 21
- 22
- 23
- 24
- 25
- 26
- 27
- 28
- 29
- 30
- 31
- 32
- 33
- 34
- 35
- 36
- 37
- 38
- 39
- 40
- 41
- 42
- 43
- 44
- 45
- 46
- 47
- 48
- 49
- 50
- 51
- 52
- 53
- 54
- 55
- 56
- 57
- 58
- 59
- 60
- 61
- 62
- 63
- 64
- 65
- 66
- 67
- 68
- 69
- 70
- 71
- 72
- 73
- 74
- 75
- 76
- 77
- 78
- 79
- 80
- 81
- 82
- 83
- 84
- 85
- 86
- 87
- 88
- 89
- 90
- 91
- 92
- 93
- 94
- 95
- 96
- 97
- 98
- 99
- 100
- 101
- 102
- 103
- 104
- 105
- 106
- 107
- 108
- 109
- 110
- 111
- 112
- 113
- 114
- 115
- 116
- 117
- 118
- 119
- 120
- 121
- 122
- 123
- 124
- 125
- 126
- 127
- 128
- 129
- 130
- 131
- 132
- 133
- 134
- 135
- 136
- 137
- 138
- 139
- 140
- 141
- 142
- 143
- 144
- 145
- 146
- 147
- 148
- 149
- 150
- 151
- 152
- 153
- 154
- 155
- 156
- 157
- 158
- 159
- 160
- 161
- 162
- 163
- 164
- 165
- 166
- 167
参考文献
[1].Python+OpenCV+OpenPose实现人体姿态估计(人体关键点检测)_不脱发的程序猿-CSDN博客
运行过程
(gif较卡只能用jpg)
本项目实现代码及模型参见网址:https://github.com/Daniil-Osokin/lightweight-human-pose-estimation.pytorch
人体姿态估计代码运行
注意
首先需要阅读README.MD文件。里面有一个文件checkpoint_iter_370000.pth 要下载下来。这是训练好的模型文件。
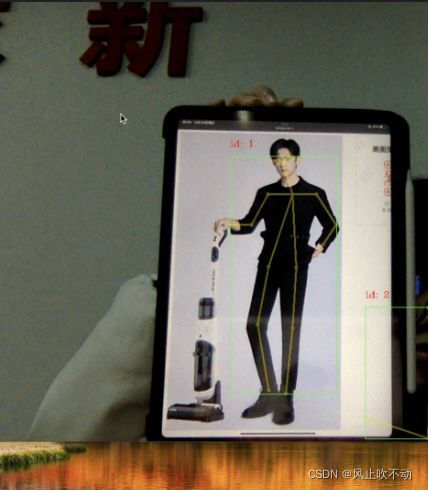
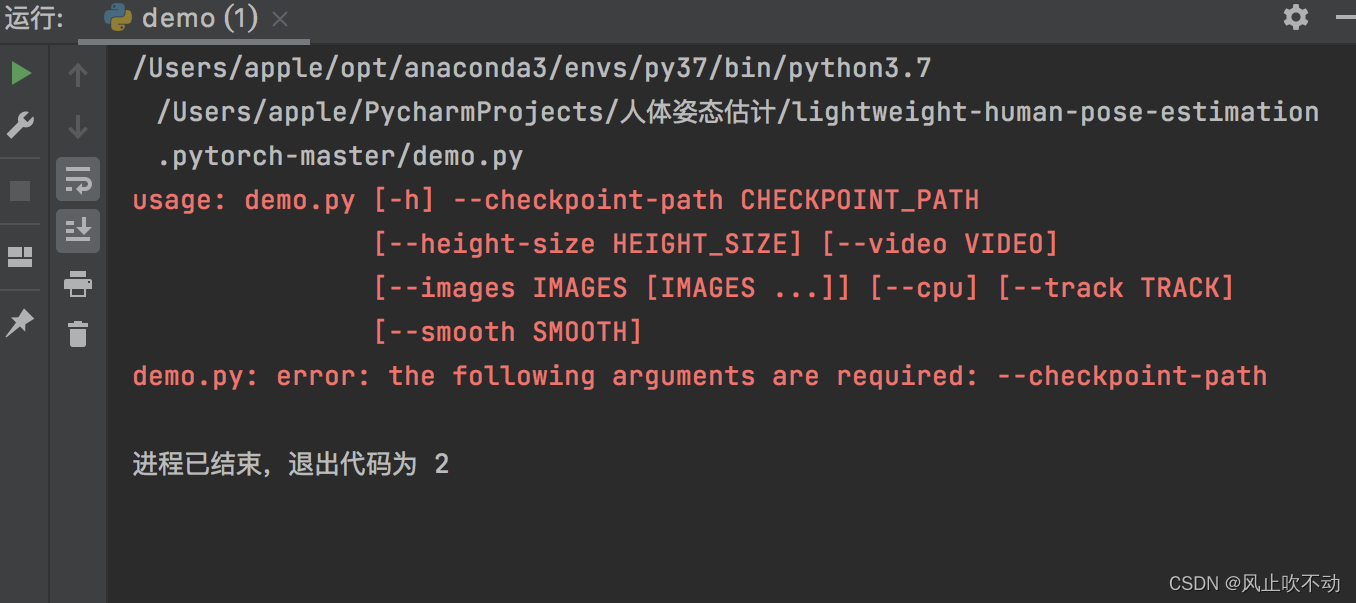
运行demo.py时
例如,可能会提示No module named pycocotools,
在环境中pip install pycocotools 即可解决
依赖库安装成功后,会提示
The following arguments are required: --checkpoint-path
然后在菜单Run,edit configurations在parameters 一栏填–checkpoint-path=checkpoint_iter_370000.pth
如果提示要缺少 –video 或 –image
则在命令行参数里添加 --video=0,表示使用你的0号摄像头。
可能还会提示关于cuda的错误,增加一个命令行参数:–cpu,即可。(每个命令行参数都需要一个空格隔开)
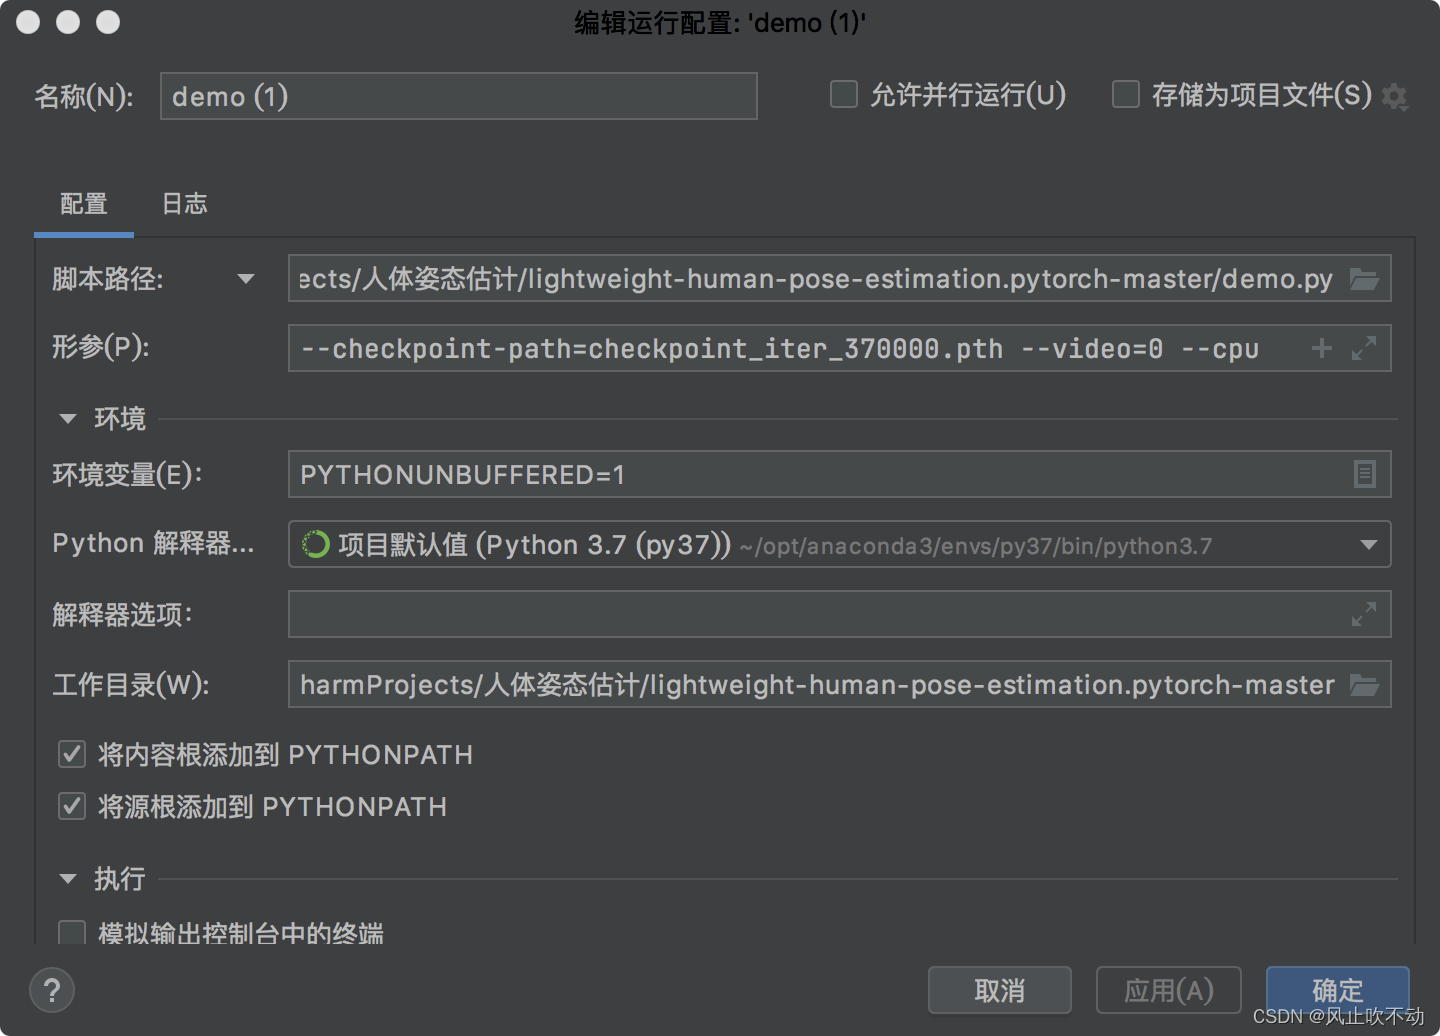
(即形参)
类似代码:
https://github.com/edvardHua/PoseEstimationForMobile
https://github.com/tensorlayer/hyperpose
https://github.com/facebookresearch/VideoPose3D

