
- 1husky+ prettier + commitlint 提交前代码检查和提交信息规范
- 2外贸专线费用解析与选择要点_国际专线网络费用
- 3魔法打败魔法?OpenAI用GPT-4 来解释 GPT-2 的行为
- 42021-09-29_listnode dummy = new listnode(0, head);
- 5SpringBoot知识概括_springboot,读取不到application-dev配置
- 6强化学习(PPO、DQN、A3C)简述_ppo和dqn
- 72023五一赛ABC题赛题发布_喷气式无人机定点投放问题数据
- 8关于junit单元测试时用户线程自动终止问题_springboot单元测试多线程会自动结束
- 9听GPT 讲Rust源代码--library/std(16)_temporary value created here result
- 10Java源码分析-LinkedList双向链表_linkedlist为什么用双向链表
FastAPI Web框架教程 第8章 集成关系型数据库_fastapi 对接数据库例子
赞
踩
8-1 关系型数据库介绍
提前说明
- 数据库操作是WEB开发的一个非常重要的环节,所以想要学WEB开发的同学,比如最流行的MySQL数据库。
- 但MySQL的教学不在本教程内,因此推荐大家自行学习
什么是数据库
-
开发中,我们离不开数据存储,简单的可以把数据存在文件中,比如 a.txt等。
-
但是问题也随之而来,简单的增加数据还好,但对于想要找到特定位置的数据并修改更新之,就变得比较复杂;然后再加上多线程,并发等问题,我们直接使用文件存数据的方式操作上就变得异常困难。
-
后来,出现了数据库管理系统(DBMS, DataBase Management System),它可以帮助我们快捷的操作文件夹/文件中的数据。
-
想要使用数据库管理系统,我们只需要学习它的使用语句即可,再也不用关心底层数据的增删查改。
常见的数据库管理系统
场景的数据库一般表现为软件,比如
- MySQL、Oracle、SQL Server、PostgreSQL、DB2、SQLite等等(关系型数据库)。
- Redis、Memcached、MangoDb等等(键值型数据库)。
关系型数据库
- 关系型数据库,是指采用了关系模型来组织数据的数据库,其以行和列的形式存储数据,可以类比EXCEL表格。
- 一张表可以包含多列,每一列都有一个标题字段。然后可以有N行,一行数据有多个字段。
- 一个数据库中可以包含多张表。
键值型数据库
- 按照键-值的形式存在数据库中。
8-2 使用pymysql之查询基础
需求场景
在命令行中通过SQL语句,我可以实现数据的增删查改,但是如何通过Python代码来操作数据库呢?
解决方式
- 本质上,MySQL是一个客户端-服务端架构的软件,我们就可以使用不同的客户端去连接服务端。
- 在命令中使用自带的客户端连接:
mysql -uroot -p12345 - 使用专门数据库可视化软件连接:比如 navicate、workbench等软件
- 只要遵循MySQL的客户端-服务端之间通信的协议,任何编程语言都可以充当MySQL的客户端。
- Python语言中,有一个第三方包,它就实现了MySQL的通信协议,我们可以使用它来操作数据库。
pip3 install PyMySQL
- 1
示例1:pymysql的基本使用
- 在数据库
db中新建下面这张users表
-- 新建一个数据库,名字是 db
create database db charset utf8;

-- 使用 db
use db;

-- 在db中新建一张 users表
CREATE TABLE `users` (
    `id` int(11) NOT NULL AUTO_INCREMENT,
    `name` varchar(255) COLLATE utf8_bin NOT NULL,
    `password` varchar(255) COLLATE utf8_bin NOT NULL,
    PRIMARY KEY (`id`)
) ENGINE=InnoDB DEFAULT CHARSET=utf8mb4 COLLATE=utf8mb4_bin AUTO_INCREMENT=1 ;


-- 插入两条数据
insert into users(name, password) values("liuxu","12345");
insert into users(name, password) values("liuxu2","12345");

- 1
- 2
- 3
- 4
- 5
- 6
- 7
- 8
- 9
- 10
- 11
- 12
- 13
- 14
- 15
- 16
- 17
- 18
- 通过Python代码连接数据库并查询数据
import pymysql

# 获取连接
conn = pymysql.connect(
    host='127.0.0.1',
    port=3306,
    user='root',
    password='12345',
    database='db',
    charset='utf8'
)

# 获取游标
cursor = conn.cursor()


# 准备SQL语句
sql = 'select * from users;'


print(cursor.execute(sql))		# 返回受影响的函数

print(cursor.fetchone())        # 取出一行数据,	(1, 'liuxu', '12345')
print(cursor.fetchmany(2))      # 取出N行数据
print(cursor.fetchall())        # 取出剩下所有数据
- 1
- 2
- 3
- 4
- 5
- 6
- 7
- 8
- 9
- 10
- 11
- 12
- 13
- 14
- 15
- 16
- 17
- 18
- 19
- 20
- 21
- 22
- 23
- 24
- 25
- 补充1:直接使用
cursor = conn.cursor()得到的游标获取的数据按照元组的形式组织数据,仅有数据值没有字段名
# 此时指定为字典的形式,即可以看得见字段名和数据
...
cursor = conn.cursor(pymysql.cursors.DictCursor)

sql = 'select * from users;'
cursor.execute(sql)
print(cursor.fetchone())        # {'id': 1, 'name': 'liuxu', 'password': '12345'}
- 1
- 2
- 3
- 4
- 5
- 6
- 7
8-3 使用pymysql之按条件查询
需求场景
很多时候,需要按照一定的要求查询数据,比如按照姓名查找特定用户的数据,或者查找id=2的用户数据,此时该怎么办?
解决方式
按照条件需求查找数据,这是MySQL基本的功能。使用pymysql时,我们使用特定的语法就可以实现。
示例1:找到id=2的用户数据
...


sql = 'select * from users where id = %s;'		# 使用 %s占位

cursor.execute(sql, 2)						  # execute()中第一个是sql语句,第二个是替换占位的条件

for d in cursor.fetchall():
    print(d)
- 1
- 2
- 3
- 4
- 5
- 6
- 7
- 8
- 9
示例2:查询有多个条件
...


sql = 'select * from users where id >= %s and id <= %s;'		# 使用 %s占位

cursor.execute(sql, [1, 2])			# 以为有两个参数,使用列表会元组的形式存放替换占位的条件

for d in cursor.fetchall():
    print(d)
- 1
- 2
- 3
- 4
- 5
- 6
- 7
- 8
- 9
示例3:按照字典的形式传参
...
cursor = conn.cursor(pymysql.cursors.DictCursor)

sql = 'select * from users where id >= %(start)s and id <= %(end)s;'

cursor.execute(sql, {
   "start": 1, "end": 2})
for d in cursor.fetchall():
    print(d)
- 1
- 2
- 3
- 4
- 5
- 6
- 7
- 8
- 9
8-4 使用pymysql之新增数据
示例1:增加数据,手动提交
...
cursor = conn.cursor(pymysql.cursors.DictCursor)


sql = 'insert into users(name, password) values("liuxu3", "123456");'
cursor.execute(sql)
conn.commit()			# 需要确认一次, 否则数据库中不会保存记录
- 1
- 2
- 3
- 4
- 5
- 6
- 7
示例2:自动提交保存
import pymysql

# 获取连接
conn = pymysql.connect(
    host='127.0.0.1',
    port=3306,
    user='root',
    password='12345',
    database='db',
    charset='utf8',
    autocommit=True			# autocommit=True,表示execute后自动提交保存,无需再手动commit()
)

cursor = conn.cursor(pymysql.cursors.DictCursor)


sql = 'insert into users(name, password) values("liuxu4", "123456")'
cursor.execute(sql)
- 1
- 2
- 3
- 4
- 5
- 6
- 7
- 8
- 9
- 10
- 11
- 12
- 13
- 14
- 15
- 16
- 17
- 18
示例3:批量执行 executemany
import pymysql

# 获取连接
conn = pymysql.connect(
    host='127.0.0.1',
    port=3306,
    user='root',
    password='12345',
    database='db',
    charset='utf8',
    autocommit=True
)

cursor = conn.cursor(pymysql.cursors.DictCursor)


sql = 'insert into users(name, password) values(%s, %s)'	# 占位, 注意和 "%s"的区别!!!
item_list = [("liuxu10", "12345"), ("liuixu11", "12345"), ("liuxu12", "12345")]		# 多个替换数据
cursor.executemany(sql, args=item_list)		# 返回受影响的函数
- 1
- 2
- 3
- 4
- 5
- 6
- 7
- 8
- 9
- 10
- 11
- 12
- 13
- 14
- 15
- 16
- 17
- 18
- 19
8-5 使用pymysql之修改和删除数据
修改和删除比较简单,分两步:
- 第一步:编写SQL语句 sql
- 第二步:使用 cursor.execute(sql)
示例
import pymysql

# 获取连接
conn = pymysql.connect(
    ...
    autocommit=True
)

cursor = conn.cursor(pymysql.cursors.DictCursor)

# 更新id=1的用户 name="LIUXU"
update_sql = 'update users set name="LIUXU" where id=1;'
cursor.execute(sql)

# 删除id>5的用户数据
delete_sql = 'delete from users where id>5;'
cursor.execute(sql)
- 1
- 2
- 3
- 4
- 5
- 6
- 7
- 8
- 9
- 10
- 11
- 12
- 13
- 14
- 15
- 16
- 17
8-6 ORM介绍
需求场景
上面我们使用pymysql可以直接操作MySQL,但是你会发现对数据的增删改查,都需要我们自己手写SQL语句。并且,存在大量重复的代码,不能使用面向对象。那是否是否一种更优雅的方式来操作数据库呢?
解决方式
-
使用ORM来完成对数据的操作
-
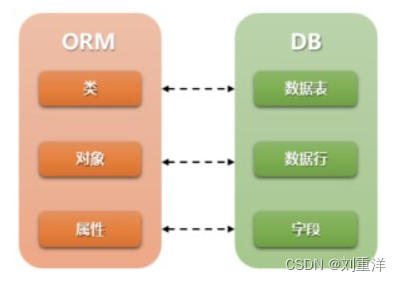
ORM:对象关系映射(Object-Relational Mapping),它可以将Python中的类-对象-属性 和 数据库中的表-行数据-字段做映射。利用它,我们就不需要在直接操作数据库中的表、行和字段了,直接操作Python中面向对象的类、对象和属性即可实现数据的CRUD
-
优点:能够让一个不用sql语句的小白也能够通过python 面向对象的代码简单快捷的操作数据库
-
缺点:封装程度太高,有时候sql语句的效率相对较低,可能需要你自己写SQL语句
Python中的ORM典型代表
- Django-ORM,是Django框架自带的ORM,只能在django中使用
- SQLAlchemy ORM,是一个开源的ORM,不依赖web框架
- Peewee ,不依赖web框架的ORM
- 等等。
8-7 使用SQLAlchemy查询数据
安装:
pip3 install SQLAlchemy
使用SQLAlchemy的基本流程分为三步:
- 创建session对象
- 创建类模型
- 使用session对象和模型类实现数据的CRUD
第一步:创建session对象
import pymysql
from sqlalchemy import create_engine
from sqlalchemy.orm import sessionmaker


# 使用pymysql作为MySQLdb
pymysql.install_as_MySQLdb()

# 指定连接的MySQL数据库
DATABASE_URL = "mysql://root:12345@localhost:3306/db"

# 创建引擎
engine = create_engine(DATABASE_URL)

# 基于引擎创建session
SessionLocal = sessionmaker(bind=engine)

# 实例化session对象,得到db对象
db = SessionLocal()

#  db使用只有需要关闭,避免占用资源
db.close()
- 1
- 2
- 3
- 4
- 5
- 6
- 7
- 8
- 9
- 10
- 11
- 12
- 13
- 14
- 15
- 16
- 17
- 18
- 19
- 20
- 21
- 22
第二步:创建模型类
from sqlalchemy import Column, String, Integer
from sqlalchemy.ext.declarative import declarative_base

# 创建对象的基类:
BaseModel = declarative_base()

# 定义User对象:
class - 1
- 2
- 3
- 4
- 5
- 6
- 7

