
- 1[RAM] DRAM 导论:DDR4 | DDR5 | LPDDR5 | GDRR6 | HBM 应运而生_ddr gddr lpgddr hbm
- 2Pandas数据入Doris库----Doris超级低配版_doris pandas
- 3[问题已处理]-harbor开启https解决nginx转发后无法push的问题
- 4代码随想录算法训练营第二十九天| 62.不同路径, 63. 不同路径 II, 96.不同的二叉搜索树
- 5kafka 开启用户认证_kafka assistant会员_kafka用户密码认证
- 6opencv+zbar在arm下二维码识别检测_libzbar.so
- 7Android Audio知识梳理 看完这一篇就够了!
- 8开源与闭源 AI 模型:发展路径的比较与前瞻_ai开源的跟没开源的区别
- 9张俊林:LLama3 405B 技术解读
- 10使用JsonPath字符串获取json内容_jsonpath提取json数据
MoonDream2 微调简明教程
赞
踩
在本指南中,我们将探讨如何使用计算机视觉数据集对完全开源的小型视觉语言模型 Moondream2 进行微调,以计数项目(这是 GPT-4V 一直表现不一致的任务),并以一种可以依赖输出用于生产应用程序的方式进行微调。
视觉语言模型 (VLM),有时也称为多模态模型,越来越受欢迎。随着 CLIP、GPT-4 with Vision 等技术的出现以及其他进步,从视觉输入中查询问题的能力变得比以往任何时候都更容易获得。
VLM 是机器学习的新前沿,随着新突破的出现,其性能也在不断提高。正如我们在 GPT-4 with Vision 和最近的 GPT-4o 中发现的那样,有些任务(例如计数)是 VLM 难以完成的。虽然可以理解,但由于训练成本和推理速度的限制,在每一项任务上都表现出色很困难,缺乏专家能力使得很难在生产用例中使用和依赖 VLM。
虽然有些多模态模型比其他模型更好,但许多模型在输出一致、可解析的格式方面存在问题。这给将 VLM 整合到应用程序和系统中带来了挑战。

NSDT工具推荐: Three.js AI纹理开发包 - YOLO合成数据生成器 - GLTF/GLB在线编辑 - 3D模型格式在线转换 - 可编程3D场景编辑器 - REVIT导出3D模型插件 - 3D模型语义搜索引擎 - Three.js虚拟轴心开发包 - 3D模型在线减面 - STL模型在线切割
1、什么是 Moondream2
Moondream2 是一个开源小型视觉语言模型,源代码位于 GitHub 上,vikhyatk制作。虽然它不是最先进的模型,但它能够以合理的速度和准确性在设备上本地运行,这使它成为 VLM 的一个引人注目的选择,值得尝试进行微调,看看它是否适合您的用例。与其他 VLM 相比,它的得分相对较高。它甚至在 VQAv2 上击败了最近发布的 GPT-4o,考虑到 Moondream2 的本地、开源和小得多的模型,这令人印象深刻。
| Benchmark | Moondream2 (5/8/2024) | GPT-4o | Gemini 1.5 Pro | PaliGemma |
| VQAv2 | 79.0% | 77.2% | 73.2% | 85.6%* |
| TextVQA | 53.1% | 78.0% | 73.5% | 73.15%* |
与谷歌最近发布的另一款多模态开放 VLM PaliGemma 相比,该模型的规模要小得多,只有 18.6 亿,而 PaliGemma 的规模则为 80 亿。GPT-4o 和 Gemini 1.5 Pro 被怀疑比这两个模型大得多,但它们的具体规模尚不清楚。
- Moondream2 开源许可
与一些因限制性条款而受到审查的“开放”模型(包括 PaliGemma)不同,Moondream2 是根据 Apache 2.0 许可开源的,也允许商业使用。
2、微调 Moondream2
对于本指南,我们将修改创建者提供的微调笔记本版本,并提高 Moondream2 在计数不同类型的美国货币时的性能。
首先,安装我们在整个过程中需要的软件包。
!pip install torch transformers timm einops datasets bitsandbytes accelerate roboflow supervision -q
3、收集用于微调 Moondream2 的数据
创建任何类型的机器学习模型都面临的挑战之一是获取高质量的训练数据。
由于我们想要微调 Moondream2 来计数硬币和钞票,因此我们将使用来自 Roboflow Universe 的这个数据集。你也可以构建和使用自己的 Roboflow 项目来执行此操作。
虽然这是一个对象检测数据集,但我们将展示如何使用它来微调 VLM。
首先,从 Universe 下载数据集:
- from roboflow import Roboflow
- from google.colab import userdata
-
- rf = Roboflow(api_key=userdata.get('ROBOFLOW_API_KEY'))
- project = rf.workspace("alex-hyams-cosqx").project("cash-counter")
- version = project.version(8)
- dataset = version.download("coco")
然后,我们创建一个辅助类,供微调时使用。我们使用 Supervision 从我们下载的 COCO 格式导入数据集。
- from torch.utils.data import Dataset
- import json
- from PIL import Image
- import supervision as sv
-
- class RoboflowDataset(Dataset):
- def __init__(self, dataset_path, split='train'):
- self.split = split
-
- sv_dataset = sv.DetectionDataset.from_coco(
- f"{dataset_path}/{split}/",
- f"{dataset_path}/{split}/_annotations.coco.json"
- )
-
- self.dataset = sv_dataset
-
- def __len__(self):
- return len(self.dataset)
-
- # ... other methods listed below (full code in Colab notebook)

然后,我们进入定义数据集的重要步骤。在此微调实现中,数据集是从对象读取的,其中 image 是数据集图像,数组 qa 包含一个带有问题和答案的对象,它将定义我们想要微调的提示/响应对。
- def __getitem__(self, idx):
- CLASSES = ["dime", "nickel", "penny", "quarter", "fifty", "five", "hundred", "one", "ten", "twenty"]
-
- # Retrieve the image/annotation info from the Supervision DetectionDataset
- image_name, annotations = list(self.dataset.annotations.items())[idx]
- image = self.dataset.images[image_name]
-
- # Finds the amount of each type of currency there is from the number of annotations there are
- money = {}
- for class_idx, money_type in enumerate(CLASSES):
- count = len(annotations[annotations.class_id == (class_idx+1)]) # Counts the number of annotations with that class
- if count == 0: continue;
-
- money[money_type] = count
-
- # Define the prompt/answer
- prompt = f"How many of each type of the currency ({', '.join(CLASSES)}) are there? Respond in JSON format with the currency type as the key and a integer count as the value."
- answer = json.dumps(money, indent=2) # Formats the JSON and makes it the answer
-
- # Return as the proper format
- return {
- "image": Image.fromarray(image),
- "qa": [
- {
- "question": prompt,
- "answer": answer,
- }
- ]
- }
以下代码检索数据并为我们数据的每个分割创建数据集类。
- datasets = {
- "train": RoboflowDataset(dataset.location,"train"),
- "val": RoboflowDataset(dataset.location,"valid"),
- "test": RoboflowDataset(dataset.location,"test"),
- }
4、Moondream2 的初步测试
现在我们有了数据集,我们可以开始测试它在没有微调的情况下的表现。我们可以通过运行以下命令来初始化 Moondream2:
- import torch
- from transformers import AutoTokenizer, AutoModelForCausalLM
-
- DEVICE = "cuda"
- FLASHATTENTION = "flash_attention_2" # "flash_attention_2" if A100, RTX 3090, RTX 4090, H100, None if CPU
- DTYPE = torch.float32 if DEVICE == "cpu" else torch.float16 # CPU doesn't support float16
- MD_REVISION = "2024-04-02"
- tokenizer = AutoTokenizer.from_pretrained("vikhyatk/moondream2", revision=MD_REVISION)
- moondream = AutoModelForCausalLM.from_pretrained(
- "vikhyatk/moondream2", revision=MD_REVISION, trust_remote_code=True,
- attn_implementation=FLASHATTENTION,
- torch_dtype=DTYPE, device_map={"": DEVICE}
- )
然后,我们传入一张美元钞票的图片,提示每种货币(一角硬币、五分硬币、一分硬币、四分之一美元硬币、五十美元硬币、五美元硬币、一百美元硬币、一美元硬币、十美元硬币、二十美元硬币)有多少种?以 JSON 格式响应,以货币类型为键,整数计数为值。:
- sample = datasets['test'][0]
-
- md_answer = moondream.answer_question(
- moondream.encode_image(sample['image']),
- sample['qa'][0]['question'],
- tokenizer=tokenizer,
- )
-
- sv.plot_image(sample['image'], (3,3))
- print('Question:', sample['qa'][0]['question'])
- print('Ground Truth:', sample['qa'][0]['answer'])
- print('Moondream:', md_answer)
它返回了一个毫无帮助、支离破碎且不正确的答复:

来自数据集中其他图像的其他示例响应也不是特别有帮助、正确或一致:
[0.39, 0.28, 0.67, 0.52]There is one silver coin in the image, which is a silver dollar coin. The coin is silver in color and features a profile of a man on it. The coin is worth one dollar.01 dime, 1 nickel, 1 penny, 1 quarter, 1 fifty, 1 five, 1 hundred, 1 ten, 1 twenty, 1 dollar bill...
在评估了整个数据集的测试分割后,它达到了大约 0%,没有一个响应符合预期的地面实况输出。
5、微调 Moondream2 以计数对象
接下来,我们通过配置超参数来微调 Moondream2。在这里,我们将 epoch 数设置为 2,因为我们自己的测试证实,任何更少/更多的 epoch 都会导致欠拟合/过拟合。
修改了批处理大小以利用碰巧可用的更强大的 GPU。对于你可能在 Google Colab 中使用的 T4,我们建议使用 6。
其余参数保留为创建者的实现的默认值。
- # Number of times to repeat the training dataset. Increasing this may cause the model to overfit or
- # lose generalization due to catastrophic forgetting. Decreasing it may cause the model to underfit.
- EPOCHS = 1
-
- # Number of samples to process in each batch. Set this to the highest value that doesn't cause an
- # out-of-memory error. Decrease it if you're running out of memory. Batch size 8 currently uses around
- # 15 GB of GPU memory during fine-tuning.
- BATCH_SIZE = 24
-
- # Number of batches to process before updating the model. You can use this to simulate a higher batch
- # size than your GPU can handle. Set this to 1 to disable gradient accumulation.
- GRAD_ACCUM_STEPS = 1
-
- # Learning rate for the Adam optimizer. Needs to be tuned on a case-by-case basis. As a general rule
- # of thumb, increase it by 1.4 times each time you double the effective batch size.
- #
- # Source: https://www.cs.princeton.edu/~smalladi/blog/2024/01/22/SDEs-ScalingRules/
- #
- # Note that we linearly warm the learning rate up from 0.1 * LR to LR over the first 10% of the
- # training run, and then decay it back to 0.1 * LR over the last 90% of the training run using a
- # cosine schedule.
- LR = 3e-5
-
- # Whether to use Weights and Biases for logging training metrics.
- USE_WANDB = False
一旦我们开始训练,训练时间将高度依赖于可用的系统,主要是 GPU。

6、评估微调的 Moondream2 结果
现在我们已经完成了训练过程,我们可以使用不属于微调数据的相同测试数据来评估微调模型的性能。
- moondream.eval()
-
- correct = 0
- for i, sample in enumerate(datasets['test']):
- md_answer = moondream.answer_question(
- moondream.encode_image(sample['image']),
- sample['qa'][0]['question'],
- tokenizer=tokenizer,
- )
-
- if md_answer == sample['qa'][0]['answer']:
- correct += 1
-
- if i < 21:
- sv.plot_image(sample['image'], (3,3))
- print('Ground Truth:', sample['qa'][0]['answer'])
- print('Moondream:', md_answer)
-
- print(f"\n\nAccuracy: {correct / len(datasets['test']) * 100:.2f}%")
查看样本,我们看到更加一致、可预测和准确的输出答案和输出格式。
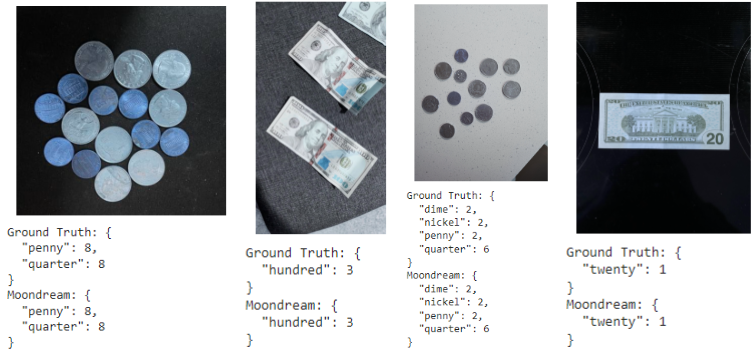
经过微调的 Moondream2 对我们的第一张测试图像给出了更准确的答复:
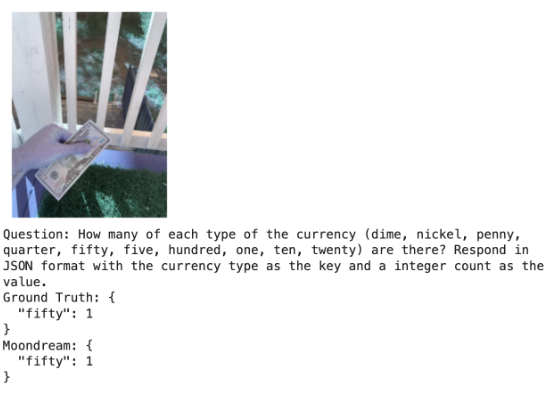
不过,经过微调的 Moondream 版本仍然会存在计数错误的情况。
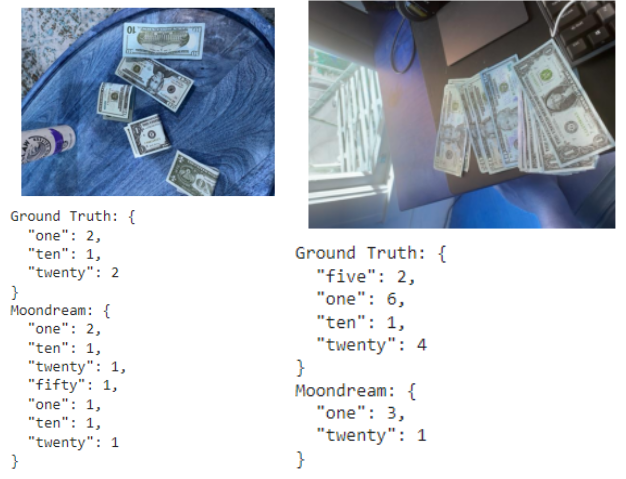
总体而言,在相同的测试数据集分割中,我们获得了 85.50% 的准确率。
7、结束语
通过本指南,我们能够利用计算机视觉数据集来微调视觉语言模型,以更一致、更准确的格式生成结果,使其易于解析以用于生产应用程序。这使 VLM 从一个有趣的实验级别变成了更大的计算机视觉系统中更有用的组件。


