
- 1springboot整合ueditor,图片上传及视频上传(后端)_ueditor怎么开启上传视频功能
- 2Elcker-npm,yarn,pnpm的本地配置_pnpm 设置本地仓库
- 3Kindling协议开发流程 - Dubbo2 协议开发流程_kindling结构
- 4pandas 读取excel文件_pandas读取excel
- 5Qt 之数据库QSqlite应用_qsqlquery 排序
- 6ROS | Ubuntu18手动安装ROS-Melodic_ubuntu18 ros melodic 安装
- 7关于实现控件突出父布局_android 组件中某个组件突出
- 8Java-JVM-安全点SafePoint_java中什么是安全点
- 9推荐使用:workers - 极简部署的Cloudflare Workers HTTP服务器框架
- 10java调用海康威视SDK实现车牌识别_海康威视车牌识别sdk
Unity射击游戏(完整版步骤)_unity的reactivetarget组件
赞
踩
基本功能
-
创建基本场景(Cube创建,后续添加的场景物体都需要有Collider组件,实现碰撞)
-
Player(胶囊体)的移动和视角(Player下需要包含一个Camera对象,以便于实现视角和射线检测)
KeyboardMove.cs代码(添加到Player下),通过键盘控制移动:
- using System.Collections;
- using System.Collections.Generic;
- using UnityEngine;
-
- [RequireComponent(typeof(CharacterController))]
- [AddComponentMenu("Control Script/FPS Input")]
- public class KeyboardMove : MonoBehaviour
- {
-
- public float speed = 6.0f;
- public float gravity = 0;
- private CharacterController _charController; //用于引用CharacterController的变量
-
- // Use this for initialization
- void Start()
- {
- _charController = GetComponent<CharacterController>(); //使用附加到相同对象上的其他组件
- }
-
- // Update is called once per frame
- void Update()
- {
- float deltaX = Input.GetAxis("Horizontal") * speed;
- float deltaZ = Input.GetAxis("Vertical") * speed;
- Vector3 movement = new Vector3(deltaX, 0, deltaZ);
- movement = Vector3.ClampMagnitude(movement, speed); //将对角移动的速度限制为和沿着轴移动的速度一样
- movement.y = gravity;
- movement *= Time.deltaTime;
- movement = transform.TransformDirection(movement); //把movement向量从本地变换为全局坐标
- _charController.Move(movement); //告知CharacterController通过movement向量移动
- }
- }

MouseLook.cs代码(添加到Camera下),通过鼠标控制视野:
- using System.Collections;
- using System.Collections.Generic;
- using UnityEngine;
-
- public class MouseLook : MonoBehaviour
- {
-
- public enum RotationAxes
- {
- MouseXAndY = 0,
- MouseX = 1,
- MouseY = 2
- }
-
- public RotationAxes axes = RotationAxes.MouseXAndY;
- public float sensitivityHor = 9.0f;
- public float sensitivityVert = 9.0f;
-
- public float minimumVert = -15.0f;
- public float maximumVert = 45.0f;
-
- private float _rotationX = 0;
-
- // Use this for initialization
- void Start()
- {
- Rigidbody body = GetComponent<Rigidbody>();
- if (body != null)
- {
- body.freezeRotation = true;
- }
- }
-
- // Update is called once per frame
- void Update()
- {
- if (axes == RotationAxes.MouseX)
- {
- //horizontal rotation here
- transform.Rotate(0, Input.GetAxis("Mouse X") * sensitivityHor, 0);
- }
- else if (axes == RotationAxes.MouseY)
- {
- //vertical rotation here
- _rotationX -= Input.GetAxis("Mouse Y") * sensitivityVert;
- _rotationX = Mathf.Clamp(_rotationX, minimumVert, maximumVert);
- float rotationY = transform.localEulerAngles.y;
- transform.localEulerAngles = new Vector3(_rotationX, rotationY, 0);
- }
- else
- {
- //both horizontal and vertical rotation here
- _rotationX -= Input.GetAxis("Mouse Y") * sensitivityVert;
- _rotationX = Mathf.Clamp(_rotationX, minimumVert, maximumVert);
- float delta = Input.GetAxis("Mouse X") * sensitivityHor;
- float rotationY = transform.localEulerAngles.y + delta;
- transform.localEulerAngles = new Vector3(_rotationX, rotationY, 0);
- }
- }
- }
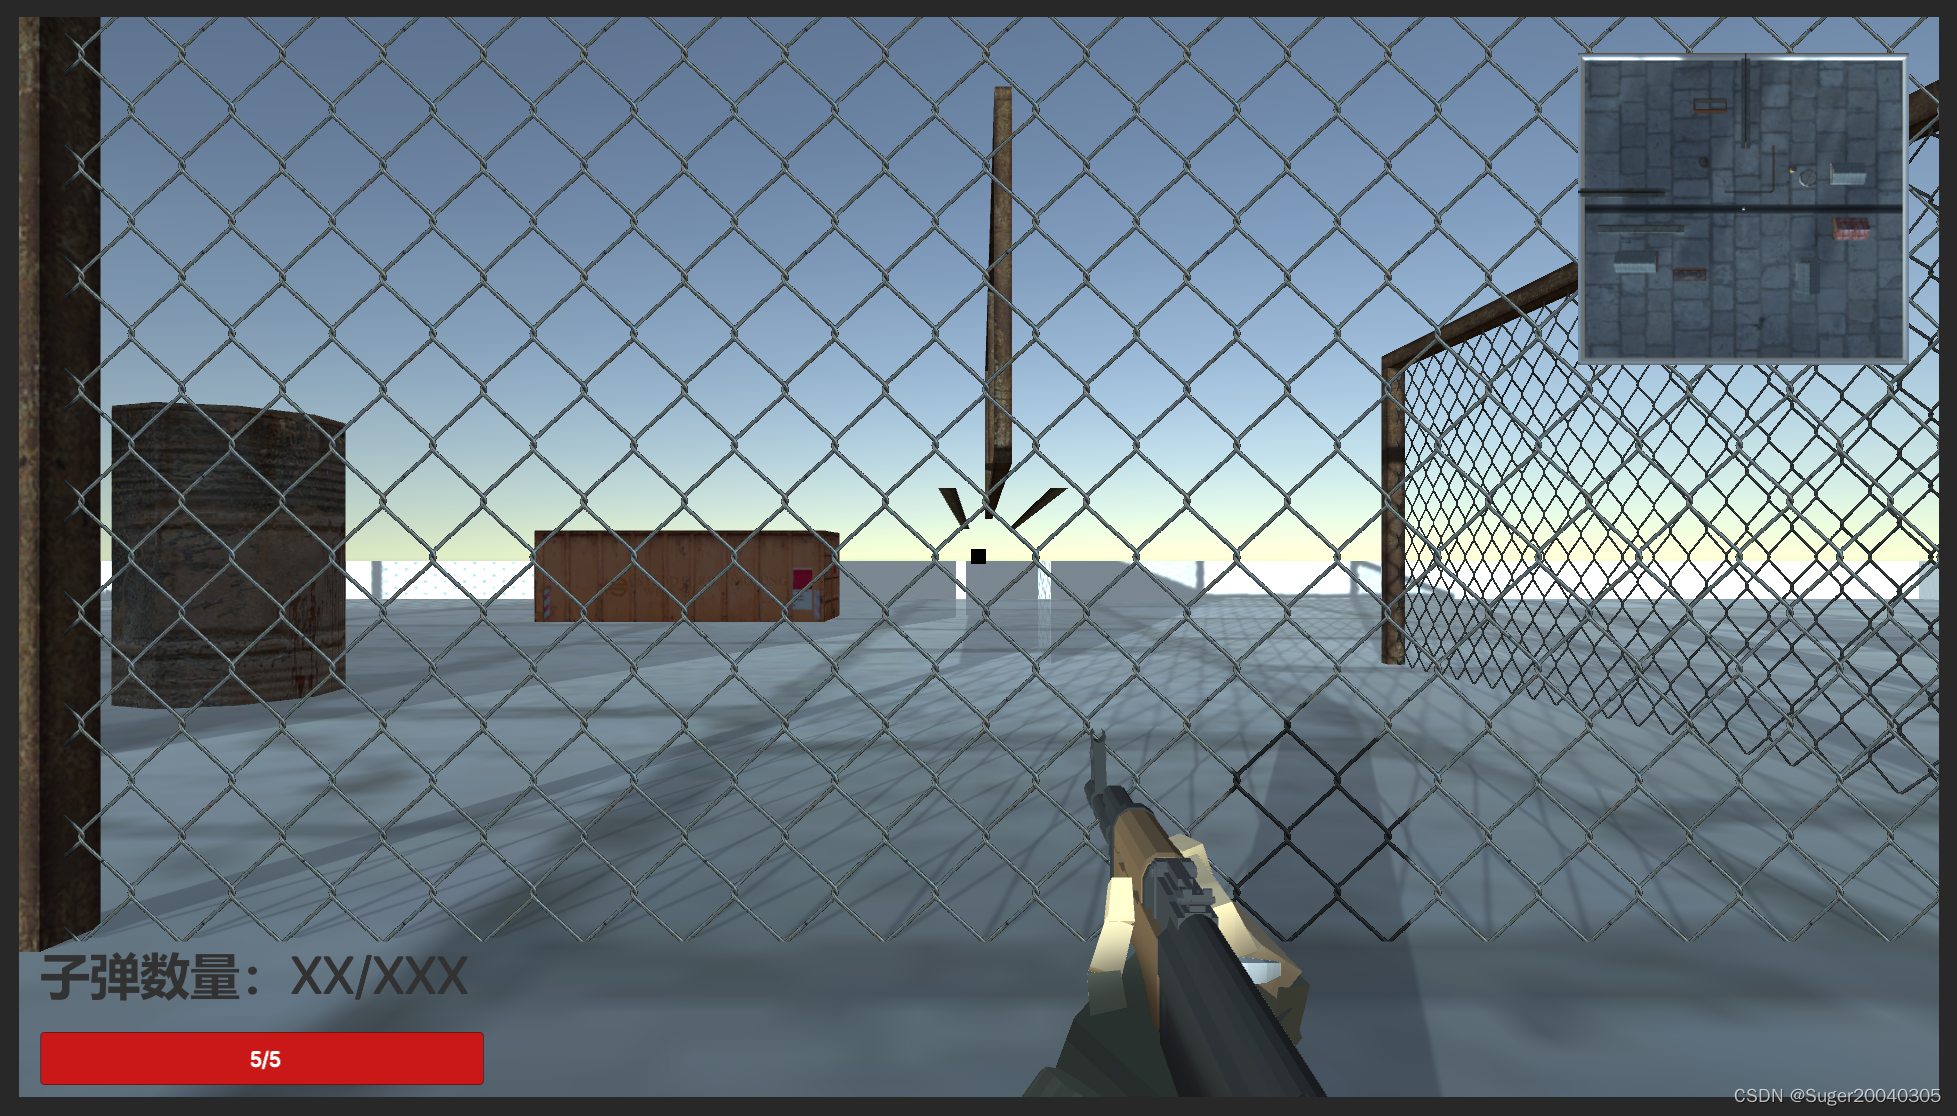
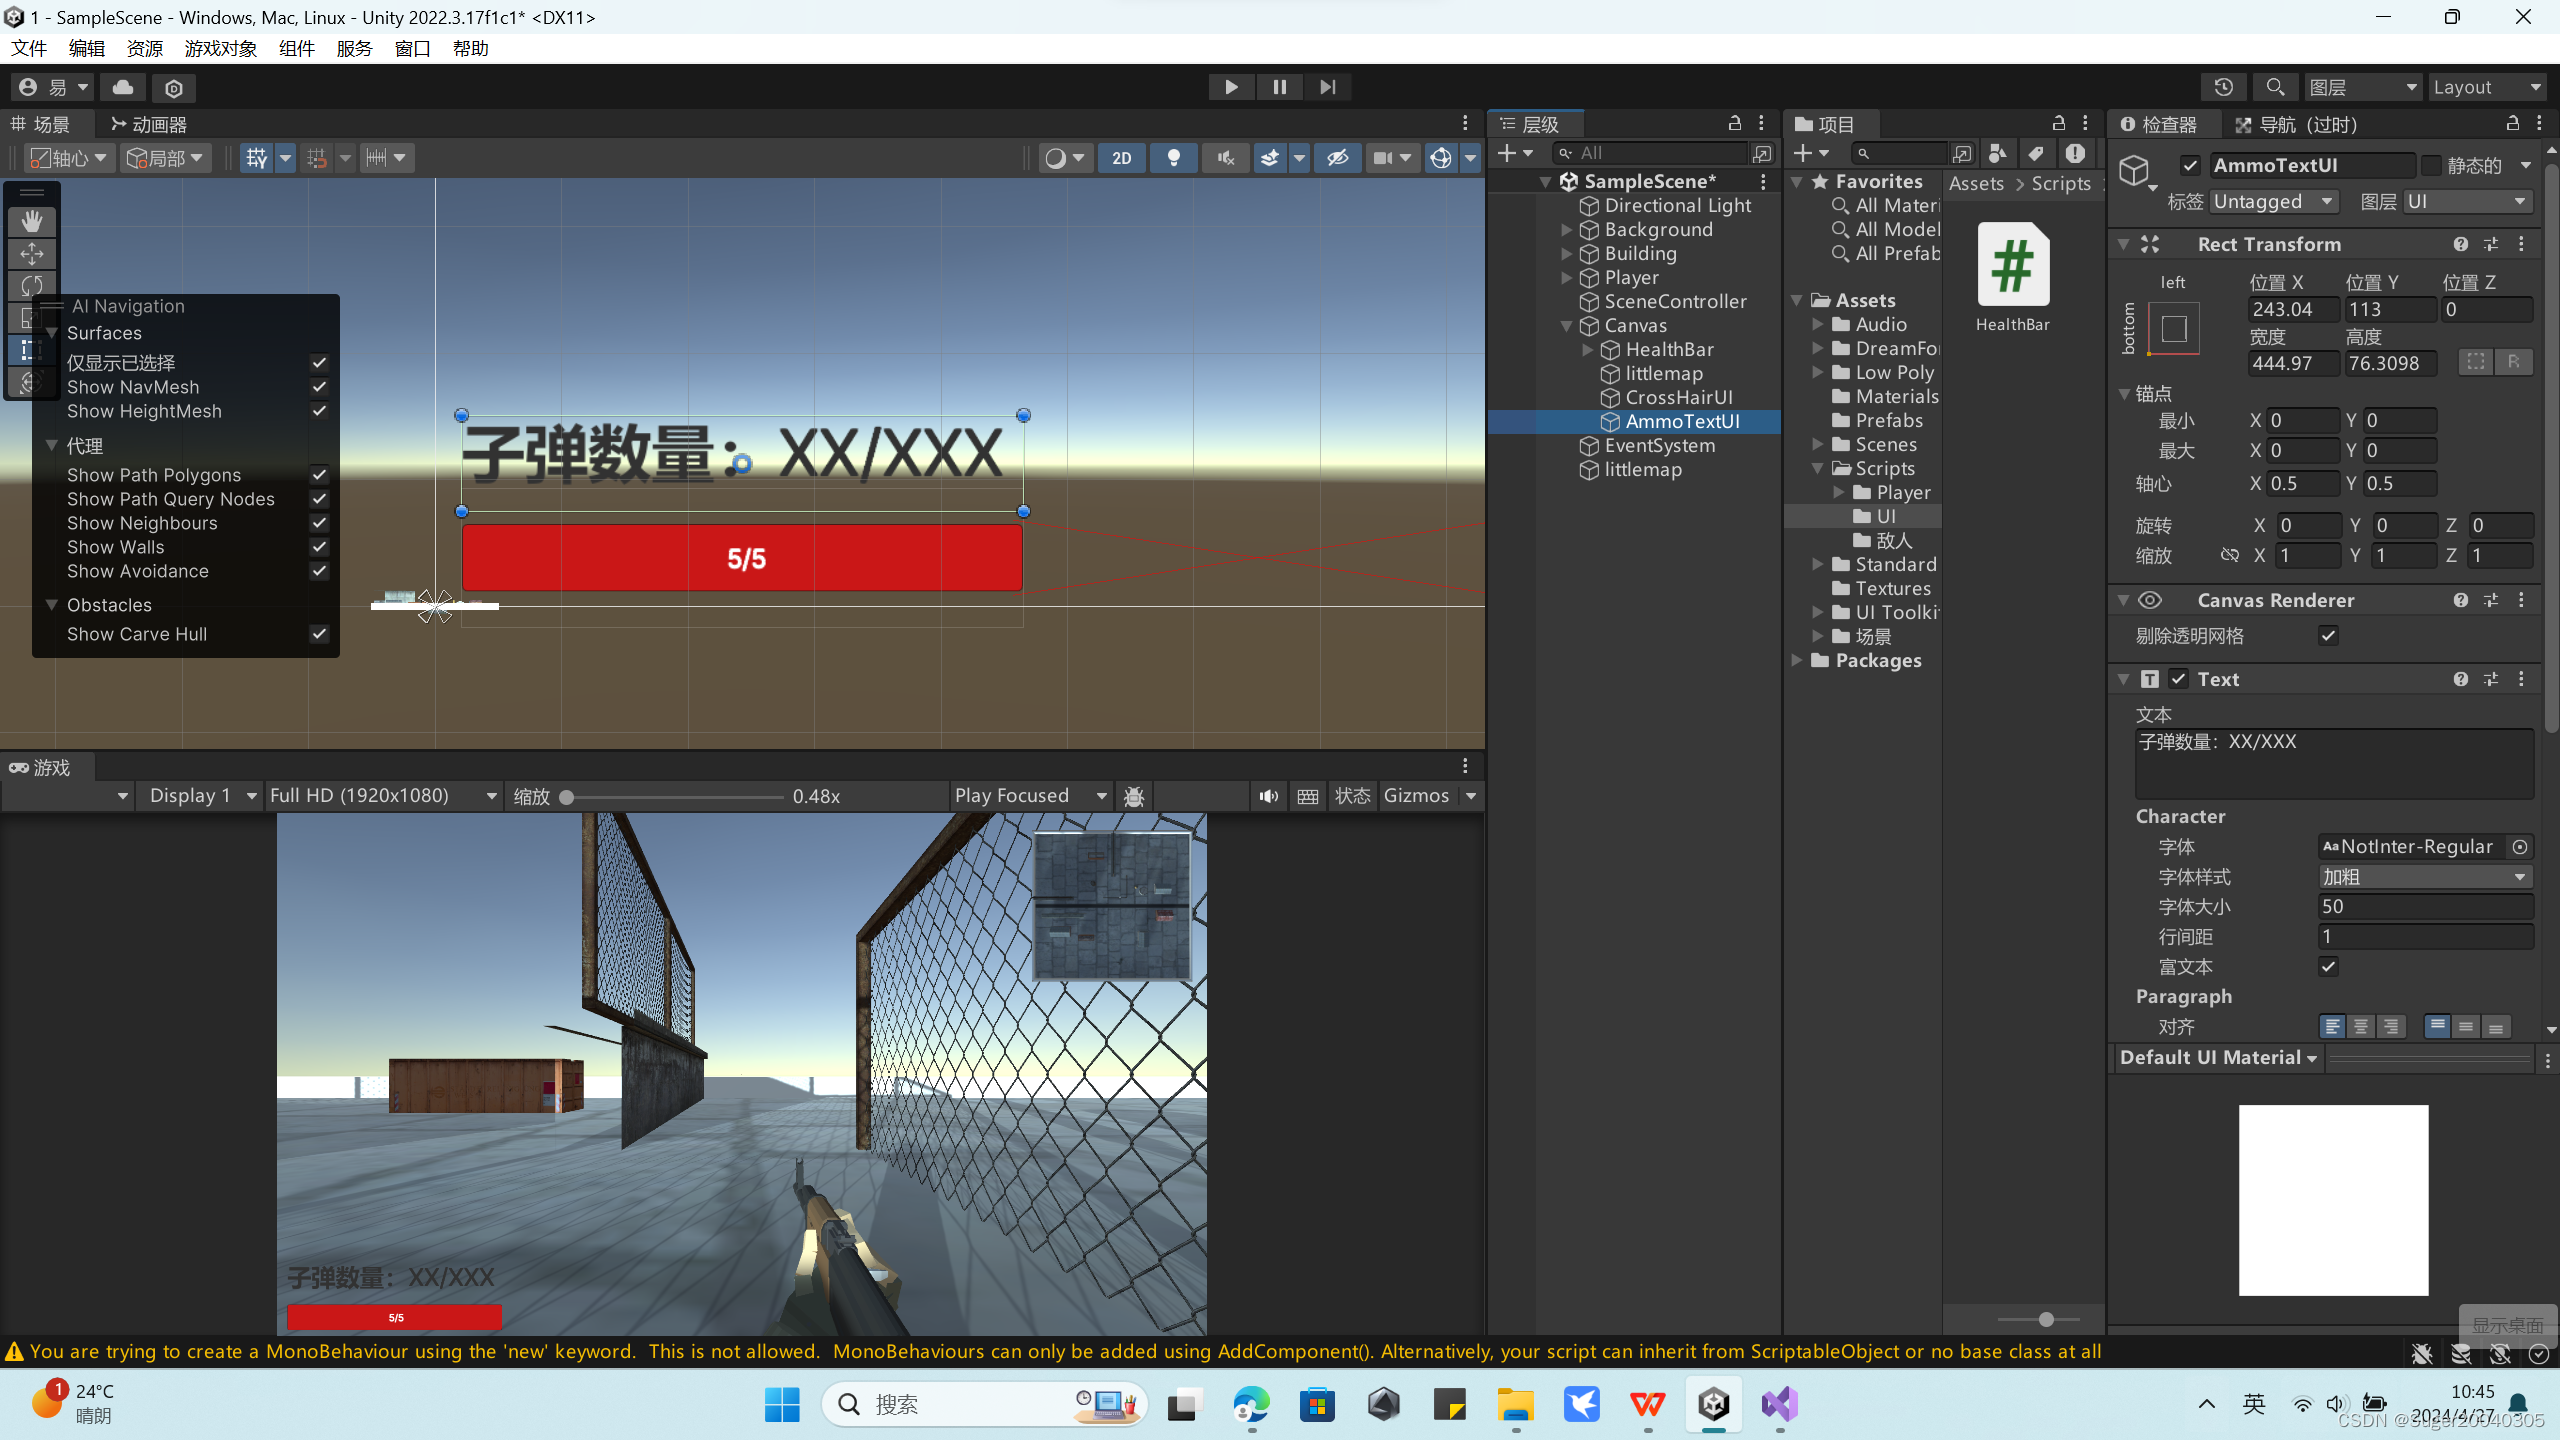
RayShooter.cs代码(添加到Camera下),通过鼠标左键进行射击:
这里的代码同时也实现了换弹和子弹数量的UI显示
- using System.Collections;
- using System.Collections.Generic;
- using UnityEngine;
- using UnityEngine.UI;
-
- public class RayShooter : MonoBehaviour
- {
-
- private Camera _camera;
-
- //加入子弹计数和换弹功能并在UI上显示
- //子弹弹夹
- public int bulletsMag = 31;//一个弹夹子弹数量
- public int bulletLeft = 300;//备弹
- public int currentBullects;//当前子弹数量
- //关于子弹数量的UI设置,需要导入命名空间UnityEngine.UI
- [Header("UI设置")]
- public Image CrossHairUI;//瞄点UI
- public Text AmmoTextUI;//子弹数量UI
- [Header("键位设置")]
- [SerializeField][Tooltip("填装子弹按键")]private KeyCode reloadInputName;
-
-
-
- // Use this for initialization
- void Start()
- {
- _camera = GetComponent<Camera>(); //访问相同对象上附加的其他组件
- Cursor.lockState = CursorLockMode.Locked;
- Cursor.visible = false; //隐藏屏幕中心的光标
-
- //关于子弹数量
- currentBullects = bulletsMag;
- UpdateAmmoUI();//UI
- reloadInputName = KeyCode.R;//R键填装子弹
- }
-
- void OnGUI()
- {
- int size = 12;
- float posX = _camera.pixelWidth / 2 - size / 4;
- float posY = _camera.pixelHeight / 2 - size / 2;
- GUI.Label(new Rect(posX, posY, size, size), "*"); //GUI.Label()在屏幕上显示文本,射击瞄点
- }
-
- // Update is called once per frame
- void Update()
- {
-
- if (Input.GetMouseButtonDown(0) && currentBullects!=0) //鼠标左键按下且目前子弹数量不为0才射击
- {
-
- Vector3 point = new Vector3(_camera.pixelWidth / 2, _camera.pixelHeight / 2, 0); //屏幕中心是宽高的一半
- Ray ray = _camera.ScreenPointToRay(point); //使用ScreenPointToRay()在摄像机所在位置创建射线
- RaycastHit hit;
- if (Physics.Raycast(ray, out hit)) //检测是否击中物体
- {
- GameObject hitObject = hit.transform.gameObject;//获取被击中的游戏对象
- ReactiveTarget target = hitObject.GetComponent<ReactiveTarget>();
- if (target != null)//如果有ReactiveTarget组件
- {
- target.ReactToHit();
- }
- else
- {
- StartCoroutine(SphereIndicator(hit.point)); //运行协程来响应击中
- }
-
- //射击即触发,关于子弹的数量
- currentBullects--;
- UpdateAmmoUI();
-
- }
- }
-
- if (Input.GetKeyDown(reloadInputName) && currentBullects < bulletsMag && bulletLeft > 0) //执行换子弹
- {
- Reload();
- }
-
- }
-
- private IEnumerator SphereIndicator(Vector3 pos) //协程使用IEnumerator方法
- {
- GameObject sphere = GameObject.CreatePrimitive(PrimitiveType.Sphere);
- sphere.transform.position = pos;
- yield return new WaitForSeconds(1); //yield关键字告诉协程在何处暂停
- Destroy(sphere); //移除GameObject并清除它占用的内存
- }
-
- //更新UI
- public void UpdateAmmoUI()
- {
- AmmoTextUI.text = "子弹数量:" + currentBullects + "/" + bulletLeft;
- }
-
- //换子弹逻辑
- public void Reload()
- {
- if (bulletLeft <= 0) return;
- //需要填装子弹数
- int bullectToLoad = bulletsMag - currentBullects;
- //备弹需扣除子弹数
- int bullectToReduce = (bulletLeft >= bullectToLoad) ? bullectToLoad : bulletLeft;
- bulletLeft -= bullectToReduce;//减少备弹
- currentBullects += bullectToReduce;//当前子弹数增加
- UpdateAmmoUI();
- }
-
- }
miaoju.cs代码(添加到Camera下),实现缩放:
- using UnityEngine;
-
- public class RifleScopeZoom : MonoBehaviour
- {
- [SerializeField] private Camera playerCamera;
- [SerializeField] private float zoomSpeed = 10f;
- [SerializeField] private float minFOV = 20f;
- [SerializeField] private float maxFOV = 60f;
-
- private void Update()
- {
- // 获取滚轮滑动的值
- float scrollValue = Input.GetAxis("Mouse ScrollWheel");
-
- // 根据滚轮滑动的值调整 FOV
- playerCamera.fieldOfView -= scrollValue * zoomSpeed;
-
- // 限制 FOV 的范围在最小值和最大值之间
- playerCamera.fieldOfView = Mathf.Clamp(playerCamera.fieldOfView, minFOV, maxFOV);
- }
- }
创建预设:通过在层及创建需要物体,然后拖到项目文件夹中,就可以形成预制体了。
创建了敌人和Fireball预制体后,需要在层级面板中删除
敌人组件ReactiveTarget.cs,实现敌人的响应:
- using System.Collections;
- using System.Collections.Generic;
- using UnityEngine;
-
- public class ReactiveTarget : MonoBehaviour
- {
-
- public void ReactToHit()
- {
- WanderingAI behavior = GetComponent<WanderingAI>();
- if (behavior != null) //检查角色是否有WanderingAI脚本
- {
- behavior.SetAlive(false);
- }
- StartCoroutine(Die()); //通过射击脚本调用的方法
- }
-
- private IEnumerator Die()
- {
- this.transform.Rotate(-75, 0, 0); //推到命中物体,等待1.5秒后摧毁命中物体
- yield return new WaitForSeconds(0.5f);
- Destroy(this.gameObject); //对象能销毁自己,就像一个分开独立的对象
- }
-
- // Use this for initialization
- void Start()
- {
-
- }
-
- // Update is called once per frame
- void Update()
- {
-
- }
-
- private void OnTriggerEnter(Collider other)
- {
- // Debug.Log("进去");
- //下面是判断与障碍碰撞的是不是主角,如果是则调用PlayerController中减少血量的函数
- PlayerCharacter pc = other.GetComponent<PlayerCharacter>();
- if (pc!=null)
- {
- // Debug.Log("碰到我啦");
- pc.Hurt(5);
- if (pc.currentHealth == 0)//判断血量是否为零,为零则死亡
- {
- pc.death();
- }
- //障碍物被碰撞后会销毁
- Destroy(gameObject);
- }
- }
-
- }
敌人组件WanderingAI.cs,实现敌人自动寻找玩家,进行攻击:
- using System.Collections; // 引入使用集合的命名空间
- using System.Collections.Generic; // 引入使用泛型集合的命名空间
- using UnityEditor; // 引入Unity编辑器命名空间
- using UnityEngine; // 引入Unity引擎命名空间
- using UnityEngine.AI;
-
- public class WanderingAI : MonoBehaviour // 定义名为WanderingAI的类,继承自MonoBehaviour
- {
- //AI寻路
- private Transform target; //设置追踪目标的位置
- private NavMeshAgent navMeshAgent; //设置寻路组件
-
- [SerializeField] private GameObject fireballPrefab; // 序列化字段,用于存储火球预制体
- private GameObject fireball; // 火球对象
- public float speed = 3.0f; // 移动速度
- public float obstacleRange = 2f; // 障碍物检测范围
- private bool _alive; // 存储AI是否存活的布尔值
-
- private void Awake()
- {
- Messenger<float>.AddListener(GameEvent.SPEED_CHANGED, OnSpeedChanged); // 在Awake方法中添加速度改变事件监听器
- }
-
- private void OnDestroy()
- {
- Messenger<float>.RemoveListener(GameEvent.SPEED_CHANGED, OnSpeedChanged); // 在对象销毁时移除速度改变事件监听器
- }
-
- private void Start()
- {
- target = GameObject.FindWithTag("Player").transform; //获取游戏中主角的位置,在我的工程里面主角的标签是Player
- navMeshAgent = GetComponent<NavMeshAgent>();
- navMeshAgent.speed = speed; //设置寻路器的行走速度
- if (navMeshAgent == null)
- {
- navMeshAgent = gameObject.AddComponent<NavMeshAgent>();
- }
- _alive = true; // 设置AI为存活状态
- }
-
- // Update is called once per frame
- void Update()
- {
- if (_alive) // 如果AI存活
- {
- navMeshAgent.SetDestination(target.transform.position); //设置寻路目标
- transform.Translate(0, 0, speed * Time.deltaTime); // 沿着Z轴移动
- Ray ray = new Ray(transform.position, transform.forward); // 创建射线
- RaycastHit hitInfo; // 存储射线碰撞信息
- if (Physics.SphereCast(ray, 100f, out hitInfo)) // 发射球形射线检测碰撞
- {
- GameObject hitObject = hitInfo.transform.gameObject; // 获取碰撞的游戏对象
- if (hitObject.GetComponent<PlayerCharacter>()) // 如果碰撞到玩家角色
- {
- if (fireball == null) // 如果火球对象为空
- {
- fireball = Instantiate(fireballPrefab) as GameObject; // 实例化火球对象
- fireball.transform.position = transform.TransformPoint(Vector3.forward * 1.5f); // 设置火球位置
- fireball.transform.rotation = transform.rotation; // 设置火球旋转
- }
- }
- if (hitInfo.distance < obstacleRange) // 如果碰撞距离小于障碍物检测范围
- {
- float angle = Random.Range(-110, 110); // 随机旋转角度
- transform.Rotate(0, angle, 0); // 绕Y轴旋转
- }
- }
- }
- }
-
- public void SetAlive(bool alive)
- {
- _alive = alive; // 设置AI存活状态
- }
-
- private void OnSpeedChanged(float value)
- {
- speed = speed * value; // 根据事件传递的值调整速度
- }
- }
在添加完脚本组建后,要实现敌人的自动寻路,需要将场景物体设置为静态,还需要添加 Nav Mesh Agent组件, 本文代码仅实现静态寻路。设置敌人自动寻路参考文章:
首先点击窗口,查看是否有AI插件,若没有请参考:unity的AI自动寻路Navigation,及其组件详解_ai navigation-CSDN博客进行下载。
下载完成后参考进行设置:
【Unity自动寻路】使用Navigation系统实现物体自动寻路绕开障碍物_unity navigation动态寻路-CSDN博客
构建 Fireball.cs脚本,实例化敌人向玩家设计的子弹:
- using System.Collections;
- using System.Collections.Generic;
- using UnityEngine;
-
- public class Fireball : MonoBehaviour
- {
-
- public float speed = 10.0f;
- public int damage = 1;
-
- // Use this for initialization
- void Start()
- {
-
- }
-
- // Update is called once per frame
- void Update()
- {
- transform.Translate(0, 0, speed * Time.deltaTime);
- }
-
- void OnTriggerEnter(Collider other)
- {
- PlayerCharacter player = other.GetComponent<PlayerCharacter>();
- if (player != null)
- {
- player.Hurt(damage);
- }
- Destroy(this.gameObject);
- }
- }
注意将Player的标签设置为Player
PlayerCharacter.cs脚本:
- using System.Collections;
- using System.Collections.Generic;
- using UnityEngine;
- using UnityEngine.SceneManagement;
-
- public class PlayerCharacter : MonoBehaviour
- {
- private Rigidbody rbody; // 用于存储 Rigidbody 组件的私有变量
- private CapsuleCollider cCollider; // 用于存储 CapsuleCollider 组件的私有变量
-
- private int maxhealth = 5;
- public int MaxHealth
- {
- get { return maxhealth; }
- }
-
- public float currentHealth;
- public float CurrentHealth
- {
- get { return currentHealth; }
- }
-
-
- // Use this for initialization
- void Start()
- {
- currentHealth = maxhealth;
- rbody = GetComponent<Rigidbody>(); // 获取附加到 GameObject 上的 Rigidbody 组件
-
- HealthBar.Instance.changeHealth();//UI
-
- }
-
- public void Hurt(int damage)
- {
- currentHealth = Mathf.Clamp(currentHealth - damage, 0, maxhealth);
- // Mathf.Clamp(expression, min, max) - 该函数将结果限制在指定范围内
- //currentHealth -= damage;
- HealthBar.Instance.changeHealth();
- Debug.Log("Health: " + currentHealth);
- }
-
- //角色死亡
- public void death()
- {
- if (currentHealth == 0)
- {
- Destroy(gameObject);
-
- }
- }
- // Update is called once per frame
- void Update()
- {
-
- }
- }
-
实现当消灭敌人后,再次出现敌人,保持游戏中一直有一个敌人。
首先创建一个空对象SceneController,然后编写SceneController.cs脚本:
- using System.Collections;
- using System.Collections.Generic;
- using UnityEngine;
-
- public class SceneController : MonoBehaviour
- {
-
- [SerializeField] private GameObject enemyPrefab; //序列化变量,用于链接预设对象
- private GameObject _enemy; //一个私有变量,跟踪场景中敌人的实例
-
- // Use this for initialization
- void Start()
- {
-
- }
-
- // Update is called once per frame
- void Update()
- {
- if (_enemy == null) //只用当场景中没有敌人时才产生一个新敌人
- {
- _enemy = Instantiate(enemyPrefab) as GameObject; //这个方法复制了预设对象
- _enemy.transform.position = new Vector3(0, 1, 1);
- float angle = Random.Range(0, 360);
- _enemy.transform.Rotate(0, angle, 0);
- }
- }
- }
基础UI
Player血量
参考文章:U3D游戏角色血条制作并显示血量变化_unity 3d血条显示-CSDN博客
仅需要参考在场景中添加UI,代码部分如下HealthBar.cs:
- using System;
- using System.Collections;
- using System.Collections.Generic;
- using UnityEngine;
- using UnityEngine.UI;
-
- public class HealthBar : MonoBehaviour
- {
- Slider healthBar;
- //在unity中关联游戏角色
- public PlayerCharacter _play = new PlayerCharacter();
- //创建一个单例
- public static HealthBar Instance;
- //挂载创建的CurrentHealth的文本UI
- public Text healthNumber;
-
- void Awake()
- {
- Instance = this;
- }
-
- public void changeHealth()
- {
- //在playcontrol脚本中调用该函数,所以先判断是否获取到组件,
- //若是放在该脚本的Start中可能会获取不到
- if (healthBar == null)
- {
- healthBar = GetComponent<Slider>();
- }
- //使用该段代码前,在Slider检视器中勾选整数,设置最大最小值
- healthBar.value = _play.CurrentHealth;
- healthNumber.text = healthBar.value + "/" + _play.MaxHealth;
- }
- }
子弹数
在RayShooter.cs实现了UI的动态变化,现在需要在场景中添加UI。
首先在Canvas添加文本,UI——旧版——文本,文本命名为AmmoTextUI
然后编辑文本:
小地图
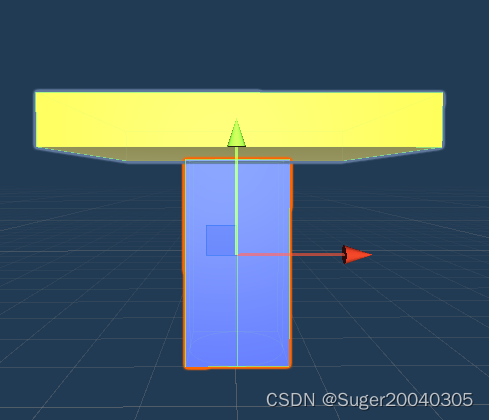
创建一个小地图是为了方便查看敌人的位置,因为敌人的速度较快,撞击到Player游戏会结束,所以创建一个小地图。但是由于只用一个长方体当做敌人,小地图上显示不明显,所以在长方体头上加了一个物体。
创建小地图:Unity小地图制作_unity3d中两种绘制小地图的方法-CSDN博客
建议使用第一种方法比较简单

