
- 1pdf只要前几页,pdf怎么只要前几页
- 2在【语雀表格】里面移动单元格或区域位置最便捷的方法_语雀拆分单元格
- 3git push时报错“Remote: http basic: access denied”_git push remote: http basic: access denied
- 4帮公司面试一个32岁的程序员,只因一个细节,被我一眼看穿是培训班出来的,工作经验也是假的..._小公司工作经验会被认可吗
- 5树莓派4B串口通信配置
- 6【数学建模】模拟干预条件下传染病SIER模型【含Matlab源码 2937期】
- 7深入学习JUC,深入了解Java线程中死锁与活锁问题,并理解其解决方法,笔记开记!!!_活锁java
- 8分享几个找图得坐标的方法_python找图返回坐标
- 9多媒体库函数 WinMM.dll 简介
- 10HDFS中java API操作以及缺乏配置文件的报错_hdfs—api配置winutils报错
从零搭建react + webpack项目_react项目增加webpack
赞
踩
初始化项目
mkdir my-react
cd my-react
npm init
- 1
- 2
- 3
安装 webpack
npm install webpack webpack-cli --save-dev
- 1
最简单的案例
- 创建配置文件
webpack.config.js文件 src目录下创建index.js、HelloWorld.js文件- index.js 文件中引入 HelloWorld 函数直接打印出来
// webpack.config.js
'use strict';

const path = require('path');

module.exports = {
  entry: '/src/index.js',
  output: {
    path: path.join(__dirname, 'dist'),
    filename: 'bundle.js'
  },
  mode: 'production'
};
- 1
- 2
- 3
- 4
- 5
- 6
- 7
- 8
- 9
- 10
- 11
- 12
- 13
// index.js 入口文件
import { HelloWorld } from "./HelloWord";

document.write(HelloWorld);
- 1
- 2
- 3
- 4
// HelloWorld.js
export function HelloWorld() {
  return 'HelloWorld';
}
- 1
- 2
- 3
- 4
- 直接使用 node_modules 下webpack,直接执行表示不选择配置文件,直接默认
webpack.config.js
./node_modules/.bin/webpack
- 1
- 获得
/dist/bundle.js
(()=>{"use strict";document.write((function(){return"HelloWorld"}))})();
- 1
- 为方便查看效果,在
dist目录下创建一个 index.html 文件- 手动引入 bundle.js 文件
<!DOCTYPE html>
<html lang="en">

  <head>
    <meta charset="UTF-8">
    <meta http-equiv="X-UA-Compatible"
          content="IE=edge">
    <meta name="viewport"
          content="width=device-width, initial-scale=1.0">
    <title>Document</title>
  </head>

  <body>
+    <script src="./bundle.js"
            type="text/javascript"> </script>
  </body>

</html>

- 1
- 2
- 3
- 4
- 5
- 6
- 7
- 8
- 9
- 10
- 11
- 12
- 13
- 14
- 15
- 16
- 17
- 18
通过 npm script 运行 webpack
模块局部安装会在 node_modules/.bin 目录下创建软链接
{
  "name": "my-react",
  "version": "1.0.0",
  "description": "react react-dom react-router-dom",
  "main": "index.js",
  "author": "yanadev",
  "license": "MIT",
+  "scripts": {
+    "build": "webpack"
+  },
  "devDependencies": {
    "webpack": "^5.72.1",
    "webpack-cli": "^4.9.2"
  }
}
- 1
- 2
- 3
- 4
- 5
- 6
- 7
- 8
- 9
- 10
- 11
- 12
- 13
- 14
- 15
- 在执行
npm run build之前需要手动删除dist目录
rm -rf dist
- 1
- 执行打包命令
npm run build

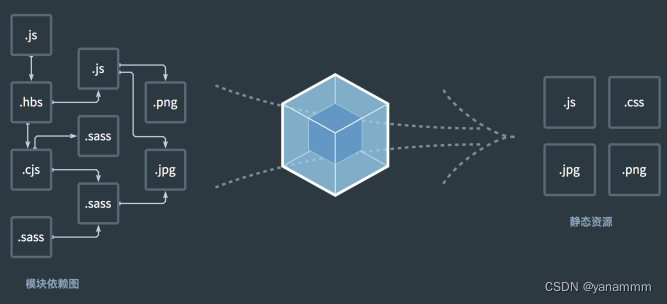
核心概念
Entry 指定打包入口
依赖图的入口是 entry,对非代码的依赖也会不断加入到依赖图中
用法
- 单入口:
entry:String
module.exports = {
    entry: './path/to/entry/file.js'
}
- 1
- 2
- 3
- 多入口:
entry: Object
module.exports = {
    entry: {
        app: './src/app.js',
        adminApp: './src/adminApp.js'
    }
};
- 1
- 2
- 3
- 4
- 5
- 6
Output 编译后文件地址
- 单入口配置
modue.exports = {
    entry:'./path/to/entry/file.js' ,
    output:{
        filename: 'bundle.js',
        path: __dirname + '/dist'
    }
}
- 1
- 2
- 3
- 4
- 5
- 6
- 7
- 多入口配置(通过占位符确保文件名的唯一)
module.exports = {
    entry: {
        app: './src/app.js',
        search: './src/search.js'
    },
    output: {
        filename: '[name].js',
        path: __dirname + '/dist'
    }
};
- 1
- 2
- 3
- 4
- 5
- 6
- 7
- 8
- 9
- 10
Loaders 函数,接收源文件,返回转换结果
webpack 开箱即用的只支持 json 和 json
通过 loaders 支持其他文件类型并转化为有效模块,并可添加到依赖图中
常用 loaders
- babel-loader 转换 ES6、7等新特性语法
- css-loader 支持 css 文件加载和解析
- less-loader 支持 less 文件转换成 css
- ts-loader 将 ts 转换为 js
- file-loader 图片文字等打包
- raw-loader 将文件以字符形式导入
- thread-loader 多进程打包 js 和 css
用法 rules:[]
- 注意执行顺序从下到上(根据出栈顺序执行)
const path = require('path')
module.exports = {
    module: {
        rules: [
            {test:/\txt$/, use: 'raw-loader'}
        ]
    }
}
- 1
- 2
- 3
- 4
- 5
- 6
- 7
- 8
Plugins 整个构建过程
bundle 文件优化、资源管理和环境变量注入
常见 plugins
- CommonsChunkPlugin 将chunks相同模块提取成 公共js
- CleanWebpackPlugin 清理构建目录
- ExtractTextWebpackPlugin 将 css 从 bundle 文件里提取成一个单独css文件
- CopyWepackPlugin 将文件或者文件夹拷贝到输出目录
- HtmlWebpackPlugin 创建 html 去承载输出的 bundle 文件
- UglifyjsWebpackPlugins 压缩 js
- ZipWebpackPlugin 将打包的资源生成一个 zip 包
plugins 用法
const path = require('path')
module.exports = {
    plugins: [
        new HtmlWebpackPlugin({
            template: './src/index/html'
        })
    ]
}
- 1
- 2
- 3
- 4
- 5
- 6
- 7
- 8
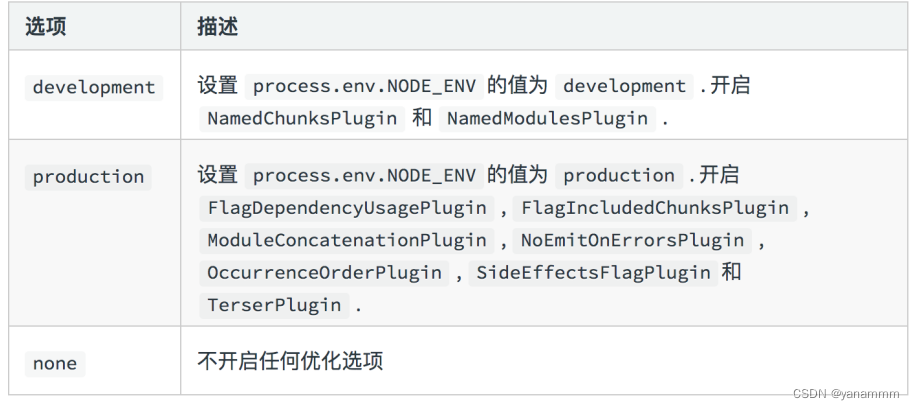
Mode 指定构建环境
- production
- development
- none
设置 mode 可使用 webpack 内置函数,默认值为 production
Mode 内置函数功能
资源解析:ES6()babel-loader
配置文件为 .babelrc
module.exports = {
    module: {
        rules:[
            {test: /\.js$/, use: 'babel-loader'}
        ]
    }
}
- 1
- 2
- 3
- 4
- 5
- 6
- 7
.babelrc增加 babel preset 配置
{
    "presets":[
        "@babel/preset-env"
    ],
    "plugins":[
        "@bebel/proposal-class-properties"
    ]
}
- 1
- 2
- 3
- 4
- 5
- 6
- 7
- 8
资源解析:React JSX
{
    "presets": [
        "@babel/preset-env",
        "@babel/preset-react"
    ],
    "plugins":[
        "@babel/proposal-class-properties"
    ]
}
- 1
- 2
- 3
- 4
- 5
- 6
- 7
- 8
- 9
资源解析:CSS
- css-loader 加载 css 文件,并转换成 commonjs 对象
- style-loader 将样式通过
 module.exports = {
     module:{
         rules: [
             {
                test: /\.css$/,
                use:[
                    'style-loader',
                    'css-loader'
                ]
             }
         ]
     }
 }
- 1
- 2
- 3
- 4
- 5
- 6
- 7
- 8
- 9
- 10
- 11
- 12
- 13
资源解析:less 和 sass
- less-loader 将 less 转换为 css
- sass-loader 将 sass 转换为 css
module.exports = {
    module:{
        rules:[
            {
                test:/\.less$/,
                use:[
                    'style-loader',
                    'css-loader',
                    'less-loader'
                ]
            }
        ]
    }
}
- 1
- 2
- 3
- 4
- 5
- 6
- 7
- 8
- 9
- 10
- 11
- 12
- 13
- 14
module.exports = {
    module:{
        rules:[
            {
                test:/\.sass$/,
                use:[
                    'style-loader',
                    'css-loader',
                    'sass-loader'
                ]
            }
        ]
    }
}
- 1
- 2
- 3
- 4
- 5
- 6
- 7
- 8
- 9
- 10
- 11
- 12
- 13
- 14
资源解析:图片、字体
- file-loader 处理文件
module.exports = {
    module:{
        rules:[
            {
                test: /\.(png|svg|jpg|jpeg|gif)$/,
                use: [
                    'file-loader'
                ]
            }
        ]
    }
}
- 1
- 2
- 3
- 4
- 5
- 6
- 7
- 8
- 9
- 10
- 11
- 12
- file-loader 处理字体
module.exports = {
    module:{
        rules:[
            {
                test: /\.(woff|woff2|eot|ttf|otf)$/,
                use: [
                    'file-loader'
                ]
            }
        ]
    }
}
- 1
- 2
- 3
- 4
- 5
- 6
- 7
- 8
- 9
- 10
- 11
- 12
- url-loader 也可以处理图片和字体,**可设置较小资源自动转 base64 **
module.exports = {
    module:{
        rules:[
            {
                test:/\.(png|svg|jpg|gif)$/,
                use:[
                    {
                        loader:'url-loader',
                        options:{
                            limit: 10240
                        }
                    }
                ]
            }
        ]
    }
}
- 1
- 2
- 3
- 4
- 5
- 6
- 7
- 8
- 9
- 10
- 11
- 12
- 13
- 14
- 15
- 16
- 17
webpack 文件监听
文件监听,即发现源码变化时,自动构建新的输出文件,唯一的缺陷就是需要手动刷新浏览器
启动文件监听两种方式:
- 启动 webpack 命令,加上 --watch
{
    "scripts": {
        "build": "webpack ",
        + "watch": "webpack --watch"
    },
}
- 1
- 2
- 3
- 4
- 5
- 6
- 配置 webpack.config.js 中设置
watch: true
原理分析
轮询判断文件的最后编辑时间是否变化
某个文件发生变化变化,并不会立刻告诉监听者,而是先缓存起来,等 aggregateTimeout
module.exports = {
    watch: true,
    watchOptions: {
        ignored: /node_modules/, // 默认为空,支持正则匹配
        aggregateTimeout: 300, // 监听到变化之后会等 300ms 再去执行,默认 300ms
        poll: 1000// 判断文件是否发生变化是 通过不断循环系统指定文件是否发生变化,默认每秒问 1000 次
    }
}
- 1
- 2
- 3
- 4
- 5
- 6
- 7
- 8
热更新:wepack-dev-server
WDS(webpack-dev-server):
- 不刷新浏览器
- 不输出文件,而是放在内存中
- 使用 HotModuleReplacementPlugin 插件
{
    "scripts": {
        "build": "webpack ",
        + ”dev": "webpack-dev-server --open"
    },
}
- 1
- 2
- 3
- 4
- 5
- 6
热更新:webpack-dev-middleware
WDM(webpack-dev-middleware):
- 将webpack输出文件传输给服务器
- 适用于灵活的定制场景
const express = require('express')
const webpack = require('webpack')
const WebpackDevMiddleware = require('webpack-dev-middleware')

const app = express()
const config = require('./webpack.config.js')
const compiler = webpack(config)

app.use(
	webpackDevMiddleware(
    	compiler,
        {
            publicPath: config.output.publicPath
        }
    )
)

app.listen(
	3000,
    function(){
        console.log('Example app listening on port 3000!\n')
    }
)
- 1
- 2
- 3
- 4
- 5
- 6
- 7
- 8
- 9
- 10
- 11
- 12
- 13
- 14
- 15
- 16
- 17
- 18
- 19
- 20
- 21
- 22
- 23
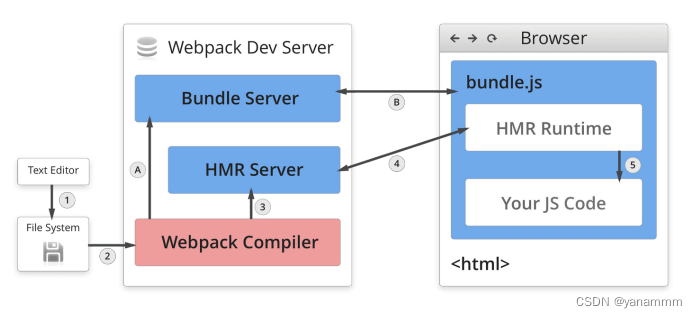
原理分析
-
Webpack Compile:将 JS 编译成 Bundle
-
HMR Server:将热更新的文件输出给 HMR Runtime
-
Bundle server:提供文件在浏览器访问
-
HMR Runtime:会被注入到浏览器,更新文件的变化
-
bundle.js:构建输出的文件
文件指纹
打包后输出的文件名的后缀
如何生成
-
Hash:和整个项目的构建相关,只要项目文件改动,整个项目构建的 hash 值就会更改
-
Chunkhash:和 webpack 打包相关的 chunk 有关,不同的 entry 生成不同的 chunkhash
-
Contenthash:根据文件内容来定义 hash,文件内容不变,则 contenthash 不变
设置文件指纹:JS
设置 output 的 filename,使用 [chunkhash]
module.exports = {
    entry: {
        app: './src/app.js',
        search: './src/search.js'
    },
    output: {
        + filename: '[name][chunkhash:8].js',
        path: __dirname + '/dist'
    }
};
- 1
- 2
- 3
- 4
- 5
- 6
- 7
- 8
- 9
- 10
文件指纹设置:CSS
设置 MiniCssExtractPlugin 的 filename,使用 [contenthash]
module.exports = {
    entry: {
        app: './src/app.js',
        search: './src/search.js'
    },
    output: {
        filename: '[name][chunkhash:8].js',
        path: __dirname + '/dist'
    },
    plugins: [
        + new MiniCssExtractPlugin({
        + filename: `[name][contenthash:8].css
        + });
    ]
};
- 1
- 2
- 3
- 4
- 5
- 6
- 7
- 8
- 9
- 10
- 11
- 12
- 13
- 14
- 15
文件指纹设置:图片
| 占位符名称 | 含义 |
|---|---|
| [ext] | 资源后缀名 |
| [name] | 文件名称 |
| [path] | 文件的相对路径 |
| [folder] | 文件所在的文件夹 |
| [contenthash] | 文件的内容 hash,默认是 md5 生成 |
| [hash] | 文件内容的 hash,默认是 md5 生成 |
| [emoji] | 一个随机的指代文件内容的 emojo |
代码压缩
JS
内置了 uglifyjs-webpack-plugin
css
使用 optimize-css-assets-webpack-plugin ,同时使用 cssnano
module.exports = {
    entry: {
        app: './src/app.js',
        search: './src/search.js'
    },
    output: {
        filename: '[name][chunkhash:8].js',
        path: __dirname + '/dist'
    },
    plugins: [
        new OptimizeCSSAssetsPugin({
            assetNameRegExp: /\.css$/g,
            cssProcessor: require('cssnano')
        })
    ]
}
- 1
- 2
- 3
- 4
- 5
- 6
- 7
- 8
- 9
- 10
- 11
- 12
- 13
- 14
- 15
- 16
html
修改 html-webpack-plugin ,设置压缩参数
module.exports = {
    plugins: [
        new HtmlWebpackPlugin({
            template: path.join(__dirname, 'src/search.html'),
            filename: 'search.html',
            chunks: ['search'],
            inject: true,
            minify: {
                html5: true,
                collapseWhitespace: true,
                preserveLineBreaks: false,
                minifyCSS: true,
                minifyJS: true,
                removeComments: false
            }
        })
    ]
}
- 1
- 2
- 3
- 4
- 5
- 6
- 7
- 8
- 9
- 10
- 11
- 12
- 13
- 14
- 15
- 16
- 17
- 18
案例
多入口、js 文件指纹打包
// search.js
document.write('search page');

// index.js
import { HelloWorld } from "./HelloWord";

document.write(HelloWorld);

// HelloWorld.js
export function HelloWorld() {
  return 'HelloWorld';
}

// webpack.config.js
'use strict';

const path = require('path');

module.exports = {
  entry: {
    index: '/src/index.js',
    search: './src/search.js'
  },
  output: {
    path: path.join(__dirname, 'dist'),
    filename: '[name]_[contenthash:8].js'
  },
  mode: 'production'
};
- 1
- 2
- 3
- 4
- 5
- 6
- 7
- 8
- 9
- 10
- 11
- 12
- 13
- 14
- 15
- 16
- 17
- 18
- 19
- 20
- 21
- 22
- 23
- 24
- 25
- 26
- 27
- 28
- 29

解析 ES6 和 react jsx 语法
- 安装 babel-loader 等开发依赖(-D / --save-dev)
npm install @babel/core @babel/preset-env babel-loader -D
- 1
- 新建
.babelrc文件
{
  "presets": [
    "@babel/preset-env"
  ]
}
- 1
- 2
- 3
- 4
- 5
- 配置 loader
module.exports = {
  module: {
    rules: [
      { test: /\.js$/, use: 'babel-loader' }
    ]
  },
}
- 1
- 2
- 3
- 4
- 5
- 6
- 7
- 修改 index.js 文件
import { HelloWorld } from "./HelloWord";
const sy = new Symbol('sy');
document.write(HelloWorld + sy);
- 1
- 2
- 3
- 执行
npm run build

- 安装 react react-dom @babel/preset-react -D
npm install react react-dom @babel/preset-react -D
- 1
- 配置
.babelrc文件
{
  "presets": [
    "@babel/preset-env",
    "@babel/preset-react"
  ]
}
- 1
- 2
- 3
- 4
- 5
- 6
- 修改 search.js 文件:引入 React ,使用 React 渲染 Sreach 组件到 root 结点上
import React from 'react';
import ReactDOM from 'react-dom';

class Search extends React.Component {
  render() {
    return <>
      This is a sreach page
    </>;
  }
}

ReactDOM.render(<Search />, document.getElementById('root'));
- 1
- 2
- 3
- 4
- 5
- 6
- 7
- 8
- 9
- 10
- 11
- 12
-
执行
npm run build -
dist 目录下手动创建 index.html 文件,引入 search_xxx.js 文件(注意: root 结点一定要在 script 脚本之前)
<!DOCTYPE html>
<html lang="en">

  <head>
    <meta charset="UTF-8">
    <meta http-equiv="X-UA-Compatible"
          content="IE=edge">
    <meta name="viewport"
          content="width=device-width, initial-scale=1.0">
    <title>Document</title>
  </head>

  <body>
    <div id="root"></div>
    <script src="./search_978f2253.js"></script>
  </body>

</html>
- 1
- 2
- 3
- 4
- 5
- 6
- 7
- 8
- 9
- 10
- 11
- 12
- 13
- 14
- 15
- 16
- 17
- 18

解析 css、less、sass
- 安装 style-loader css-loader
- css-loader 加载 css 文件,并转换为 commonjs 对象
- style-loader 将样式通过
npm install style-loader css-loader -D
- 1
- 配置 webpack.config.js 文件
module.exports = {
 module: {
    rules: [
      { test: /\.js$/, use: 'babel-loader' },
+      { test: /\.css$/, use: ['style-loader', 'css-loader'] }
    ]
  },
}
- 1
- 2
- 3
- 4
- 5
- 6
- 7
- 8
- 新建 search.css 文件
.bg {
  background-color: #ccc;
}
- 1
- 2
- 3
- search.js 中引入使用
import React from 'react';
import ReactDOM from 'react-dom';
+import './search.css';
class Search extends React.Component {
  render() {
    return <>
+      <h1 class="bg"> This is a sreach page</h1>
    </>;
  }
}

ReactDOM.render(<Search />, document.getElementById('root'));
- 1
- 2
- 3
- 4
- 5
- 6
- 7
- 8
- 9
- 10
- 11
- 12
- 执行
npm run build - dist 目录下手动创建 index.html 文件,引入 search.js 文件

- 安装 less 、less-loader
npm install less-loader less -D
- 1
- 创建 search.less 文件
@bg:#ccc;
.bg {
  background:@bg ;
}
- 1
- 2
- 3
- 4
- 引入到 search.js 中使用
- 配置 webpack.config.js 文件
module.exports = {
    module: {
        rules: [
            ...
            { test: /\.less$/, use: ['style-loader', 'css-loader', 'less-loader'] },
            ...
        ]
    },
}
- 1
- 2
- 3
- 4
- 5
- 6
- 7
- 8
- 9

文字、图片解析
- 安装 file-loader
npm install file-loader -D
- 1
- 配置 file-loader
{
    ...
    module:{
        rules:[
            { test: /\.(png|jpg|jpeg|svg|gif)$/, use: 'file-loader' }
    ]
    }
    ...
}
- 1
- 2
- 3
- 4
- 5
- 6
- 7
- 8
- 9
- search.js 文件引入 图片文件
import React from 'react';
import ReactDOM from 'react-dom';
import './search.css';
+import logo from './image/1.jpg';
class Search extends React.Component {
  render() {
    return <>
      <h1 class="bg"> This is a sreach page</h1>
+      <img src={logo} alt="" />
    </>;
  }
}

ReactDOM.render(<Search />, document.getElementById('root'));
- 1
- 2
- 3
- 4
- 5
- 6
- 7
- 8
- 9
- 10
- 11
- 12
- 13
- 14

热更新 webpack-dev-server
- 安装 webpack-dev-server
npm install webpack-dev-server -D
- 1
-
HotModuleReplacementPlugin插件 均为 内置插件,无需安装 -
配置 webpack.config.js (目前的版本已经不再需要手动引入 HotModuleReplacementPlugin 插件了)
module.exports = {
    mode: 'development',
    devServer: {
        port: 3001,
        compress: true,
        // 设置从目录提供静态资源文件的选项,默认 为 'public'
        static: {
             static: {
+                directory: path.join(process.cwd(), 'public'), // 提供静态文件
+                publicPath: '/' // 提供bundle 文件(热更新不需要磁盘 I/O,保存在内存中)
            },
        },
        // 设置浏览器是否显示错误、警告信息
        client: {
          overlay: {
            errors: true,
            warnings: true
          }
        }
    }
}
- 1
- 2
- 3
- 4
- 5
- 6
- 7
- 8
- 9
- 10
- 11
- 12
- 13
- 14
- 15
- 16
- 17
- 18
- 19
- 20
- 21

js、css、html压缩(css提取单独文件)
js
- webpack内置了
Uglifyjs-webpack-plugin若需要改动,可手动配置
css压缩与提取
- webpack 5.x 版本使用 css-minimizer-webpack-plugin
npm install css-minimizer-webpack-plugin --save-dev
- 1
- 配置 webpack.config.js
const CssMinimizerWebpackPlugin = require('css-minimizer-webpack-plugin')
module.exports = {
    optimizetion:{
        minimizer:[
            new CssMinimizerWebpackPlugin()
        ]
    }
}
- 1
- 2
- 3
- 4
- 5
- 6
- 7
- 8
- 安装 mini-css-extract-plugin 插件,使用该插件的 loader 将 css 文件抽离成单独的文件
npm install mini-css-extract-plugin -D
- 1
- 配置 webpack.config.js
- 注意:一旦使用 style-loader,就不能使用 mini-css-extract-plugin,二者是不同的运行机制
- style-loader 是创建 style 标签,将样式包裹并插入 head 中
- mini-css-extract-plugin 是提取css到单独文件,使用 link 标签引入
- 使用 mini-css-extract-plugin.loader 处理样式文件解析过程
- 同时在 plugins 中生成一个实例对象配置对应样式文件的命名规则
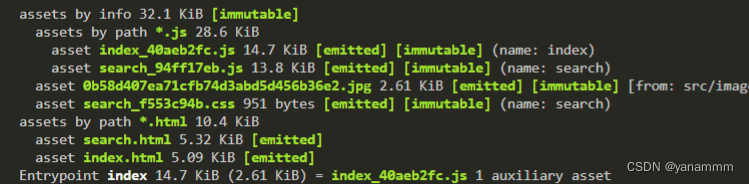
'use strict';
const MiniCssExtractPlugin = require('mini-css-extract-plugin');

module.exports = {
...
    module: {
        rules: [
			...
            // { test: /\.css$/, use: ['style-loader', 'css-loader'] },
            // { test: /\.less$/, use: ['style-loader', 'css-loader', 'less-loader'] }, // 创建 style 标签,插入 head
            { test: /\.css$/, use: [MiniCssExtractPlugin.loader, 'css-loader'] },// MiniCssExtractPlugin.loader创建 link 标签引入样式文件
            { test: /\.less$/, use: [MiniCssExtractPlugin.loader, 'css-loader', 'less-loader'] },
        ]
    },
    plugins: [
        // 指定单独提取出来的 css 文件的命名规则
        new MiniCssExtractPlugin({
            filename: '[name]_[contenthash:8].css'
        }),
    ]

};
- 1
- 2
- 3
- 4
- 5
- 6
- 7
- 8
- 9
- 10
- 11
- 12
- 13
- 14
- 15
- 16
- 17
- 18
- 19
- 20
- 21
- 22
html
- 安装 html-webpack-plugin 为入口文件创建 html 文件(尤其是随着编译而改变 hash 的 webpack bundle 尤其有用
npm install html-webpack-plugin -D
- 1
- src 目录下创建两个空的 html 文件作为配置的 template
- 如果需要查看效果的话,需要在 search.html 中创建一个 root 结点
<!-- search.html -->
<!DOCTYPE html>
<html lang="en">

  <head>
    <meta charset="UTF-8">
    <meta http-equiv="X-UA-Compatible"
          content="IE=edge">
    <meta name="viewport"
          content="width=device-width, initial-scale=1.0">
    <title>Search</title>
  </head>

  <body>
    <div id="root"></div>

  </body>

</html>
- 1
- 2
- 3
- 4
- 5
- 6
- 7
- 8
- 9
- 10
- 11
- 12
- 13
- 14
- 15
- 16
- 17
- 18
- 19
<!-- index.html -->
<!DOCTYPE html>
<html lang="en">

  <head>
    <meta charset="UTF-8">
    <meta http-equiv="X-UA-Compatible"
          content="IE=edge">
    <meta name="viewport"
          content="width=device-width, initial-scale=1.0">
    <title>Search</title>
  </head>

  <body>

  </body>

</html>
- 1
- 2
- 3
- 4
- 5
- 6
- 7
- 8
- 9
- 10
- 11
- 12
- 13
- 14
- 15
- 16
- 17
- 18
- 19
- 配置 webpack.config.js
- 目前有多少个入口,就需要手动创建多少个插件实例来创建 html 模板
'use strict';

const path = require('path');
const webpack = require('webpack');
const MiniCssExtractPlugin = require('mini-css-extract-plugin');
const CssMinimizerWebpackPlugin = require('css-minimizer-webpack-plugin');
const HtmlWebpackPlugin = require('html-webpack-plugin');

module.exports = {
    entry: {
    index: '/src/index.js',
    search: './src/search.js'
    },
    ...
    mode: 'development',
    plugins: [
        // 指定单独提取出来的 css 文件的命名规则
        new MiniCssExtractPlugin({
          filename: '[name]_[contenthash:8].css'
        }),
        new HtmlWebpackPlugin({
          template: path.join(__dirname, 'src/search.html'),
          filename: 'search.html',
          chunk: ['search'],
          inject: true,
          minify: {
            html5: true,
            collapseWhitespace: true,
            preserveLinkBreaks: false,
            minifyCSS: true,
            minifyJS: true,
            removeComments: false
          }
        }),
        new HtmlWebpackPlugin({
          template: path.join(__dirname, 'src/index.html'),
          filename: 'index.html',
          chunks: ['index'],
          inject: true,
          minify: {
            html5: true,
            collapseWhitespace: true,
            preserveLinkBreaks: false,
            minifyCSS: true,
            minifyJS: true,
            removeComments: false
          }
        })
    ],
    ...
};
- 1
- 2
- 3
- 4
- 5
- 6
- 7
- 8
- 9
- 10
- 11
- 12
- 13
- 14
- 15
- 16
- 17
- 18
- 19
- 20
- 21
- 22
- 23
- 24
- 25
- 26
- 27
- 28
- 29
- 30
- 31
- 32
- 33
- 34
- 35
- 36
- 37
- 38
- 39
- 40
- 41
- 42
- 43
- 44
- 45
- 46
- 47
- 48
- 49
- 50
- 51
清理构建目录
有两种方式:
- 通过 npm scripts 清理构建目录
rm -rf ./dist && webpack
rimraf ./dist && webpack
- 1
- 2
- 使用插件 clean-webpack-plugin
- 默认会删除 output 指定的输出目录
npm install clean-webpack-plugin -D
- 1
CSS增强(兼容)
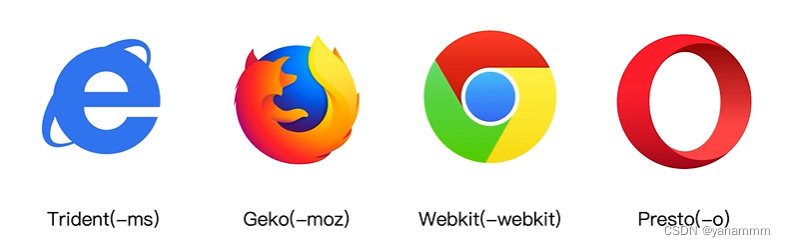
postcss-loader、autoprefixer 自动补齐 css3 前缀
浏览器前缀:
- Trident (-ms)
- Geko (-moz)
- Webkit (-webkit)
- Presto (-o)
- postcss-loader 确保在 css-loader 之前使用,放在 less-loader 之前问题也不大
npm install postcss-loader autoprefixer postcss-preset-env -D
- 1
-
webpack 5 使用需要额安装 postcss-preset-env
-
配置 package.json 的 浏览器兼容选项 browserslist
{
  "browserslist": {
    "production": [
      ">0.2%",
      "not dead",
      "not op_mini all"
    ],
    "development": [
      "last 1 chrome version",
      "last 1 firefox version",
      "last 1 safari version"
    ]
  },
}
- 1
- 2
- 3
- 4
- 5
- 6
- 7
- 8
- 9
- 10
- 11
- 12
- 13
- 14
- 配置 webpack.prod.js
const autoprefixer = require('autoprefixer');
module.exports = {
module:{
    rules:[
        {
            test: /\.less$/,
            use: [
                MiniCssExtractPlugin.loader,
                'css-loader',
                'less-loader',
                {
                loader: 'postcss-loader',
                options: {
                  postcssOptions: {
                    plugins: ["autoprefixer","postcss-preset-env"]
                  }
                }
                }
            ]
        },
    ]
}
}
- 1
- 2
- 3
- 4
- 5
- 6
- 7
- 8
- 9
- 10
- 11
- 12
- 13
- 14
- 15
- 16
- 17
- 18
- 19
- 20
- 21
- 22
- 23

移动端 px 自动转 rem (px2rem-loader 配合 lib-flexible.js)
二者必须配合使用
px2rem-loader 以构建的手段将 px 转换成了 rem
但是rem 和 px 的单位计算并不清楚,flexible 的最用是动态计算不同设备下的 rem 相对 px 的单位,即 计算根元素 html 结点的 font-size 的大小
- 安装 px2rem-loader
npm install px2rem-loader -D
- 1
- 使用(注意使用的时候,需要在 less-loader/sass-loader 之后 css-loader 之前使用,否则会报错 链式调用,从右到左)
- 可以设置 exclude 忽略 node_modules 里面的模块
- 也可使用 /*no*/来设置某一行样式不进行 px2rem 转换
module.exports = {
    module:{
        rules:[
            {
                test: /\.css$/,
                use:[
                    ...
                    {
                        loader: 'px2rem-loader',
                        options: {
                            remUnit: 75,
                            remPrecision: 8
                        }
                    }
                    ...
                ]
            },
            {
                test: /\.less$/,
                use: [
                    // 'style-loader',
                    MiniCssExtractPlugin.loader,
                    'css-loader',
                    {
                        loader: 'postcss-loader',
                        options: {
                            postcssOptions: {
                                plugins: ["autoprefixer"]
                            }
                        }
                    },
                    {
                        loader: 'px2rem-loader',
                        options: {
                            remUnit: 75,
                            remPrecision: 8
                        }
                    },
                    'less-loader',
                ]
            },
        ]
    }
}
- 1
- 2
- 3
- 4
- 5
- 6
- 7
- 8
- 9
- 10
- 11
- 12
- 13
- 14
- 15
- 16
- 17
- 18
- 19
- 20
- 21
- 22
- 23
- 24
- 25
- 26
- 27
- 28
- 29
- 30
- 31
- 32
- 33
- 34
- 35
- 36
- 37
- 38
- 39
- 40
- 41
- 42
- 43
- 44
- 安装 lib-flexible.js
npm install lib-flexible -S
- 1
- 此处直接将 lib-flexible.js 文件中内容直接复制到 html 模板的 head 中(后续的资源内联可解决该问题)
<!DOCTYPE html>
<html lang="en">

  <head>
    <meta charset="UTF-8">
    <meta http-equiv="X-UA-Compatible"
          content="IE=edge">
    <meta name="viewport"
          content="width=device-width, initial-scale=1.0">
    <title>Search</title>
+    <script type="text/javascript">
+        <!-- flexible.js 文件信息拷贝至此 -->
+    </script>
  </head>

  <body>
    <div id="root"></div>
    Search 页面
  </body>

</html>
- 1
- 2
- 3
- 4
- 5
- 6
- 7
- 8
- 9
- 10
- 11
- 12
- 13
- 14
- 15
- 16
- 17
- 18
- 19
- 20
- 21
资源内联
意义
代码层面:
- 页面框架的初始化脚本
- 上报相关打点
- css 内联避免页面闪动
请求层面:减少 HTTP 网络请求
- 小图片或者字体内联(url-loader)
使用
- html 和 js 内联使用
raw-loader - css 内联有两个方案:
- 借助 style-loader
- html-inline-css-webpack-plugin 插件
html 、js 内联
- 安装 raw-loader
npm install raw-loader -D
- 1
- 安装 lib-flexible.js 库
npm install lib-flexible -S
- 1
-
在使用了 html-webpack-plugin 生成 html 模板的情况下,默认使用的 ejs 模板引擎 ,支持 <%= %>
-
修改 webpack.prod.js
module.export = {
    module: {
        rules:[
            {
                resourceQuery: /raw/,
                type: 'asset/source'
            }
        ]
    }
}
- 1
- 2
- 3
- 4
- 5
- 6
- 7
- 8
- 9
- 10
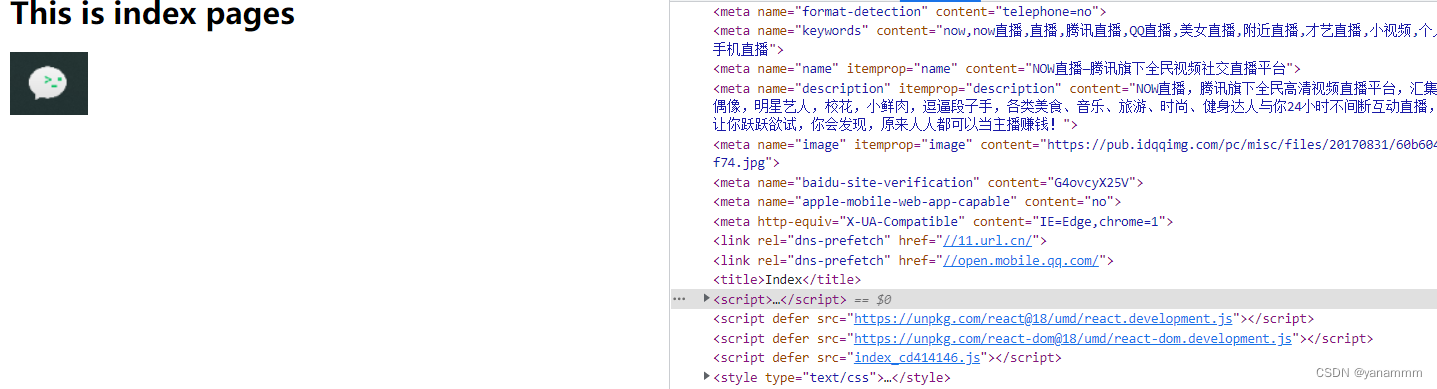
- /public 目录下创建 meta.html 静态文件
<meta charset="UTF-8">
<meta name="viewport"
      content="viewport-fit=cover,width=device-width,initial-scale=1,user-scalable=no">
<meta name="format-detection"
      content="telephone=no">
<meta name="keywords"
      content="now,now直播,直播,腾讯直播,QQ直播,美女直播,附近直播,才艺直播,小视频,个人直播,美女视频,在线直播,手机直播">
<meta name="name"
      itemprop="name"
      content="NOW直播—腾讯旗下全民视频社交直播平台">
<meta name="description"
      itemprop="description"
      content="NOW直播,腾讯旗下全民高清视频直播平台,汇集中外大咖,最in网红,草根偶像,明星艺人,校花,小鲜肉,逗逼段子手,各类美食、音乐、旅游、时尚、健身达人与你24小时不间断互动直播,各种奇葩刺激的直播玩法,让你跃跃欲试,你会发现,原来人人都可以当主播赚钱!">
<meta name="image"
      itemprop="image"
      content="https://pub.idqqimg.com/pc/misc/files/20170831/60b60446e34b40b98fa26afcc62a5f74.jpg">
<meta name="baidu-site-verification"
      content="G4ovcyX25V">
<meta name="apple-mobile-web-app-capable"
      content="no">
<meta http-equiv="X-UA-Compatible"
      content="IE=Edge,chrome=1">
<link rel="dns-prefetch"
      href="//11.url.cn/">
<link rel="dns-prefetch"
      href="//open.mobile.qq.com/">
- 1
- 2
- 3
- 4
- 5
- 6
- 7
- 8
- 9
- 10
- 11
- 12
- 13
- 14
- 15
- 16
- 17
- 18
- 19
- 20
- 21
- 22
- 23
- 24
- 25
- 26
- 将资源内联进 index.ejs(插件生成的模板) 内联 js 和 html
<!DOCTYPE html>
<html lang="en">

  <head>
    <%= require('../public/meta.html?raw')
        %>

      <title>Index</title>

      <script><%= require('../node_modules/lib-flexible/flexible.js?raw')
          %></script>
  </head>

  <body>


  </body>

</html>
- 1
- 2
- 3
- 4
- 5
- 6
- 7
- 8
- 9
- 10
- 11
- 12
- 13
- 14
- 15
- 16
- 17
- 18
- 19
- 20
css 内联
- 安装 lib-flexible (手淘的 lib-flexible 库:页面渲染时计算根元素的 font-size 值)
npm install lib-flexible -S
- 1
- 安装 mini-css-extract-plugin 和 html-inline-css-webpack-plugin
- mini-css-extract-plugin 先将 css 文件抽成一个单独文件
- 再使用 html-inline-css-webpack-plugin 将 css 文件内联到模板 html 里面(注意 html-webpack-plugin 要在前面)有模板之后才能注入
npm install mini-css-extract-plugin html-inline-css-webpack-plugin -D
- 1
- 配置 webpack.prod.js
'use strict';

const path = require('path');
const MiniCssExtractPlugin = require('mini-css-extract-plugin');

const HtmlWebpackPlugin = require('html-webpack-plugin');

const HtmlInlineCssWebpackPlugin = require('html-inline-css-webpack-plugin').default;

module.exports = {
  ...
  mode: 'production',
  plugins: [

    new MiniCssExtractPlugin({
      filename: '[name]_[contenthash:8].css'
    }),
    new HtmlWebpackPlugin({
      template: path.join(__dirname, '/src/index.html'),
      filename: 'index.html',
      chunks: ['index'],
      inject: true
    }),
    new HtmlWebpackPlugin({
      template: path.join(__dirname, '/src/search.html'),
      filename: 'search.html',
      chunks: ['search'],
      inject: true
    }),
    new HtmlInlineCssWebpackPlugin()
  ],
  ...
};
- 1
- 2
- 3
- 4
- 5
- 6
- 7
- 8
- 9
- 10
- 11
- 12
- 13
- 14
- 15
- 16
- 17
- 18
- 19
- 20
- 21
- 22
- 23
- 24
- 25
- 26
- 27
- 28
- 29
- 30
- 31
- 32
- 33
多页面打包通用方案
基本思路
每个页面对应一个 entry,一个 html-webpack-plugin
缺点:每次增删页面都需要改 webpack 配置
动态获取 entry 和 设置 html-webpack-plugin 数量(利用 glob.sync)
var glob = require('glob')
entry: glob.sync( path.join(__dirname, './src/*/index.js') )
- 1
- 2
-
重新设置目录结构
-
每个入口文件以
src/ 入口文件名 / index.js形式创建 -
使用 * 号正则匹配所有符合的目录(获取入口文件列表)
-
安装 glob
npm install glob -D
- 1
- 自定义函数处理 MPA (Multi Page web Application 多页面应用)
- 该函数处理生成 html-webpack-plugin 模板 和 入口文件对象
setMPA = () => {
    let entry = {}
    let HtmlWebpackPlugins = []
    /* 具体逻辑 */
    return { entry, HtmlWebpackPlugins }
}
- 1
- 2
- 3
- 4
- 5
- 6
glob.sync( path.join(__dirname, './src/*/index.js') )// 同步方法获取符合条件的目录列表
// 由于在 windows 中获取的绝对路径是 \ 形式的,需要手动转换一下
- 1
- 2
- 3
'use strict';


const path = require('path');
const MiniCssExtractPlugin = require('mini-css-extract-plugin');
const { CleanWebpackPlugin } = require('clean-webpack-plugin');
const HtmlWebpackPlugin = require('html-webpack-plugin');
const autoprefixer = require('autoprefixer');
const HtmlInlineCssWebpackPlugin = require('html-inline-css-webpack-plugin').default;

+const glob = require('glob');

+const setMPA = () => {
  let entry = {};
  let htmlWebpackPlugins = [];
  let url = path.join(__dirname, 'src/*/index.js').replaceAll("\\",
    '/');

  const entryFiles = glob.sync(url);
  Object.keys(entryFiles)
    .map(index => {

      /**
       * 匹配路由
       */
      const entryFile = entryFiles[index];
      // src/(.*)/index.js   // . 匹配除了新行之外的所有, * 表示 0或0个以上
      const match = entryFile.match(/src\/(.*)\/index.js/);
      // [
      //   'src/search/index.js',
      //   'search',
      //   index: 30,
      //   input: 'D:/Z-workSpace/React/my-react/src/search/index.js',
      //   groups: undefined
      // ]
      const pageName = match && match[1];
      entry[pageName] = entryFile;
      htmlWebpackPlugins.push(
        new HtmlWebpackPlugin({
          template: path.join(__dirname, `/src/${pageName}/index.html`),
          filename: `${pageName}.html`,
          chunks: [pageName],
          inject: true
        }));
    });

  return {
    entry, htmlWebpackPlugins
  };
};

+let { entry, htmlWebpackPlugins } = setMPA();
module.exports = {
+  // entry: {
+  //   index: '/src/index.js',
+  //   search: './src/search.js'
+  // },
+  entry,
  output: {
    path: path.join(__dirname, 'dist'),
    filename: '[name]_[contenthash:8].js'
  },
  mode: 'production',
  plugins: [
    autoprefixer,
    new CleanWebpackPlugin(),
    new MiniCssExtractPlugin({
      filename: '[name]_[contenthash:8].css'
    }),
+    // new HtmlWebpackPlugin({
+    //   template: path.join(__dirname, '/src/index.html'),
+    //   filename: 'index.html',
+    //   chunks: ['index'],
+    //   inject: true
+    // }),
+    // new HtmlWebpackPlugin({
+    //   template: path.join(__dirname, '/src/search.html'),
+    //   filename: 'search.html',
+    //   chunks: ['search'],
+    //   inject: true
+    // }),
+    new HtmlInlineCssWebpackPlugin()
+  ].concat(...htmlWebpackPlugins),

};
- 1
- 2
- 3
- 4
- 5
- 6
- 7
- 8
- 9
- 10
- 11
- 12
- 13
- 14
- 15
- 16
- 17
- 18
- 19
- 20
- 21
- 22
- 23
- 24
- 25
- 26
- 27
- 28
- 29
- 30
- 31
- 32
- 33
- 34
- 35
- 36
- 37
- 38
- 39
- 40
- 41
- 42
- 43
- 44
- 45
- 46
- 47
- 48
- 49
- 50
- 51
- 52
- 53
- 54
- 55
- 56
- 57
- 58
- 59
- 60
- 61
- 62
- 63
- 64
- 65
- 66
- 67
- 68
- 69
- 70
- 71
- 72
- 73
- 74
- 75
- 76
- 77
- 78
- 79
- 80
- 81
- 82
- 83
- 84
- 85
使用 sourcemap 定位源码
- eval 使用 eval 包裹模块代码
- source map 产生 .map 文件
- cheap 不包含列信息
- inline 将 .map 作为 DataURL 嵌入,不单独生成 .map 文件
- module 包含 loader 的 sourcemap
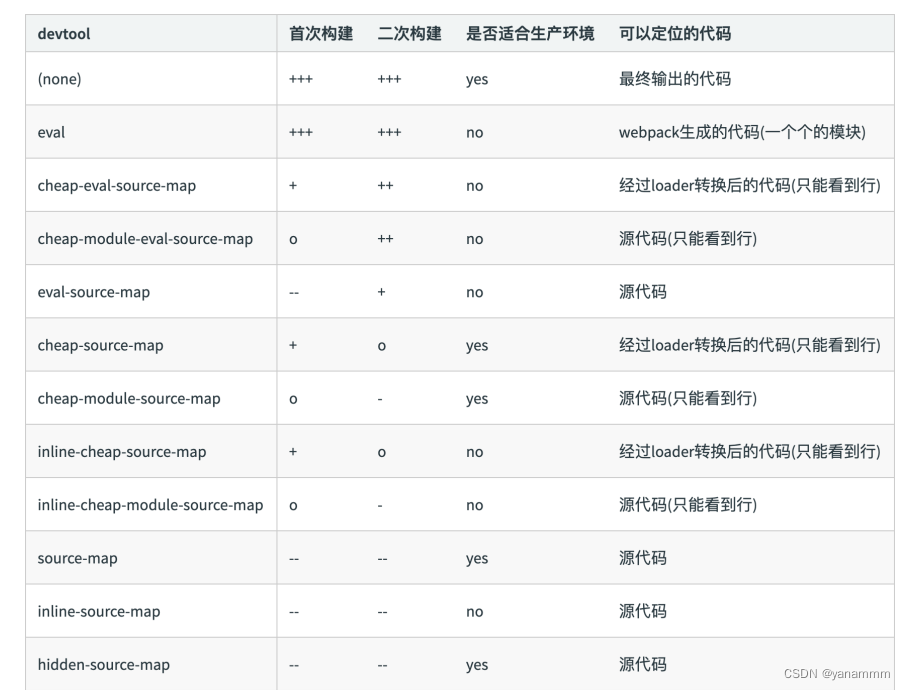
- 设置 devtool 即可(webpack.dev.js 一般开发环境下开启可定位源码位置)
module.exports = {
    devtool: 'source-map'
}
- 1
- 2
- 3
出于对性能的考虑,在生产环境推荐不使用 source map,这样有最好的打包性能。
开发环境开启,线上环境关闭
- 如果想使用,可以使用分析不出来业务逻辑的 source map 类型。
- 线上排查问题的时候可以将 source map 上传到错误监控系统。
- 生产环境:
devtool: source-map;拥有高质量的 source map - 开发环境推荐使用:
devtool: eval-cheap-module-source-map
配置路径别名
module.exports = {
    ...
    resolve: {
        alias: {
          '@': path.join(__dirname, '/'),
          '@src': path.join(__dirname, '/src'),
          '@public': path.join(__dirname, '/public'),
          '@image': path.join(__dirname, '/src/image'),
          '@asset': path.join(__dirname, '/src/asset'),
          '@comp': path.join(__dirname, '/src/components'),
        }
    }
}
- 1
- 2
- 3
- 4
- 5
- 6
- 7
- 8
- 9
- 10
- 11
- 12
- 13
提取页面公共资源
基础库分离
- 思路
- 将 react 、react-dom 基础包通过 cdn 引入,不打入 bundle 中
- 方法
- 使用
html-webpack-externals-plugin分离基础库 - webpack 内置的
SplitChunksPlugin,替代COmmonsChunkPlugin插件- chunks 参数说明
- async 一步引入的库进行分离(默认)
- initial 同步引入的库进行分离
- all 所有引入的库进行分离(推荐)
- chunks 参数说明
- 使用
html-webpack-externals-plugin 设置基础库 cdn
- 安装
html-webpack-externals-plugin设置分离基础库的 cdn
npm install html-webpack-externals-plugin -D
- 1
- 设置需要分离的基础库及其 cdn 地址
- entry 设置 cdn 地址
- module 表示模块名
- global 表示导出的全局名称
modules.exports = {
    plugins:[
        ...
        new HtmlWebpackExternalsPlugin({
          externals: [
            {
              module: 'react',
              entry: 'https://unpkg.com/react@16/umd/react.development.js',
              global: 'React'
            },
            {
              module: 'react-dom',
              entry: 'https://unpkg.com/react-dom@16/umd/react-dom.development.js',
              global: 'ReactDOM'
            }
          ]
        }),
    ]
}
- 1
- 2
- 3
- 4
- 5
- 6
- 7
- 8
- 9
- 10
- 11
- 12
- 13
- 14
- 15
- 16
- 17
- 18
- 19

splitChunksPlugin 代码分割
optimization: {
    splitChunks: {
        chunks: "async",
        minSize: 30000,
        minChunks: 1,
        maxAsyncRequests: 5,
        maxInitialRequests: 3,
        automaticNameDelimiter: '~',
        name: true,
        cacheGroups: {
            vendors: {
                test: /[\\/]node_modules[\\/]/,
                priority: -10
            },
            default: {
                minChunks: 2,
                priority: -20,
                reuseExistingChunk: true
            }
        }
    }
}
- 1
- 2
- 3
- 4
- 5
- 6
- 7
- 8
- 9
- 10
- 11
- 12
- 13
- 14
- 15
- 16
- 17
- 18
- 19
- 20
- 21
- 22
- 23
  module.exports = {
    //...
    optimization: {
      splitChunks: {
        // async:异步引入的库进行分离(默认),  initial: 同步引入的库进行分离, all:所有引入的库进行分离(推荐)
        chunks: 'async',
        minSize: 30000, // 抽离的公共包最小的大小,单位字节
        maxSize: 0, // 最大的大小
        minChunks: 1, // 资源使用的次数(在多个页面使用到), 大于1, 最小使用次数
        maxAsyncRequests: 5,  // 并发请求的数量
        maxInitialRequests: 3, // 入口文件做代码分割最多能分成3个js文件
        automaticNameDelimiter: '~', // 文件生成时的连接符
        automaticNameMaxLength: 30, // 自动自动命名最大长度
        name: true, //让cacheGroups里设置的名字有效
        cacheGroups: { //当打包同步代码时,上面的参数生效
          vendors: {
            test: /[\\/]node_modules[\\/]/,  //检测引入的库是否在node_modlues目录下的
            priority: -10, //值越大,优先级越高.模块先打包到优先级高的组里
            filename: 'vendors.js'//把所有的库都打包到一个叫vendors.js的文件里
          },
          default: {
            minChunks: 2, // 上面有
            priority: -20,  // 上面有
            reuseExistingChunk: true //如果一个模块已经被打包过了,那么再打包时就忽略这个上模块
          }
        }
      }
    }
  };
- 1
- 2
- 3
- 4
- 5
- 6
- 7
- 8
- 9
- 10
- 11
- 12
- 13
- 14
- 15
- 16
- 17
- 18
- 19
- 20
- 21
- 22
- 23
- 24
- 25
- 26
- 27
- 28
- 29
- CacheGroups
- minChunks 模块被引用多少次才对模块进行代码分割
- test 正则匹配条件
- priority 缓存组的优先级
- reuseExistingChunk 如果模块被打包了,遇到相同的模块不会再打包,复用之前的默块
- chunks 类型
- async 异步导入
- sync 同步导入
- all 二者均
- maxAsyncRequests 同时加载的模块数量(包含入口文件及其入口依赖文件所导入模块)
- maxInitialRequests 入口文件进行分割最多分割出多少个模块(超出部分不进行代码分割)对入口文件中直接导入的包数量的统计
- automaticNameDelimiter 文件名连接符(默认 ~)
- name 起的文件名起效 默认值 true
缓存组中的属性
为什么需要缓存组?
cacheGroups 只对同步引入模块有约束作用,且同步导入的模块要进行代码分割必须配置相关的缓存组
异步导入的模块不管有没有缓存组都会对每个异步导入的模块单独生成一个 js 模块
有设置缓存组的话,会将同一个缓存组的模块代码打包同一个模js 文件中;若没有缓存组,是没有办法将两个模块打包到同一个文件中的
module.exports = {
    optimization: {
        splitChunks: {
          minSize: 0,
          cacheGroups: {
            commons: {
              name: 'commons',
              chunks: 'all',
              minChunks: 2
            }
          }
        }
    }
}
- 1
- 2
- 3
- 4
- 5
- 6
- 7
- 8
- 9
- 10
- 11
- 12
- 13
- 14
tree shaking 摇树优化
一个模块可能有多个方法,但其中只有某个方法用到,整个文件就会被打包到 bundle 文件中,tree shaking 就是只把用到的方法打包的 bundle 中,没有用到的会在 uglify 阶段被擦除掉
使用
默认支持,.babelrc 文件中设置 modules: false 即可使用
.production mode 情况下默认开启
必须是 ES6,不支持 cjs
即如果要将 es6 转成 es5,同时又开启 tree-shaking,需要在
.babelrc中设置 modules 为 false不然,babel 会默认将 es6 语法转化成 commonjs ,这样就不能进行 tree-shaking
- 设置 modules: false
{
  "presets": [
    [
      "@babel/preset-env",
      {
        "modules": false
      }
    ],
    [
      "@babel/preset-react",
      {
        "modules": false
      }
    ],
  ]
}
- 1
- 2
- 3
- 4
- 5
- 6
- 7
- 8
- 9
- 10
- 11
- 12
- 13
- 14
- 15
- 16
- 不设置 modules: false
{
  "presets": [
    "@babel/preset-env",
    "@babel/preset-react"
  ]
}
- 1
- 2
- 3
- 4
- 5
- 6
scope hoisting
将所有模块的代码按照引用顺序放在一个函数作用域里,使用重命名一些变量以避免变量名冲突
通过 scope hoisting 可减少声明代码和内存开销
懒加载脚本
-
CommonJS:
require.ensure -
ES6:动态 import (目前没有原生支持,需要 babel 转换)
npm install @babel/plugin-syntax-dynamic-import --save-dev
- 1
- 配置
.babelrc文件
{
    ...
    "plugins":[
        "@babel/plugin-syntax-dynamic-import"
    ]
}
- 1
- 2
- 3
- 4
- 5
- 6
<!-- /src/index/index.js -->
import React from 'react';
import { createRoot } from 'react-dom/client';

class Index extends React.Component {
  constructor(props) {
    super(props);
    this.state = {
      Test: null
    };
    this.handleClick = this.handleClick.bind(this);
  }
  handleClick() {
    console.log('hello');
    import('./test.js').then(res => {
      const { name } = res.default;
      this.setState({
        Test: () => <h1>name</h1>

      });
    });
  }
  render() {
    let { Test } = this.state;
    return <>
      {/* <h1>This is index pages!!!</h1>
      <img src={logo} alt="" /> */}
      {Test ? <Test></Test> : '------'}
      <button onClick={this.handleClick}>btn</button>
    </>;
  }
}

const container = document.getElementById('root');
const root = createRoot(container);
root.render(<Index />);
- 1
- 2
- 3
- 4
- 5
- 6
- 7
- 8
- 9
- 10
- 11
- 12
- 13
- 14
- 15
- 16
- 17
- 18
- 19
- 20
- 21
- 22
- 23
- 24
- 25
- 26
- 27
- 28
- 29
- 30
- 31
- 32
- 33
- 34
- 35
- 36
- 点击按钮会发起一个请求

使用 ESlint
行业里面优秀的 ESlint 规范实践
-
Airbnb
- eslint-config-airbnb
- selint-config-airbnb-base
-
腾讯
- alloyteam 团队
- eslint-config-alloy[https://github.com/AlloyTeam/eslint-config-alloy]
- ivweb 团队
- eslint-config-ivweb[https://github.com/feflow/eslint-config-ivweb]
- alloyteam 团队
指定团队 ESLint 规范
- 不重复造轮子
- 基于 eslint:recommend 配置并改进
- 能够帮助发现代码错误的规则,全部开启
- 帮助保持团队的代码风格统一,而不是限制开发体验
| 规则名 | 错误级别 | 说明 |
|---|---|---|
| for-direction | error | for 循环方向要求必须正确 |
| getter-return | error | getter必须有返回值,并且禁止返回值为 undefined,如 return; |
| no-await-in-loop | off | 允许在循环里面使用 await |
| no-console | off | 允许在代码里面使用 console |
| no-prototype-builtins | warn | 直接调用对象原型链上的方法 |
| valid-jsdoc | off | 函数注释一定要遵守 jsdoc 规则 |
| no-template-curly-in-string | warn | 在字符串里面出现(和)进行警告 |
| accessor-pairs | warn | getter 和 setter 没有成对出现时给出警告 |
| array-callback-return | error | 对于数据相关操作函数如 reduce、map、filter 等,callback 必须有 return |
| block-scoped-var | error | 把 var 关键字看成块级作用域,放置变量提升导致的 bug |
| class-methods-use-this | error | 要求在 class 中合理使用 this,如果某个方法没有使用 this,应该声明为静态方法 |
| complexity | off | 关闭代码复杂度限制 |
| default-case | error | switch-case 语句里面一定需要 default 分支 |
如何执行落地?

-
和 CI/CD 系统集成(webpack 与 CI/CD)
-
本地开发阶段增加,增加 prcommit 钩子
-
安装 husky
npm install husky --save-dev -
增加 npm script 通过
lint-staged增量检查修改的文件
-
-
"sciprts" :{
    "precommit": "lingt-staged"
},
"lint-staged": {
    "linters": {
        "*.{js,scss}": ["eslint --fix", "git add"]
    }
}
- 1
- 2
- 3
- 4
- 5
- 6
- 7
- 8
- 和 webpack 集成(webpack 与 ESLint)
- 使用
eslint-loader构建时检查 JS 规范
- 使用
module.exports = {
    module: {
        rules: [
            {
                test: /\.js$/,
                exclude:/node_modules/,
                use:[
                    'babel-loader',
                    'eslint-loader'
                ]
            }
        ]
    }
}
- 1
- 2
- 3
- 4
- 5
- 6
- 7
- 8
- 9
- 10
- 11
- 12
- 13
- 14
使用(eslint-config-airbnb)
- 安装 eslint (此为 react 项目,若是其他项目需要根据文档进行对应配置)
yarn add eslint eslint-config-airbnb eslint-import-resolver-webpack eslint-plugin-import eslint-plugin-jsx-a11y eslint-plugin-react eslint-plugin-react-hooks eslint-webpack-plugin -D
- 1
- 安装解释器
yarn add babel-eslint -D
- 1
- 创建 eslint 配置文件
.eslintrc.js- extends 继承自一个或者多个(字符串或者数组)
- env 配置指定环境,true 为启动
- rules 可以修改规则
- settings 部分是对 webpack alias 部分的补充(若不设置,会报错,eslint 找不到该目录)
npm install babel-elint -D
- 1
const path = require('path');
module.exports = {
  "extends": 'airbnb',
  "env": {
    "browser": true,
    "es2021": true
  },
  "parserOptions": {
    "ecmaVersion": 12,
    "sourceType": "module"
  },
  "settings": {
    "import/resolver": {
      webpack: {
        config: path.join(__dirname, './webpack.dev.js')
      }
    }
  }
};
- 1
- 2
- 3
- 4
- 5
- 6
- 7
- 8
- 9
- 10
- 11
- 12
- 13
- 14
- 15
- 16
- 17
- 18
- 19
- webpack 中设置
module.exports = {
    plugins:[
        new ESLintWebpackPlugin({
            extensions: ["js", "jsx"],
            exclude: "node_modules",
            fix: true
        }),
    ]
}
- 1
- 2
- 3
- 4
- 5
- 6
- 7
- 8
- 9
|
- 1
| default-case | error | switch-case 语句里面一定需要 default 分支 |
如何执行落地?

-
和 CI/CD 系统集成(webpack 与 CI/CD)
-
本地开发阶段增加,增加 prcommit 钩子
-
安装 husky
npm install husky --save-dev -
增加 npm script 通过
lint-staged增量检查修改的文件
-
-
"sciprts" :{
    "precommit": "lingt-staged"
},
"lint-staged": {
    "linters": {
        "*.{js,scss}": ["eslint --fix", "git add"]
    }
}
- 1
- 2
- 3
- 4
- 5
- 6
- 7
- 8
- 和 webpack 集成(webpack 与 ESLint)
- 使用
eslint-loader构建时检查 JS 规范
- 使用
module.exports = {
    module: {
        rules: [
            {
                test: /\.js$/,
                exclude:/node_modules/,
                use:[
                    'babel-loader',
                    'eslint-loader'
                ]
            }
        ]
    }
}
- 1
- 2
- 3
- 4
- 5
- 6
- 7
- 8
- 9
- 10
- 11
- 12
- 13
- 14
使用(eslint-config-airbnb)
- 安装 eslint (此为 react 项目,若是其他项目需要根据文档进行对应配置)
yarn add eslint eslint-config-airbnb eslint-import-resolver-webpack eslint-plugin-import eslint-plugin-jsx-a11y eslint-plugin-react eslint-plugin-react-hooks eslint-webpack-plugin -D
- 1
- 安装解释器
yarn add babel-eslint -D
- 1
- 创建 eslint 配置文件
.eslintrc.js- extends 继承自一个或者多个(字符串或者数组)
- env 配置指定环境,true 为启动
- rules 可以修改规则
- settings 部分是对 webpack alias 部分的补充(若不设置,会报错,eslint 找不到该目录)
npm install babel-elint -D
- 1
const path = require('path');
module.exports = {
  "extends": 'airbnb',
  "env": {
    "browser": true,
    "es2021": true
  },
  "parserOptions": {
    "ecmaVersion": 12,
    "sourceType": "module"
  },
  "settings": {
    "import/resolver": {
      webpack: {
        config: path.join(__dirname, './webpack.dev.js')
      }
    }
  }
};
- 1
- 2
- 3
- 4
- 5
- 6
- 7
- 8
- 9
- 10
- 11
- 12
- 13
- 14
- 15
- 16
- 17
- 18
- 19
- webpack 中设置
module.exports = {
    plugins:[
        new ESLintWebpackPlugin({
            extensions: ["js", "jsx"],
            exclude: "node_modules",
            fix: true
        }),
    ]
}
- 1
- 2
- 3
- 4
- 5
- 6
- 7
- 8
- 9


