热门标签
热门文章
- 1基于K210芯片的人脸识别智能门禁系统_k210人脸识别门禁
- 2Obsidian Git 多端同步_obsidian 不同电脑 git
- 32024最新1小时零基础编写uniapp和小程序管理后台,基于uniadmin和vue3实现uniapp小程序的网页管理后台_uni-admin
- 4一文搞懂Flink生成StreamGraph_flink streamgraph
- 5开发者导航:分享10个程序员常用的IT资讯网站(第一期)_it资讯什么网站好
- 6华为OD机试D卷——2024真题目录+在线练习地址(华为OD机试华为OD机试华为OD机试华为OD机试华为OD机试华为OD机试华为OD机试华为OD机试华为OD机试华为OD机试华为OD机试华为OD机试华)_华为od机试题库2024
- 7目标检测算法(YOLOv3)_yolov3算法
- 8Oracle中的SQL语言
- 9国产AI全面崛起!盘点11款2019年热门国产AI芯片
- 10深度学习-第四章 LSTM面试题(大厂必问,历经半年整理)
当前位置: article > 正文
微信小程序页面开发-本地生活_为想见你小程序开发本地生活
作者:我家自动化 | 2024-07-01 05:15:30
赞
踩
为想见你小程序开发本地生活
微信小程序开发实践之本地生活
基础准备知识
- 下载小程序开发工具并且创建简单的小程序
- 基础小程序组件使用,API了解
- js,css,html语法了解
2.效果以级实现步骤
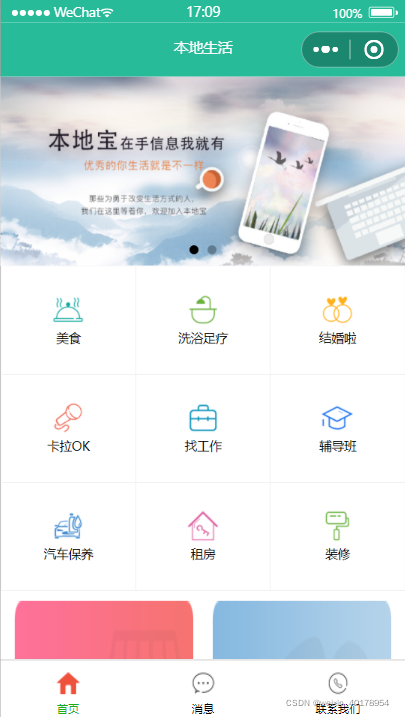
效果:


步骤:
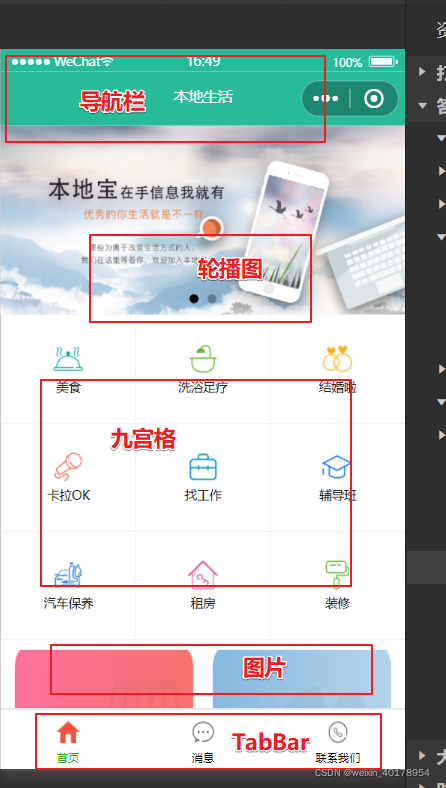
- 1.配置app.json中导航栏、tabBar效果
- 2.配置导航栏
- 3.实现轮播图
- 4.实现九宫格
- 5.实现图片布局
- 1
- 2
- 3
- 4
- 5
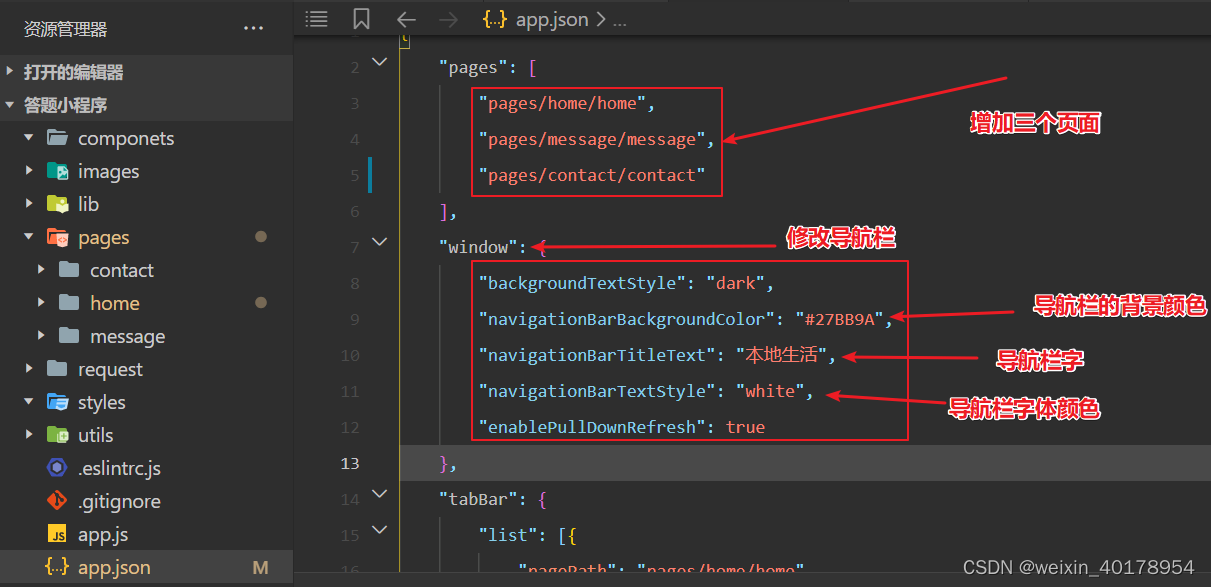
增加三个页面
- 在app.json中删除index
- app.json中增加三个页面
- 修改导航栏

"pages": [
        "pages/home/home",
        "pages/message/message",
        "pages/contact/contact"
    ],
    "window": {
        "backgroundTextStyle": "dark",
        "navigationBarBackgroundColor": "#27BB9A",
        "navigationBarTitleText": "本地生活",
        "navigationBarTextStyle": "white",
        "enablePullDownRefresh": true
    },
- 1
- 2
- 3
- 4
- 5
- 6
- 7
- 8
- 9
- 10
- 11
- 12
配置tabBar效果
在 app.json中 增加tabBar
将icons放入images文件夹中
"tabBar": {
        "list": [{
            "pagePath": "pages/home/home",
            "text": "首页",
            "iconPath": "./images/home.png",
            "selectedIconPath": "./images/home-active.png"
        },{
            "pagePath": "pages/message/message",
            "text": "消息",
            "iconPath": "./images/message.png",
            "selectedIconPath": "./images/message-active.png"
        },{
            "pagePath": "pages/contact/contact",
            "text": "联系我们",
            "iconPath": "./images/contact.png",
            "selectedIconPath": "./images/contact-active.png"
        }]
    }
- 1
- 2
- 3
- 4
- 5
- 6
- 7
- 8
- 9
- 10
- 11
- 12
- 13
- 14
- 15
- 16
- 17
- 18
- 19
- 20
轮播图的实现
pages/home/home.xml根据组件建立图片框架
<!--轮播图区域-->
<!--indicator-dots 属性:显示面板指示点-->
<swiper indicator-dots circular>
  <!--第一页-->
  <swiper-item wx:for="{{swiperList}}" wx:key="id">
    <image src="{{item.image}}"></image>
  </swiper-item>
</swiper>
- 1
- 2
- 3
- 4
- 5
- 6
- 7
- 8
pages/home/home.wxss 设计轮播图样式
/* pages/home/home.wxss */
swiper {
  height: 350rpx;
}
swiper image {
  width: 100%;
  height: 100%;
}
- 1
- 2
- 3
- 4
- 5
- 6
- 7
- 8
pages/home/home.js 通过request获取轮播图图片
步骤:1.在data中添加接收轮播图的数组 : swiperList: [],
2.增加获取函数 getSwiperList()
3.在 onLoad: function (options)中注册函数使之一进入页面就启动:this.getSwiperList()
data: {
      //存放轮播图的数据列表
      swiperList: [],
  },

  onLoad: function (options) {
      this.getSwiperList()
      this.getGridList()
  },
  //获取轮播图数据的方法
  getSwiperList() {
    wx.request({
      url: 'https://www.escook.cn/slides',
      method:'GET',
      success:(res) => {
        this.setData({
          swiperList:res.data
        })
      }
    })
  },
- 1
- 2
- 3
- 4
- 5
- 6
- 7
- 8
- 9
- 10
- 11
- 12
- 13
- 14
- 15
- 16
- 17
- 18
- 19
- 20
- 21
九宫格图标的实现
pages/home/home.xml根据组件建立图片框架
<!--九宫格区域-->
<view class="grid-list">
  <view class="grid-item" wx:for="{{gridList}}" wx:key="id">
    <image src="{{item.icon}}"></image>
    <text>{{item.name}}</text>
  </view>
</view>
- 1
- 2
- 3
- 4
- 5
- 6
- 7
pages/home/home.wxss 设计九宫格样式 难点
/*外围大box*/
.grid-list{
    display:flex;
  	flex:wrap	/*多行且换行显示*/
    border-left: 1rpx solid #efefef;
  	border-top: 1rpx  solid #efefef;
}
/*每个图文*/
.grid-item{
    display:flex
    flex-direction:column;/*文字和图片按照列的方向排放*/
    align-item: center;/*纵向居中*/
    justify-content: center;/*横向居中居中*/
  	border-right: 1rpx solid #efefef;/*边框理解*/
  	border-bottom: 1rpx solid #efefef;
  	box-sizing: border-box;;/*默认是content-box百度自行理解*/
}
/*设置图片和文字的大小*/
.grid-item image {
  width: 60rpx;
  height: 60rpx;
}
.grid-item text {
  font-size: 24rpx;
  margin-top: 10rpx;
}
- 1
- 2
- 3
- 4
- 5
- 6
- 7
- 8
- 9
- 10
- 11
- 12
- 13
- 14
- 15
- 16
- 17
- 18
- 19
- 20
- 21
- 22
- 23
- 24
- 25
- 26
- 27
pages/home/home.js中设置图片的获取同上轮播图
 data: {
      //存放轮播图的数据列表
      swiperList: [],
      //存放九宫格数据列表
      gridList: []
  },

  /**
   * 生命周期函数--监听页面加载
   */
  onLoad: function (options) {
      this.getSwiperList()
      this.getGridList()
  },
  //获取轮播图数据的方法
  getSwiperList() {
    wx.request({
      url: 'https://www.escook.cn/slides',
      method:'GET',
      success:(res) => {
        this.setData({
          swiperList:res.data
        })
      }
    })
  },
  // 获取九宫格数据的方法
  getGridList() {
    wx.request({
      url: 'https://www.escook.cn/categories',
      method: 'GET',
      success: (res) => {
        this.setData({
          gridList: res.data
        })
      }
    })
  },
- 1
- 2
- 3
- 4
- 5
- 6
- 7
- 8
- 9
- 10
- 11
- 12
- 13
- 14
- 15
- 16
- 17
- 18
- 19
- 20
- 21
- 22
- 23
- 24
- 25
- 26
- 27
- 28
- 29
- 30
- 31
- 32
- 33
- 34
- 35
- 36
- 37
- 38
末尾图片设置(简单)
pages/home/home.xml根据组件建立图片框架
<!--图片区域-->
<view class="img-box">
  <image src="../../images/link-01.png"></image>
  <image src="../../images/link-02.png"></image>
</view>
- 1
- 2
- 3
- 4
- 5
pages/home/home.wxss 设计图片样式
.img-box{
	display:flex;
    justify-content:space-around;
    padding: 20rpx 10rpx;/* 上边下边 | 左边右边 */

}
.img-box image {
  width: 45%;
}
- 1
- 2
- 3
- 4
- 5
- 6
- 7
- 8
- 9
声明:本文内容由网友自发贡献,不代表【wpsshop博客】立场,版权归原作者所有,本站不承担相应法律责任。如您发现有侵权的内容,请联系我们。转载请注明出处:https://www.wpsshop.cn/w/我家自动化/article/detail/775211
推荐阅读
相关标签


