
- 1用Python模拟识别图片验证码并发送手机验证码
- 2Eclipse表示:“正在使用或无法创建的工作区,请选择其他工作区。”如何解锁工作区?_workspace cannot be locked
- 3项目经验-王红波_2006年中国首届杰出数据库工程师 王红波
- 4c++ ShellExecute 执行cmd命令_c++ shellexecute cmd
- 5Android开发中三个绘图工具(Paint,Canvas,Path)的基本用法(总结)_android.graphics.paint是什么
- 6【探索Linux】—— 强大的命令行工具 P.28(网络编程套接字 —— 简单的UDP网络程序模拟实现)
- 7FFmpeg在win10上编译安装(配置libx264)_windows上安装libx264
- 8Apache POI处理EXCEL中的图片_poi 图片
- 9select 中where 条件的技巧写法(where 1=1 and ....)_select where (条件and条件) and (条件and条件) and (条件and条件)
- 10org.apache.commons.logging.LogFactory_orgapachecommonslogging
Harmony OS ServiceAbility学习(二)_鸿蒙 serviceability socket
赞
踩
ServiceAbility基本概念
其实这玩意就跟Android的Service一毛一样,Android的Service有什么特性,ServiceAbility就有什么特性,除了名字不一样,其它完全一样。所以这玩意启动后,要记得退出,耗时任务要单独开启线程。
创建Service
创建很简单,注册也很简单,基本ide会自动注册,只不过有些东西需要手动添加
public class MyServiceAbility extends Ability {
    private static final HiLogLabel LABEL_LOG = new HiLogLabel(3, 0xD001100, "MainAbility");

    @Override
    public void onStart(Intent intent) {
        HiLog.error(LABEL_LOG, "MyServiceAbility::onStart");
        super.onStart(intent);
    }

    @Override
    public void onBackground() {
        super.onBackground();
        HiLog.error(LABEL_LOG, "MyServiceAbility::onBackground");
    }

    @Override
    public void onStop() {
        super.onStop();
        HiLog.error(LABEL_LOG, "MyServiceAbility::onStop");
    }

    @Override
    public void onCommand(Intent intent, boolean restart, int startId) {
        HiLog.error(LABEL_LOG, "MyServiceAbility::onCommand");
    }

    /**
     * 返回给客户端
     * @param intent
     * @return
     */
    @Override
    public IRemoteObject onConnect(Intent intent) {
        HiLog.error(LABEL_LOG, "MyServiceAbility::onConnect");
        return new MyRemoteObject();
    }

    @Override
    public void onDisconnect(Intent intent) {
        HiLog.error(LABEL_LOG, "MyServiceAbility::onDisconnect");
    }


    //创建自定义LocalRemoteObject
    private class MyRemoteObject extends LocalRemoteObject {
        public MyRemoteObject() {
        }
    }
}

- 1
- 2
- 3
- 4
- 5
- 6
- 7
- 8
- 9
- 10
- 11
- 12
- 13
- 14
- 15
- 16
- 17
- 18
- 19
- 20
- 21
- 22
- 23
- 24
- 25
- 26
- 27
- 28
- 29
- 30
- 31
- 32
- 33
- 34
- 35
- 36
- 37
- 38
- 39
- 40
- 41
- 42
- 43
- 44
- 45
- 46
- 47
- 48
- 49
看一下注册文件:
 {
        "name": "com.example.hmlearning.ui.MyServiceAbility",
        "icon": "$media:icon",
        "description": "$string:myserviceability_description",
        "type": "service",//类型是service
        "visible": true,//允许其他应用调用这个service
        "backgroundModes": [
          "dataTransfer",
          "audioPlayback",
          "audioRecording",
          "pictureInPicture",
          "voip",
          "location",
          "bluetoothInteraction",
          "wifiInteraction"
        ]
      }
- 1
- 2
- 3
- 4
- 5
- 6
- 7
- 8
- 9
- 10
- 11
- 12
- 13
- 14
- 15
- 16
- 17
启动Service
非常简单,就跟Android启动差不多
启动同一设备Service
/**
 * 启动本地Service
 *
 * DeviceId:如果是本地设备,则可以直接留空;
 * 如果是远程设备,通过ohos.distributedschedule.interwork.DeviceManager提供的getDeviceList获取设备列表
 *
 * BundleName:表示包名称
 *
 * AbilityName:表示待启动的Ability名称
 *
 **/
public static void startLocalService(Ability ability) {
        Intent intent = new Intent();
        Operation operation = new Intent.OperationBuilder()
                .withDeviceId("")
                .withBundleName("com.example.hmlearning")
                .withAbilityName("com.example.hmlearning.ui.MyServiceAbility")
                .build();
        intent.setOperation(operation);
        ability.startAbility(intent);
    }
- 1
- 2
- 3
- 4
- 5
- 6
- 7
- 8
- 9
- 10
- 11
- 12
- 13
- 14
- 15
- 16
- 17
- 18
- 19
- 20
- 21
停止同一设备Service
 /**
     * 停止service
     * @param ability
     */
    public static void stopLocalService(Ability ability){
        Intent intent = new Intent();
        Operation operation = new Intent.OperationBuilder()
                .withDeviceId("")
                .withBundleName("com.example.hmlearning")
                .withAbilityName("com.example.hmlearning.ui.MyServiceAbility")
                .build();
        intent.setOperation(operation);
        ability.stopAbility(intent);
    }
- 1
- 2
- 3
- 4
- 5
- 6
- 7
- 8
- 9
- 10
- 11
- 12
- 13
- 14
启动远程设备Service
 	/**
 	 *
     * 启动远程service
     */
    public static void startRemoteService(Ability ability) {
        Intent intent = new Intent();
        Operation operation = new Intent.OperationBuilder()
                .withDeviceId("deviceId")
                .withBundleName("com.domainname.hiworld.himusic")
                .withAbilityName("com.domainname.hiworld.himusic.ServiceAbility")
                .withFlags(Intent.FLAG_ABILITYSLICE_MULTI_DEVICE) // 设置支持分布式调度系统多设备启动的标识
                .build();
        intent.setOperation(operation);
        ability.startAbility(intent);
    }
- 1
- 2
- 3
- 4
- 5
- 6
- 7
- 8
- 9
- 10
- 11
- 12
- 13
- 14
- 15
停止远程设备Service
 /**
     * 停止service
     * @param ability
     */
    public static void stopRemoteService(Ability ability){
        Intent intent = new Intent();
        Operation operation = new Intent.OperationBuilder()
                .withDeviceId("")
                .withBundleName("com.example.hmlearning")
                .withAbilityName("com.example.hmlearning.ui.MyServiceAbility")
                .withFlags(Intent.FLAG_ABILITYSLICE_MULTI_DEVICE) // 设置支持分布式调度系统多设备启动的标识
                .build();
        intent.setOperation(operation);
        ability.stopAbility(intent);
    }
- 1
- 2
- 3
- 4
- 5
- 6
- 7
- 8
- 9
- 10
- 11
- 12
- 13
- 14
- 15
- 16
Service一旦创建就会一直保持在后台运行,除非必须回收内存资源,否则系统不会停止或销毁Service。开发者可以在Service中通过terminateAbility()停止本Service或在其他Ability调用stopAbility()来停止Service。
连接Service
如果Service需要与Page Ability或其他应用的Service Ability进行交互,则须创建用于连接的Connection。Service支持其他Ability通过connectAbility()方法与其进行连接。
在使用connectAbility()处理回调时,需要传入目标Service的Intent与IAbilityConnection的实例。IAbilityConnection提供了两个方法供开发者实现:onAbilityConnectDone()是用来处理连接Service成功的回调,onAbilityDisconnectDone()是用来处理Service异常死亡的回调。
// 创建连接Service回调实例
private IAbilityConnection connection = new IAbilityConnection() {
    // 连接到Service的回调
    @Override
    public void onAbilityConnectDone(ElementName elementName, IRemoteObject iRemoteObject, int resultCode) {
        // Client侧需要定义与Service侧相同的IRemoteObject实现类。开发者获取服务端传过来IRemoteObject对象,并从中解析出服务端传过来的信息。
    }

    // Service异常死亡的回调
    @Override
    public void onAbilityDisconnectDone(ElementName elementName, int resultCode) {
    }
};
- 1
- 2
- 3
- 4
- 5
- 6
- 7
- 8
- 9
- 10
- 11
- 12
- 13
连接同一设备Service
连接service代码如下:
// 连接Service
Intent intent = new Intent();
Operation operation = new Intent.OperationBuilder()
        .withDeviceId("deviceId")
        .withBundleName("com.domainname.hiworld.himusic")
        .withAbilityName("com.domainname.hiworld.himusic.ServiceAbility")
        .build();
intent.setOperation(operation);
connectAbility(intent, connection);


	//这种方式也可以连接同一设备的service
    public void connectRemoteService() {
        Intent intent = new Intent();
        ElementName elementName =
            new ElementName("", "com.example.remorerpcserver", "com.example.remorerpcserver.RemoteService");
        intent.setElement(elementName);
        ability.connectAbility(intent, this);
    }
- 1
- 2
- 3
- 4
- 5
- 6
- 7
- 8
- 9
- 10
- 11
- 12
- 13
- 14
- 15
- 16
- 17
- 18
- 19
- 20
连接远程设备Service
// 连接Service
Intent intent = new Intent();
Operation operation = new Intent.OperationBuilder()
        .withDeviceId("deviceId")
        .withBundleName("com.domainname.hiworld.himusic")
        .withAbilityName("com.domainname.hiworld.himusic.ServiceAbility")
        .withFlags(Intent.FLAG_ABILITYSLICE_MULTI_DEVICE) // 设置支持分布式调度系统多设备启动的标识
        .build();
intent.setOperation(operation);
connectAbility(intent, connection);
- 1
- 2
- 3
- 4
- 5
- 6
- 7
- 8
- 9
- 10
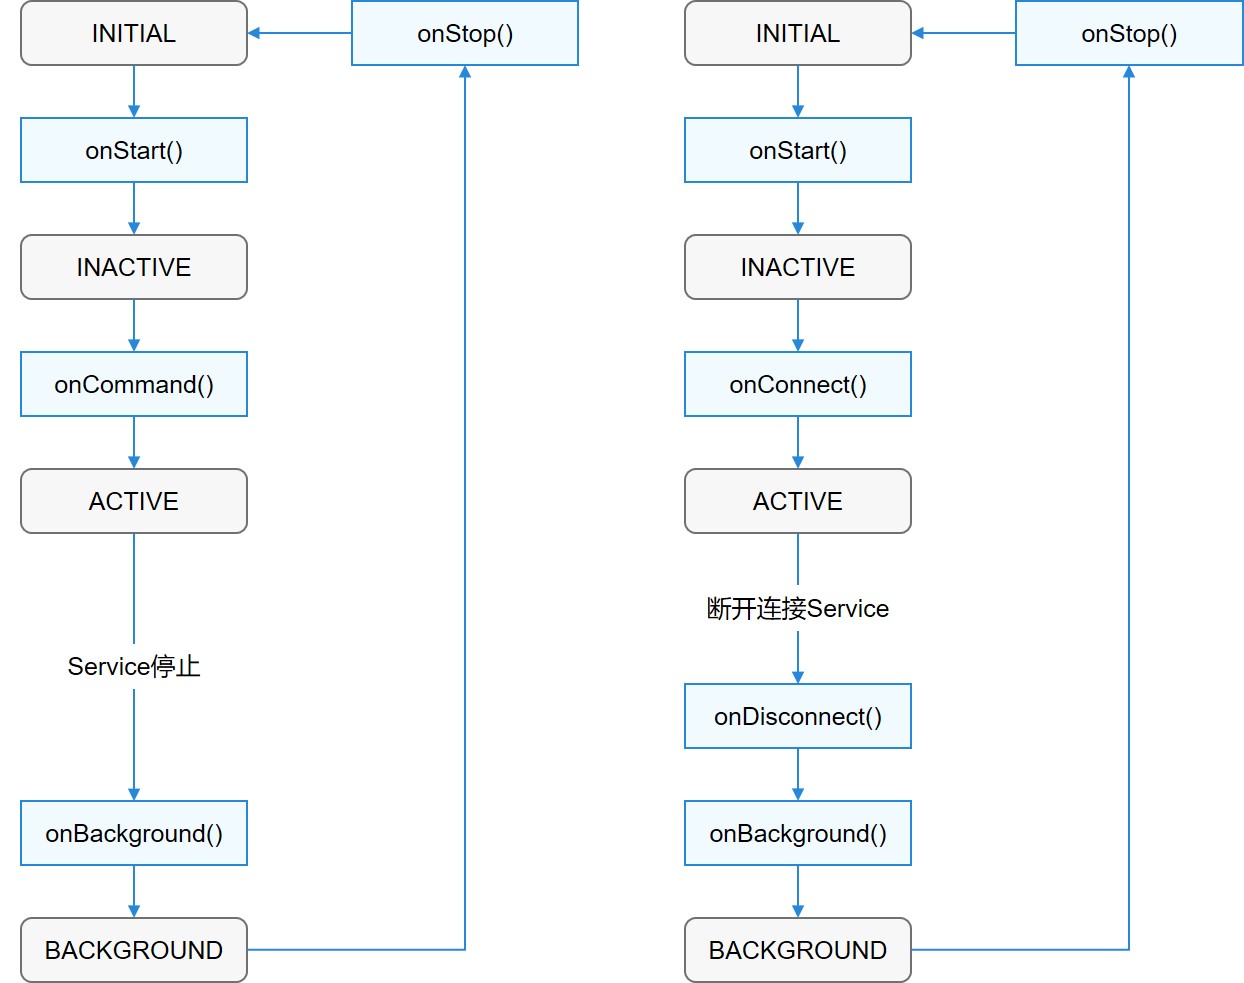
ServiceAbility生命周期
与PageAbility类似,Service也有生命周期,根据调用方法不同,其生命周期有以下两种路径:
-
启动Service
该Service在其他Ability调用startAbility()时创建,然后保持运行。其他Ability通过调用stopAbility()来停止Service,Service停止后,系统会将其销毁。
-
连接Service
该Service在其他Ability调用connectAbility()时创建,客户端可通过调用disconnectAbility()断开连接。多个客户端可以绑定到相同Service,而且当所有绑定全部取消后,系统即会销毁该Service。
前台Service
一般情况下,Service都是在后台运行的,后台Service的优先级都是比较低的,当资源不足时,系统有可能回收正在运行的后台Service。
在一些场景下(如播放音乐),用户希望应用能够一直保持运行,此时就需要使用前台Service。前台Service会始终保持正在运行的图标在系统状态栏显示。
使用前台Service并不复杂,开发者只需在Service创建的方法里,调用keepBackgroundRunning()将Service与通知绑定。调用keepBackgroundRunning()方法前需要在配置文件中声明ohos.permission.KEEP_BACKGROUND_RUNNING权限,同时还需要在配置文件中添加对应的backgroundModes参数。在onStop()方法中调用cancelBackgroundRunning()方法可停止前台Service。
使用前台Service的onStart()代码示例如下:
 @Override
    public void onStart(Intent intent) {
        HiLog.error(LABEL_LOG, "MyServiceAbility::onStart");
        startForeground();
        super.onStart(intent);
    }

	//创建前台服务
    private void startForeground(){
        // 创建通知,其中1005为notificationId
        NotificationRequest request = new NotificationRequest(NOTIFICATION_ID);
        NotificationRequest.NotificationNormalContent content = new NotificationRequest.NotificationNormalContent();
        content.setTitle("Foreground Service").setText("I'm a ForeGround Service");
        NotificationRequest.NotificationContent notificationContent = new NotificationRequest.NotificationContent(content);
        request.setContent(notificationContent);

        // 绑定通知,1005为创建通知时传入的notificationId
        keepBackgroundRunning(NOTIFICATION_ID, request);
    }

//取消前台服务
    private void cancelForeground(){
        cancelBackgroundRunning();
    }

    @Override
    public void onBackground() {
        super.onBackground();
        HiLog.error(LABEL_LOG, "MyServiceAbility::onBackground");
    }

    @Override
    public void onStop() {
        super.onStop();
        HiLog.error(LABEL_LOG, "MyServiceAbility::onStop");
        cancelForeground();
    }
- 1
- 2
- 3
- 4
- 5
- 6
- 7
- 8
- 9
- 10
- 11
- 12
- 13
- 14
- 15
- 16
- 17
- 18
- 19
- 20
- 21
- 22
- 23
- 24
- 25
- 26
- 27
- 28
- 29
- 30
- 31
- 32
- 33
- 34
- 35
- 36
- 37
在配置文件中,“module > abilities”字段下对当前Service做如下配置:
{
    "name": ".ServiceAbility",
    "type": "service",
    "visible": true,
    "backgroundModes": ["dataTransfer", "location"]
},
    "reqPermissions": [
      {
        "name": "ohos.permission.KEEP_BACKGROUND_RUNNING"
      }
    ]
- 1
- 2
- 3
- 4
- 5
- 6
- 7
- 8
- 9
- 10
- 11
结尾
参考代码已上传github https://github.com/luncang/hmlearning

