
热门标签
热门文章
- 1k8s 攻击面
- 2【Linux】在Ubuntu下安装Zotero_ubuntu安装zotero
- 3开源驰骋BPM低代码-积极拥抱AI时代
- 4【数学建模】【优化算法】:【MATLAB】从【一维搜索】到】非线性方程】求解的综合解析_非线性方程的一维搜索
- 5Flink - Java篇_java flink
- 6Leecode刷题笔记——378. 有序矩阵中第K小的元素_leeetcode378 python
- 7SQL:DATE_FORMAT()函数_dateformat sql函数
- 8FastDFS配置之常见错误_fastdfs部署,配置能用127.0.0.1么
- 9Mac环境安装jmeter - 终端启动(输入jmeter即可启动)_jmeter怎么显示终端
- 10解决RequestContextHolder获取请求的javax与Jakarta不匹配的问题_jakarta 获取request
当前位置: article > 正文
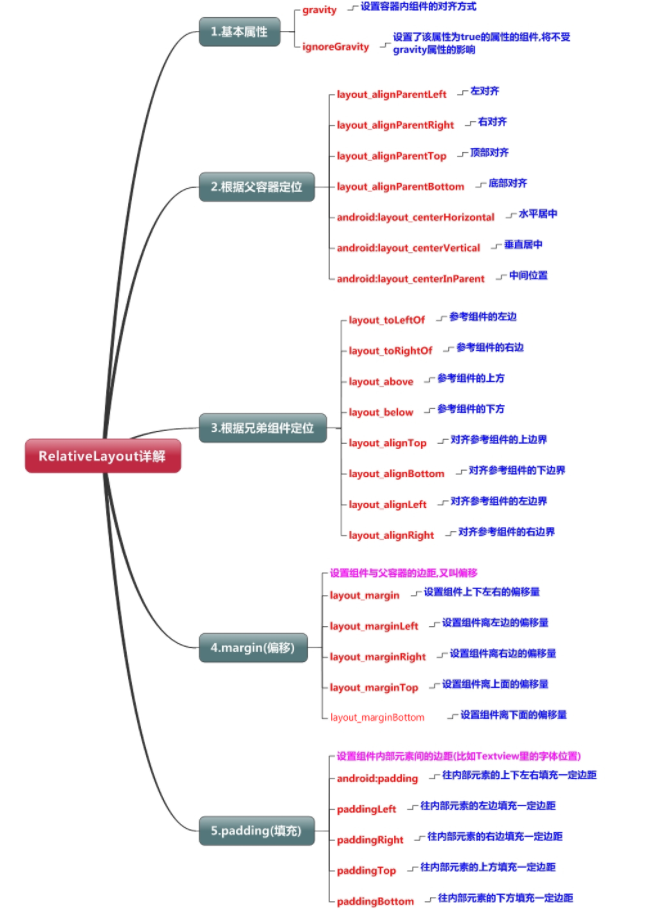
【Android 布局】RelativeLayout(相对布局)_相对布局的父布局什么样
作者:人工智能uu | 2024-08-07 18:45:34
赞
踩
相对布局的父布局什么样
RelativeLayout(相对布局)
1.父容器定位属性示意图

2.根据兄弟组件定位
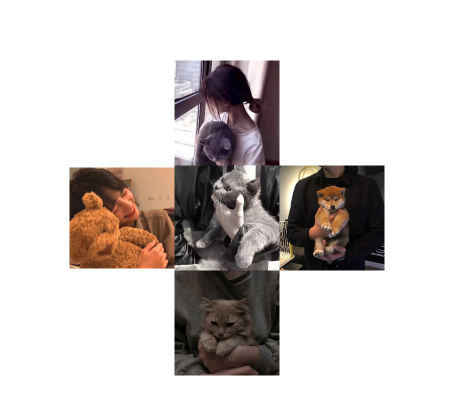
恩,先说下什么是兄弟组件吧,所谓的兄弟组件就是处于同一层次容器的组件,如图:

图中的组件1,2就是兄弟组件了,而组件3与组件1或组件2并不是兄弟组件,所以组件3不能通过 组件1或2来进行定位,比如layout_toleftof = "组件1"这样是会报错的!切记! 关于这个兄弟组件定位的最经典例子就是"梅花布局"了.
运行效果图:
实现代码:
<?xml version="1.0" encoding="utf-8"?>
<RelativeLayout xmlns:android="http://schemas.android.com/apk/res/android"
    xmlns:tools="http://schemas.android.com/tools"
    android:id="@+id/RelativeLayout1"
    android:layout_width="match_parent"
    android:layout_height="match_parent" >
    <!-- 这个是在容器中央的 -->
    <ImageView
        android:id="@+id/img1"
        android:layout_width="80dp"
        android:layout_height="80dp"
        android:layout_centerInParent="true"
        android:src="@drawable/a"/>
    <!-- 在中间图片的左边 -->
    <ImageView
        android:id="@+id/img2"
        android:layout_width="80dp"
        android:layout_height="80dp"
        android:layout_toLeftOf="@id/img1"
        android:layout_centerVertical="true"
        android:src="@drawable/b"/>
    <!-- 在中间图片的右边 -->
    <ImageView
        android:id="@+id/img3"
        android:layout_width="80dp"
        android:layout_height="80dp"
        android:layout_toRightOf="@id/img1"
        android:layout_centerVertical="true"
        android:src="@drawable/c"/>
    <!-- 在中间图片的上面-->
    <ImageView
        android:id="@+id/img4"
        android:layout_width="80dp"
        android:layout_height="80dp"
        android:layout_above="@id/img1"
        android:layout_centerHorizontal="true"
        android:src="@drawable/d"/>
    <!-- 在中间图片的下面 -->
    <ImageView
        android:id="@+id/img5"
        android:layout_width="80dp"
        android:layout_height="80dp"
        android:layout_below="@id/img1"
        android:layout_centerHorizontal="true"
        android:src="@drawable/e"/>
</RelativeLayout>

- 1
- 2
- 3
- 4
- 5
- 6
- 7
- 8
- 9
- 10
- 11
- 12
- 13
- 14
- 15
- 16
- 17
- 18
- 19
- 20
- 21
- 22
- 23
- 24
- 25
- 26
- 27
- 28
- 29
- 30
- 31
- 32
- 33
- 34
- 35
- 36
- 37
- 38
- 39
- 40
- 41
- 42
- 43
- 44
- 45
- 46
3.margin与padding的区别
初学者对于这两个属性可能会有一点混淆,这里区分下:
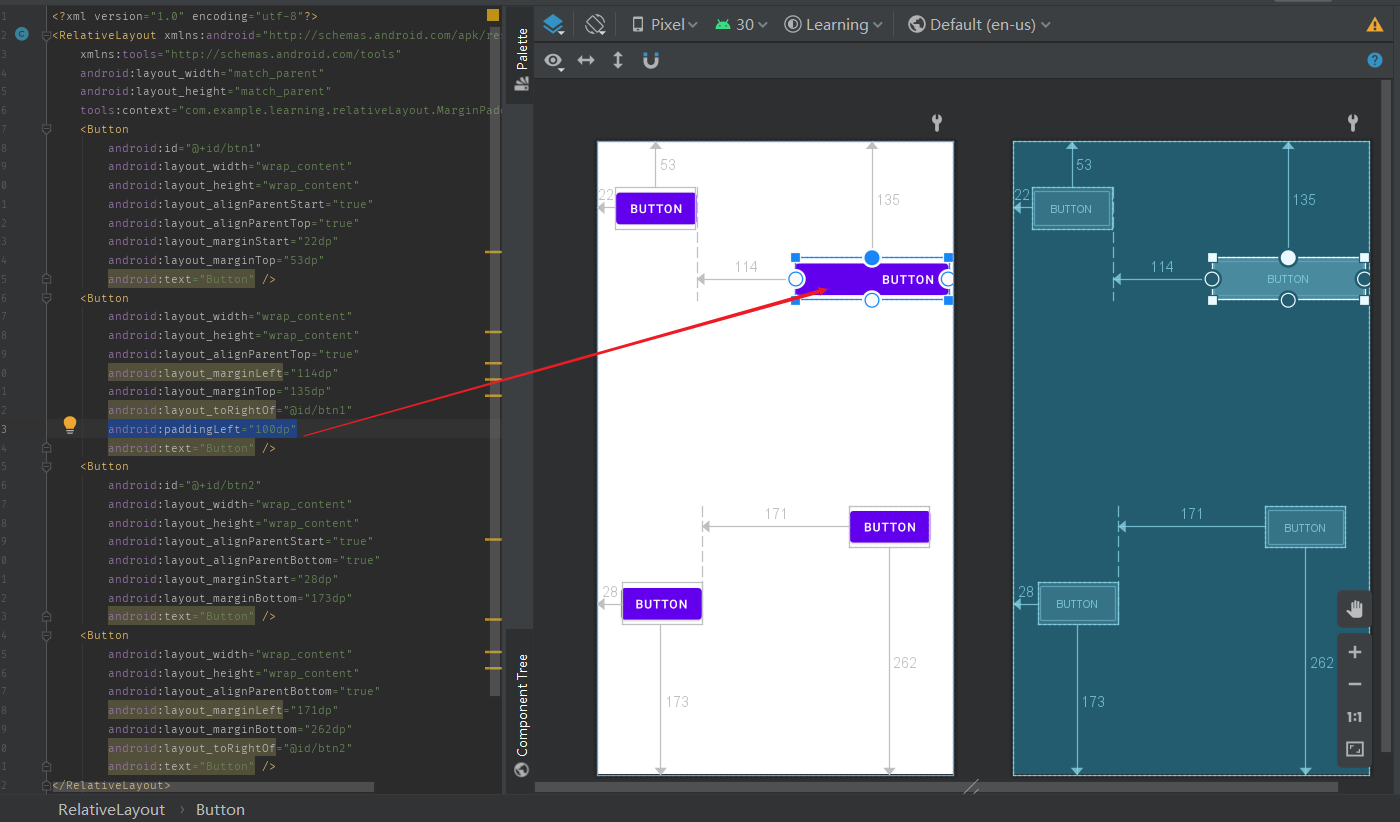
首先 margin 代表的是偏移,比如 marginleft = “5dp” 表示组件离容器左边缘偏移5dp;
而 padding 代表的则是填充,而填充的对象针对的是组件中的元素,比如TextView中的文字 比如为TextView设置 paddingleft = “5dp”,则是在组件里的元素的左边填充5dp的空间!
margin针对的是容器中的组件,而padding针对的是组件中的元素,要区分开来!
运行效果图比较:
比较示例代码如下:
<?xml version="1.0" encoding="utf-8"?>
<RelativeLayout xmlns:android="http://schemas.android.com/apk/res/android"
    xmlns:tools="http://schemas.android.com/tools"
    android:layout_width="match_parent"
    android:layout_height="match_parent"
    tools:context="com.example.learning.relativeLayout.MarginPaddingActivity" >
    <Button
        android:id="@+id/btn1"
        android:layout_width="wrap_content"
        android:layout_height="wrap_content"
        android:layout_alignParentStart="true"
        android:layout_alignParentTop="true"
        android:layout_marginStart="22dp"
        android:layout_marginTop="53dp"
        android:text="Button" />
    <Button
        android:layout_width="wrap_content"
        android:layout_height="wrap_content"
        android:layout_alignParentTop="true"
        android:layout_marginLeft="114dp"
        android:layout_marginTop="135dp"
        android:layout_toRightOf="@id/btn1"
        android:paddingLeft="100dp"
        android:text="Button" />
    <Button
        android:id="@+id/btn2"
        android:layout_width="wrap_content"
        android:layout_height="wrap_content"
        android:layout_alignParentStart="true"
        android:layout_alignParentBottom="true"
        android:layout_marginStart="28dp"
        android:layout_marginBottom="173dp"
        android:text="Button" />
    <Button
        android:layout_width="wrap_content"
        android:layout_height="wrap_content"
        android:layout_alignParentBottom="true"
        android:layout_marginLeft="171dp"
        android:layout_marginBottom="262dp"
        android:layout_toRightOf="@id/btn2"
        android:text="Button" />
</RelativeLayout>
- 1
- 2
- 3
- 4
- 5
- 6
- 7
- 8
- 9
- 10
- 11
- 12
- 13
- 14
- 15
- 16
- 17
- 18
- 19
- 20
- 21
- 22
- 23
- 24
- 25
- 26
- 27
- 28
- 29
- 30
- 31
- 32
- 33
- 34
- 35
- 36
- 37
- 38
- 39
- 40
- 41
- 42
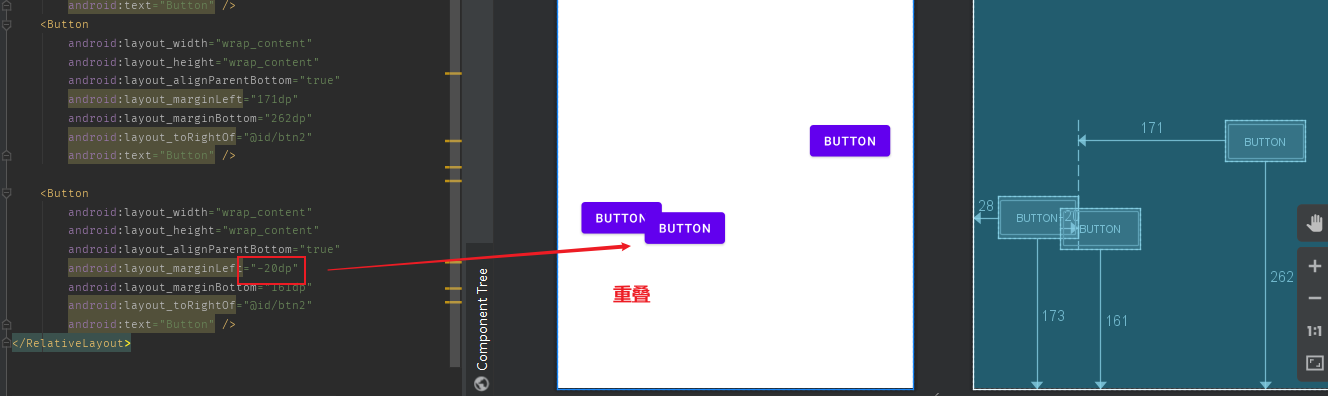
4.很常用的一点:margin可以设置为负数
相信很多朋友都不知道一点吧,平时我们设置margin的时候都习惯了是正数的, 其实是可以用负数的,下面写个简单的程序演示下吧,模拟进入软件后,弹出广告 页面的,右上角的cancle按钮的margin则是使用负数的,也就是将cancle按钮和图片组件重叠!
效果图如下:

贴出的广告Activity的布局代码吧,当然,如果你对这个有兴趣的话可以下下demo, 因为仅仅是实现效果,所以代码会有些粗糙!
<RelativeLayout xmlns:android="http://schemas.android.com/apk/res/android"
    xmlns:tools="http://schemas.android.com/tools"
    android:layout_width="match_parent"
    android:layout_height="match_parent"
    tools:context="com.jay.example.relativelayoutdemo.MainActivity"
    android:background="#00CCCCFF">
    <ImageView
        android:id="@+id/imgBack"
        android:layout_width="200dp"
        android:layout_height="200dp"
        android:layout_centerInParent="true"
        android:background="@drawable/myicon" />
    <ImageView
        android:id="@+id/imgCancle"
        android:layout_width="28dp"
        android:layout_height="28dp"
        android:layout_alignRight="@id/imgBack"
        android:layout_alignTop="@id/imgBack"
        android:background="@drawable/cancel"
        android:layout_marginTop="-15dp"
        android:layout_marginRight="-10dp" />
</RelativeLayout>
- 1
- 2
- 3
- 4
- 5
- 6
- 7
- 8
- 9
- 10
- 11
- 12
- 13
- 14
- 15
- 16
- 17
- 18
- 19
- 20
- 21
- 22
声明:本文内容由网友自发贡献,不代表【wpsshop博客】立场,版权归原作者所有,本站不承担相应法律责任。如您发现有侵权的内容,请联系我们。转载请注明出处:https://www.wpsshop.cn/w/人工智能uu/article/detail/943995
推荐阅读
相关标签

