
- 1微信支付 商户号该产品权限未开通,请前往商户平台_微信商户号该产品权限未开通
- 2ctfmon是什么启动项_Win7启动项找不到ctfmon进程无法正常使用输入法的解决方法...
- 3【MySQL】SQL查询语句在MySQL中的执行过程_mysql中一条sql查询语句的执行流程
- 4uniapp 开发的H5 微信公众jssdk验签 invalid signature的问题_uniapp 微信公众号 签名失败
- 5使用opencv 进行图像美化_opencv窗口美化
- 6SpringBoot从入门到精通教程(二十六)- 全局header/body接口请求参数+Swagger2集成/接口规范用法_springboot header参数
- 7双侧检验的p值和单侧检验_单侧检验与双侧检验的区别
- 802-Kubernetes中的NameSpace与Pod
- 9axios详解以及完整封装方法_axios封装
- 10标准化(Normalization)和归一化实现_f.normalize 0-1
skywalking_如何删除skywalking中不用的实例
赞
踩
修改应用的服务名称
1.系统配置

2.探针配置

3.在skywalking安装目录agent目录下配置文件中,指定服务名称


排除不需要监听的请求
1.拷贝ignore-plugin插件到 plugins目录下
2.在启动命令上加上配置

告警
在alarm-settings配置文件中配置告警的规则,然后配置webhooks的地址,就跟发送短信或者企业微信了

打印traceId
需要首先启动skywalking服务,不然获取不到traceId
下面是官网log4j2的配置
https://skywalking.apache.org/docs/skywalking-java/latest/en/setup/service-agent/java-agent/application-toolkit-log4j-2.x/#print-trace-id-in-your-logs
log4j2.xml
<?xml version="1.0" encoding="UTF-8"?>
<configuration status="INFO" monitorInterval="30">
    <properties>
        <property name="LOG_HOME">/data/logs/demo</property>
        <property name="CHARSET">UTF-8</property>
        <property name="LOG_PATH">/data/logs/demo</property>
        <property name="PATTERN">%d [%traceId] %-5p %c{1}:%L - %m%n</property>
    </properties>
    <appenders>
        <Console name="console" target="SYSTEM_OUT">
            <ThresholdFilter level="ALL" onMatch="ACCEPT" onMismatch="DENY"/>
            <PatternLayout pattern="${PATTERN}"/>
        </Console>
    </appenders>

    <!--root 默认加载-->
    <loggers>
        <root level="info">
            <appender-ref ref="console"/>
        </root>
    </loggers>
</configuration>

- 1
- 2
- 3
- 4
- 5
- 6
- 7
- 8
- 9
- 10
- 11
- 12
- 13
- 14
- 15
- 16
- 17
- 18
- 19
- 20
- 21
- 22
-javaagent:D:\tool\apache-skywalking-apm-es7-8.7.0.tar\apache-skywalking-apm-es7-8.7.0\apache-skywalking-apm-bin-es7\agent\skywalking-agent.jar=agent.service_name=demo

java agent原理

创建一个maven项目

import java.lang.instrument.Instrumentation;

public class PreMainAgent {

    public static void premain(String arguments , Instrumentation instrumentation){

     System.out.println("=====premain 执行,参数为:"+arguments);
    }
}
- 1
- 2
- 3
- 4
- 5
- 6
- 7
- 8
- 9
pom.xml
 <build>
        <plugins>
            <plugin>
                <groupId>org.apache.maven.plugins</groupId>
                <artifactId>maven-assembly-plugin</artifactId>
                <configuration>
                    <appendAssemblyId>false</appendAssemblyId>
                    <descriptorRefs>
                        <descriptorRef>jar-with-dependencies</descriptorRef>
                    </descriptorRefs>
                    <archive>
                        <!-- 自动添加META-INF/MANIFEST.MF-->
                        <manifest>
                            <addClasspath>true</addClasspath>
                        </manifest>
                        <manifestEntries>
                            <Premain-Class>com.demo.PreMainAgent</Premain-Class>
                            <Agent_Class>com.demo.PreMainAgent</Agent_Class>
                            <Can-Redefine-Classes>true</Can-Redefine-Classes>
                            <Can-Retransform-Classes>true</Can-Retransform-Classes>
                        </manifestEntries>
                    </archive>
                </configuration>
                <executions>
                    <execution>
                        <id>make-assembly</id>
                        <!-- 绑定到package生命周期 -->
                        <phase>package</phase>
                        <goals>
                            <!-- 只运行一次 -->
                            <goal>single</goal>
                        </goals>
                    </execution>
                </executions>

            </plugin>
        </plugins>
    </build>
- 1
- 2
- 3
- 4
- 5
- 6
- 7
- 8
- 9
- 10
- 11
- 12
- 13
- 14
- 15
- 16
- 17
- 18
- 19
- 20
- 21
- 22
- 23
- 24
- 25
- 26
- 27
- 28
- 29
- 30
- 31
- 32
- 33
- 34
- 35
- 36
- 37
- 38
然后maven clean package。
解压jar后可以看见生成MANIFEST.MF文件,里面的信息就是maven-assembly-plugin 中配置的

在其他项目中配置启动命令

bytebuddy拦截
增加依赖包
    <dependency>
            <groupId>net.bytebuddy</groupId>
            <artifactId>byte-buddy</artifactId>
            <version>1.9.12</version>
        </dependency>

        <dependency>
            <groupId>net.bytebuddy</groupId>
            <artifactId>byte-buddy-agent</artifactId>
            <version>1.9.12</version>
        </dependency>
- 1
- 2
- 3
- 4
- 5
- 6
- 7
- 8
- 9
- 10
- 11
修改PreMainAgent
import net.bytebuddy.agent.builder.AgentBuilder;
import net.bytebuddy.description.type.TypeDescription;
import net.bytebuddy.dynamic.DynamicType;
import net.bytebuddy.implementation.MethodDelegation;
import net.bytebuddy.matcher.ElementMatcher;
import net.bytebuddy.matcher.ElementMatchers;
import net.bytebuddy.utility.JavaModule;

import java.lang.instrument.Instrumentation;

public class PreMainAgent {

    public static void premain(String arguments , Instrumentation instrumentation){

        System.out.println("=====premain 执行,参数为:"+arguments);


        AgentBuilder.Transformer transformer = new AgentBuilder.Transformer() {
            public DynamicType.Builder<?> transform(DynamicType.Builder<?> builder, TypeDescription typeDescription, ClassLoader classLoader, JavaModule javaModule) {
                return builder.method(ElementMatchers.any()).intercept(MethodDelegation.to(MyInterceptor.class));
            }
        };

        //指定拦截以com.example.demo开头的包名
        ElementMatcher.Junction<TypeDescription> type = ElementMatchers.<TypeDescription>nameStartsWith("com.example.demo");
        new AgentBuilder.Default()
                .type(type)
                .transform(transformer).installOn(instrumentation);
    }
}
- 1
- 2
- 3
- 4
- 5
- 6
- 7
- 8
- 9
- 10
- 11
- 12
- 13
- 14
- 15
- 16
- 17
- 18
- 19
- 20
- 21
- 22
- 23
- 24
- 25
- 26
- 27
- 28
- 29
- 30
增加拦截器类
import net.bytebuddy.implementation.bind.annotation.*;

import java.lang.reflect.Method;
import java.util.concurrent.Callable;


public class MyInterceptor {

    @RuntimeType
    public static Object intercept(@Origin Method method, @SuperCall Callable<?> callable, @AllArguments Object[] objects) throws Exception {

        long start = System.currentTimeMillis();

        Object object = callable.call();

        System.out.println("执行时间为:" + (System.currentTimeMillis() - start));
        return object;
    }

}
- 1
- 2
- 3
- 4
- 5
- 6
- 7
- 8
- 9
- 10
- 11
- 12
- 13
- 14
- 15
- 16
- 17
- 18
- 19
- 20
执行效果:
拦截了以com.example.demo开头的类

调试源码
下载源码
git clone https://github.com/apache/skywalking.git
cd skywalking/
git checkout  -b 8.7.0 v8.7.0
git submodule init
git submodule update
- 1
- 2
- 3
- 4
- 5
删除父类pom中maven-checkstyle-plugin 插件
将amp-webapp中pom 的frontend-maven-plugin插件的configuration 换成
install --registry=https://registry.npm.taobao.org
- 1
进行打包编译
mvn clean package -DMaven.test.skip=true
- 1
编译时间预计半个小时,
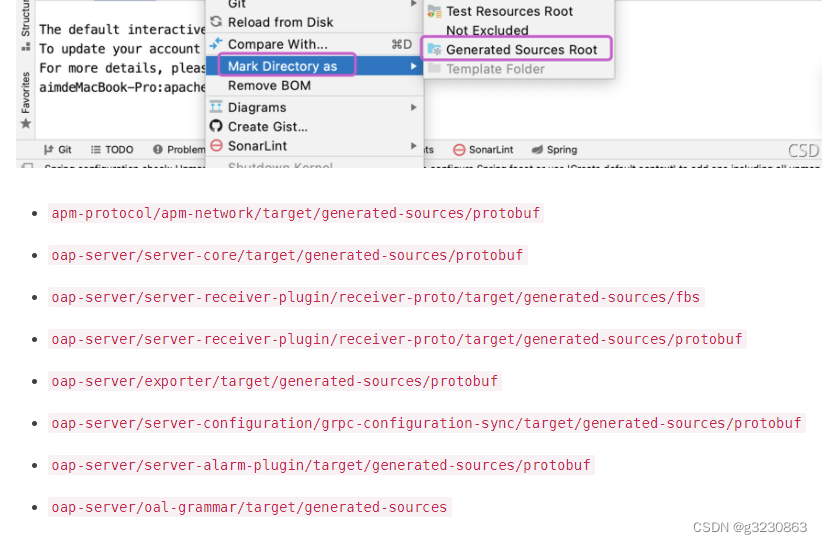
编译完成后,把下面的target文件标记成源码
运行:
1.运行oap-server模块下的server-start-es7(我使用的是es7)模块中中的OAPServerStartUp这个类的main方法来启动OAPServer
2.运行 apm-webapp 模块的 ApplicationStartUp这个类的main方法,启动 SkyWalking UI 。
浏览器输入 http://127.0.0.1:8080,进入Skywalking UI的主页面。


