
- 1【Web 安全】刚开始学渗透,零基础怎么入门?看完这篇就足够了_自学渗透
- 2java岗想进大厂不知道从哪学起?来看看精心整理的学习路线!!(建议收藏)_学习java如何进入中大厂
- 3Python爬虫实战,requests+openpyxl模块,爬取手机商品信息数据(附源码)_python 爬虫 callback jquery_python爬虫手机
- 4连锁直营店小程序赋能多店如何管理
- 5【熔断基础】_hystrixobservablecommand什么情况会走到fallback
- 6ue引擎游戏开发笔记(40)——行为树的建立:丰富ai行动_ue 怪物行为树
- 7第十一届蓝桥杯省赛国赛总结_蓝桥杯国一心得体会
- 8【JDBC编程】Java连接MySQL的五个步骤_java怎么与mysql建立连接
- 9Web渗透漏洞靶场收集_webbug靶场
- 10Day3-从上到下打印二叉树_第3关:打印二叉树
如何在Visual Studio Code中用Mocha对TypeScript进行测试_mocha typescript
赞
踩
目录
在Visual Studio Code中使用调试器在线调试代码
首先,本文不是一篇介绍有关TypeScript、JavaScript或其它编程语言数据结构和算法的文章。如果你正在准备一场面试,或者学习某一个课程,互联网上可以找到许多相关的资源,我个人比较推崇hackerrank.com。
本文的主要目的在于帮助你了解并熟知以下两点:
- 如何用TypeScript编写并运行测试用例?
- 如何在Visual Studio Code中使用调试器在线调试代码,并发现代码中的bug?
使用TypeScript编写测试用例
在我的电脑中,我创建了一个目录ts-algorithms,在终端上运行下面的命令:
- mkdir ts-algorithms
- cd ts-algorithms
- npm init -y
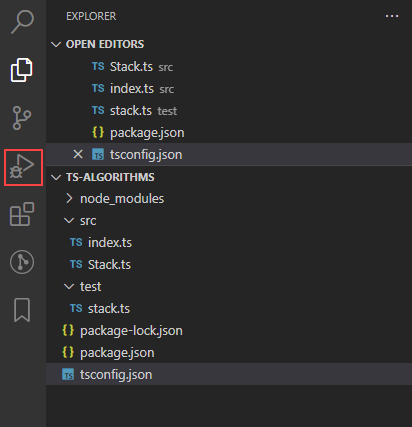
这将创建一个最简单的项目结构,其中包含一个package.json文件,你可以根据自己的需要随意修改其中的内容,通常我会加入license、作者、描述和关键字等信息。
接下来,我们编写一些代码,将其放在src目录中,和测试相关的代码则放在test目录中。手动创建这两个目录,然后用TypeScript编写一个模块。例如,下面是我编写的src/Stack.ts文件的代码:
- /**
- * Implementation of a classic stack.
- */
- export class Stack<T> {
- // Internal storage for the stack
-
- private _items: T[] = [];
-
- /**
- * Creates a pre-populated stack.
- *
- * @param {T[]} initialData the initial contents of the stack
- */
- constructor(initialData: Array<T> = []) {
- this._items.push(...initialData)
- }
-
- /**
- * Adds an item to the top of the stack.
- *
- * @param {T} item the item to be added to the stack
- */
- push(item: T): void {
- this._items.push(item);
- }
-
- /**
- * Removes an item from the top of the stack, returning it.
- *
- * @returns {T} the item at the top of the stack.
- */
- pop(): T {
- return this._items.pop();
- }
-
- /**
- * Take a peek at the top of the stack, returning the top-most item,
- * without removing it.
- *
- * @returns {T} the item at the top of the stack.
- */
- peek(): T {
- if (this.isEmpty())
- return undefined;
- else
- return this._items[this._items.length - 1];
-
- }
-
- /**
- * @returns {boolean} true if the stack is empty.
- */
- isEmpty(): boolean {
- return this._items.length === 0;
- }
-
- /**
- * @returns {number} the number of items in the stack.
- */
- size(): number {
- return this._items.length;
- }
- }

同时我还在src目录下添加了index.ts文件,用来导出所有的模块。目前只有简单的一行代码:
export { Stack } from './Stack';为了进行单元测试,我使用了mocha和chai这两个包,我们通过下面的命令将它们安装到项目里:
npm install --save-dev mocha chai由于mocha不会自动运行TypeScript代码,所以我们还需要用到ts-node:
npm install --save-dev ts-node typescript另外,如果能让Visual Studio Code编辑器理解mocha和chai的类型并为其提供智能感知功能那就太好了,所以我们加上下面这两个包:
npm install --save-dev @types/chai @types/mocha然后,我们在package.json中加入一个script的入口,这样我们就可以通过一个命令行来运行我们的测试程序:
- "scripts": {
- "tests": "mocha --require ts-node/register test/**/*.ts"
- },
注意这里的--require ts-node/register很重要,它将TypeScript注册为解释器,这样我们就可以用TypeScript编写测试用例了。
让我们创建文件test/stack.ts,编写测试用例以对src/Stack.ts进行测试:
- import { expect } from 'chai';
- import { Stack } from '../src';
-
- describe('Stack', () => {
- it('can be initialized without an initializer', () => {
- const s = new Stack<number>();
- expect(s.size()).to.equal(0);
- });
- it('can be initialized with an initializer', () => {
- const s = new Stack<number>([ 1, 2, 3, 4 ]);
- expect(s.size()).to.equal(4);
- });
- it('can be pushed upon', () => {
- const s = new Stack<number>([ 1, 2, 3, 4 ]);
- s.push(5);
- expect(s.size()).to.equal(5);
- expect(s.peek()).to.equal(5);
- });
- it('can be popped', () => {
- const s = new Stack<number>([ 1, 2, 3, 4 ]);
- expect(s.pop()).to.equal(4);
- expect(s.size()).to.equal(3);
- });
- it('can be peeked', () => {
- const s = new Stack<number>([ 1, 2, 3, 4 ]);
- expect(s.peek()).to.equal(4);
- expect(s.size()).to.equal(4);
- });
- it('isEmpty() returns true when empty', () => {
- const s = new Stack<number>();
- expect(s.isEmpty()).to.be.true;
- });
- it('isEmpty() is false when not empty', () => {
- const s = new Stack<number>([1, 2, 3, 41]);
- expect(s.isEmpty()).to.be.false;
- });
- it('cannot pop when no elements', () => {
- const s = new Stack<number>();
- expect(s.pop()).to.be.undefined;
- });
- it('cannot peek when empty', () => {
- const s = new Stack<number>();
- expect(s.peek()).to.be.undefined;
- });
- });
为了确保TypeScript在编译时通过类型检查,我们还需要在项目的根目录下添加tsconfig.json文件,并将mocha添加到types配置节点中:
- {
- "compilerOptions": {
- "types": ["mocha"]
- }
- }
否则,直接运行测试,你可能会遇到下面这样的错误:
- TSError: ⨯ Unable to compile TypeScript:
- test/stack.ts:4:1 - error TS2593: Cannot find name 'describe'. Do you need to install type definitions for a test runner? Try `npm i --save-dev @types/jest` or `npm i --save-dev @types/mocha` and then add 'jest' or 'mocha' to the types field in your tsconfig.
所有工作准备就绪后,我们通过下面的命令直接运行测试:
npm run tests你也可以在Visual Studio Code的集成终端窗口中运行上面的命令(View > Terminal)。如果一切正常,你应该会得到如下图所示的结果(所有9个测试用例都检测成功):
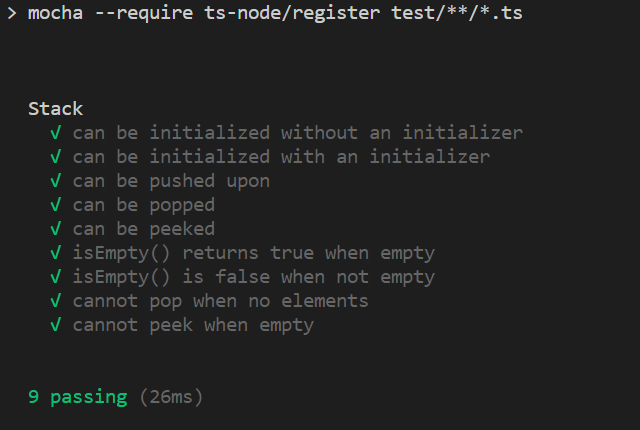
注意这里所有的代码,包括测试用例,都是用TypeScript编写的。此外,借助于Visual Studio Code编辑器,你还可以在编译时进行类型检查,泛型类型审查以及获得对JavaScript所进行的一系列其它增强。
在Visual Studio Code中使用调试器在线调试代码
我们不仅仅只能运行测试,我们还可以做得更好。如果我们的测试用例在运行中遇到问题怎么办?例如,让我们在src/Stack.ts文件中加入一行代码,使isEmpty()方法始终报错:
- isEmpty(): boolean {
- throw new Error("Something went wrong");
- return this._items.length === 0;
- }
重新运行测试,首先失败的就是第三个测试用例——"can be pushed upon"。我很想知道它为什么会失败!在Visual Studio Code中打开Run and Debug:
然后左侧的窗口变成下面这样:

在进行调试之前,我需要告诉Visual Studio Code如何在调试器中运行测试,点击Run and Debug按钮下方的create a launch.json file链接,然后在弹出的下拉列表中选择Node.js环境。这将在.vscode目录中创建一个launch.json配置文件,其中包含了一个默认的启动配置项,我们将该配置项删除,然后点击界面右下角的Add Configuration按钮,在弹出的列表中选择{} Node.js: Mocha Tests,这是运行mocha测试的基本配置项。不过,这里我们需要给mocha添加一些命令行参数,正如我们在package.json文件的script中向mocha添加的参数一样。
- {
- // Use IntelliSense to learn about possible attributes.
- // Hover to view descriptions of existing attributes.
- // For more information, visit: https://go.microsoft.com/fwlink/?linkid=830387
- "version": "0.2.0",
- "configurations": [
- {
- "args": [
- "--require", "ts-node/register",
- "-u",
- "bdd",
- "--timeout",
- "999999",
- "--colors",
- "${workspaceFolder}/test/**/*.ts"
- ],
- "internalConsoleOptions": "openOnSessionStart",
- "name": "Mocha Tests",
- "program": "${workspaceFolder}/node_modules/mocha/bin/_mocha",
- "request": "launch",
- "type": "pwa-node"
- }
- ]
- }
注意这里的args配置项,它包含了一些非常重要的配置,其中之一就是我们在package.json文件的script中向mocha添加的命令行参数"--require"和"ts-node/register"。另外就是"${WorkspaceFolder}/test/**/*.ts"用来指定测试文件所在的目录。还有一个就是我们将默认生成的配置项"tdd"改成"bdd"以确保mocha在Visual Studio Code的debugger模式下能正确运行。
现在,我们可以在测试代码中打断点:
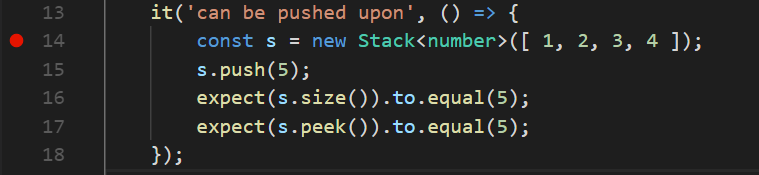
然后,在Visual Studio Code的Run and Debug窗口中点击绿色的运行按钮:

一旦断点被命中,程序会暂停,然后你可以逐步跟踪代码执行:

该控制条会显示在屏幕的顶部,从左到右依次是:
- 继续执行,直到下一个断点。
- 执行到下一个语句。
- 进入下一个语句内部。
- 跳出当前语句。
- 重新运行。
- 停止运行。
同时,Visual Studio Code的左侧也有一些和调试相关的窗口,其中包含当前程序运行的变量的信息(通常会非常有用)、被监视的变量的值、调用堆栈以及断点的位置信息等等。
我们可以试着来调试一下。前两个测试用例已经成功运行了,我们创建了stack类并且测试了它的size。在接下来的测试中我想要测试push()和peek()这两个方法。我们执行下面的操作:
- 跳过stack类的创建。
- 进入到push()方法内部。
- 在push()方法内部跳过stack数组的push()调用。
光标现在出现在push()方法的末尾,现在我可以查看一下变量的值——特别是this._items变量的值,因为它表示的是stack类中items的数量。目前一切看起来都很正常,让我们继续:
- 跳过push()方法的返回。
- 然后我们可以直接跳过对size()方法的测试语句,因为前面的测试用例已经测试过了。
- 进入到peek()方法内部。
- 进入到this.isEmpty()方法内部。
- 然后我们看到程序抛出一个异常。

如果想要暂时隐藏断点使其在程序运行时不被命中,可以在左侧的breakpoints窗口中点击Toggle Activate Breakpoints。再次点击时可以激活所有已添加的断点。
你可以通过Visual Studio Code提供的这种在线调试工具来一步步跟踪执行我们的代码,从而分析每个步骤中各个变量的值,看看它们是否和你预期的一致。你熟知你的算法,在编码之前可以先在纸上将整个执行过程画一遍,然后看看最终程序运行时是否偏离了你的预期?
另外需要注意的是,在调试过程中,我们看到的是TypeScript代码,而不是编译之后的JavaScript代码。
现在我们可以使用Visual Studio Code来编写更多丰富的功能强大的TypeScript代码。
以下是我收集到的比较好的学习教程资源,虽然不是什么很值钱的东西,如果你刚好需要,可以评论区,留言【777】直接拿走就好了
各位想获取资料的朋友请点赞 + 评论 + 收藏,三连!
三连之后我会在评论区挨个私信发给你们~


