
热门标签
热门文章
- 1【SD】Stable Diffusion 问题_文生图提示词框没了
- 2command a expects \ followed by text
- 3Prompt提示词工程构建指南_提示词 prom
- 4Linux命令 —— sed和awk_linux sed -i替换
- 5chatGPT的prompt技巧
- 6qlaber 中放置图片_如何在设计中使用透明度?
- 7算法#16--B树完整代码Java实现_代码实现b-树的输出
- 8ACL2022 | 关系抽取和NER等论文分类整理_few-shot class-incremental learning for named enti
- 9AI帮忙做论文笔记——高端Prompt技巧——chatGPT时代背景下文献阅读新范式_阅读论文的prompt
- 102024年3月更新,10个AI绘画工具推荐
当前位置: article > 正文
3D目标检测——代码理解——OpenPCDet:数据处理kitti_dataset.py的理解_openpcdet 数据处理
作者:Gausst松鼠会 | 2024-03-27 13:31:45
赞
踩
openpcdet 数据处理
3D目标检测——代码理解——OpenPCDet:数据处理kitti_dataset.py的理解
OpenPCDet的源码:OpenPCDet的源码github地址
作者:史少帅博士本人对OpenPCDet的描述可以参看这篇文章:作者本人的中文描述
因为要根据kitti数据集的dataset来编写自己数据集的dataset,所以花了几天的时间对源码看了一遍,并把自己的理解注释在了上面,有些可能会理解的错了,希望和大家一起交流学习。
目前已经根据kitti数据集的dataset为自己的数据集robosense数据集编写了dataset,且能正确训练和evaluation。
修改自己数据集的代码在这篇文章里
https://blog.csdn.net/weixin_44128857/article/details/117445420
3D目标检测——代码理解——OpenPCDet:数据处理适应自己的点云数据
改写的主要思路也是按照作者本人的步骤:
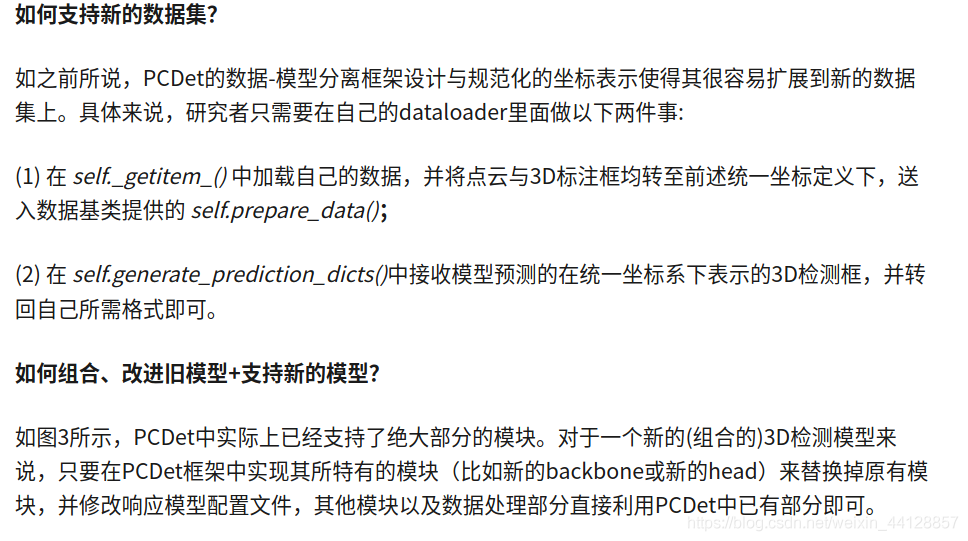 这是作者本人为支持数据集提供的思路和方法
同样参考的博客有:
https://blog.csdn.net/qq_31511117/article/details/107530571
https://blog.csdn.net/weixin_44579633/article/details/108083331
下面就直接贴出了dataset的代码注释了,恳请各位批评指正:
import copy import pickle import numpy as np from skimage import io from ...ops.roiaware_pool3d import roiaware_pool3d_utils from ...utils import box_utils, calibration_kitti, common_utils, object3d_kitti from ..dataset import DatasetTemplate #定义kitti数据集的类 class KittiDataset(DatasetTemplate): def __init__(self, dataset_cfg, class_names, training=True, root_path=None, logger=None): """ Args: root_path: dataset_cfg: class_names: training: logger: """ #初始化类,将参数赋值给 类的属性 super().__init__( dataset_cfg=dataset_cfg, class_names=class_names, training=training, root_path=root_path, logger=logger ) #传递参数是 训练集train 还是验证集val self.split = self.dataset_cfg.DATA_SPLIT[self.mode] # root_path的路径是/data/kitti/ #kitti数据集一共三个文件夹“training”和“testing”、“ImageSets” #如果是训练集train,将文件的路径指为训练集training ,否则为测试集testing self.root_split_path = self.root_path / ('training' if self.split != 'test' else 'testing') #/data/kitti/ImageSets/下面一共三个文件:test.txt , train.txt ,val.txt #选择其中的一个文件 split_dir = self.root_path / 'ImageSets' / (self.split + '.txt') #得到.txt文件下的序列号,组成列表sample_id_list self.sample_id_list = [x.strip() for x in open(split_dir).readlines()] if split_dir.exists() else None #创建用于存放kitti信息的空列表 self.kitti_infos = [] #调用函数,加载kitti数据,mode的值为:train 或者 test self.include_kitti_data(self.mode) def include_kitti_data(self, mode): if self.logger is not None: #如果日志信息存在,则加入'Loading KITTI dataset'的信息 self.logger.info('Loading KITTI dataset') #创建新列表,用于存放信息 kitti_infos = [] ''' INFO_PATH: { 'train': [kitti_infos_train.pkl], 'test': [kitti_infos_val.pkl],} ''' for info_path in self.dataset_cfg.INFO_PATH[mode]: # root_path的路径是/data/kitti/ info_path = self.root_path / info_path #则 info_path:/data/kitti/kitti_infos_train.pkl之类的文件 if not info_path.exists(): #如果该文件不存在,跳出,继续下一个文件 continue #打开该文件, with open(info_path, 'rb') as f: # pickle.load(f) 将该文件中的数据 解析为一个Python对象 infos, # 并将该内容添加到kitti_infos 列表中 infos = pickle.load(f) kitti_infos.extend(infos) self.kitti_infos.extend(kitti_infos) #最后在日志信息中 添加 kitti数据集样本总个数 if self.logger is not None: self.logger.info('Total samples for KITTI dataset: %d' % (len(kitti_infos))) # def set_split(self, split): #参数赋值 super().__init__( dataset_cfg=self.dataset_cfg, class_names=self.class_names, training=self.training, root_path=self.root_path, logger=self.logger ) self.split = split #root_path的路径是/data/kitti/ # 则root_split_path=/data/kitti/ training或者testing self.root_split_path = self.root_path / ('training' if self.split != 'test' else 'testing') #/data/kitti/ImageSets/下面一共三个文件:test.txt , train.txt ,val.txt #选择其中的一个文件 split_dir = self.root_path / 'ImageSets' / (self.split + '.txt') self.sample_id_list = [x.strip() for x in open(split_dir).readlines()] if split_dir.exists() else None #根据序列号,获取lidar信息 def get_lidar(self, idx): # lidar_file为某个点云的bin文件(序列) lidar_file = self.root_split_path / 'velodyne' / ('%s.bin' % idx) assert lidar_file.exists() #如果该文件不存在,直接跳出,并报错 #读取该 bin文件类型,并将点云数据以 numpy的格式输出!!! #并且将数据 转换成 每行四个数据,刚好是一个点云数据的四个参数:X,Y,Z,R(强度或反射值) return np.fromfile(str(lidar_file), dtype=np.float32).reshape(-1, 4) # 根据序列号,获取图像的信息 def get_image_shape(self, idx): #获取到某个具体的图片 img_file = self.root_split_path / 'image_2' / ('%s.png' % idx) #print(img_file) assert img_file.exists() #如果该图片文件不存在,直接报错 # 返回图片的数据,最终得到的是这张图片的 长和宽 的,如 (375, 1242) # 该函数的返回值是:array([ 375, 1242], dtype=int32) return np.array(io.imread(img_file).shape[:2], dtype=np.int32) #根据序列号,获取标签的信息 def get_label(self, idx): #获取到某个标签的.txt文件 ,该文件表示 图片中物体的参数 label_file = self.root_split_path / 'label_2' / ('%s.txt' % idx) assert label_file.exists() #如果不存在,直接报错 # 调用get_objects_from_label函数,首先读取该文件的所有行 赋值为 lines # 在对lines中的每一个line(一个object的参数)作为object3d类的参数 进行遍历, # 最后返回:objects[]列表 ,里面是当前文件里所有物体的属性值,如:type、x,y,等 return object3d_kitti.get_objects_from_label(label_file) #该函数是根据序列得到某一标定 def get_calib(self, idx): calib_file = self.root_split_path / 'calib' / ('%s.txt' % idx) assert calib_file.exists() #获取文件,如果不存在,报错 #调用类和函数,该返回值是一个类的参数,包含相机自身的内参和外参数 return calibration_kitti.Calibration(calib_file) ## 如果有路面情况,调用该函数,获得路面的相关信息 #该文件没有路面情况,故不分析 def get_road_plane(self, idx): plane_file = self.root_split_path / 'planes' / ('%s.txt' % idx) if not plane_file.exists(): return None with open(plane_file, 'r') as f: lines = f.readlines() lines = [float(i) for i in lines[3].split()] plane = np.asarray(lines) # Ensure normal is always facing up, this is in the rectified camera coordinate if plane[1] > 0: plane = -plane norm = np.linalg.norm(plane[0:3]) plane = plane / norm return plane #定义静态方法 @staticmethod def get_fov_flag(pts_rect, img_shape, calib): """ Args: pts_rect: img_shape: calib: #其中三个参数是这个场景下(一帧下的场景:同一个bin文件、图像) # :pts_rect (M,3),M是该场景下采集到点云的个数。 # info['image']['image_shape']:该图片的长和宽,如[375,1242] """ #调用矫正类中的方法,将点的直角坐标转为 相机坐标,pts_img为(M,2) pts_img, pts_rect_depth = calib.rect_to_img(pts_rect) #返回的结果是val_flag_1和val_flag_2 : # array([ True, True, True, True, True, True, True, True, True, True]) val_flag_1 = np.logical_and(pts_img[:, 0] >= 0, pts_img[:, 0] < img_shape[1]) val_flag_2 = np.logical_and(pts_img[:, 1] >= 0, pts_img[:, 1] < img_shape[0]) val_flag_merge = np.logical_and(val_flag_1, val_flag_2) pts_valid_flag = np.logical_and(val_flag_merge, pts_rect_depth >= 0) #得到一系列标识符 true or false,用于判断该点云能否有效 (是否用于训练) #所以 pts_valid_flag=array([ True, True, True, False, True, True,.....])之类的,一共有M个 return pts_valid_flag # ###### 获取信息############## def get_infos(self, num_workers=4, has_label=True, count_inside_pts=True, sample_id_list=None): import concurrent.futures as futures #处理单帧数据 def process_single_scene(sample_idx): # self.split 的实际值是 train训练集 or val验证集 print('%s sample_idx: %s' % (self.split, sample_idx)) #定义 info空字典 info = {} pc_info = {'num_features': 4, 'lidar_idx': sample_idx} #将目前的特征、序列加入info字典里 info['point_cloud'] = pc_info #获取图像的信息,并加进去 image_info = {'image_idx': sample_idx, 'image_shape': self.get_image_shape(sample_idx)} info['image'] = image_info # calib是一个字典,里面是相机坐标的一些参数,返回P2,P3,R0,V2C等参数 calib = self.get_calib(sample_idx) #在p2下面加了一行数,从(3,4)变为(4,4) P2 = np.concatenate([calib.P2, np.array([[0., 0., 0., 1.]])], axis=0) #生成与R0相同数据类型的4X4全零数组,该数组前三行三列为R0,最后一位数置为1 R0_4x4 = np.zeros([4, 4], dtype=calib.R0.dtype) R0_4x4[3, 3] = 1. R0_4x4[:3, :3] = calib.R0 #V2C也加了一行 0 0 0 1 V2C_4x4 = np.concatenate([calib.V2C, np.array([[0., 0., 0., 1.]])], axis=0) calib_info = {'P2': P2, 'R0_rect': R0_4x4, 'Tr_velo_to_cam': V2C_4x4} info['calib'] = calib_info if has_label: # 调用get_objects_from_label函数,首先读取该文件的所有行 赋值为 lines # 在对lines中的每一个line(一个object的参数)作为object3d类的参数 进行遍历, # 最后返回:objects[]列表 ,里面是当前文件里所有物体的属性值,如:type、x,y,等 obj_list = self.get_label(sample_idx) #定义一个空字典,annotations是注解的意思 annotations = {} annotations['name'] = np.array([obj.cls_type for obj in obj_list]) annotations['truncated'] = np.array([obj.truncation for obj in obj_list]) annotations['occluded'] = np.array([obj.occlusion for obj in obj_list]) annotations['alpha'] = np.array([obj.alpha for obj in obj_list]) annotations['bbox'] = np.concatenate([obj.box2d.reshape(1, 4) for obj in obj_list], axis=0) annotations['dimensions'] = np.array([[obj.l, obj.h, obj.w] for obj in obj_list]) # lhw(camera) format annotations['location'] = np.concatenate([obj.loc.reshape(1, 3) for obj in obj_list], axis=0) annotations['rotation_y'] = np.array([obj.ry for obj in obj_list]) annotations['score'] = np.array([obj.score for obj in obj_list]) annotations['difficulty'] = np.array([obj.level for obj in obj_list], np.int32) # 计算有效物体的个数,如10个,object除去“DontCare”4个,还剩num_objects6个 num_objects = len([obj.cls_type for obj in obj_list if obj.cls_type != 'DontCare']) #总物体的个数 10个 num_gt = len(annotations['name']) index = list(range(num_objects)) + [-1] * (num_gt - num_objects) #由此可以得到 index=[0,1,2,3,4,5,-1,-1,-1,-1] annotations['index'] = np.array(index, dtype=np.int32) #假设有效物体的个数是N # 取有效物体的 location(N,3)、dimensions(N,3)、rotation_y(N,1)信息, loc = annotations['location'][:num_objects] dims = annotations['dimensions'][:num_objects] rots = annotations['rotation_y'][:num_objects] #通过计算得到在lidar坐标系下的坐标,loc_lidar:(N,3) loc_lidar = calib.rect_to_lidar(loc) #分别取 dims中的第一列、第二列、第三列:l,h,w(N,1) l, h, w = dims[:, 0:1], dims[:, 1:2], dims[:, 2:3] # h[:, 0] :(1,N),通过下面计算后,得到loc_lidar[:, 2]:(1,N) loc_lidar[:, 2] += h[:, 0] / 2 #下面计算得到的gt_boxes_lidar是(N,7) , np.newaxis 的功能是增加新的维度, # x[:, np.newaxis] ,放在后面,会给列上增加维度 # (N, 7) [x, y, z, dx, dy, dz, heading], (x, y, z) is the box center gt_boxes_lidar = np.concatenate([loc_lidar, l, w, h, -(np.pi / 2 + rots[..., np.newaxis])], axis=1) annotations['gt_boxes_lidar'] = gt_boxes_lidar info['annos'] = annotations if count_inside_pts: # points 是一个数组,假设一个bin文件里点云的个数为M, # 则points:(M,4),四个数代表一个点云 points = self.get_lidar(sample_idx) # get_calib返回的相机方面的参数,P2,R0,V2C等参数, # 同时calib也是 calibration类的一个对象 calib = self.get_calib(sample_idx) #一个点云有四个数字组成:前三个是坐标信息:x,y,z,最后一个是反射的强度值 # 所以,在以下函数调用中,取了points的前三列 作为参数 x,y,z:(M,3) #返回得到的pts_rect:(M,3) pts_rect = calib.lidar_to_rect(points[:, 0:3]) #其中三个参数是这个场景下(一帧下的场景:同一个bin文件、图像) # :pts_rect (M,3) info['image']['image_shape']:该图片的长和宽,如[375,1242] #得到一系列标识符 true or false,用于判断该点云能否有效 (是否用于训练) #所以 fov_flag=array([ True, True, True, False, True, True,.....])之类的,一共有M个 fov_flag = self.get_fov_flag(pts_rect, info['image']['image_shape'], calib) #把为True所在的行挑选出来,假设有m个false, # 所以pts_fov是(M-m,4),里面的数据还是原始的x,y,z,反射值 pts_fov = points[fov_flag] #gt_boxes_lidar是(N,7) [x, y, z, dx, dy, dz, heading], (x, y, z) is the box center corners_lidar = box_utils.boxes_to_corners_3d(gt_boxes_lidar) #经过一系列复杂的变换后boxes_to_corners_3d(), # 返回值corners_lidar为(N,8,3),数据类型是numpy.ndarray #num_gt是这一帧图像里物体的总个数,假设为10, # 则num_points_in_gt=array([-1, -1, -1, -1, -1, -1, -1, -1, -1, -1], dtype=int32) num_points_in_gt = -np.ones(num_gt, dtype=np.int32) #num_objects是有效物体的个数,为N,假设为N=6 '''def in_hull(p, hull): Test if points in `p` are in `hull`, `p` should be a `NxK` coordinates of `N` points in `K` dimensions `hull` is either a scipy.spatial.Delaunay object or the `MxK` array of the coordinates of `M` points in `K`dimensions for which Delaunay triangulation will be computed ''' for k in range(num_objects): #in_hull函数是判断点云是否在bbox中,(是否在物体的2D检测框中) #在这个函数里,判断点云的点是否在该检测框内,如果是,返回flag #运用到了“三角剖分”的概念和方法 flag = box_utils.in_hull(pts_fov[:, 0:3], corners_lidar[k]) #该函数的参数是:pts_fov[:, 0:3],(M-m,3):表示当前帧可用点云的三维位置信息 # corners_lidar[k]:当前帧第k个物体框的信息 # 则返回值是flag:array([False, False, True, False, True, False,...]),(一共M-m个) #则,flag.sum()是计算,在当前框内的点云的个数(True的个数) #最后num_points_in_gt是一个数组:[5,8,10,5,4,...],其长度是框的个数, # 里面的数字表示该框里包含点云的个数 num_points_in_gt[k] = flag.sum() annotations['num_points_in_gt'] = num_points_in_gt return info #是.txt文件下的序列号,组成列表sample_id_list,上面的函数的是一个帧的信息 #下面几行是将该sample_id_list列表上的都执行一下,每个返回的信息info都存放在infos里面 #最后执行完成后,infos是一个列表,每一个元素代表了一帧的信息 sample_id_list = sample_id_list if sample_id_list is not None else self.sample_id_list #下面是异步线程的处理方式 with futures.ThreadPoolExecutor(num_workers) as executor: infos = executor.map(process_single_scene, sample_id_list) return list(infos) #建立地面真相数据库:翻译的意思是地面实况,放到机器学习里面, # 再抽象点可以把它理解为真值、真实的有效值或者是标准的答案 # 用trainfile产生groundtruth_database, # 意思就是只保存训练数据中的gt_box及其包围的点的信息,用于数据增强 def create_groundtruth_database(self, info_path=None, used_classes=None, split='train'): import torch #创建保存文件的路径 root_path的路径是/data/kitti/ #如果是“train”,创建的路径是 /data/kitti/gt_database database_save_path = Path(self.root_path) / ('gt_database' if split == 'train' else ('gt_database_%s' % split)) #在/data/kitti/下创建保存 info的文件 db_info_save_path = Path(self.root_path) / ('kitti_dbinfos_%s.pkl' % split) database_save_path.mkdir(parents=True, exist_ok=True) all_db_infos = {} #传入的参数 info_path 是一个.pkl文件,ROOT_DIR / 'data' / 'kitti'/('kitti_infos_%s.pkl' % train_split) with open(info_path, 'rb') as f: infos = pickle.load(f) #调取infos里的每个info的信息,一个info是一帧的数据 for k in range(len(infos)): #输出的是 第几个样本 如7/780 print('gt_database sample: %d/%d' % (k + 1, len(infos))) #取当前帧的信息 info info = infos[k] #取 里面的样本序列,其实就是data/kitti/ImageSets/train.txt里面的数字序列, # 如000000,000003,000007.... sample_idx = info['point_cloud']['lidar_idx'] #读取该 bin文件类型,并将点云数据以 numpy的格式输出!!! #将数据 转换成 每行四个数据,刚好是一个点云数据的四个参数:X,Y,Z,R(强度或反射值) #故 points是一个数组(M,4) points = self.get_lidar(sample_idx) annos = info['annos'] #name的数据是['car','car','pedestrian'...'dontcare'...]表示当前帧里面的所有物体objects names = annos['name'] #difficulty:[0,1,2,-1,0,0,-1,1,...,]里面具体物体的难度,长度为总物体的个数 difficulty = annos['difficulty'] # bbox是一个数组,表示物体2D边框的个数, # 假设有效物体为N,dontcare个数为n,则bbox:(N+n,4) bbox = annos['bbox'] #同样是一个数组:(N,7),: x,y,z,dx,dy,dz,heading,为有效物体的信息 gt_boxes = annos['gt_boxes_lidar'] #num_obj是有效物体的个数,为N num_obj = gt_boxes.shape[0] #对参数的处理:首先转为tensor格式(M,3)(N,7) ##返回一个“全零"(后面又运行了一个cuda的函数,故值可能会变化)的张量, # 维度是(N,M), N是有效物体的个数,M是点云的个数,在转化为numpy #point_indices意思是点的索引 point_indices = roiaware_pool3d_utils.points_in_boxes_cpu( torch.from_numpy(points[:, 0:3]), torch.from_numpy(gt_boxes) ).numpy() # (nboxes, npoints) for i in range(num_obj): #创建文件名,并设置保存路径,最后文件如:000007_Cyclist_3.bin filename = '%s_%s_%d.bin' % (sample_idx, names[i], i) filepath = database_save_path / filename #point_indices[i] > 0得到的是一个[T,F,T,T,F...]之类的真假索引,共有M个 #再从points中取出相应为true的点云数据,放在gt_points中 gt_points = points[point_indices[i] > 0] #gt_points中每个的前三列数据 # 又都减去gt_boxes中当前物体的前三列的位置信息 gt_points[:, :3] -= gt_boxes[i, :3] #把gt_points的信息写入文件里 with open(filepath, 'w') as f: gt_points.tofile(f) if (used_classes is None) or names[i] in used_classes: db_path = str(filepath.relative_to(self.root_path)) # gt_database/xxxxx.bin #获取当前物体的信息 db_info = {'name': names[i], 'path': db_path, 'image_idx': sample_idx, 'gt_idx': i, 'box3d_lidar': gt_boxes[i], 'num_points_in_gt': gt_points.shape[0], 'difficulty': difficulty[i], 'bbox': bbox[i], 'score': annos['score'][i]} #把db_info信息添加到 all_db_infos字典里面 if names[i] in all_db_infos: all_db_infos[names[i]].append(db_info) else: all_db_infos[names[i]] = [db_info] for k, v in all_db_infos.items(): print('Database %s: %d' % (k, len(v))) #把所有的all_db_infos写入到文件里面 with open(db_info_save_path, 'wb') as f: pickle.dump(all_db_infos, f) @staticmethod def generate_prediction_dicts(batch_dict, pred_dicts, class_names, output_path=None): """ Args: batch_dict: frame_id: 帧号 pred_dicts: list of pred_dicts 预测后得到的列表 pred_boxes: (N, 7), Tensor 预测的框,包含七个信息 pred_scores: (N), Tensor 预测得分 pred_labels: (N), Tensor 预测的标签 class_names: output_path: Returns: """ #获取预测后的模板字典 ret_dict,全部定义为全零的向量 #参数num_samples 是这一帧里面的物体个数 def get_template_prediction(num_samples): ret_dict = { 'name': np.zeros(num_samples), 'truncated': np.zeros(num_samples), 'occluded': np.zeros(num_samples), 'alpha': np.zeros(num_samples), 'bbox': np.zeros([num_samples, 4]), 'dimensions': np.zeros([num_samples, 3]), 'location': np.zeros([num_samples, 3]), 'rotation_y': np.zeros(num_samples), 'score': np.zeros(num_samples), 'boxes_lidar': np.zeros([num_samples, 7]) } return ret_dict #生成一个帧的预测字典 #参数:box_dict是预测的结果,pred_dicts: list of pred_dicts 预测后得到的列表 # 在 self.generate_prediction_dicts()中接收模型预测的在统一坐标系下表示的3D检测框, # 并转回自己所需格式即可。 def generate_single_sample_dict(batch_index, box_dict): #pred_scores: (N), Tensor 预测得分,N是这一帧预测物体的个数 #pred_boxes: (N, 7), Tensor 预测的框,包含七个信息 #pred_labels: (N), Tensor 预测的标签 pred_scores = box_dict['pred_scores'].cpu().numpy() pred_boxes = box_dict['pred_boxes'].cpu().numpy() pred_labels = box_dict['pred_labels'].cpu().numpy() #定义一个帧的空字典,用来存放来自预测的信息 pred_dict = get_template_prediction(pred_scores.shape[0]) if pred_scores.shape[0] == 0: #如果没有物体,则返回空字典 return pred_dict #batch_dict: frame_id: 帧号(但不是一个纯数字,应该是一个字典之类的) calib = batch_dict['calib'][batch_index] image_shape = batch_dict['image_shape'][batch_index] #将预测完成的信息(相对激光雷达的)转化为相对相机的坐标系下 #此处需要改!!!! pred_boxes_camera = box_utils.boxes3d_lidar_to_kitti_camera(pred_boxes, calib) pred_boxes_img = box_utils.boxes3d_kitti_camera_to_imageboxes( pred_boxes_camera, calib, image_shape=image_shape ) #向刚刚创建的字典中填充预测的信息,类别名,角度之类的 pred_dict['name'] = np.array(class_names)[pred_labels - 1] #涉及到运算转换 pred_dict['alpha'] = -np.arctan2(-pred_boxes[:, 1], pred_boxes[:, 0]) + pred_boxes_camera[:, 6] pred_dict['bbox'] = pred_boxes_img pred_dict['dimensions'] = pred_boxes_camera[:, 3:6] pred_dict['location'] = pred_boxes_camera[:, 0:3] pred_dict['rotation_y'] = pred_boxes_camera[:, 6] pred_dict['score'] = pred_scores pred_dict['boxes_lidar'] = pred_boxes return pred_dict ''' pred_dicts: list of pred_dicts 预测后得到的列表 pred_boxes: (N, 7), Tensor 预测的框,包含七个信息 pred_scores: (N), Tensor 预测得分 pred_labels: (N), Tensor 预测的标签 ''' annos = [] # index的值为1,2,。。。,N ????不确定 for index, box_dict in enumerate(pred_dicts): #获取帧号 frame_id = batch_dict['frame_id'][index] #得到单个 !!!(帧)!!!的预测的结果, single_pred_dict = generate_single_sample_dict(index, box_dict) single_pred_dict['frame_id'] = frame_id annos.append(single_pred_dict) if output_path is not None: #定义输出结果的文件,帧号.txt文件 cur_det_file = output_path / ('%s.txt' % frame_id) with open(cur_det_file, 'w') as f: #将预测信息写入该文件中 bbox = single_pred_dict['bbox'] loc = single_pred_dict['location'] dims = single_pred_dict['dimensions'] # lhw -> hwl for idx in range(len(bbox)): #打印输出 物体的名字当前帧中,每个物体的预测结果 print('%s -1 -1 %.4f %.4f %.4f %.4f %.4f %.4f %.4f %.4f %.4f %.4f %.4f %.4f %.4f' % (single_pred_dict['name'][idx], single_pred_dict['alpha'][idx], bbox[idx][0], bbox[idx][1], bbox[idx][2], bbox[idx][3], dims[idx][1], dims[idx][2], dims[idx][0], loc[idx][0], loc[idx][1], loc[idx][2], single_pred_dict['rotation_y'][idx], single_pred_dict['score'][idx]), file=f) #返回处理后的预测信息 return annos def evaluation(self, det_annos, class_names, **kwargs): if 'annos' not in self.kitti_infos[0].keys(): #如果'annos'没在kitti信息里面,直接返回空字典。实际上在里面呢 return None, {} from .kitti_object_eval_python import eval as kitti_eval #复制一下参数det_annos #copy.deepcopy()在元组和列表的嵌套上的效果是一样的,都是进行了深拷贝(递归的) eval_det_annos = copy.deepcopy(det_annos) # 一个info 表示一帧数据的信息,则下面是把所有数据的annos属性取出来,进行copy eval_gt_annos = [copy.deepcopy(info['annos']) for info in self.kitti_infos] #下面的函数相当于做了进一步的运算,然后返回结果 ap_result_str, ap_dict = kitti_eval.get_official_eval_result(eval_gt_annos, eval_det_annos, class_names) return ap_result_str, ap_dict def __len__(self): if self._merge_all_iters_to_one_epoch: return len(self.kitti_infos) * self.total_epochs #等于返回训练帧的总个数,等于图片的总个数,帧的总个数 return len(self.kitti_infos) #在 self._getitem_() 中加载自己的数据, #并将点云与3D标注框均转至前述统一坐标定义下, # 送入数据基类提供的 self.prepare_data(); #参数index 是需要送进来处理的 帧序号的索引值,如1,2,3,4.。。。 def __getitem__(self, index): # index = 4 if self._merge_all_iters_to_one_epoch: index = index % len(self.kitti_infos) #将第index帧的信息 全部赋值为info info = copy.deepcopy(self.kitti_infos[index]) #将采样的序列号 赋值出来 sample_idx,这个序列号可能不是连续的 #是在train.txt文件里的数据序列号 sample_idx = info['point_cloud']['lidar_idx'] #得到该序列号相应的 点云数据 (M,4) points = self.get_lidar(sample_idx) #得到该序列号相应的相机参数,如P2,R0,V2C calib = self.get_calib(sample_idx) #得到相应帧的图片长和宽,如[375,1242] img_shape = info['image']['image_shape'] #在配置文件里FOV_POINTS_ONLY=true if self.dataset_cfg.FOV_POINTS_ONLY: #将雷达坐标系转为直角坐标,参数都是(M,3) pts_rect = calib.lidar_to_rect(points[:, 0:3]) ##fov_flag得到一系列标识符 true or false,用于判断该点云能否有效 (是否用于训练) #所以 pts_valid_flag=array([ True, True, True, False, True, True,.....])之类的,一共有M个 fov_flag = self.get_fov_flag(pts_rect, img_shape, calib) #取出有效的点云数据points points = points[fov_flag] #定义输入数据的字典:points 处理过后的点云数据, # frame_id 帧号(采样的序列号如000003,000015...,是train.txt文件里的数据) # calib:得到该序列号相应的相机参数,如P2,R0,V2C 。calib = self.get_calib(sample_idx) input_dict = { 'points': points, 'frame_id': sample_idx, 'calib': calib, } if 'annos' in info: #将该帧信息中的annos 赋值出来 annos = info['annos'] #下面函数的作用是 在info中剔除包含'DontCare'的数据信息 #不但从name中剔除,余下的location、dimensions等信息也都不考虑在内 annos = common_utils.drop_info_with_name(annos, name='DontCare') #得到有效物体object(N个)的位置、大小和角度信息(N,3),(N,3),(N) loc, dims, rots = annos['location'], annos['dimensions'], annos['rotation_y'] gt_names = annos['name'] #由下面得到的是 (N,7),因为物体都是由相机测量得到的, # 所以这是相对于相机坐标系的坐标,但点云的数据是基于雷达坐标系的, # 所有要转换为激光雷达坐标系 gt_boxes_camera = np.concatenate([loc, dims, rots[..., np.newaxis]], axis=1).astype(np.float32) """该函数的参数是 boxes3d_camera: (N, 7) [x, y, z, l, h, w, r] in rect camera coords Returns: boxes3d_lidar: [x, y, z, dx, dy, dz, heading], (x, y, z) is the box center""" gt_boxes_lidar = box_utils.boxes3d_kitti_camera_to_lidar(gt_boxes_camera, calib) #将新的键值对 添加到输入的字典中去,此时输入中有五个键值对了 input_dict.update({ 'gt_names': gt_names, 'gt_boxes': gt_boxes_lidar }) #如果有路面信息,则加入进去 road_plane = self.get_road_plane(sample_idx) if road_plane is not None: input_dict['road_plane'] = road_plane #调用函数,将需要送入数据进行训练的input_dict # 进一步的处理,这一步经过了很多的处理。。。。。。 data_dict = self.prepare_data(data_dict=input_dict) #得到相应帧的图片长和宽,如[375,1242] #把这个信息添加进去 data_dict['image_shape'] = img_shape return data_dict def create_kitti_infos(dataset_cfg, class_names, data_path, save_path, workers=4): #传递参数 dataset = KittiDataset(dataset_cfg=dataset_cfg, class_names=class_names, root_path=data_path, training=False) train_split, val_split = 'train', 'val' #定义文件的路径和名称 train_filename = save_path / ('kitti_infos_%s.pkl' % train_split) val_filename = save_path / ('kitti_infos_%s.pkl' % val_split) trainval_filename = save_path / 'kitti_infos_trainval.pkl' test_filename = save_path / 'kitti_infos_test.pkl' print('---------------Start to generate data infos---------------') dataset.set_split(train_split) #执行完上一步,得到train相关的保存文件,以及sample_id_list的值为train.txt文件下的数字 ## 下面是得到train.txt 中序列相关的所有点云数据的信息,并且进行保存 kitti_infos_train = dataset.get_infos(num_workers=workers, has_label=True, count_inside_pts=True) with open(train_filename, 'wb') as f: pickle.dump(kitti_infos_train, f) print('Kitti info train file is saved to %s' % train_filename) #开始对验证集的数据进行信息统计病保存 dataset.set_split(val_split) kitti_infos_val = dataset.get_infos(num_workers=workers, has_label=True, count_inside_pts=True) with open(val_filename, 'wb') as f: pickle.dump(kitti_infos_val, f) print('Kitti info val file is saved to %s' % val_filename) #把训练集和验证集的信息 合并写到一个文件里 with open(trainval_filename, 'wb') as f: pickle.dump(kitti_infos_train + kitti_infos_val, f) print('Kitti info trainval file is saved to %s' % trainval_filename) #写测试集的信息并保存 dataset.set_split('test') kitti_infos_test = dataset.get_infos(num_workers=workers, has_label=False, count_inside_pts=False) with open(test_filename, 'wb') as f: pickle.dump(kitti_infos_test, f) print('Kitti info test file is saved to %s' % test_filename) print('---------------Start create groundtruth database for data augmentation---------------') #生成数据增强相关的文件 # 用trainfile产生groundtruth_database, # 意思就是只保存训练数据中的gt_box及其包围的点的信息,用于数据增强 dataset.set_split(train_split) dataset.create_groundtruth_database(train_filename, split=train_split) print('---------------Data preparation Done---------------') if __name__ == '__main__': import sys #以下的命令和配置,只是为创建kitti信息做的 if sys.argv.__len__() > 1 and sys.argv[1] == 'create_kitti_infos': import yaml from pathlib import Path from easydict import EasyDict #设置配置文件的路径和相关参数 dataset_cfg = EasyDict(yaml.load(open(sys.argv[2]))) ROOT_DIR = (Path(__file__).resolve().parent / '../../../').resolve() create_kitti_infos( dataset_cfg=dataset_cfg, class_names=['Car', 'Pedestrian', 'Cyclist'], data_path=ROOT_DIR / 'data' / 'kitti', save_path=ROOT_DIR / 'data' / 'kitti' )

- 1
- 2
- 3
- 4
- 5
- 6
- 7
- 8
- 9
- 10
- 11
- 12
- 13
- 14
- 15
- 16
- 17
- 18
- 19
- 20
- 21
- 22
- 23
- 24
- 25
- 26
- 27
- 28
- 29
- 30
- 31
- 32
- 33
- 34
- 35
- 36
- 37
- 38
- 39
- 40
- 41
- 42
- 43
- 44
- 45
- 46
- 47
- 48
- 49
- 50
- 51
- 52
- 53
- 54
- 55
- 56
- 57
- 58
- 59
- 60
- 61
- 62
- 63
- 64
- 65
- 66
- 67
- 68
- 69
- 70
- 71
- 72
- 73
- 74
- 75
- 76
- 77
- 78
- 79
- 80
- 81
- 82
- 83
- 84
- 85
- 86
- 87
- 88
- 89
- 90
- 91
- 92
- 93
- 94
- 95
- 96
- 97
- 98
- 99
- 100
- 101
- 102
- 103
- 104
- 105
- 106
- 107
- 108
- 109
- 110
- 111
- 112
- 113
- 114
- 115
- 116
- 117
- 118
- 119
- 120
- 121
- 122
- 123
- 124
- 125
- 126
- 127
- 128
- 129
- 130
- 131
- 132
- 133
- 134
- 135
- 136
- 137
- 138
- 139
- 140
- 141
- 142
- 143
- 144
- 145
- 146
- 147
- 148
- 149
- 150
- 151
- 152
- 153
- 154
- 155
- 156
- 157
- 158
- 159
- 160
- 161
- 162
- 163
- 164
- 165
- 166
- 167
- 168
- 169
- 170
- 171
- 172
- 173
- 174
- 175
- 176
- 177
- 178
- 179
- 180
- 181
- 182
- 183
- 184
- 185
- 186
- 187
- 188
- 189
- 190
- 191
- 192
- 193
- 194
- 195
- 196
- 197
- 198
- 199
- 200
- 201
- 202
- 203
- 204
- 205
- 206
- 207
- 208
- 209
- 210
- 211
- 212
- 213
- 214
- 215
- 216
- 217
- 218
- 219
- 220
- 221
- 222
- 223
- 224
- 225
- 226
- 227
- 228
- 229
- 230
- 231
- 232
- 233
- 234
- 235
- 236
- 237
- 238
- 239
- 240
- 241
- 242
- 243
- 244
- 245
- 246
- 247
- 248
- 249
- 250
- 251
- 252
- 253
- 254
- 255
- 256
- 257
- 258
- 259
- 260
- 261
- 262
- 263
- 264
- 265
- 266
- 267
- 268
- 269
- 270
- 271
- 272
- 273
- 274
- 275
- 276
- 277
- 278
- 279
- 280
- 281
- 282
- 283
- 284
- 285
- 286
- 287
- 288
- 289
- 290
- 291
- 292
- 293
- 294
- 295
- 296
- 297
- 298
- 299
- 300
- 301
- 302
- 303
- 304
- 305
- 306
- 307
- 308
- 309
- 310
- 311
- 312
- 313
- 314
- 315
- 316
- 317
- 318
- 319
- 320
- 321
- 322
- 323
- 324
- 325
- 326
- 327
- 328
- 329
- 330
- 331
- 332
- 333
- 334
- 335
- 336
- 337
- 338
- 339
- 340
- 341
- 342
- 343
- 344
- 345
- 346
- 347
- 348
- 349
- 350
- 351
- 352
- 353
- 354
- 355
- 356
- 357
- 358
- 359
- 360
- 361
- 362
- 363
- 364
- 365
- 366
- 367
- 368
- 369
- 370
- 371
- 372
- 373
- 374
- 375
- 376
- 377
- 378
- 379
- 380
- 381
- 382
- 383
- 384
- 385
- 386
- 387
- 388
- 389
- 390
- 391
- 392
- 393
- 394
- 395
- 396
- 397
- 398
- 399
- 400
- 401
- 402
- 403
- 404
- 405
- 406
- 407
- 408
- 409
- 410
- 411
- 412
- 413
- 414
- 415
- 416
- 417
- 418
- 419
- 420
- 421
- 422
- 423
- 424
- 425
- 426
- 427
- 428
- 429
- 430
- 431
- 432
- 433
- 434
- 435
- 436
- 437
- 438
- 439
- 440
- 441
- 442
- 443
- 444
- 445
- 446
- 447
- 448
- 449
- 450
- 451
- 452
- 453
- 454
- 455
- 456
- 457
- 458
- 459
- 460
- 461
- 462
- 463
- 464
- 465
- 466
- 467
- 468
- 469
- 470
- 471
- 472
- 473
- 474
- 475
- 476
- 477
- 478
- 479
- 480
- 481
- 482
- 483
- 484
- 485
- 486
- 487
- 488
- 489
- 490
- 491
- 492
- 493
- 494
- 495
- 496
- 497
- 498
- 499
- 500
- 501
- 502
- 503
- 504
- 505
- 506
- 507
- 508
- 509
- 510
- 511
- 512
- 513
- 514
- 515
- 516
- 517
- 518
- 519
- 520
- 521
- 522
- 523
- 524
- 525
- 526
- 527
- 528
- 529
- 530
- 531
- 532
- 533
- 534
- 535
- 536
- 537
- 538
- 539
- 540
- 541
- 542
- 543
- 544
- 545
- 546
- 547
- 548
- 549
- 550
- 551
- 552
- 553
- 554
- 555
- 556
- 557
- 558
- 559
- 560
- 561
- 562
- 563
- 564
- 565
- 566
- 567
- 568
- 569
- 570
- 571
- 572
- 573
- 574
- 575
- 576
- 577
- 578
- 579
- 580
- 581
- 582
- 583
- 584
- 585
- 586
- 587
- 588
- 589
- 590
- 591
- 592
- 593
- 594
- 595
- 596
- 597
- 598
- 599
- 600
- 601
- 602
- 603
- 604
- 605
- 606
- 607
- 608
- 609
- 610
- 611
- 612
- 613
- 614
- 615
- 616
- 617
- 618
- 619
- 620
- 621
- 622
- 623
- 624
- 625
- 626
- 627
- 628
- 629
- 630
- 631
- 632
- 633
- 634
- 635
- 636
- 637
- 638
- 639
- 640
- 641
- 642
- 643
- 644
- 645
- 646
- 647
- 648
- 649
- 650
- 651
- 652
- 653
- 654
- 655
- 656
- 657
- 658
- 659
- 660
- 661
- 662
- 663
- 664
- 665
- 666
- 667
- 668
- 669
- 670
- 671
- 672
- 673
- 674
- 675
- 676
- 677
- 678
- 679
- 680
- 681
修改自己数据集的代码在这篇文章里
https://blog.csdn.net/weixin_44128857/article/details/117445420
声明:本文内容由网友自发贡献,不代表【wpsshop博客】立场,版权归原作者所有,本站不承担相应法律责任。如您发现有侵权的内容,请联系我们。转载请注明出处:https://www.wpsshop.cn/w/Gausst松鼠会/article/detail/324476
推荐阅读
相关标签

