
热门标签
热门文章
- 1Pytest测试用例参数化
- 2【目标检测】评价指标:mAP概念及其代码实现(yolo源码/pycocotools)
- 3分类预测 | OOA-SVM鱼鹰算法优化支持向量机的多变量输入数据分类预测
- 4PyTorch的ONNX结合MNIST手写数字数据集的应用(.pth和.onnx的转换与onnx运行时)_invalid_argument : invalid feed input name:input
- 5vue基础——自定义按键修饰符_vue全局按键修饰报错
- 6Eclipse中Web项目找不到类解决办法_eclipse看不到ibatis.basedao类
- 7灰度图恢复(100%用例)C卷(Java&&Python&&C++&&Node.js&&C语言)
- 8示例程序001--模板匹配_模板匹配c语言代码
- 9分奖金(python)_分奖金问题算法python
- 10Egret使用心得_egret cost
当前位置: article > 正文
Vue实现动态路由【记录学习的快乐】_vue 动态路由
作者:编程领航者 | 2024-02-04 14:23:55
赞
踩
vue 动态路由
1、什么是动态路由?
2、动态路由的好处
3、动态路由如何实现
1、什么是动态路由?
动态路由,动态即不是写死的,是可变的。我们可以根据自己不同的需求加载不同的路由,做到不同的实现及页面的渲染。动态的路由存储可分为两种,一种是将路由存储到前端。另一种则是将路由存储到数据库。动态路由的使用一般结合角色权限控制一起使用。
总结:
1:路由可变,不是写死的,动态加载;
2:存储分两种:存储前端、存储数据库
2、动态路由的好处
使用动态路由可以跟灵活,无需手工维护,我们可以使用一个页面对路由进行维护。如果将路由存储到数据库,还可以增加安全性。
总结:
1:灵活,无需手工维护;
2:增加安全性
3、动态路由如何实现
在此以路由存储在数据库为例
流程:一般我们在登录的时候,根据登录用户的角色返回此角色可以访问的页面的路由,前端将路由存储到vuex(vuex存储的数据必须可持久的,不要一刷新页面就不见),我们在路由前置守卫处动态添加拿到的路由,对页面进行渲染。
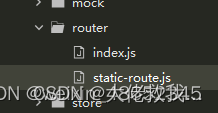
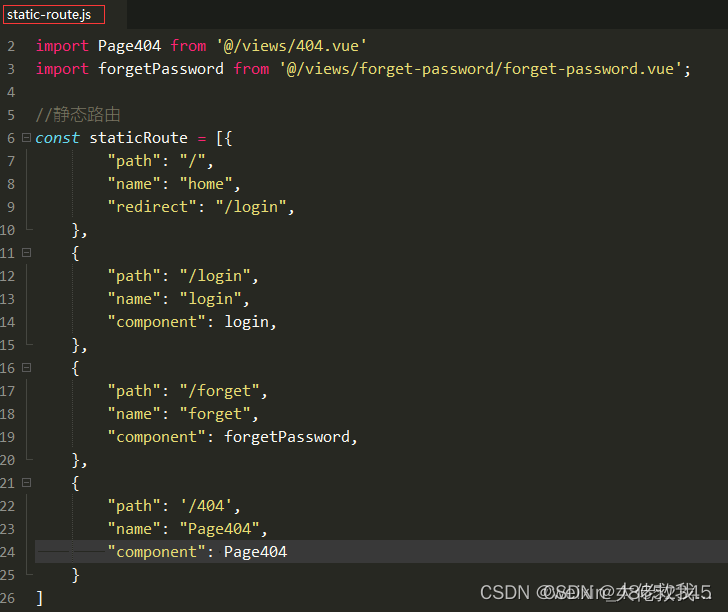
1)此为我的router目录,index.js对路由添加,守卫拦截等处理。static-route.js为前端定义的静态路由,不需要动态加载的,如登陆页面,忘记密码页面,404页面等。
index.js文件
- import Vue from 'vue'
- import $cookies from 'vue-cookies'
- import VueRouter from 'vue-router'
- import store from '../store'
- import staticRoute from './static-route.js'
- Vue.use(VueRouter)
- const router = new VueRouter({
- mode: 'history',
- base: process.env.BASE_URL,
- routes: staticRoute //staticRoute为静态路由,不需动态添加
- })
- let isToken = true
- router.beforeEach(async (to, from, next) => {
- //定义isToken为true和vuex不为空时添加路由
- if (isToken && store.state.routers.routers.length != 0) {
- //从vuex中获取动态路由
- const accessRouteses = await store.state.routers.routers;
- //动态路由循环解析和添加
- accessRouteses.forEach(v => {
- v.children = routerChildren(v.children);
- v.component = routerCom(v.component);
- router.addRoute(v); //添加
- })
- isToken = false //将isToken赋为 false ,否则会一直循环,崩溃
- next({
- ...to, // next({ ...to })的目的,是保证路由添加完了再进入页面 (可以理解为重进一次)
- replace: true, // 重进一次, 不保留重复历史
- })
- } else {
- if (to.name == null) {
- next("/404")
- } else {
- if (to.meta.title) { //判断是否有标题
- document.title = to.meta.title //给相应页面添加标题
- }
- next()
- }
- }
- })
- function routerCom(path) { //对路由的component解析
- return (resolve) => require([`@/views/${path}`], resolve);
- }
- function routerChildren(children) { //对子路由的component解析
- children.forEach(v => {
- v.component = routerCom(v.component);
- if (v.children != undefined) {
- v.children = routerChildren(v.children)
- }
- })
- return children
- }
- export default router

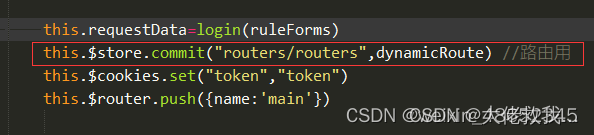
2)登陆成功后将获取到的动态路由存储到vuex
vuex—>index.js文件
- import Vue from 'vue'
- import Vuex from 'vuex'
- //数据持久化
- import createPersistedState from "vuex-persistedstate";
-
- Vue.use(Vuex)
- const routers = {
- namespaced: true,
- state: () => ({
- routers:"",
- }),
- mutations: {
- routers(state, newsdata) {
- state.routers = newsdata
- },
-
- },
- actions: {
- routers(context) {
- context.commit('routers')
- },
- },
- getters: {
- routers(state) {
- console.log("getters", state)
- return state.routers
- },
-
- }
- }
-
-
- const store = new Vuex.Store({
- modules: {
- routers: routers,
- },
-
- // 数据持久化
- plugins: [createPersistedState({
- //key是存储数据的键名
- key: 'routersData',
- //paths是存储state中的那些数据,如果是模块下具体的数据需要加上模块名称,如user.token
- paths: ["routers.routers"]
- })]
- })
-
-
- export default store
我的动态路由模板
- //动态路由
- const dynamicRoute = [{
- "path": "/main",
- "name": "main",
- "redirect": "/main/index",
- "component": "main/main.vue",
- "children": [{
- "path": "index",
- "name": "index",
- "component": "index/index.vue",
- "meta": {
- "name": "index",
- "title": "首页",
- "icon": "el-icon-location",
- "menu":true //true为菜单栏
- }
- },
- {
- "path": "Configuration",
- "name": "Configuration",
- "redirect": "Configuration/route",
- "component": "Configuration/index.vue",
- "roles": ['developer', "admin"], // developer、admin角色的用户才能访问该页面
- "meta": {
- "title": "配置",
- "icon": "el-icon-location",
- "menu":true
- },
- "children": [{
- "path": "route",
- "name": "route",
- "component": "Configuration/route/index.vue",
- "meta": {
- "title": "菜单",
- "icon": "",
- "menu":true
- },
- }, {
- "path": "user",
- "name": "user",
- "component": "Configuration/user/index.vue",
- "meta": {
- "title": "用户管理",
- "icon": "el-icon-location",
- "menu":true
- },
- },
- {
- "path": "admin",
- "name": "admin",
- "component": "Configuration/admin/index.vue",
- "meta": {
- "title": "管理员管理",
- "icon": "",
- "menu":true
- },
- },
-
- {
- "path": "userEdit",
- "name": "userEdit",
- "component": "Configuration/user/user-Edit.vue",
- "meta": {
- "title": "编辑用户",
- "icon": "",
- "menu":false
- },
- },
- ]
- },
- {
- "path": "check",
- "name": "check",
- "redirect": "check/user",
- "component": "check/index.vue",
- "roles": ['developer', "admin", "check"], // developer、admin角色的用户才能访问该页面
- "meta": {
- "title": "审核",
- "icon": "el-icon-location",
- "menu":true
- },
- "children": [{
- "path": "user",
- "name": "checkUser",
- "component": "check/check-user/index.vue",
- "meta": {
- "title": "用户实名审核",
- "icon": "el-icon-location",
- "menu":true
- }
- },
- {
- "path": "enterprise",
- "name": "checkEnterprise",
- "component": "check/check-enterprise/index.vue",
- "meta": {
- "title": "企业认证审核",
- "icon": "el-icon-location",
- "menu":true
- },
- },
- {
- "path": "checkNormImage",
- "name": "checkNormImage",
- "component": "check/check-norm-image/index.vue",
- "meta": {
- "title": "标准照认证审核",
- "icon": "el-icon-location",
- "menu":true
- },
- },
- {
- "path": "checkHiringJobs",
- "name": "checkHiringJobs",
- "component": "check/check-hiring-Jobs/index.vue",
- "meta": {
- "title": "求职、招聘认证审核",
- "icon": "el-icon-location",
- "menu":true
- },
- }
- ]
-
- }
- ]
- }, ]
- export default dynamicRoute
路由界面

讲一讲遇到的坑及注意点
-
“component”: “check/check-norm-image/index.vue”, 用字符串再在解析,不要像静态路由一样。否则第一次进去可以,刷新就变空白
-
此处为重要的一点,直接用next()不行
- next({
- ...to, // next({ ...to })的目的,是保证路由添加完了再进入页面 (可以理解为重进一次)
- replace: true, // 重进一次, 不保留重复历史
- })
3)由于添加完路由还会重复执行一遍路由守卫,所有必须确保不要一直死循环添加路由。否则直接崩溃。这里我用的是isToken变量确保不循环。
声明:本文内容由网友自发贡献,不代表【wpsshop博客】立场,版权归原作者所有,本站不承担相应法律责任。如您发现有侵权的内容,请联系我们。转载请注明出处:https://www.wpsshop.cn/article/detail/59005
推荐阅读
相关标签

