赞
踩
权限管理是指一个角色(如vip和非vip)在一个系统中只能使用指定的功能并且只能访问指定的界面,权限管理是一个项目当中必不可少的部分。
路由分为两块:
不需要权限访问的路由,比如登录页面、404页面,有时首页也不需要。
需要权限访问的路由
用户登录后后端会返回一个当前用户的权限标识,前端通过给定的权限标识筛选出用户能够访问的有权限的路由,先把筛选出来的有权限的路由通过 addRoutes 添加到实例上,目的是为了可以通过地址栏访问,然后把筛选出来有权限的动态路由存储到 vuex 中,目的是为了能够在菜单栏中体现。
注意:这里的 addRoutes 有一定的缺陷,它在导航守卫进行完一次后才会添加新配置的路由,所以需要让它再走一次导航守卫才能够使用。
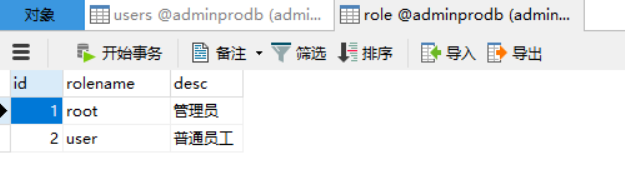
users 用户表(要包含role字段,里面是对应的role表里的id值)
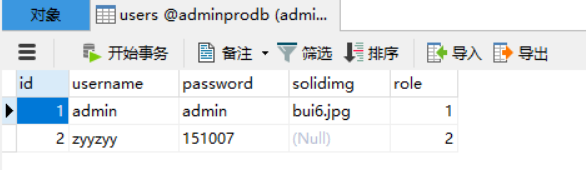
role 角色表 (具体有哪些角色,不同的角色有不同的权限)
在登录页面输入用户名和密码,携带用户名和密码向服务端发送请求
<template></template>模板
<div class="login-content"> <div class="con-left"> <div class="text"> <p class="item1">车响汽车CRM系统</p> <p class="item2">CAR CRM SYSTEM</p> </div> </div> <el-form :model="ruleForm" status-icon :rules="rules" ref="ruleForm" label-width="100px" class="demo-ruleForm" > <h3>登录</h3> <el-form-item label="用户名" prop="username"> <el-input type="username" v-model="ruleForm.username" autocomplete="off" ></el-input> </el-form-item> <el-form-item label="密码" prop="password"> <el-input type="password" v-model="ruleForm.password" autocomplete="off" ></el-input> </el-form-item> <el-form-item> <el-button @click="resetForm('ruleForm')">重置</el-button> <el-button type="primary" @click="submitForm('ruleForm')">登录</el-button> </el-form-item> </el-form> </div>
<script></script>标签中
<script> import { userLogin } from "@/api/request"; //引入路由中定义的动态添加路由的函数 import {asyncRoutes} from '@/router/index.js' export default { data() { return { ruleForm: { username: '', password: '', }, rules: { username: [ { validator: validateUsername, trigger: 'blur' } ], password: [ { validator: validatePassword, trigger: 'blur' } ], } }; }, methods: { submitForm(formName) { this.$refs[formName].validate(async (valid) => { if (valid) { //验证用户名和密码 let res = await userLogin(this.ruleForm); let {code,token,navData }=res.data; if(code==200){ localStorage.setItem('token',token); localStorage.setItem("navData",JSON.stringify(navData)); this.$store.commit("getNavData",navData) // 动态添加路由 asyncRoutes(); this.$message({ message:'登录成功', type:'success' }); this.$router.push('/home'); }else{ this.$message.error('登录失败'); this.$refs[formName].resetFields(); } } else { console.log('error submit!!'); return false; } }); }, resetForm(formName) { this.$refs[formName].resetFields(); } } } </script>
express后端userLogin.js文件中 let express=require("express"); let userLogin=express.Router(); const db = require("../service/db"); const vartoken = require("../utils/token"); let adminRoutes = require('../api/adminRoutes.json'); let userRoutes = require('../api/userRoutes.json'); let routers = { root:adminRoutes,//管理员身份的路由数据 user:userRoutes//普通用户身份的路由数据 } userLogin.post("/login",(req,res)=>{ let {username,password} = req.body; let sql = `select * from users,role where users.role = role.id and username='${username}' and password='${password}'`; db.base(sql,null,(result)=>{ if(result.length>0){ // 4. 使用用户名生成token,将token进行返回 // 生成token vartoken.setToken(username).then(token=>{ data={ code:200, msg:'登录成功', token:token, navData:routers[result[0].rolename],//返回对应角色的路由信息 } res.send(data); }) }else{ // 3. 不正确,返回登录失败 data={ code:401, msg:'登录失败' } res.send(data); } }) }); module.exports=userLogin;
以管理员的adminRoutes.json为例
[ { "path": "/market", "name": "market", "title": "营销管理", "icon": "el-icon-s-grid", "children": [ { "path": "clue", "name": "clue", "url": "/Market/Clue", "title": "线索信息" }, { "path": "activity", "name": "activity", "url": "/Market/Activity", "title": "活动管理" }, { "path": "channel", "name": "channel", "url": "/Market/Channel", "title": "渠道管理" } ] }, { "path": "/customer", "name": "customer", "title": "客户管理", "icon": "el-icon-s-custom", "url": "/Customer/CustList" }, { "path": "/stock", "name": "stock", "title": "库存管理", "icon": "el-icon-s-order", "children": [ { "path": "carlist", "name": "carlist", "url": "/Stock/CarList", "title": "车辆管理" }, { "path": "waiting", "name": "waiting", "url": "/Stock/Waiting", "title": "排队库管理" } ] }, { "path": "/finance", "name": "finance", "title": "财务管理", "icon": "el-icon-s-finance", "children": [ { "path": "contract", "name": "contract", "url": "/Finance/Contract", "title": "合同管理" }, { "path": "order", "name": "order", "url": "/Finance/Order", "title": "订单管理" } ] }, { "path": "/notice", "name": "notice", "title": "发布活动", "icon": "el-icon-message-solid", "url": "/Notice/Notice" } ]
在index.js路由文件中
全局前置守卫中 获取数据
//解决重新登录时,路由重复定义的报错 const createRouter = () => new VueRouter({ routes, }); const router = createRouter(); //在重新登录时,重置路由对象 function resetRouter() { const newRouter = createRouter(); router.matcher = newRouter.matcher; // the relevant part } // 全局前置守卫 router.beforeEach((to, from, next) => { document.title = to.meta.title; let token = localStorage.getItem("token"); if (to.fullPath === "/login") { next(); } else { if (token) { // 解决刷新页面时重新获取路由数据 let navData = store.state.navData; if (navData.length === 0) { //如果长度为0,则是刷新 // 从sessionStorage中拿navData数据 navData = JSON.parse(localStorage.getItem("navData")); store.commit("getNavData", navData); asyncRoutes(navData); // 参考4.3.4解释 next({ ...to, replace: true }); } else { next(); } } else { next("/login"); } } });
遍历数据 放到router身上
export function asyncRoutes() { resetRouter() //重置路由 // 1.获取路由信息 let navData = store.state.navData; //store中的动态路由菜单 // 2. 处理路由信息 navData.forEach(item => { let routeItem = {}; if (item.children) { // 二级路由 routeItem = { path: item.path, name: item.name, component: () => import('@/views/Layout'), redirect: item.path + '/' + item.children[0].path, meta: { title: item.title, }, children: [] } item.children.forEach(child => { routeItem.children.push({ path: child.path, meta: { title: child.title }, component: () => import('@/views' + child.url) }) }) } else { // 一级路由 routeItem = { path: item.path, name: item.name, component: () => import('@/views/Layout'), meta: { title: item.title, leavel: 1, }, children: [{ path: item.path + item.path, meta: { title: item.title }, component: () => import('@/views' + item.url) }] } } // 把拼接好的路由,放入到router中 router.addRoute(routeItem); router.addRoute({ path: '*', name: '404', meta: { title: '404页面' }, component: () => import('../views/NotFound') }); }) }
1.在navmen.vue中获取数据 使用计算属性进行获取
- <script>
- export default {
- computed:{
- routerList(){
- return this.$store.state.navData;
- }
- }
- };
- </script>
2. 直接将值传给侧边栏子组件
<template> <el-menu :default-active="$route.fullPath" class="el-menu-vertical-demo" @open="handleOpen" @close="handleClose" background-color="#001529" text-color="#fff" active-text-color="#ffd04b" :router="true" :collapse="iscollapse" :collapse-transition="false" > <!-- 循环侧边栏 --> <el-menu-item index="/home"> <i class="el-icon-s-home"></i> <span slot="title" v-if="!iscollapse">首页</span> </el-menu-item> <div v-for="item in routerList" :key="item.path" > <!-- 二级路由 --> <el-submenu :index="item.path" v-if="item.children"> <template slot="title"> <i :class="item.icon" tyle="width:40px;"></i> <span v-if="!iscollapse">{{ item.title}}</span> </template> <el-menu-item-group> <el-menu-item :index="item.path+'/'+child.path" v-for="child in item.children" :key="child.path">{{ child.title }}</el-menu-item> </el-menu-item-group> </el-submenu> <el-menu-item :index="item.path+item.path" v-else> <i :class="item.icon"></i> <span slot="title" v-if="!iscollapse">{{item.title}}</span> </el-menu-item> </div> </el-menu> </template>
Copyright © 2003-2013 www.wpsshop.cn 版权所有,并保留所有权利。