- 1小程序实现微信登录Java后端(一)--前端实现_java小程序自动登录
- 2Arduino超声波智能循迹避障小车简易教程_arduino小车超声波
- 3【Linux】 OpenSSH_9.3p1 升级到 OpenSSH_9.3p2(亲测无问题,建议收藏)_linux 安装ssh9.3p2
- 4自动完成文本框AutoCompleteTextView
- 5蓝桥杯 平面切分(欧拉定理)_蓝桥杯平面切分
- 6python七段数码管10秒倒计时_python实现七段数码管和倒计时效果
- 7Leetcode算法——26、有序数组去重_leetcode list去重
- 8Tensorflow可以做什么----谷歌大牛告诉你_tensorflow能做什么
- 9Albert: A lite bert for self-supervised learning of language representations (Albert)
- 10软件测试最新复习【太原理工大学】_软件测试能排除软件中潜藏的错误吗
Nacos_nacos 网关
赞
踩
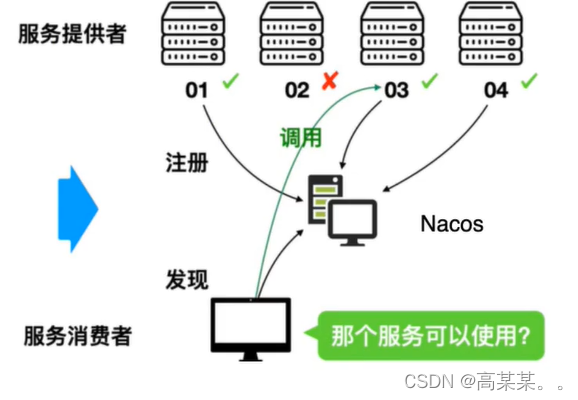
nacos是一个服务注册于发现的平台 它可以做到将我们的服务展示出来 只需要去访问我们的nacos就可以浏览所有的服务,那它和我们的网关有什么关系,网关主要是提供给用户一个访问的接口,所有的用户通过网关访问,而nacos主要是提供给我们的所有服务其他服务的信息,包括给网关提供我们需要到达服务的信息。
nacos的简单使用:官网地址
https://nacos.io/zh-cn/docs/quick-start.html
- 1
官网推荐下载稳定的2.03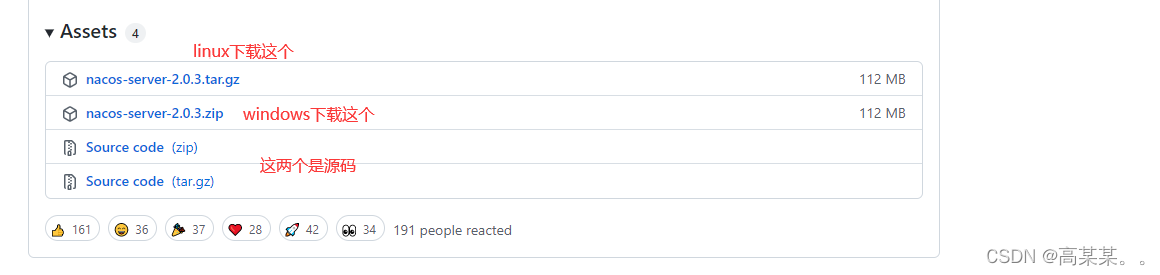
下载好我们的nacos包过后 将他上传到linux服务器上
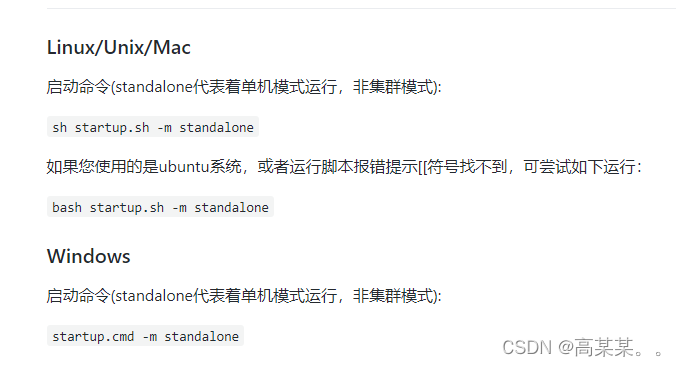
执行命令解压tar -xvf nacos-server-$version.tar.gz
进入解压好的nacos的bin目录下
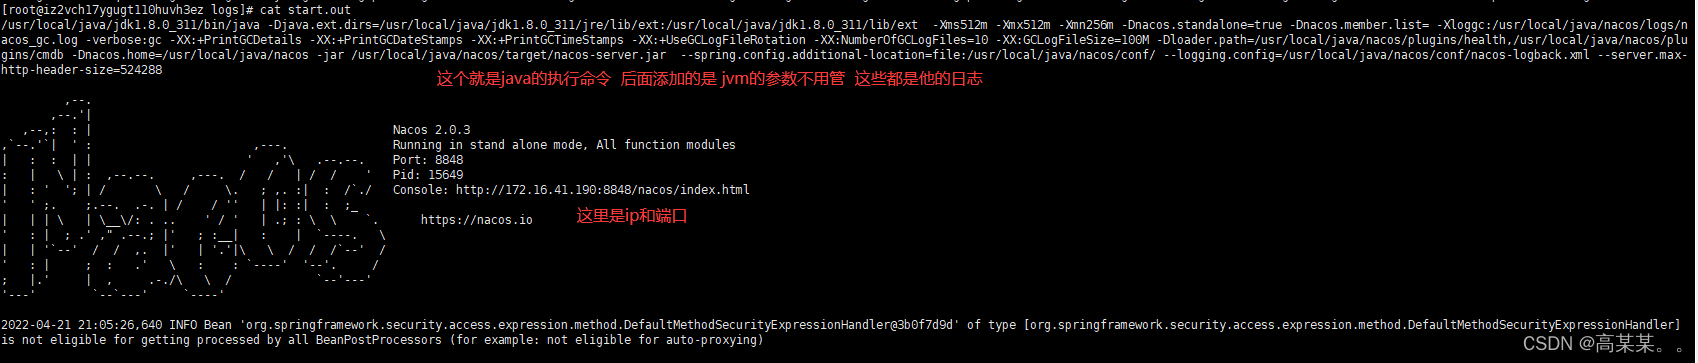
启动:
启动成功:可以到最下面那一行的推荐目录下观察它的日志输出:
 根据网址进入即可:
版本对应文档:
https://github.com/alibaba/spring-cloud-alibaba/wiki/%E7%89%88%E6%9C%AC%E8%AF%B4%E6%98%8E
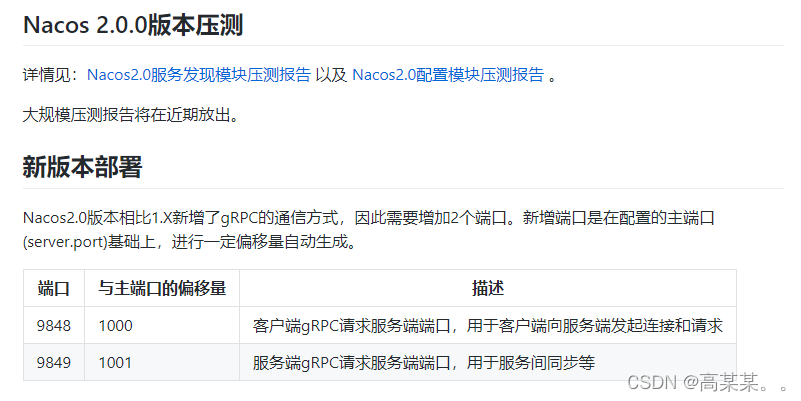
同时如果是使用的nacos是2.0以上版本 还要打开9848 9849端口
版本一定要用好
我使用的是2.0.3版本的nacos,父类的在pom文件中添加这个:
<dependencyManagement>
        <dependencies>
            <dependency>
                <groupId>com.alibaba.cloud</groupId>
                <artifactId>spring-cloud-alibaba-dependencies</artifactId>
                <version>${spring-cloud-alibaba-version}</version>
                <type>pom</type>
                <scope>import</scope>
            </dependency>
        </dependencies>
</dependencyManagement>
<dependencies>
        <dependency>
            <groupId>org.springframework.boot</groupId>
            <artifactId>spring-boot-starter</artifactId>
            <version>${spring-boot.version}</version>
        </dependency>
        <dependency>
            <groupId>org.springframework.boot</groupId>
            <artifactId>spring-boot-starter-tomcat</artifactId>
            <version>${spring-boot.version}</version>
        </dependency>
        <dependency>
            <groupId>org.springframework.boot</groupId>
            <artifactId>spring-boot-starter-test</artifactId>
            <version>${spring-boot.version}</version>
            <scope>test</scope>
            <exclusions>
                <exclusion>
                    <groupId>org.junit.vintage</groupId>
                    <artifactId>junit-vintage-engine</artifactId>
                </exclusion>
            </exclusions>
        </dependency>
        <dependency>
            <groupId>org.apache.httpcomponents</groupId>
            <artifactId>httpclient</artifactId>
            <version>4.5</version>
        </dependency>
</dependencies>

- 1
- 2
- 3
- 4
- 5
- 6
- 7
- 8
- 9
- 10
- 11
- 12
- 13
- 14
- 15
- 16
- 17
- 18
- 19
- 20
- 21
- 22
- 23
- 24
- 25
- 26
- 27
- 28
- 29
- 30
- 31
- 32
- 33
- 34
- 35
- 36
- 37
- 38
- 39
- 40
接下来是服务提供者的pom文件: 记得把服务提供者配置为父类的子文件
<dependencies>
        <dependency>
            <groupId>org.springframework.boot</groupId>
            <artifactId>spring-boot-starter-web</artifactId>
            <version>${spring-boot.version}</version>
        </dependency>
        <dependency>
            <groupId>com.alibaba.cloud</groupId>
            <artifactId>spring-cloud-starter-alibaba-nacos-discovery</artifactId>
        </dependency>
</dependencies>
- 1
- 2
- 3
- 4
- 5
- 6
- 7
- 8
- 9
- 10
- 11
接下来是服务的yml文件的,其实服务消费者和服务提供者 在我们的nacos中并没有什么不同,都是同样的一组组件 ,只是当我们的某个组件需要调用分布式中其他项目的时候 我们会把被调用的项目称作服务的提供者,另一个叫做服务消费者
server:
  port: 9001
spring:
  application:
    name: nacos-provider
  cloud:
    nacos:
      server-addr: 47.108.140.135:8848
management:
  endpoint:
    web:
      exposure:
        include: '*'
==================================服务消费者的========================================
server:
  port: 8080
spring:
  application:
    name: nacos-consumer
  cloud:
    nacos:
      server-addr: 47.108.140.135:8848

#消费者将要去访问的微服务名称 这个没有什么大用 就是方便用@Value拿而已 不用写直接字符串也可
#就是配置文件和代码的分离
#我们的服务注册中心会把 应用程序名和它的ip联系起来
service-url:
  nacos-user-service: http://nacos-provider
- 1
- 2
- 3
- 4
- 5
- 6
- 7
- 8
- 9
- 10
- 11
- 12
- 13
- 14
- 15
- 16
- 17
- 18
- 19
- 20
- 21
- 22
- 23
- 24
- 25
- 26
- 27
- 28
设计到服务的消费就需要设计到远程方法调用:
在消费者的主程序中添加这一个 好方便我们调用其他服务 ribbon为我们提供了负载均衡
	@Bean
    @LoadBalanced //开启负载均衡(利用hash码的均匀分布 达成负载均衡)
    public RestTemplate restTemplate(){
        return new RestTemplate();
    }
- 1
- 2
- 3
- 4
- 5
远程方法调用:
提供者的
@Value("${server.port}")
    private String port;

    @GetMapping("/serverport")
    public String getServerPort(){
        return "hello nacos discovery "+port;
    }
============================================================================
消费者的
@Value("${service-url.nacos-user-service}")
    private String url;

    @Autowired
    private RestTemplate restTemplate;

    @GetMapping("/consumer/nacos")
    public String getDiscovery(){
        //第一个参数是访问的地址 第二个是返回值的类型 如果返回值类型是 list 要写成arr数组类型
        //第三个参数是传给url的动态参数 使用该参数需要 在url中加上 {1}{2}{3}占位符
        return restTemplate.getForObject(url+"/serverport",String.class);
    }
- 1
- 2
- 3
- 4
- 5
- 6
- 7
- 8
- 9
- 10
- 11
- 12
- 13
- 14
- 15
- 16
- 17
- 18
- 19
- 20
- 21
- 22
接下来可以执行方法 可以看出 我们的调用结果是不同的,证明我们的ribbon确实办到了负载均衡(复杂的我没有测试,就是权重 每个服务器性能不同我们设置不同权重 让性能差的分的请求少一些)


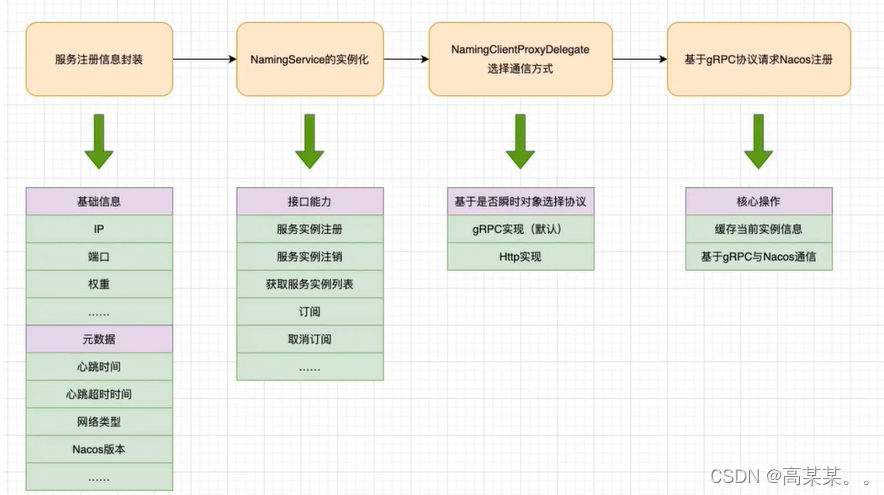
nacos的核心功能: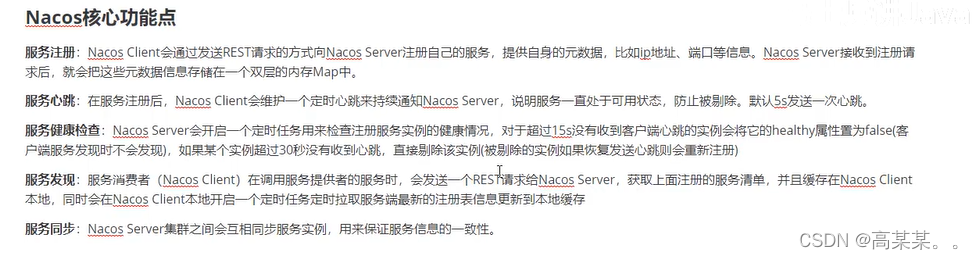
接下来我们来了解一下nacos服务是如何运行起来的,下载源码的过程网上都可以找到:
我们来看一看nacos给我们留下的naming测试类:
@Test
    public void testServiceList() throws Exception {

        Properties properties = new Properties();
        properties.put(PropertyKeyConst.SERVER_ADDR, "www.gsxa.top:8848");//nacos的连接信息
        properties.put(PropertyKeyConst.USERNAME, "nacos");
        properties.put(PropertyKeyConst.PASSWORD, "nacos");
        properties.put(CommonParams.NAMING_REQUEST_TIMEOUT,20);

        Instance instance = new Instance();//实例信息 将自身的信息发送给nacos服务器
        instance.setIp("1.1.1.1");
        instance.setPort(800);
        instance.setWeight(2);
        Map<String, String> map = new HashMap<String, String>();
        map.put("netType", "external");
        map.put("version", "2.0");
        instance.setMetadata(map);

        NamingService namingService = NacosFactory.createNamingService(properties);
        namingService.registerInstance("nacos.test.1", instance);

        ThreadUtils.sleep(5000L);
        List<Instance> list = namingService.getAllInstances("nacos.test.1");
        System.out.println(list);

    }
- 1
- 2
- 3
- 4
- 5
- 6
- 7
- 8
- 9
- 10
- 11
- 12
- 13
- 14
- 15
- 16
- 17
- 18
- 19
- 20
- 21
- 22
- 23
- 24
- 25
- 26
首先 它创建了两种信息 1. 连接信息 即properties属性 里面主要存储了 与nacos服务端连接需要什么信息。 2. Instance 实例信息 就是自生服务的信息元数据传送给服务器 然他了解 我们直接看 registerInstance方法。
@Override
    public void registerInstance(String serviceName, Instance instance) throws NacosException {
        registerInstance(serviceName, Constants.DEFAULT_GROUP, instance);
    }

    @Override
    public void registerInstance(String serviceName, String groupName, Instance instance) throws NacosException {
        NamingUtils.checkInstanceIsLegal(instance);//检查心跳时间是否设置有问题
        clientProxy.registerService(serviceName, groupName, instance);
    }
========================================================================================
 public static void checkInstanceIsLegal(Instance instance) throws NacosException {
 //这几个属性都是Instance的默认设置的值 比如发送心跳时间5s 每5s向nacos服务端发送心跳信息 证明自己还活着   15s心跳异常时间 如果15s没有发送信息 那么该实例将被标记为异常 30s删除服务 如果30s没有发送信息 nacos服务端会直接将这个服务从他的列表中删除
        //查看一下心跳的间隔发送时间 是否大于了心跳的销毁时间 或者 心跳发生异常的时间  如果超过了 证明你设置出了问题
        if (instance.getInstanceHeartBeatTimeOut() < instance.getInstanceHeartBeatInterval()
                || instance.getIpDeleteTimeout() < instance.getInstanceHeartBeatInterval()) {
            throw new NacosException(NacosException.INVALID_PARAM,
                    "Instance 'heart beat interval' must less than 'heart beat timeout' and 'ip delete timeout'.");
        }
}
=======================================================================================
上面检测完过后调用这个方法 去注册服务 先查看 getExecuteClientProxy
@Override
public void registerService(String serviceName, String groupName, Instance instance) throws NacosException {
        getExecuteClientProxy(instance).registerService(serviceName, groupName, instance);
}
//使用那种请求去发送 http 还是 grpc
private NamingClientProxy getExecuteClientProxy(Instance instance) {
        //用grpc 还是 http协议来发送请求 如果是瞬时对象就会用grpc
        //grpc 是rpc同学的一个实现 2.0版本默认使用grpc
        return instance.isEphemeral() ? grpcClientProxy : httpClientProxy;
}
instance中的属性  默认为true  我们在nacos的官方文档中也可以看到 默认用grpc发送连接请求等信息 上面有图片
/**
     * If instance is ephemeral.
     *
     * @since 1.0.0
     */
private boolean ephemeral = true;
========================================================================================
所以我们直接调用grpcClientProxy的
@Override
public void registerService(String serviceName, String groupName, Instance instance) throws NacosException {
        NAMING_LOGGER.info("[REGISTER-SERVICE] {} registering service {} with instance {}", namespaceId, serviceName,
                instance);//日志信息
        InstanceRequest request = new InstanceRequest(namespaceId, serviceName, groupName,
                NamingRemoteConstants.REGISTER_INSTANCE, instance);//创建实例请求对象
        requestToServer(request, Response.class);//向服务端发送请求
        namingGrpcConnectionEventListener.cacheInstanceForRedo(serviceName, groupName, instance);//缓存 为了下次再次发送
}
=========================================================================================
对象创建没有什么好看的 直接去看 requestToServer查看发送请求到服务端的
private <T extends Response> T requestToServer(AbstractNamingRequest request, Class<T> responseClass)   throws NacosException {
        try {
            request.putAllHeader(getSecurityHeaders());//往请求头里面放数据
            request.putAllHeader(getSpasHeaders(
                    NamingUtils.getGroupedNameOptional(request.getServiceName(), request.getGroupName())));
            Response response =
                    requestTimeout < 0 ? rpcClient.request(request) : rpcClient.request(request, requestTimeout);
            //如果请求超时时间为小于0 就使用默认的3s 如果不是 就使用我们自己规定的
            //其实求实发送请求 获取响应对象信息
            if (ResponseCode.SUCCESS.getCode() != response.getResultCode()) {//请求失败 抛异常
                throw new NacosException(response.getErrorCode(), response.getMessage());
            }
            if (responseClass.isAssignableFrom(response.getClass())) {
                return (T) response;
            }
            NAMING_LOGGER.error("Server return unexpected response '{}', expected response should be '{}'",
                    response.getClass().getName(), responseClass.getName());
        } catch (Exception e) {
            throw new NacosException(NacosException.SERVER_ERROR, "Request nacos server failed: ", e);
        }
        throw new NacosException(NacosException.SERVER_ERROR, "Server return invalid response");
}
======================================================================================
没有什么好看的 其实就是发送请求 获取响应 我删除了一些 太多trycache了
public Response request(Request request, long timeoutMills) throws NacosException {
        int retryTimes = 0;//重试次数  默认为3次
        Response response = null;
        Exception exceptionThrow = null;
        long start = System.currentTimeMillis();//计时器 防止超时
        while (retryTimes < RETRY_TIMES && System.currentTimeMillis() < timeoutMills + start) {//如果没有超时 那么就反复重试
            boolean waitReconnect = false;
            try {
                if (this.currentConnection == null || !isRunning()) {
                    waitReconnect = true;
                    throw new NacosException(NacosException.CLIENT_DISCONNECT,
                            "Client not connected,current status:" + rpcClientStatus.get());
                }
                response = this.currentConnection.request(request, timeoutMills);//通过当前连接发送请求
                if (response == null) {
                    throw new NacosException(SERVER_ERROR, "Unknown Exception.");
                }
                if (response instanceof ErrorResponse) {//如果响应是错误的响应
                    if (response.getErrorCode() == NacosException.UN_REGISTER) {
                        synchronized (this) {
                            waitReconnect = true;
                            if (rpcClientStatus.compareAndSet(RpcClientStatus.RUNNING, RpcClientStatus.UNHEALTHY)) {
                                LoggerUtils.printIfErrorEnabled(LOGGER,
                                        "Connection is unregistered, switch server,connectionId={},request={}",
                                        currentConnection.getConnectionId(), request.getClass().getSimpleName());
                                switchServerAsync();
                            }
                        }

                    }
                    throw new NacosException(response.getErrorCode(), response.getMessage());
                }
                // return response.
                lastActiveTimeStamp = System.currentTimeMillis();
                return response;//返回响应

            } catch (Exception e) {
                if (waitReconnect) {
                    try {
                        //wait client to re connect.
                        Thread.sleep(Math.min(100, timeoutMills / 3));
                    } catch (Exception exception) {
                        //Do nothing.
                    }
                }

                LoggerUtils.printIfErrorEnabled(LOGGER, "Send request fail, request={}, retryTimes={},errorMessage={}",
                        request, retryTimes, e.getMessage());

                exceptionThrow = e;

            }
            retryTimes++;

        }
}
- 1
- 2
- 3
- 4
- 5
- 6
- 7
- 8
- 9
- 10
- 11
- 12
- 13
- 14
- 15
- 16
- 17
- 18
- 19
- 20
- 21
- 22
- 23
- 24
- 25
- 26
- 27
- 28
- 29
- 30
- 31
- 32
- 33
- 34
- 35
- 36
- 37
- 38
- 39
- 40
- 41
- 42
- 43
- 44
- 45
- 46
- 47
- 48
- 49
- 50
- 51
- 52
- 53
- 54
- 55
- 56
- 57
- 58
- 59
- 60
- 61
- 62
- 63
- 64
- 65
- 66
- 67
- 68
- 69
- 70
- 71
- 72
- 73
- 74
- 75
- 76
- 77
- 78
- 79
- 80
- 81
- 82
- 83
- 84
- 85
- 86
- 87
- 88
- 89
- 90
- 91
- 92
- 93
- 94
- 95
- 96
- 97
- 98
- 99
- 100
- 101
- 102
- 103
- 104
- 105
- 106
- 107
- 108
- 109
- 110
- 111
- 112
- 113
- 114
- 115
- 116
- 117
- 118
- 119
- 120
- 121
- 122
- 123
- 124
- 125
- 126
- 127
- 128
- 129
- 130
- 131
- 132
大致就是这么一个流程