- 1(附源码)Springboot 点餐系统 毕业设计 100908_基于springboot点餐系统的论文
- 2【Shell 命令集合 磁盘管理 】Linux 取消挂载 umount命令使用教程
- 3关于Android Studio无法检测到夜神模拟器的原因及解决方案_为什么打开android studio 识别不到夜神模拟器
- 4爆肝整理,企业级性能测试-性能方案设计详细总结(一)
- 5很多工程师,最后都是被生活裹挟,没法一直在技术路径走到极致
- 6AI为文档图像安全注入新力量_如何预防ai用文本生成图片的安全问题
- 7Python 安装 包时 VC 14 找不到错误终极解决办法_python setup.py msvc
- 8史上最详细微信小程序授权登录与后端SprIngBoot交互操作说明,附源代码,有疑惑大家可以直接留言,蟹蟹 2021.11.29 完善更新小程序代码,2022.4.27 更新_微信小程序登录
- 9QIODevice :: read:设备未打开(QIODevice::read : device not open)_qiodevice::read (qprocess): device not open
- 10用Python编写的小游戏:探索游戏世界的乐趣_python制作小游戏
刚开始介绍的是Tensorflow1.13.1版本,后来介绍的是2.0.0和2.1.0版本(附3个版本的代码)_reset_default_graph在哪个版本的tensorflow里
赞
踩
- TensorFlow = Tensor + Flow(张量+流)
- 在TensorFlow中,所有的数据都通过
张量的形式来表示; - 张量并没有真正保存数字,它
保存的是计算过程 - 张量的阶(rank)表示的是:张量的维度
- 从功能的角度,张量可以简单理解为多维数组
零阶张量表示标量(scalar),也就是一个数;
一阶张量为向量(vector),也就是一维数组;
n阶张量可以理解为一个n维数组; - 三个术语描述张量的维度:阶(rank)、形状(shape) 、维数(dimension number)
| 阶 | 数学实体 | 形状 | 维数 | 含义 | 代码示例 |
|---|---|---|---|---|---|
| 0 | Scalar | () | 0-D | 零阶张量表示标量,也就是一个数 | Scalar = 1000 |
| 1 | Vector | (D0) | 1-D | 一阶张量等价于向量,也就是1维数组 | Vector = [2,8,3] |
| 2 | Matrix | (D0,D1) | 2-D | 2阶张量等价于矩阵,也就是2维数组 | Matrix = [[4,2,1],[5,3,2],[5,5,6]] |
| 3 | 3-tensor | (D0,D1,D2) | 3-D | 3阶张量可以理解为一个3维数组 | Tensor = [[[4],[3],[2]],[[6],[100],[4]],[[5],[1],[4]]] |
| n | n-tensor | (D0,D1,…,Dn-1) | n-D | n阶张量可以理解为一个n维数组 | … |
- TensorFlow支持14种不同的类型
| 分类 | 类型 |
|---|---|
| 实数 | tf.float32, tf.float64 |
| 整数 | tf.int8, tf.int16, tf.int32, tf.int64, tf.uint8 |
| 布尔 | tf.bool |
| 复数 | tf.complex64, tf.complex128 |
-
张量的默认类型:
不带小数点的数会被默认为int32
带小数点的会被默认为float32 -
不同类型的张量不能进行运算。
TensorFlow会对参与运算的所有张量进行类型的检查,发现类型不匹配时会报错
- 操作
计算图中的节点就是操作(Operation)- 一次加法是一个操作
- 一次乘法也是一个操作
- 构建一些变量的初始值也是一个操作
- 每个运算操作都有
属性,它在构建图的时候需要确定下来 - 操作可以和计算设备绑定,指定操作在某个设备上执行
- 操作之间
存在顺序关系,这些操作之间的依赖就是“边” - 如果操作A的输入是操作B执行的结果,那么这个操作A就依赖于操作B
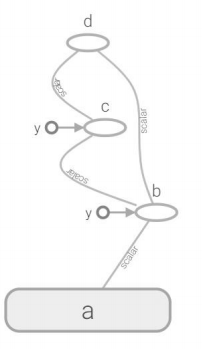
import tensorflow as tf
# 简单的运算
a = tf.Variable(1,name='a') #定义变量a
b = tf.add(a, 1,name='b') #定义操作b = a+1
c = tf.multiply(b,4,name='c')#定义操作c=b*4
d = tf.subtract(c,b,name='d') # 定义操作d=c-b
- 1
- 2
- 3
- 4
- 5
- 6
数据流图如下:
9. 会话(session)
- 会话拥有并管理TensorFlow程序运行时的所有资源
- 当所有计算完成之后需要关闭会话(使用Session.close()函数)帮助系统回收资源,当程序因为异常退出时,关闭会话函数可能就不会被执行从而导致资源泄漏
对此,可以使用try…except…finally…来确保会话可以顺利关闭
举个例子:
tens1 = tf.constant([1,2,3])
sess = tf.Session()
try:
    print(sess.run(tens1))
except:
    print("Exception!")
finally: # 确保能关闭会话使得本次运行中使用到的资源可以得到释放
    sess.close()
- 1
- 2
- 3
- 4
- 5
- 6
- 7
- 8
另外,还可以使用上下文管理器来管理这个会话,此时不需要关闭使用sess.close()来关闭会话
# 使用上下文管理器来管理会话
with tf.Session() as sess:
    print(sess.run(tens1))
- 1
- 2
- 3
注意:Tensorflow不会自动生产默认的会话,需要手动指定
当默认的会话被指定之后可以通过 tf.Tensor.eval 函数来计算一个张量的取值
另外,使用tf.InteractiveSession 这个函数也会自动将生成的会话注册为默认会话
10. 常量、变量
- 在运行过程中值不会改变的单元(比如,常量),在TensorFlow中无须进行初始化操作
创建过程:
tf.constant(
value,
dtype=None,
shape=None,
name=‘Const’
)
在创建常量时只有value值是必填的,dtype
等参数可以缺省,会根据具体的value值设置
相应的值
最主要的是(代码eg:):constant_ name = tf.constant(value)
- 在运行过程中值会改变的单元(比如,变量),在TensorFlow中须进行初始化操作
创建语句:
注意V是大写字母
变量 Variable
tf.Variable (
initial_value,
dtype=None,
shape=None,
trainable =True
name=’Variable’
)
变量在创建时必须确定初始值,可以像定义常量一样;
在变量的参数中,trainable参数用来表征当前变量是否需要被自动优化(如果要变量始终不变可以采用trainable =Flase,
创建变量对象时默认是启用自动优化标志
最主要的是(代码eg:):name_variable = tf.Variable(value)# 注意V是大写字母
个别变量初始化:
init_op = name_variable.initializer()
所有变量初始化:
init_op = tf.global_variables_initializer()
- 占位符(placeholer)
- TensorFlow中的Variable变量类型,在定义时需要初始化,但有些变量定义时并不知道其数值,只有当真正开始运行程序时,才由外部输入,比如训练数据,这时候需要用到占位符
- tf.placeholder占位符,是TensorFlow中特有的一种数据结构,类似动态变量,函数的参数、或者C语言或者Python语言中格式化输出时的“%”占位符
- TensorFlow占位符Placeholder,先定义一种数据,其参数为数据的
Type和Shape
占位符Placeholder的函数接口如下:
tf.placeholder(dtype, shape=None, name=None)
# 生成2x3的二维数组,矩阵种的每个元素类型都是tf.float32
x = tf.placeholder(tf.float32,[2,3],name='tx')
- 1
- 2
- Feed提交数据和Fetch提取数据
- 如果构建了一个包含placeholder操作的计算图,当在session中调用run方法时,placeholder占用的变量必须通过
feed_dict参数传递进去,否则报错 - 会话运行完成之后,如果我们想查看会话运行的结果,就需要使用fetch来实现,feed、fetch一般搭配起来使用
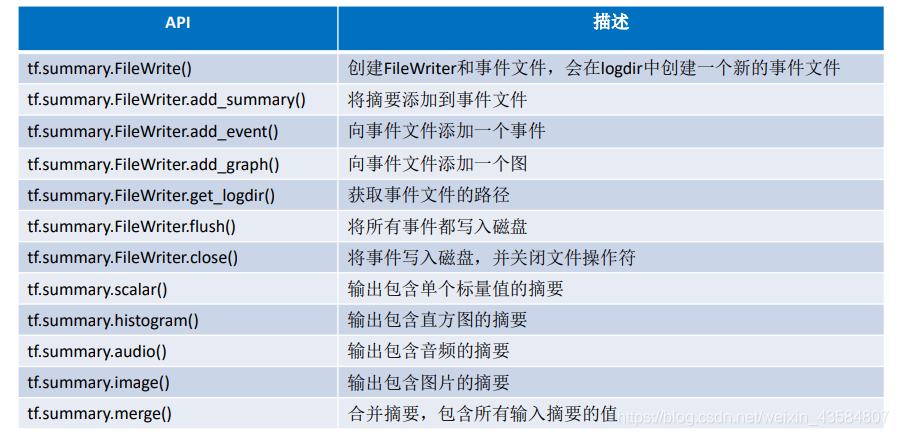
- TensorBoard 可视化初步
- TensorBoard是TensorFlow的可视化工具
- 通过TensorFlow程序运行过程中输出的日志文件可视化TensorFlow程序的运行状态
TensorBoard和TensorFlow程序跑在不同的进程中- TensorBoard不需要额外安装,在TensorFlow安装时已自动完成
tf.reset_default_graph() # 清除default graph和不断增加的节点
logdir = 'F:\log' #日志路径
# 简单的运算,定义一个简单的计算图
a = tf.Variable(1,name='a')  #定义变量a
b = tf.add(a, 1,name='b')    #定义操作b = a+1
c = tf.multiply(b,4,name='c')#定义操作c=b*4
d = tf.subtract(c,b,name='d')#定义操作d=c-b
writer = tf.summary.FileWriter(logdir,tf.get_default_graph())
writer.close()
- 1
- 2
- 3
- 4
- 5
- 6
- 7
- 8
- 9
接下来,在prompt切换目录(anaconda)
cd F:/log
tensorboard --logdir=F:/log
最后在 浏览器输入网址:http://localhost:6006
关于tensorflow 1.xx版本,代码可以查看我在kesci平台里利用tensorflow1.13.1写的代码:tensorflow_learning
而tensorflow2.xx版本,和1.xx的版本有很大的区别,
而tensorflow2.0.0和2.1.0似乎也有些区别,
2.0.0:
2.1.0:
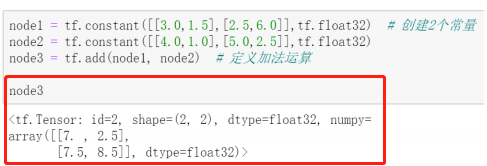
可以看到他们的输出是有区别的,2.1.0比2.0.0少了个id
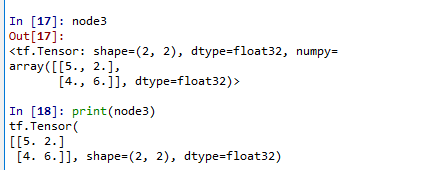
必须说的是,在控制台输入node3和print(node3),输出格式也是有区别的
总体而言,2.1.0版本和2.0.0版本的区别不会太大
- 一些简单的操作函数和属性的获取:
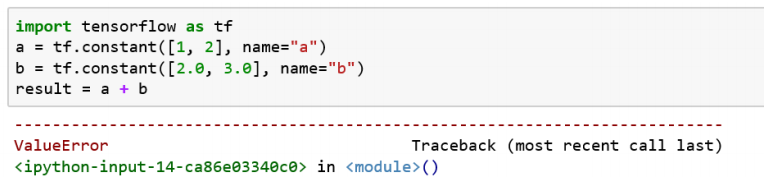
14. 类型转换
不同类型的数据不能进行运算,怎么办?
答案是:通过tf.cast()进行数据类型转换
15. 关于shape和reshape
如果shape参数值被设定,则会做相应的reshape工作
16. 在2.1.0版本中,我想要创建一个变量报错了
网上找了资源弄了下,tensorflow就,,,不能再用了
对此,我卸载了2.1.0版本,下载了2.0.0版本
可以阅读这篇文章对于新手,安装tensorflow2.1.0好还是安装2.0.0好?,个人推荐下载2.0.0版本,可以少遇到一些trouble
接下来附上2.0.0版本和2.1.0的一些代码,都在下面的代码中,有运行后出不同的结果的,我都注明了
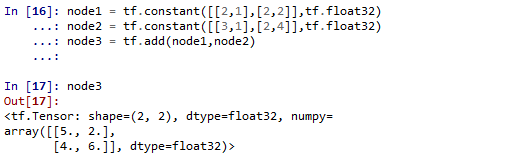
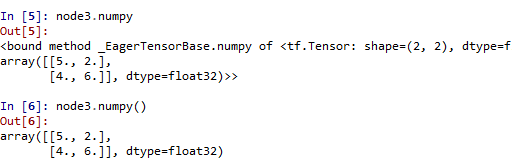
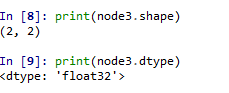
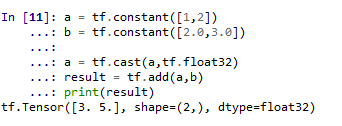
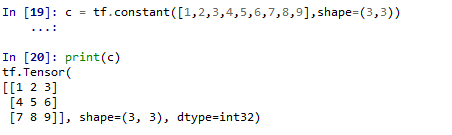
# -*- coding: utf-8 -*-
import tensorflow as tf
print(tf.__version__)
# '2.0.0'
#2.1.0版本输出'2.1.0'

node1 = tf.constant([[2,1],[2,2]],tf.float32)
node2 = tf.constant([[3,1],[2,4]],tf.float32)
node3 = tf.add(node1,node2)
node3
#<tf.Tensor: id=2, shape=(2, 2), dtype=float32, numpy=
#array([[5., 2.],
#       [4., 6.]], dtype=float32)>
#2.1.0没有id属性

print(node3.numpy())
#[[5., 2.],[4., 6.]]
# 2.1.0输出:array([[5., 2.],[4., 6.]], dtype=float32)
print(node3.shape)
#(2, 2)
print(node3.get_shape())  #等价于node3.get_shape()
#(2, 2)
print(node3.dtype)
#<dtype: 'float32'>

#类型转换(不同类型不能进行运算,需要进行转换)
a = tf.constant([1,2])
b = tf.constant([2.0,3.0])

a = tf.cast(a,tf.float32)
result = tf.add(a,b)
print(result)
# tf.Tensor([3. 5.], shape=(2,), dtype=float32)

#在创建的同时指定数据类型,在数值兼容的情况下会自动做数据类型转换
a = tf.constant([1,2],tf.float32)

# reshape的使用
c = tf.constant([1,2,3,4,5,6,7,8,9],shape=(3,3))
print(c)

v = tf.Variable(5)
print(v)
# <tf.Variable 'Variable:0' shape=() dtype=int32, numpy=5>
print(v.assign(v+1))
# <tf.Variable 'UnreadVariable' shape=() dtype=int32, numpy=6>

- 1
- 2
- 3
- 4
- 5
- 6
- 7
- 8
- 9
- 10
- 11
- 12
- 13
- 14
- 15
- 16
- 17
- 18
- 19
- 20
- 21
- 22
- 23
- 24
- 25
- 26
- 27
- 28
- 29
- 30
- 31
- 32
- 33
- 34
- 35
- 36
- 37
- 38
- 39
- 40
- 41
- 42
- 43
- 44
- 45
- 46
接下来,敲重点!!!
这是我在使用2.1.0版本的时候报错了
Attibterror gogle.rouf .pyext. pesse RepeatelCcmposteCo. objet has no ttribute 'ppend
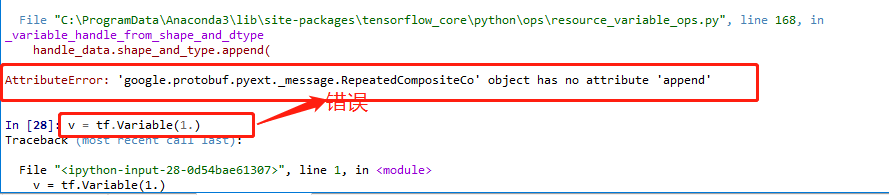
遇到这种问题,可以使用tensorflow.compat.v1代码包来兼容原有的代码。
import tensorflow.compat.v1 as tf
tf.disable_v2_behavior()
- 1
- 2
- 1.xx和2.xx在图执行机制上的区别(重点!!!)
-
TensorFlow 2代码的执行机制默认采用
Eager Execution(动态图执行机制) -
TensorFlow 1.x版本代码的执行主要是基于传统的
Graph Execution(静态图执行)机制,存在着一定弊端,如入门门槛高、调试困难、灵活性差、无法使用 Python 原生控制语句等 -
静态图执行模式对于即时执行模式效率会更高,所以通常当模型开发调试完成,部署
采用图执行模式会有更高运行效率。在TensorFlow 2里也支持已函数方式调用计算图。 -
TensorFlow 1.x版本代码的执行模式缺省是图执行模式。
这种基于静态计算图的图执行模式把程序分为两部分:
1)构建阶段:建立一个 “计算图”,通过图的模式来定义数据与操作的执行步骤;
2)执行阶段:建立一个会话,使用会话对象来实现计算图的执行。 -
在TensorFlow 2中实现图执行模式开发- TensorFlow 2 虽然TensorFlow 1.X有较大差异,不能直接兼容TensorFlow 1.X
代码。但实际上还是提供了对TensorFlow 1.X 的 API支持 - 原有的TensorFlow 1.X 的 API整理到
tensorflow.compat.v1包里去了
TensorFlow 2 中执行或者开发TensorFlow 1.X代码,可以做如下处理:
在TensorFlow 2 版本中使用1.x版本的东西,操作是
1. 导入TensorFlow时使用import tensorflow.compat.v1 as tf代替import
tensorflow as tf;
2. 执行tf.disable_eager_execution()禁用TensorFlow 2默认的即时执行模式 - TensorFlow 2 虽然TensorFlow 1.X有较大差异,不能直接兼容TensorFlow 1.X
-
在TensorFlow 2中由于是采用即时执行模式,变量创建后就能直接参与计
算,即时得到运算结果。 -
但在TensorFlow 1.X图执行模式中,在模型的其它操作运行之前先明确地
完成变量初始化工作,否则会报错。