
热门标签
热门文章
- 1爬虫爬取微博用户粉丝及其关注_爬取微博关注列表
- 2Python3,9行批量提取PDF文件的指定内容,这种操作,保证人见人爱...._python爬取pdf指定内容
- 3VSCODE配置SSH连接服务器_vscode ssh
- 4ubuntu18.04安装IntelRealsense D435的SDK及相机标定记录_[camera/realsense2_camera_manager-1] process has d
- 5在 centOS 上设置目录文件权限_centos设置用户访问目录权限
- 6试题 基础练习 龟兔赛跑预测C++_龟兔赛跑预测 c++
- 7C++中::域操作符
- 8python脚本自启动_.sh文件开机自启动运行py
- 9服务器机柜组件是,机柜及组件系统参数
- 10深度学习框架之tensorflow_基于tensorflow开发算法框架
当前位置: article > 正文
SpringBoot项目中配置Tomcat、Mysql、Redis、MongoDB_springboot讲诸如redis、mysql等地址独立配置文件在按环境加载
作者:alg789 | 2024-01-30 12:24:56
赞
踩
springboot讲诸如redis、mysql等地址独立配置文件在按环境加载
一、创建SpringBoot项目
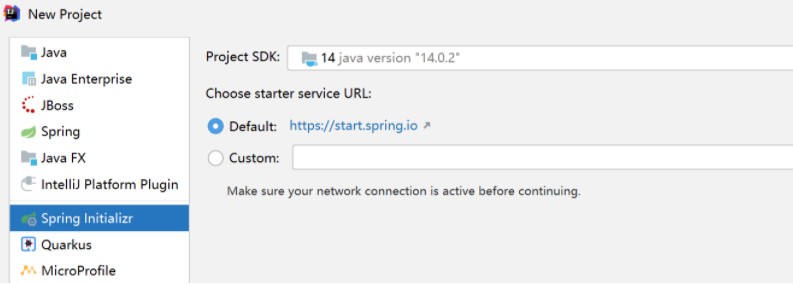
1、创建项目时选择Spring Initializr
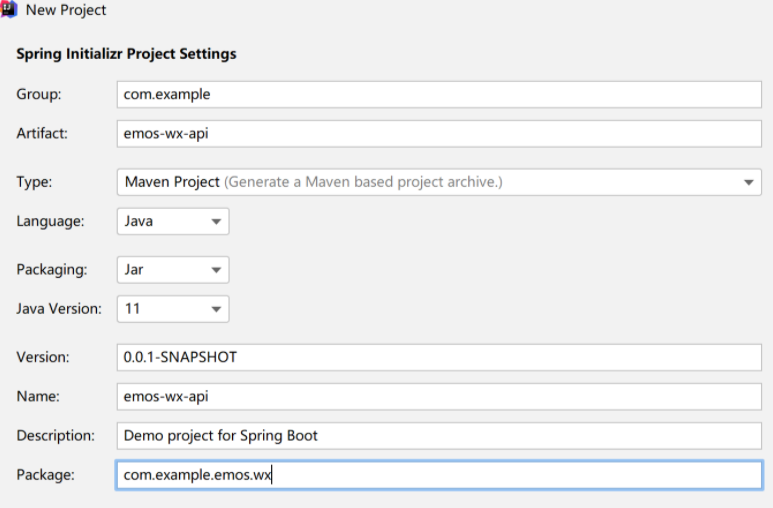
2、填好相关信息
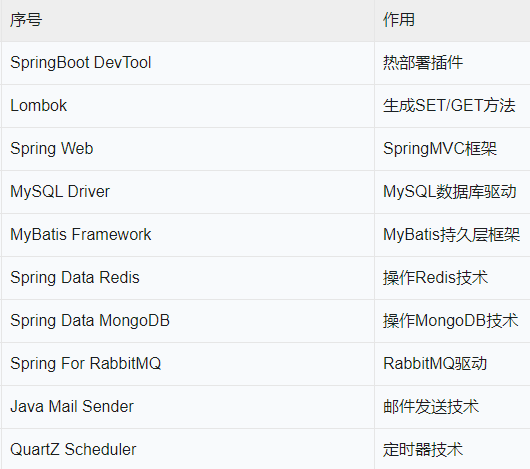
3、在依赖库中勾选如下内容
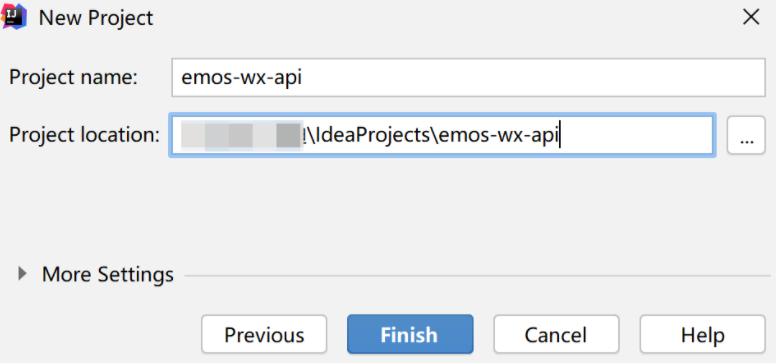
4、填写项目名称
5、把application.properties文件修改成application.yml
以下的环境配置,都是在application.yml中进行。特别的地方,会另作说明。
二、 配置Tomcat
server:
  tomcat:
    uri-encoding: UTF-8
    threads:
      max: 200 	#最大线程数量
      min-spare: 30	#最小
    connection-timeout: 5000ms
  port: 8080
  servlet:
    context-path: /emos-wx-api  #项目部署路径
- 1
- 2
- 3
- 4
- 5
- 6
- 7
- 8
- 9
- 10
三、 配置MySQL数据源
spring:
  datasource:
    type: com.alibaba.druid.pool.DruidDataSource #阿里特有的DruidDataSource连接池
    druid:
      driver-class-name: com.mysql.cj.jdbc.Driver
      url: jdbc:mysql://localhost:3306/emos?useUnicode=true&characterEncoding=UTF-8&serverTimezone=Asia/Shanghai
      username: root
      password: root #本地数据库的用户名和密码
      initial-size: 8 #数据库连接池的数量
      max-active: 16
      min-idle: 8
      max-wait: 60000
      test-while-idle: true #检测连接是否有效
      test-on-borrow: false
      test-on-return: false
- 1
- 2
- 3
- 4
- 5
- 6
- 7
- 8
- 9
- 10
- 11
- 12
- 13
- 14
- 15
然后在 pom.xml文件中配置好阿里巴巴的Druid连接池所需要的依赖库。
<dependency>
	<groupId>com.alibaba</groupId>
	<artifactId>druid-spring-boot-starter</artifactId>
	<version>1.1.13</version>
</dependency>
- 1
- 2
- 3
- 4
- 5
四、 配置Redis数据库
spring:
  #这里省略MySQL配置信息
  redis:
    database: 0  #使用0号数据库
    host: localhost
    port: 6379
    password: abc123456  #redis端口的访问密码
    jedis:
      pool:
        max-active: 1000  #设置Redis的连接池
        max-wait: -1ms
        max-idle: 16	#最大空闲连接数
        min-idle: 8
- 1
- 2
- 3
- 4
- 5
- 6
- 7
- 8
- 9
- 10
- 11
- 12
- 13
五、 配置MongoDB数据源
spring:
  #这里省略MySQL配置信息
  #这里省略Redis配置信息
  data:
    mongodb:
      host: localhost
      port: 27017
      database: emos
      authentication-database: admin
      username: admin
      password: abc123456
- 1
- 2
- 3
- 4
- 5
- 6
- 7
- 8
- 9
- 10
- 11
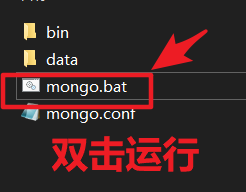
在连接mongoDB的时候,要打开软件:
六、项目最终效果
如下图,出现如下字段表示已完成。

完整的application.yml文件如下:
server:
  tomcat:
    uri-encoding: UTF-8
    threads:
      max: 200
      min-spare: 30
    connection-timeout: 5000ms
  port: 8080
  servlet:
    context-path: /emos-wx-api

spring:
  datasource:
    type: com.alibaba.druid.pool.DruidDataSource
    druid:
      driver-class-name: com.mysql.cj.jdbc.Driver
      url: jdbc:mysql://localhost:3306/emos?useUnicode=true&characterEncoding=UTF-8&serverTimezone=UTC
      username: root
      password: root
      initial-size: 8
      max-active: 16
      min-idle: 8
      max-wait: 60000
      test-while-idle: true
      test-on-borrow: false
      test-on-return: false

  redis:
    database: 0
    host: localhost
    port: 6379
    password: abc123456
    jedis:
      pool:
        max-active: 1000
        max-wait: -1ms
        max-idle: 16
        min-idle: 8

  data:
    mongodb:
      host: localhost
      port: 27017
      database: emos
      authentication-database: admin
      username: admin
      password: abc123456

- 1
- 2
- 3
- 4
- 5
- 6
- 7
- 8
- 9
- 10
- 11
- 12
- 13
- 14
- 15
- 16
- 17
- 18
- 19
- 20
- 21
- 22
- 23
- 24
- 25
- 26
- 27
- 28
- 29
- 30
- 31
- 32
- 33
- 34
- 35
- 36
- 37
- 38
- 39
- 40
- 41
- 42
- 43
- 44
- 45
- 46
- 47
声明:本文内容由网友自发贡献,转载请注明出处:【wpsshop博客】
推荐阅读


相关标签

