
- 1Flask框架开发博客网站_flask开发的网站有哪些
- 2Kubernetes Ingress诡异的502、503、504等奇葩问题(二)
- 32023十大编程语言及未来展望_编程语言排行榜2010-2023
- 4Kong工作原理 - 健康检查和断路器 - 定义健康和不健康
- 5关于ROS在一个回调函数中处理两个订阅话题消息(多话题回调、多参数回调问题)_ros 服务 回调函数多参数
- 6【送书福利-第二十五期】《机器学习高级实践》
- 7如何区分一个项目是react还react native_怎样查看项目是vue的还是react
- 8MySQL 实现多张无关联表查询数据并分页_mysql将三个表的数据一起查出来分页
- 9python云南昆明旅游景点数据可视化大屏全屏系统设计与实现(django框架)_利用django铺盖整个屏幕
- 10支持上亿物联网终端设备接入的MQTT集群
巧用 gitHooks 提交前校验代码
赞
踩
感谢bigAken投稿
在每一个使用 git 进行版本管理的仓库,都有一个目录 .git/hooks,包含 commit 各个阶段 Hooks 的脚本。这些 Hooks 在 git 操作 commit、push、merge 等得时候,可以做前置或者后置的操作,例如 pre-commit 在 git commit 前可以做代码校验,校验代码的时候使用的ESLint,格式化使用的是 prettier。Git 支持的常用钩子见下表,更多请查看官网Hooks:
| Git Hook | 调用时机 | 调用时机 |
|---|---|---|
| pre-commit | git commit 执行前 | 可以用 git commit --no-verify 绕过 |
| commit-msg | git commit 执行前 | 可以用 git commit --no-verify 绕过 |
| pre-merge-commit | git merge 执行前 | 可以用 git merge --no-verify 绕过 |
| pre-push | git push 执行前 |
本文先实践,怎么去写 pre-commit 这个 git hooks,然后介绍 husky,lint-staged,commitlint 的使用
在 git 项目中,.git/hooks下面有很多 hooks 示例如下
这些 git hooks 都是.sample结尾的,如果要启用某个 hooks 用可以去掉.sample结尾
实践
npm init -y初始化一个项目,然后git init,然后npm install eslint --save-dev
新建.gitignore文件
- node_modules
-
- # local env files
- .env.local
- .env.*.local
-
- # Log files
- npm-debug.log*
- yarn-debug.log*
- yarn-error.log*
-
- *-lock.json
- *.lock
新建.eslintrc,配置 eslint
- {
- "rules": {
- // 要求使用分号
- "semi": ["error", "always"],
- // 强制使用一致的反勾号、双引号或单引号
- "quotes": ["error", "double"]
- }
- }
新建src目录,然后里面新建index.js,禁止使用快捷键格式化
console.log('object')根目录新建文件夹.customGitHooks然后 git config 'core.hooksPath' .customGitHooks,主要是设置 gitHooks 的存放目录,因为 gitHooks 默认存放目录是.git/hooks,新建pre-commit,写入如下
- #!/bin/sh
-
- echo 'start check your code,please wait...'
- # git diff 获取更改的内容 可以通过参数--diff-filter 配置条件
- npx eslint $(git diff --cached --name-only --diff-filter=ACM -- '*.js')
- # 变量$?--->上一个命令的执行状态结果
- if [ $? != '0' ];then
- echo "ending and failed,please check your code;"
- exit 1
- else
- echo "check pass"
- fi
这时候,执行git add .,git commit -m 'test'就会发现没有 commit 成功,报错了,如下图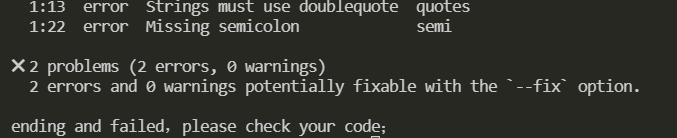
如果把 index.js 的代码修改如下:
console.log('object')执行git add . ,git commit -m 'test'就会发现 eslint 代码检查通过了,能正常提交了,以上实践能很好解释 commit 前怎么检验代码,但是有个缺点就是别人 pull 你的代码要执行git config 'core.hooksPath' .customGitHooks能起作用;下面就介绍 husky,lint-staged,commitlint 的使用
.git 文件夹不会被跟踪并且上传至远程仓库的
Husky
github为了解决.git配置不能提交远程仓库的问题,husky 出来了,husky 在你npm i安装完依赖只有自动执行husky install
安装 npm install husky -D
npm install husky -D使用
编辑package.json在script里添加prepare的值为husky install
- "scripts": {
- "prepare":"husky install"
- },
然后执行npm run prepare,做了什么事呢
源码index.ts中,我们看到执行 husky install 实际上就是创建 .husky 目录,复制../husky.sh文件到该目录下,配置了一个.gitignore,设置了core.hooksPath(设置 .husky 目录为 git hooks 目录)
添加一个 hook
在.husky目录下创建pre-commit
- #!/bin/sh
-
- echo 'start check your code,please wait...'
- # git diff 获取更改的内容 可以通过参数--diff-filter 配置条件
- npx eslint $(git diff --cached --name-only --diff-filter=ACM -- '*.js')
- # 变量$?--->上一个命令的执行状态结果
- if [ $? != '0' ];then
- echo "ending and failed,please check your code;"
- exit 1
- else
- echo "check pass"
- fi
index.js文件内容如下
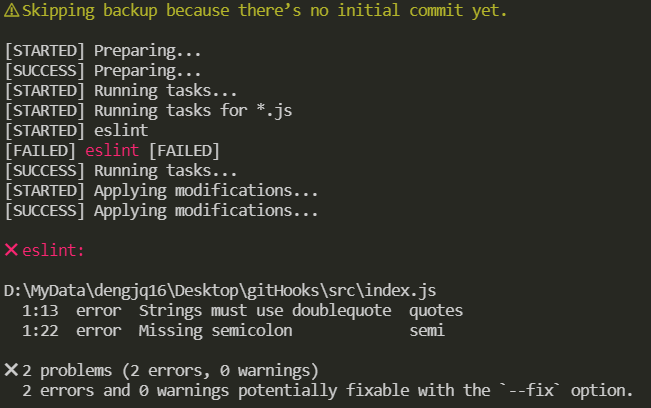
console.log('object')然后执行git add .,git commit -m 'test'发现代码已经被拦截,没有提交,因为index.js代码不符合规范
遗留问题就是 git hooks 不会编写怎么办,下面 lint-staged 出来了
lint-staged
配置例子作用:对 Git 暂存区代码文件进行 bash 命令操作等等
npm i lint-staged -D根目录下新建.lintstagedrc文件
- {
- "*.js": "eslint"
- }
把husky目录下的pre-commit修改如下
- . "$(dirname "$0")/_/husky.sh"
- npm run lint
package.json添加script
- "scripts": {
- "lint": "lint-staged"
- }
index.js如下
- console.log('object')
- console.log('object')
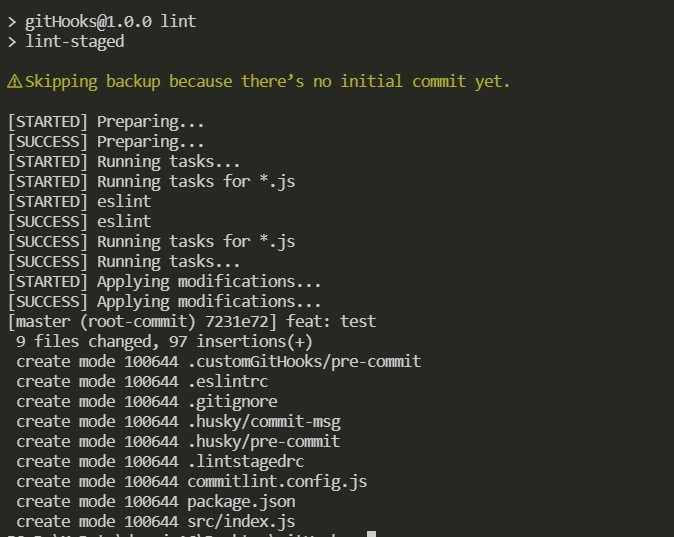
执行git add .,git commit -m 'test',可以发现调用了 eslint 去检查代码,检查不通过就退出commit
综上,代码检测规范有了,现在也需要规范一下提交规范;
commitlint
github
校验 commit 提交的信息
npm install --save-dev @commitlint/config-conventional @commitlint/cli
使用新建commitlint.config.js
- module.exports = {
- extends: ['@commitlint/config-conventional'],
- rules: {
- 'type-enum': [2, 'always', ['build', 'ci', 'docs', 'feat', 'fix', 'perf', 'refactor', 'style', 'test', 'revert', 'chore']],
- 'type-case': [0],
- 'type-empty': [0],
- 'scope-empty': [0],
- 'scope-case': [0],
- 'subject-full-stop': [0, 'never'],
- 'subject-case': [0, 'never'],
- 'header-max-length': [0, 'always', 72]
- }
- }
配置git hooks,执行下面命令
npx husky add .husky/commit-msg 'npx --no -- commitlint --edit $1'commit message 一般分为三个部分 Header,Body 和 Footer
- header
- <type>(<scope>): <subject>
- // 空一行
- <body>
- // 空一行
- <footer>
- 其中,Header 是必需的,Body 和 Footer 可以省略
接下来提交的 commit 必须符合下面的格式
注意冒号后面有空格
git commit -m <type>[optional scope]: <description>常用的 type 类别
build:主要目的是修改项目构建系统(例如 glup,webpack,rollup 的配置等)的提交
ci:主要目的是修改项目继续集成流程(例如 Travis,Jenkins,GitLab CI,Circle 等)的提交
docs:文档更新
feat:新增功能
fix:bug 修复
perf:性能优化
refactor:重构代码(既没有新增功能,也没有修复 bug)
style:不影响程序逻辑的代码修改(修改空白字符,补全缺失的分号等)
test:新增测试用例或是更新现有测试
revert:回滚某个更早之前的提交
chore:不属于以上类型的其他类型(日常事务)
optional scope:一个可选的修改范围。用于标识此次提交主要涉及到代码中哪个模块。
description:一句话描述此次提交的主要内容,做到言简意赅。
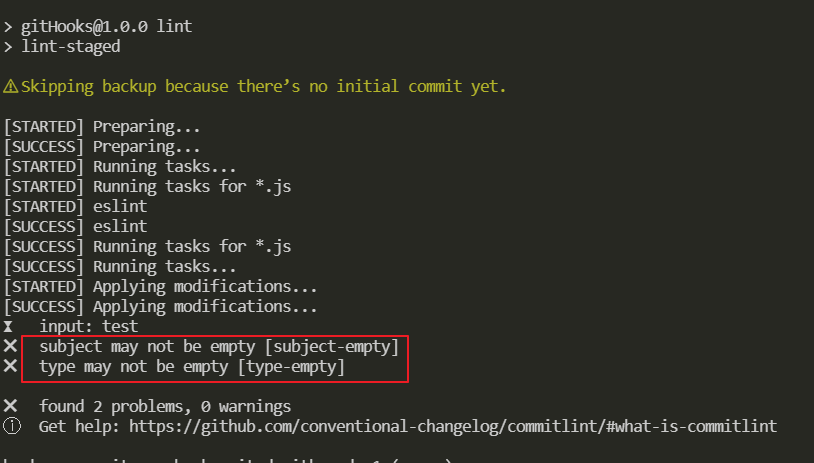
这时候,执行一次测试一下
- git add .
- git commit -m 'test'
因为该提交的 commit 是不规范的所以提交时失败的 如下图
如果把 commit 修改,就会提交成功,因为符合 commit 规范
- git add .
- git commit -m 'feat: test'
但是问题又来了,每次 commit 都要输入,有点不方便;而且有可能输错 下面就介绍到 commitizen
commitizen
cz-commitlint
生成符合规范的 commit message
本地安装并没有全局安装,当然可以全局安装具体查看官方文档,全局安装可以使用git cz,cz-commitlint打通 commitizen 和commitlint配置
npm install --save-dev @commitlint/cz-commitlint commitizen然后
npx commitizen init cz-conventional-changelog --save-dev --save-exactpackage.json添加script
- {
- "scripts": {
- "commit": "git-cz"
- },
- "config": {
- "commitizen": {
- "path": "@commitlint/cz-commitlint"
- }
- }
- }
新建commitlint.config.js
- module.exports = {
- extends: ['@commitlint/config-conventional']
- }
然后执行
git add .npm run commit发现为中文提示如下图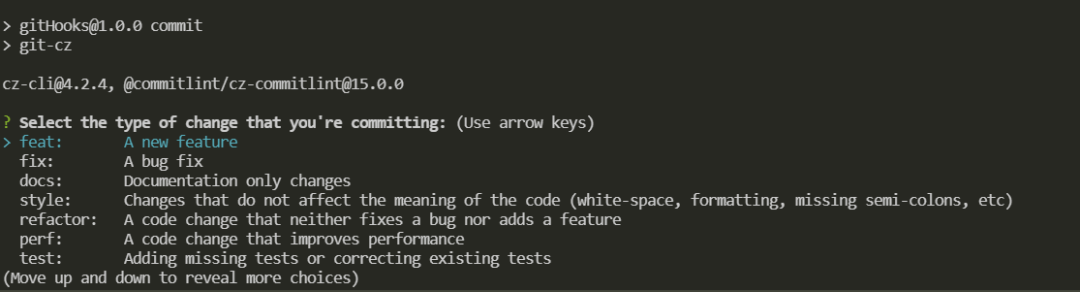
再次修改commitlint.config.js
- module.exports = {
- extends: ['@commitlint/config-conventional'],
- prompt: {
- questions: {
- type: {
- description: '选择你要提交的类型:',
- enum: {
- feat: {
- description: '新功能',
- title: 'Features',
- emoji: '✨'
- },
- fix: {
- description: '修复相关bug',
- title: 'Bug Fixes',
- emoji: '声明:本文内容由网友自发贡献,不代表【wpsshop博客】立场,版权归原作者所有,本站不承担相应法律责任。如您发现有侵权的内容,请联系我们。转载请注明出处:https://www.wpsshop.cn/article/detail/46423推荐阅读
相关标签

Copyright © 2003-2013 www.wpsshop.cn 版权所有,并保留所有权利。

