
- 1STM32 开发常见问题汇总_stm32 开发的时候遇到的问题
- 2Linux之基础指令大全【痛苦的开始】
- 3C++常见的质数判断算法_c++判断质数
- 4【目标检测】Flask+Docker在服务器部署YOLOv5应用
- 5【32单片机学习】(11)STM32启动过程详解_stm32g0系列的启动配置
- 6【uni-app】 动态设置 tabBar_uniapp动态设置tabbar
- 7记录:初学者如何安装gdal、rasterio、geopandas(中秋快乐(超大声)_rasterio和geopandas兼容版本
- 8安装spacy+zh_core_web_sm避坑指南
- 9Java刷力扣技巧总结-思想与技巧_力扣怎么刷java题
- 10【ACDC数据集】:预处理ACDC心脏3D MRI影像数据集到VOC数据集格式,nii转为jpg,label转为png
简单了解YOLOv8
赞
踩
简单介绍YOLOv8
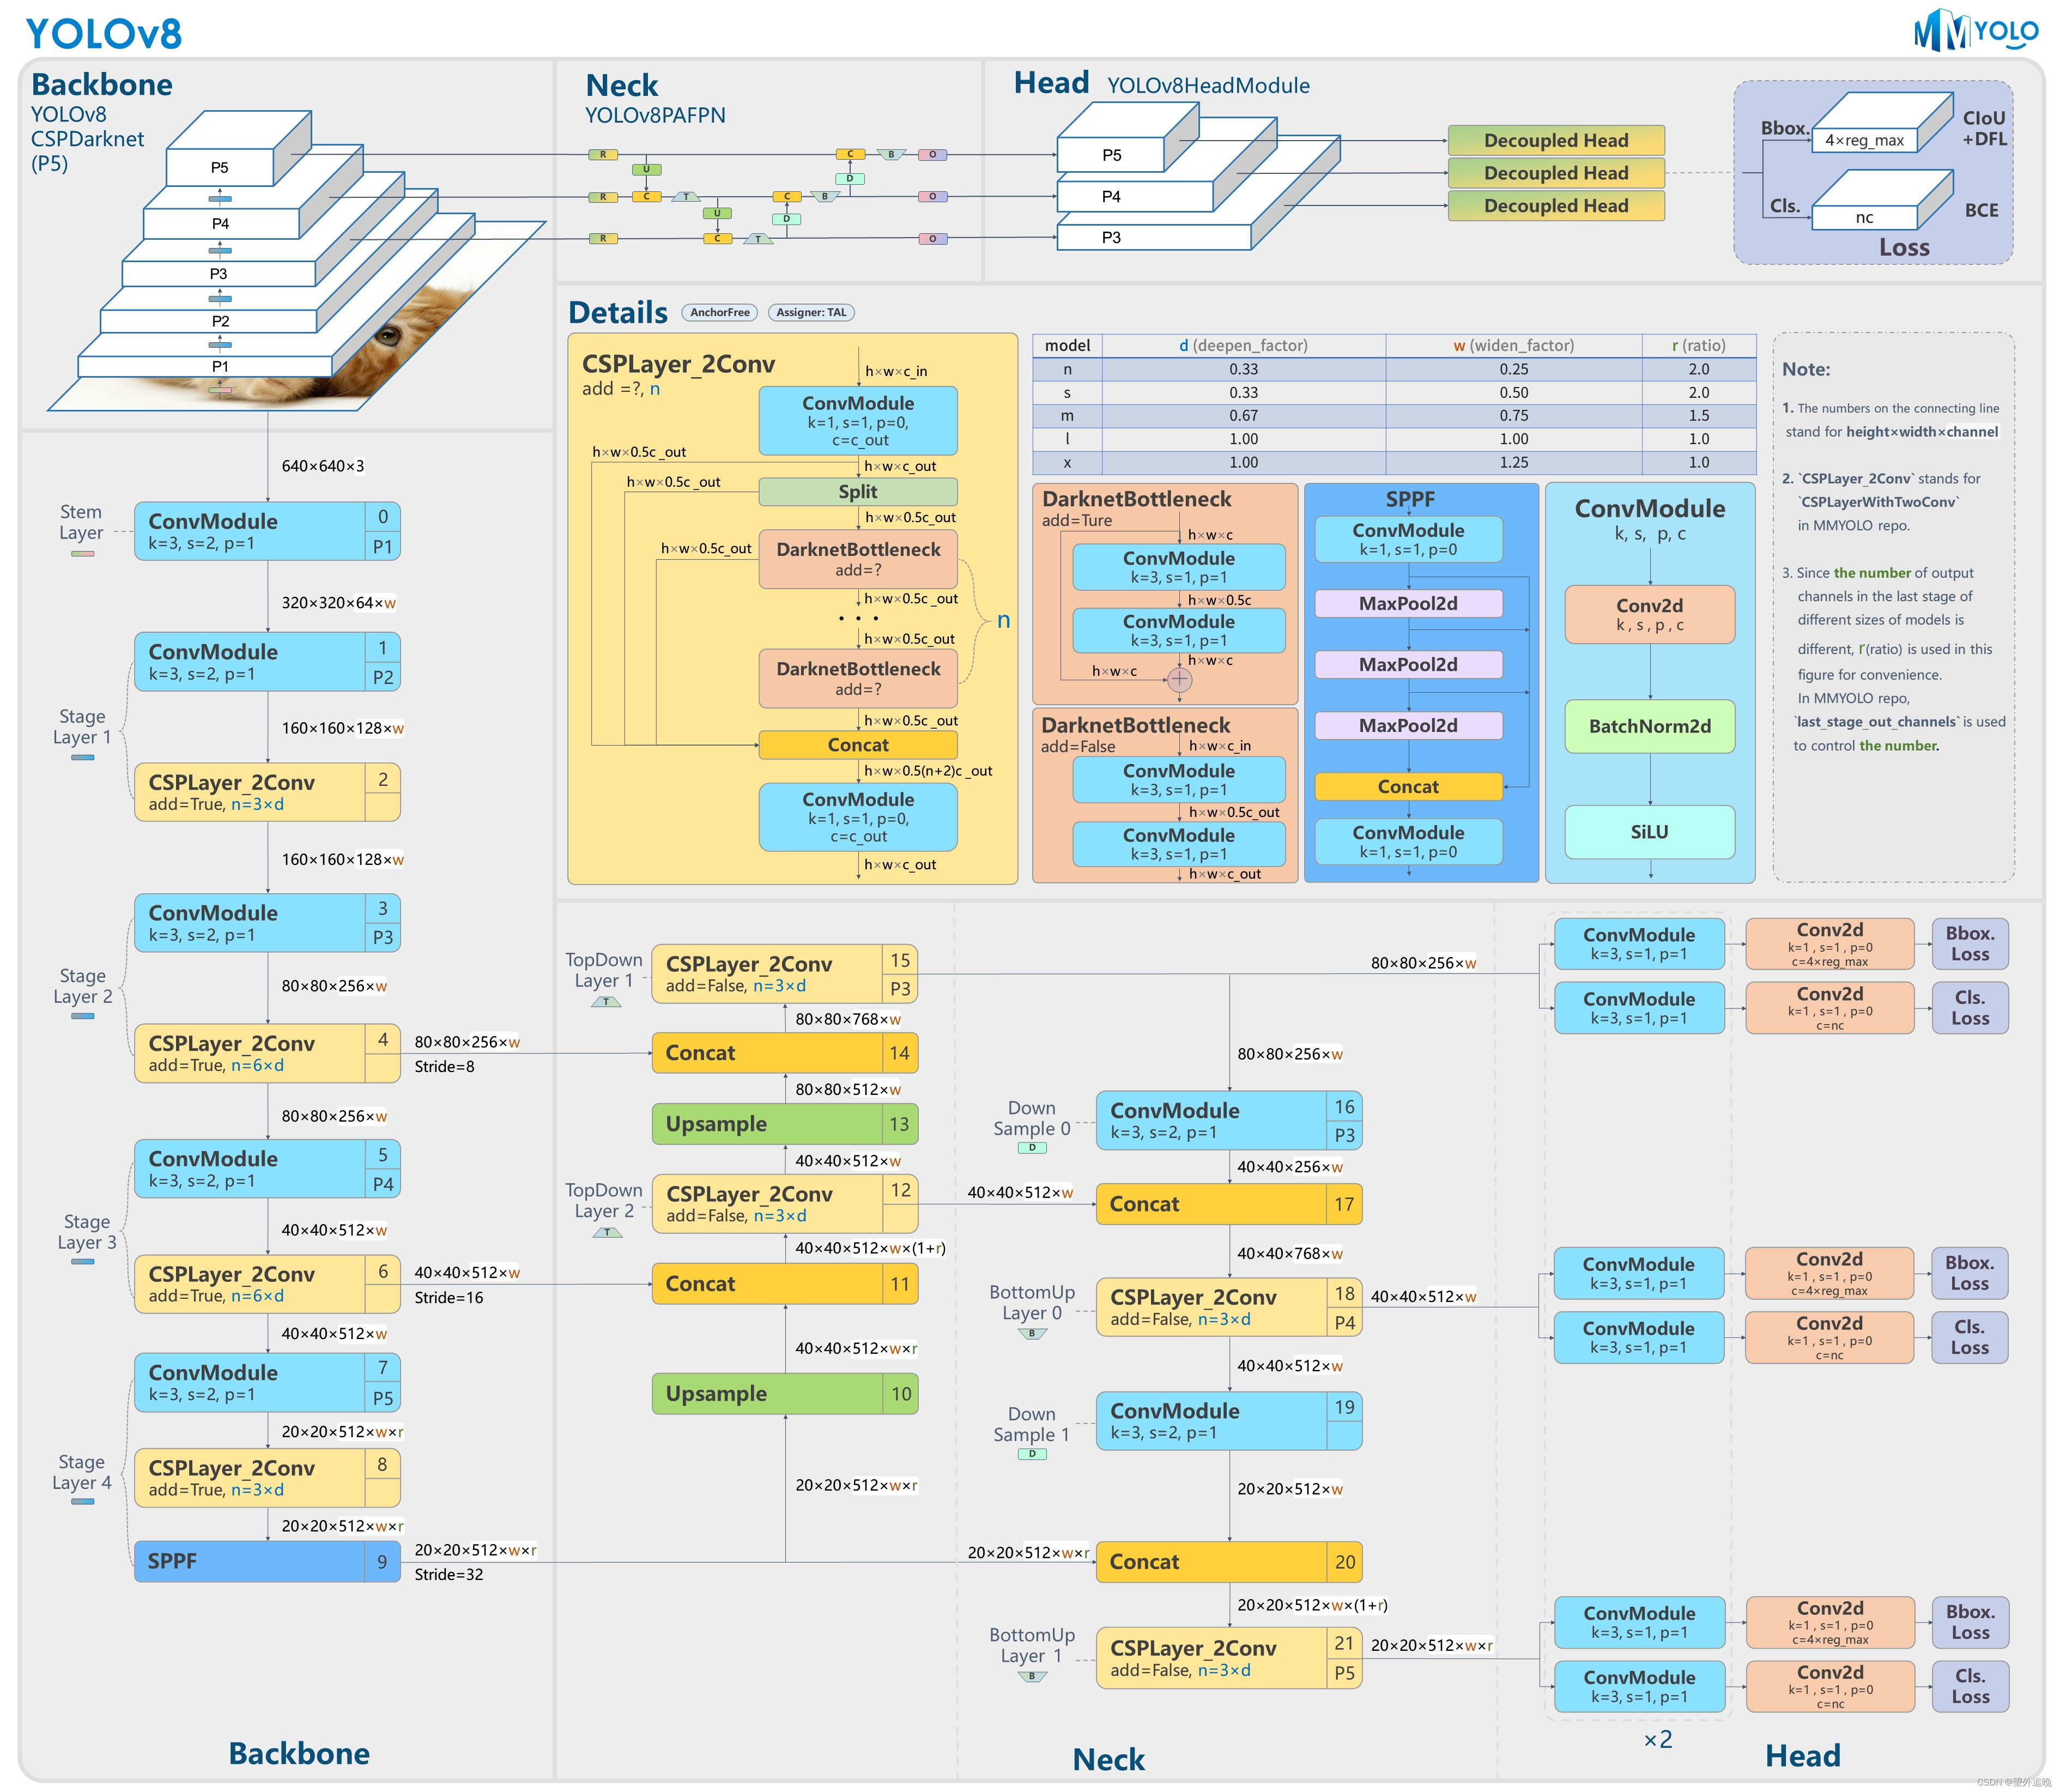
这里主要关注模型的backbone和后处理的过程,并通过对比YOLOv5的架构来更深入的了解YOLOv8。
模型框架
-
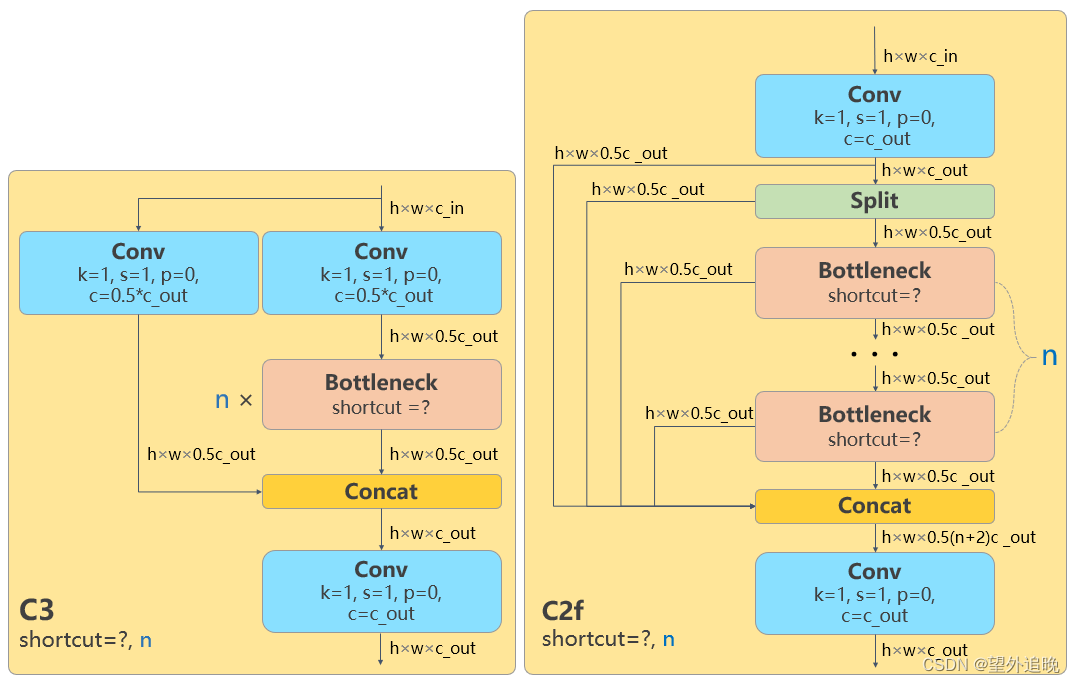
YOLOv5中的C3替换为更精简的C2f ,即增加了更多的跳跃连接和split操作;
-
Backbone 中 C2f 的block 数从 3-6-9-3 改成了 3-6-6-3;
-
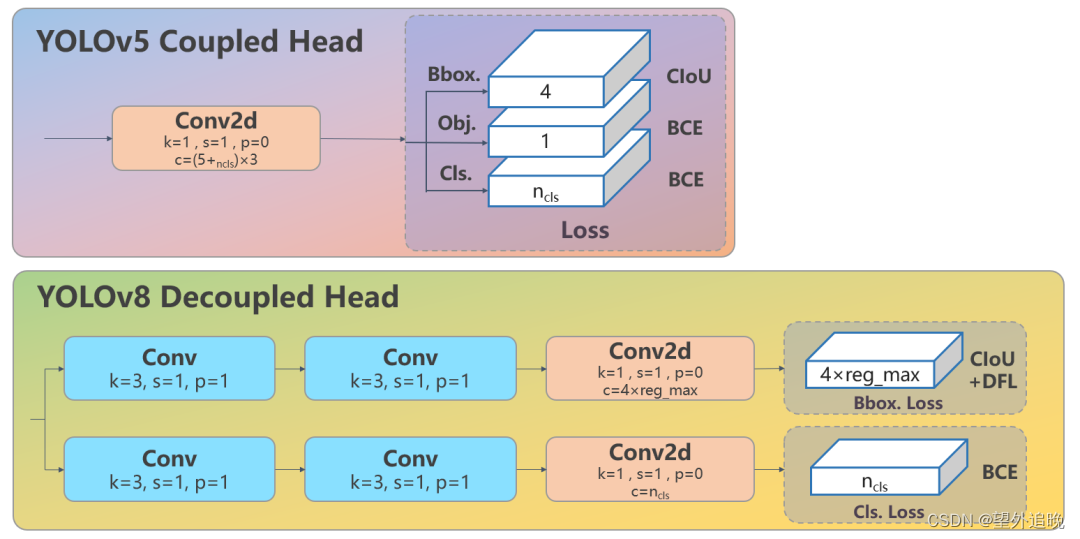
耦合头变成了解耦头,分类和回归分为两个分支分别进行;
数据前处理
1、letterbox缩放:
yolov8的输入是640*640,原图需要resize至标准大小输入网络,而直接采用拉伸的方式有可能会造成目标比例失衡(失真),所以yolov8沿用了v5的方式,即等比例缩放(宽/高至640时,剩余使用背景填充)。
模型推理
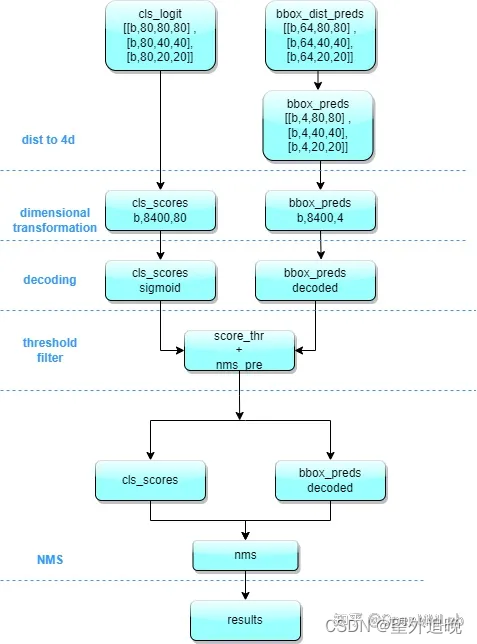
1.对 Head 输出的 bbox 分支进行转换,利用 Softmax 和 Conv 计算将积分形式转换为 4 维 bbox 格式。
2.YOLOv8 输出特征图尺度为 80x80、40x40 和 20x20 的三个特征图。Head 部分输出分类和回归共 6 个尺度的特征图。
将 6个不同尺度的特征图分别按照两个分支进行拼接,并进行维度变换。为了后续方便处理,会将原先的通道维度置换到最后,类别预测分支和 bbox 预测分支 shape 分别为 (b, 80x80+40x40+20x20, 80)=(b,8400,80),(b,8400,4)。
3.对(8400,84)进行后处理,首先采用 score_thr 进行阈值过滤。在这过程中还需要考虑 multi_label 和 nms_pre,确保过滤后的检测框数目不会多于 nms_pre。然后进行 nms ,使得最终输出的检测框不能多于 max_per_img。
4.筛选后的输出output_box格式为N*[x,y,w,h,conf,class]。N为筛选后预测框的个数,conf为最大类别概率。通过[x,y,w,h,conf,class]可以将预测框输出绘制在原图像上,由于图像的前处理经过了等比例缩放,所以此时要先将预测框的坐标转换为原坐标系的坐标。
5.输出的ret的格式为N * [x1,y1,x2,y2,conf,class]。
处理代码
import copy
import onnxruntime as rt
import numpy as np
import cv2
import matplotlib.pyplot as plt
import yaml

# 前处理(将原图宽/高等比例resize至640*640,剩余部分使用背景填充)
def resize_image(image, size, letterbox_image):
    """
        对输入图像进行resize
    Args:
        size:目标尺寸
        letterbox_image: bool 是否进行letterbox变换
    Returns:指定尺寸的图像
    """
    ih, iw, _ = image.shape
    print(ih, iw)
    h, w = size
    # letterbox_image = False
    if letterbox_image:
        scale = min(w/iw, h/ih)
        nw = int(iw*scale)
        nh = int(ih*scale)
        image = cv2.resize(image, (nw, nh), interpolation=cv2.INTER_LINEAR)
        # cv2.imshow("img", img)
        # cv2.waitKey()
        # print(image.shape)
        # 生成画布
        image_back = np.ones((h, w, 3), dtype=np.uint8) * 128
        # 将image放在画布中心区域-letterbox
        image_back[(h-nh)//2: (h-nh)//2 + nh, (w-nw)//2:(w-nw)//2+nw , :] = image
    else:
        image_back = image
        # cv2.imshow("img", image_back)
        # cv2.waitKey()
    return image_back  # 返回图像和坐标原点

 # 数据预处理
def img2input(img):
    img = np.transpose(img, (2, 0, 1))
    img = img/255
    return np.expand_dims(img, axis=0).astype(np.float32)

def std_output(pred):
    """
    将(1,84,8400)处理成(8400, 85)  85= box:4  conf:1 cls:80
    """
    pred = np.squeeze(pred)
    pred = np.transpose(pred, (1, 0))
    pred_class = pred[..., 4:]
    pred_conf = np.max(pred_class, axis=-1)
    pred = np.insert(pred, 4, pred_conf, axis=-1)
    return pred       # (8400,85)

def xywh2xyxy(*box):
    """
    将xywh转换为左上角点和左下角点
    Args:
        box:
    Returns: x1y1x2y2
    """
    ret = [box[0] - box[2] // 2, box[1] - box[3] // 2, \
          box[0] + box[2] // 2, box[1] + box[3] // 2]
    return ret

def get_inter(box1, box2):
    """
    计算相交部分面积
    Args:
        box1: 第一个框
        box2: 第二个狂
    Returns: 相交部分的面积
    """
    x1, y1, x2, y2 = xywh2xyxy(*box1)
    x3, y3, x4, y4 = xywh2xyxy(*box2)
    # 验证是否存在交集
    if x1 >= x4 or x2 <= x3:
        return 0
    if y1 >= y4 or y2 <= y3:
        return 0
    # 将x1,x2,x3,x4排序,因为已经验证了两个框相交,所以x3-x2就是交集的宽
    x_list = sorted([x1, x2, x3, x4])
    x_inter = x_list[2] - x_list[1]
    # 将y1,y2,y3,y4排序,因为已经验证了两个框相交,所以y3-y2就是交集的宽
    y_list = sorted([y1, y2, y3, y4])
    y_inter = y_list[2] - y_list[1]
    # 计算交集的面积
    inter = x_inter * y_inter
    return inter

def get_iou(box1, box2):
    """
    计算交并比: (A n B)/(A + B - A n B)
    Args:
        box1: 第一个框
        box2: 第二个框
    Returns:  # 返回交并比的值
    """
    box1_area = box1[2] * box1[3]  # 计算第一个框的面积
    box2_area = box2[2] * box2[3]  # 计算第二个框的面积
    inter_area = get_inter(box1, box2)
    union = box1_area + box2_area - inter_area   #(A n B)/(A + B - A n B)
    iou = inter_area / union
    return iou

def nms(pred, conf_thres, iou_thres):
    """
    非极大值抑制nms
    Args:
        pred: 模型输出特征图
        conf_thres: 置信度阈值
        iou_thres: iou阈值
    Returns: 输出后的结果
    """
    box = pred[pred[..., 4] > conf_thres]  # 置信度筛选
    cls_conf = box[..., 5:]
    cls = []
    for i in range(len(cls_conf)):
        cls.append(int(np.argmax(cls_conf[i])))
    total_cls = list(set(cls))  # 记录图像内共出现几种物体
    output_box = []
    # 每个预测类别分开考虑
    for i in range(len(total_cls)):
        clss = total_cls[i]
        cls_box = []
        temp = box[:, :6]
        for j in range(len(cls)):
            # 记录[x,y,w,h,conf(最大类别概率),class]值
            if cls[j] == clss:
                temp[j][5] = clss
                cls_box.append(temp[j][:6])
        #  cls_box 里面是[x,y,w,h,conf(最大类别概率),class]
        cls_box = np.array(cls_box)
        sort_cls_box = sorted(cls_box, key=lambda x: -x[4])  # 将cls_box按置信度从大到小排序
        # box_conf_sort = np.argsort(-box_conf)
        # 得到置信度最大的预测框
        max_conf_box = sort_cls_box[0]
        output_box.append(max_conf_box)
        sort_cls_box = np.delete(sort_cls_box, 0, 0)
        # 对除max_conf_box外其他的框进行非极大值抑制
        while len(sort_cls_box) > 0:
            # 得到当前最大的框
            max_conf_box = output_box[-1]
            del_index = []
            for j in range(len(sort_cls_box)):
                current_box = sort_cls_box[j]
                iou = get_iou(max_conf_box, current_box)
                if iou > iou_thres:
                    # 筛选出与当前最大框Iou大于阈值的框的索引
                    del_index.append(j)
            # 删除这些索引
            sort_cls_box = np.delete(sort_cls_box, del_index, 0)
            if len(sort_cls_box) > 0:
                # 我认为这里需要将clas_box先按置信度排序, 才能每次取第一个
                output_box.append(sort_cls_box[0])
                sort_cls_box = np.delete(sort_cls_box, 0, 0)
    return output_box

 # 坐标框映射
def cod_trf(result, pre, after):
    """
    因为预测框是在经过letterbox后的图像上做预测所以需要将预测框的坐标映射回原图像上
    Args:
        result:  [x,y,w,h,conf(最大类别概率),class]
        pre:    原尺寸图像
        after:  经过letterbox处理后的图像
    Returns: 坐标变换后的结果,
    """
    res = np.array(result)
    x, y, w, h, conf, cls = res.transpose((1, 0))
    x1, y1, x2, y2 = xywh2xyxy(x, y, w, h)  # 左上角点和右下角的点
    h_pre, w_pre, _ = pre.shape
    h_after, w_after, _ = after.shape
    scale = max(w_pre/w_after, h_pre/h_after)  # 缩放比例
    h_pre, w_pre = h_pre/scale, w_pre/scale  # 计算原图在等比例缩放后的尺寸
    x_move, y_move = abs(w_pre-w_after)//2, abs(h_pre-h_after)//2  # 计算平移的量
    ret_x1, ret_x2 = (x1 - x_move) * scale, (x2 - x_move) * scale
    ret_y1, ret_y2 = (y1 - y_move) * scale, (y2 - y_move) * scale
    ret = np.array([ret_x1, ret_y1, ret_x2, ret_y2, conf, cls]).transpose((1, 0))
    return ret

def draw(res, image, cls):
    """
    将预测框绘制在image上
    Args:
        res: 预测框数据
        image: 原图
        cls: 类别列表,类似["apple", "banana", "people"]  可以自己设计或者通过数据集的yaml文件获取
    Returns:
    """
    for r in res:
        # 画框
        image = cv2.rectangle(image, (int(r[0]), int(r[1])), (int(r[2]), int(r[3])), (255, 0, 0), 1)
        # 表明类别
        text = "{}:{}".format(cls[int(r[5])], \
                               round(float(r[4]), 2))
        h, w = int(r[3]) - int(r[1]), int(r[2]) - int(r[0])  # 计算预测框的长宽
        font_size = min(h/640, w/640) * 3  # 计算字体大小(随框大小调整)
        image = cv2.putText(image, text, (max(10, int(r[0])), max(20, int(r[1]))), cv2.FONT_HERSHEY_COMPLEX, max(font_size, 0.3), (0, 0, 255), 1)   # max()为了确保字体不过界
    cv2.imshow("result", image)
    cv2.waitKey()
    return image

# 加载配置文件
config_file = "my_datasets/my_datasets.yaml"
with open(config_file, "r") as config:
    config = yaml.safe_load(config)
if __name__ == '__main__':
    std_h, std_w = 640, 640  # 标准输入尺寸
    dic = config["names"]  # 得到的是模型类别字典
    class_list = list(dic.values())
    input_path = "my_datasets/images/"  # 输入图片的根目录路径
    img_path =  "000000000074.jpg"  # 输入图片的文件名
    img = cv2.imread(input_path+img_path)
    if img.size == 0:
        print("路径有误!")
    # 前处理
    img_after = resize_image(img, (std_w, std_h), True)  # (640, 640, 3)
    # 将图像处理成输入的格式
    data = img2input(img_after)
    # 输入模型
    sess = rt.InferenceSession('runs/detect/train49/weights/best.onnx')  # yolov8模型onnx格式
    input_name = sess.get_inputs()[0].name
    label_name = sess.get_outputs()[0].name
    pred = sess.run([label_name], {input_name: data})[0]  # 输出(bs, 84=80cls+4reg, 8400=3种尺度的特征图叠加), 这里的预测框的回归参数是xywh, 而不是中心点到框边界的距离
    pred = std_output(pred)
    result = nms(pred, 0.5, 0.4)  # [x,y,w,h,conf(最大类别概率),class]
    # 返回了三个框, 第三个框和第一个和第二个都有相交
    result = cod_trf(result, img, img_after)
    image = draw(result, img, class_list)
    # 保存输出图像
    out_path = "./runs/my_predicts/"
    cv2.imwrite(out_path + img_path, image)
    cv2.destroyWindow("result")

- 1
- 2
- 3
- 4
- 5
- 6
- 7
- 8
- 9
- 10
- 11
- 12
- 13
- 14
- 15
- 16
- 17
- 18
- 19
- 20
- 21
- 22
- 23
- 24
- 25
- 26
- 27
- 28
- 29
- 30
- 31
- 32
- 33
- 34
- 35
- 36
- 37
- 38
- 39
- 40
- 41
- 42
- 43
- 44
- 45
- 46
- 47
- 48
- 49
- 50
- 51
- 52
- 53
- 54
- 55
- 56
- 57
- 58
- 59
- 60
- 61
- 62
- 63
- 64
- 65
- 66
- 67
- 68
- 69
- 70
- 71
- 72
- 73
- 74
- 75
- 76
- 77
- 78
- 79
- 80
- 81
- 82
- 83
- 84
- 85
- 86
- 87
- 88
- 89
- 90
- 91
- 92
- 93
- 94
- 95
- 96
- 97
- 98
- 99
- 100
- 101
- 102
- 103
- 104
- 105
- 106
- 107
- 108
- 109
- 110
- 111
- 112
- 113
- 114
- 115
- 116
- 117
- 118
- 119
- 120
- 121
- 122
- 123
- 124
- 125
- 126
- 127
- 128
- 129
- 130
- 131
- 132
- 133
- 134
- 135
- 136
- 137
- 138
- 139
- 140
- 141
- 142
- 143
- 144
- 145
- 146
- 147
- 148
- 149
- 150
- 151
- 152
- 153
- 154
- 155
- 156
- 157
- 158
- 159
- 160
- 161
- 162
- 163
- 164
- 165
- 166
- 167
- 168
- 169
- 170
- 171
- 172
- 173
- 174
- 175
- 176
- 177
- 178
- 179
- 180
- 181
- 182
- 183
- 184
- 185
- 186
- 187
- 188
- 189
- 190
- 191
- 192
- 193
- 194
- 195
- 196
- 197
- 198
- 199
- 200
- 201
- 202
- 203
- 204
- 205
- 206
- 207
- 208
- 209
- 210
- 211
- 212
- 213
- 214
- 215
- 216
- 217
- 218
- 219
- 220
- 221
- 222
- 223
- 224
- 225
- 226
- 227
- 228
- 229
- 230
- 231
- 232
- 233
- 234
- 235
- 236
reference
[1]: https://zhuanlan.zhihu.com/p/598566644?utm_id=0
[2]: https://blog.csdn.net/kuabiku/article/details/132083671


