- 1这款AI绘画软件,带你快速生成高质量产品效果图!_产品效果图生成软件
- 2Esp32_Cam使用Arduino开发(一)_esp32cam arduino
- 3面试时,我说谎了——Leo网上答疑44_总经理面试发现你在小问题上撒谎了
- 4fastjson解析json数据
- 5[ WARN:0@0.014] global loadsave.cpp:248 cv::findDecoder imread_
- 6材料科学SCI期刊,IF=3+,审稿速度非常快,过审难度不大!_容易录用的复合材料类sci推荐
- 7Elasticsearch索引模板_es索引模板_es模板
- 8文心智能体-女生超爱DIY礼物大师_文心智能体插件开发
- 9深入探索SemiDrive E3系列的MCU SSDK
- 10java 基础总结(仅本人使用)_remove(k key,v value),返回什么
快速了解ActiveMQ和RocketMQ
赞
踩
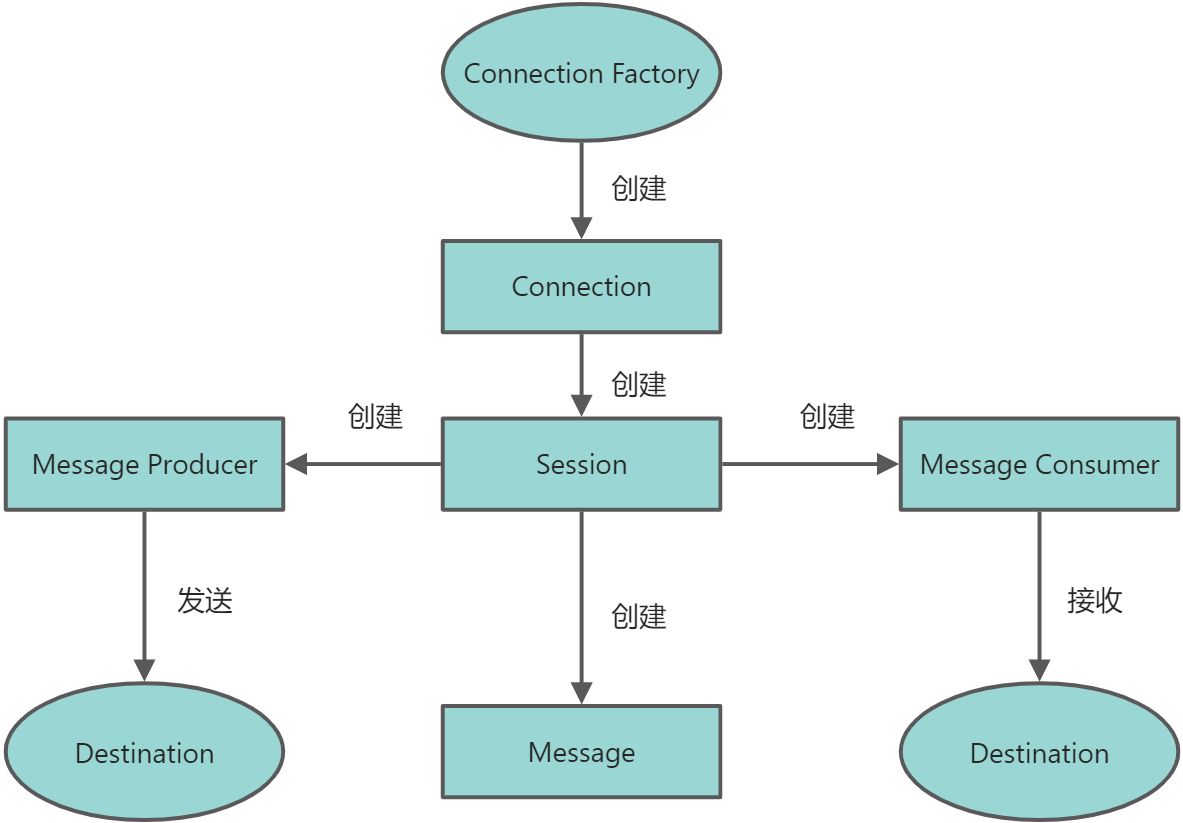
JMS
JMS即Java消息服务(Java Message Service)应用程序接口,是一个Java平台中关于面向消息中间件(MOM)的API,用于在两个应用程序之间,或分布式系统中发送消息,进行异步通信。消息中间件一般都遵循JMS规范,如图:
消息队列(Message Queue)也叫做消息中间件。生产者发送消息到消息队列,消费者则从队列中获取消息进行消费,达到异步、解耦、削峰。
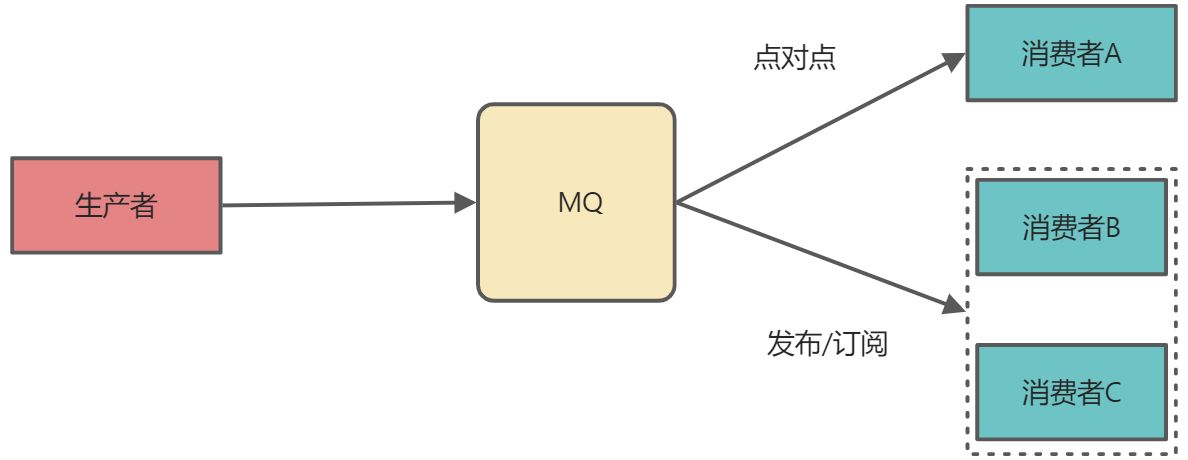
生产者发送消息有两种类型queue和topic。
- queue:生产者和消费者点对点的消息处理,如果存在多个消费者,则选择其中一个消费者进行消费。
- topic:生产者发送消息,所有的消费者都会进行消息的消费。
ActiveMQ
下载
下载地址:https://activemq.apache.org/components/classic/download/ ,支持Windows/Linux平台,根据相应的JDK版本选择对应的版本。
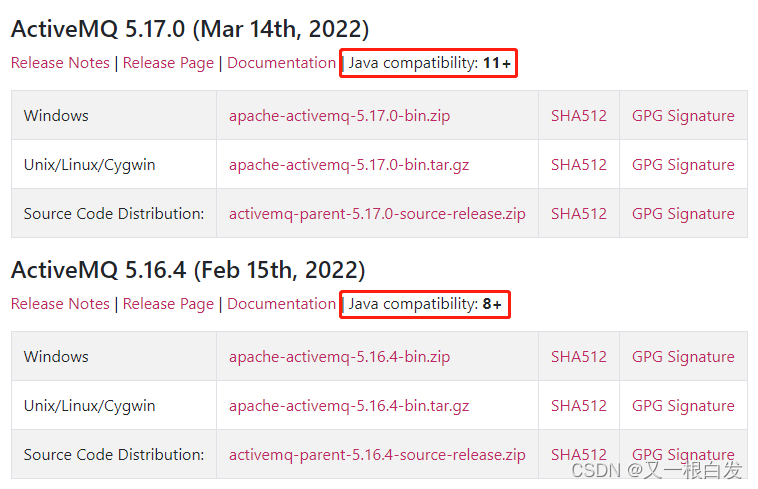
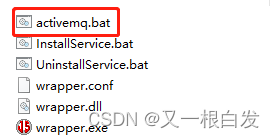
Windows版本apache-activemq-5.16.4为例,解压并启动bin目录下对应系统的activemq.bat文件

可以根据系统选择32位或者64位
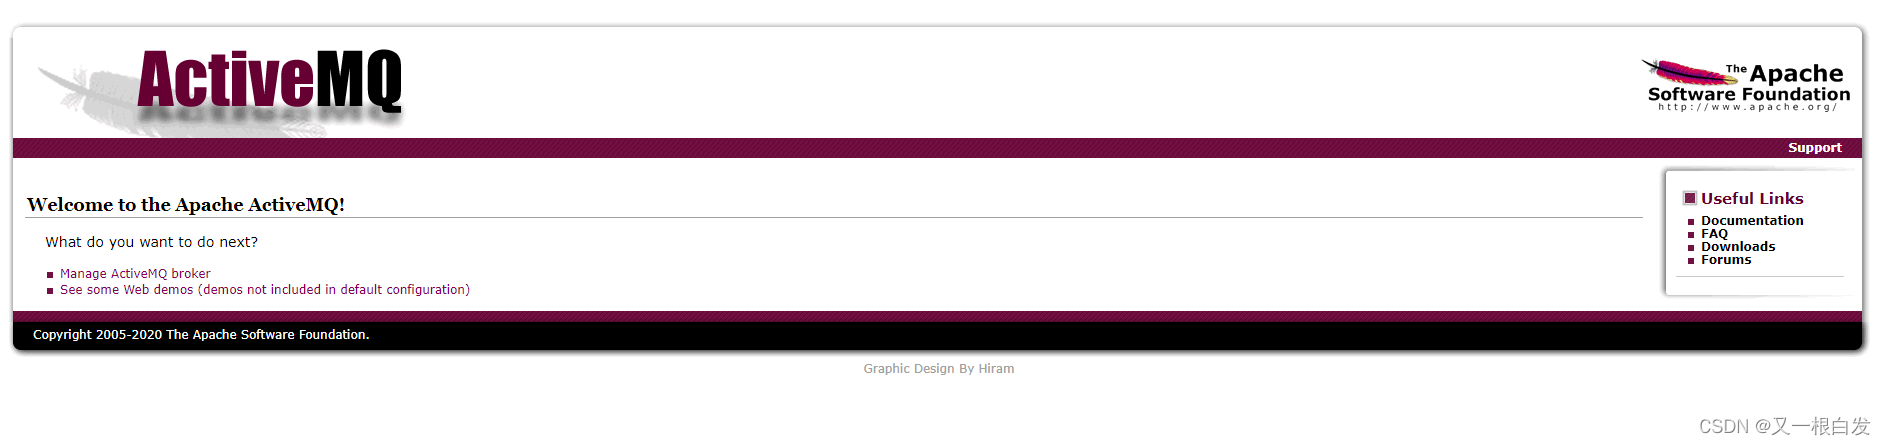
启动完成访问 http://127.0.0.1:8161, 默认用户和密码是admin/admin
Queue消息
生产者
public class Producer {

    public static final String QUEUE_NAME = "queue";

    public static void main(String[] args) throws JMSException {
        // 创建连接工厂
        ActiveMQConnectionFactory factory = new ActiveMQConnectionFactory();
        // 创建连接
        Connection connection =  factory.createConnection();
        // 启动连接
        connection.start();
        // 创建session
        Session session = connection.createSession(false, Session.AUTO_ACKNOWLEDGE);
        // 创建消息类型为queue
        Queue queue = session.createQueue(QUEUE_NAME);
        // 创建生产者
        MessageProducer producer = session.createProducer(queue);
        // 发送消息到MQ
        for (int i = 0; i < 3; i++) {
            TextMessage textMessage = session.createTextMessage("message->>>>"+i);
            producer.send(textMessage);
        }
        // 关闭连接
        connection.close();
    }
}

- 1
- 2
- 3
- 4
- 5
- 6
- 7
- 8
- 9
- 10
- 11
- 12
- 13
- 14
- 15
- 16
- 17
- 18
- 19
- 20
- 21
- 22
- 23
- 24
- 25
- 26
消费者
public class Consumer {
    public static final String QUEUE_NAME = "queue";

    public static void main(String[] args) throws JMSException, IOException {
        // 创建连接工厂
        ActiveMQConnectionFactory factory = new ActiveMQConnectionFactory();
        // 创建连接
        Connection connection =  factory.createConnection();
        // 启动连接
        connection.start();
        // 创建session
        Session session = connection.createSession(false, Session.AUTO_ACKNOWLEDGE);
        // 创建接收消息为Queue类型,QUEUE_NAME要与生产者一致
        Queue queue = session.createQueue(QUEUE_NAME);
        // 创建消费者
        MessageConsumer consumer = session.createConsumer(queue);
        // 消费消息
        TextMessage textMessage = (TextMessage) consumer.receive();
        System.out.println(textMessage.getText());
        System.out.println("结束---------------》");
        // 关闭连接
        connection.close();
    }

}
- 1
- 2
- 3
- 4
- 5
- 6
- 7
- 8
- 9
- 10
- 11
- 12
- 13
- 14
- 15
- 16
- 17
- 18
- 19
- 20
- 21
- 22
- 23
- 24
- 25
- 26
这里消费者的receive()方法是个阻塞方法,如果mq里面没有消息可以消费,会一直等待,知道有新的消息。
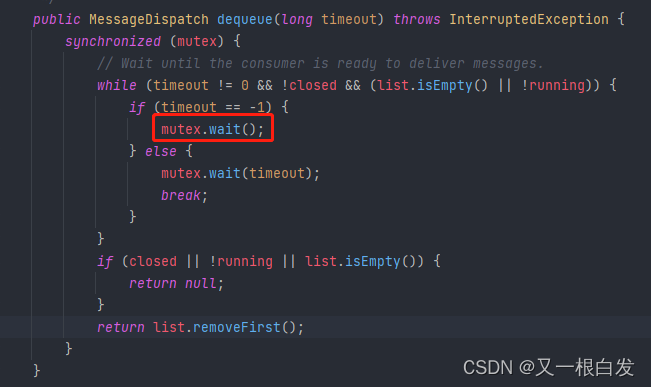
可以使用receive(long timeout)方法指定等待超时时间。
Topic发布/订阅
生产者
public class TopicProducer {

    private static final String TOPIC_NAME = "topic_name";

    public static void main(String[] args) throws JMSException {
        // 创建连接工厂
        ActiveMQConnectionFactory factory = new ActiveMQConnectionFactory();
        // 创建连接
        Connection connection =  factory.createConnection();
        // 启动连接
        connection.start();
        // 创建session
        Session session = connection.createSession(false, Session.AUTO_ACKNOWLEDGE);
        // 创建消息类型为topic
        Topic topic = (Topic) session.createTopic(TOPIC_NAME);
        // 创建生产者
        MessageProducer producer = session.createProducer(topic);
        // 发送消息到MQ
        for (int i = 0; i < 3; i++) {
            TextMessage textMessage = session.createTextMessage("topic_message->>>>"+i);
            producer.send(textMessage);
        }
        // 关闭连接
        connection.close();
    }
}
- 1
- 2
- 3
- 4
- 5
- 6
- 7
- 8
- 9
- 10
- 11
- 12
- 13
- 14
- 15
- 16
- 17
- 18
- 19
- 20
- 21
- 22
- 23
- 24
- 25
- 26
消费者
public class TopicConsumer1 {

    public static final String TOPIC_NAME = "topic_name";

    public static void main(String[] args) throws JMSException, IOException {
        // 创建连接工厂
        ActiveMQConnectionFactory factory = new ActiveMQConnectionFactory();
        // 创建连接
        Connection connection =  factory.createConnection();
        // 启动连接
        connection.start();
        // 创建session
        Session session = connection.createSession(false, Session.AUTO_ACKNOWLEDGE);
        // 创建接收消息为topic类型,TOPIC_NAME要与生产者一致
        Topic topic = session.createTopic(TOPIC_NAME);
        // 创建消费者
        MessageConsumer consumer = session.createConsumer(topic);
        // 消费消息
        consumer.setMessageListener(message -> {
            TextMessage textMessage = (TextMessage) message;
            try {
                System.out.println(textMessage.getText());
            } catch (JMSException e) {
                e.printStackTrace();
            }
        });
        System.in.read();
        // 关闭连接
        connection.close();
    }

}
- 1
- 2
- 3
- 4
- 5
- 6
- 7
- 8
- 9
- 10
- 11
- 12
- 13
- 14
- 15
- 16
- 17
- 18
- 19
- 20
- 21
- 22
- 23
- 24
- 25
- 26
- 27
- 28
- 29
- 30
- 31
- 32
SpringBoot整合ActiveMQ
引入依赖
<dependencies>
  <dependency>
    <groupId>org.springframework.boot</groupId>
    <artifactId>spring-boot-starter-activemq</artifactId>
  </dependency>

  <dependency>
    <groupId>org.springframework.boot</groupId>
    <artifactId>spring-boot-starter-web</artifactId>
  </dependency>

  <dependency>
    <groupId>org.springframework.boot</groupId>
    <artifactId>spring-boot-starter-test</artifactId>
    <scope>test</scope>
  </dependency>
</dependencies>
- 1
- 2
- 3
- 4
- 5
- 6
- 7
- 8
- 9
- 10
- 11
- 12
- 13
- 14
- 15
- 16
- 17
配置
- yaml配置文件
server:
  port: 8001

spring:
  activemq:
    # activemq服务地址
    broker-url: tcp://localhost:61616
    # 账号密码
    user: admin
    password: admin
  jms:
    # 消息类型  false: 点对点queue true: 发布/订阅topic
    pub-sub-domain: false
- 1
- 2
- 3
- 4
- 5
- 6
- 7
- 8
- 9
- 10
- 11
- 12
- 13
- 14
- java代码配置
@Configuration
@EnableJms
public class ActivemqConfig {
    /**
     * queue注入容器
     */
    public Queue queue() {
        return new ActiveMQQueue("boot_queue");
    }
}
- 1
- 2
- 3
- 4
- 5
- 6
- 7
- 8
- 9
- 10
@EnableJms 注解开启mq
编写生产者
@Service
public class Producer {

    @Autowired
    private JmsMessagingTemplate jmsMessagingTemplate;
    @Autowired
    private Queue queue;

    public void sendJms() {
        String msg = "boot msg >>>" + System.currentTimeMillis();
        System.out.println(msg);
        jmsMessagingTemplate.convertAndSend(queue, msg);
    }
}
- 1
- 2
- 3
- 4
- 5
- 6
- 7
- 8
- 9
- 10
- 11
- 12
- 13
- 14
编写消费者
@Service
public class Consumer {

    /**
     * JmsListener自动监听
     */
    @JmsListener(destination = "boot_queue")
    public void receiveJms(TextMessage textMessage) throws JMSException {
        System.out.println("消费消息:" + textMessage.getText());
    }
}
- 1
- 2
- 3
- 4
- 5
- 6
- 7
- 8
- 9
- 10
- 11
测试
- 生产消息
@SpringBootTest
class ActivemqApplicationTests {

    @Autowired
    private Producer producer;


    @Test
    void contextLoads() {
        producer.sendJms();
    }

}
- 1
- 2
- 3
- 4
- 5
- 6
- 7
- 8
- 9
- 10
- 11
- 12
- 13
- 消费消息
@SpringBootTest
class ActivemqApplicationTests {

    @Test
    void contextLoads() {

    }
}
- 1
- 2
- 3
- 4
- 5
- 6
- 7
- 8
直接启动测试类,消费者自动接收消息。
发布/订阅
发布/订阅消息基本和队列消息一样编写,pub-sub-domain改成true, bean注入改成Topic。
RocketMQ
概述
架构
-
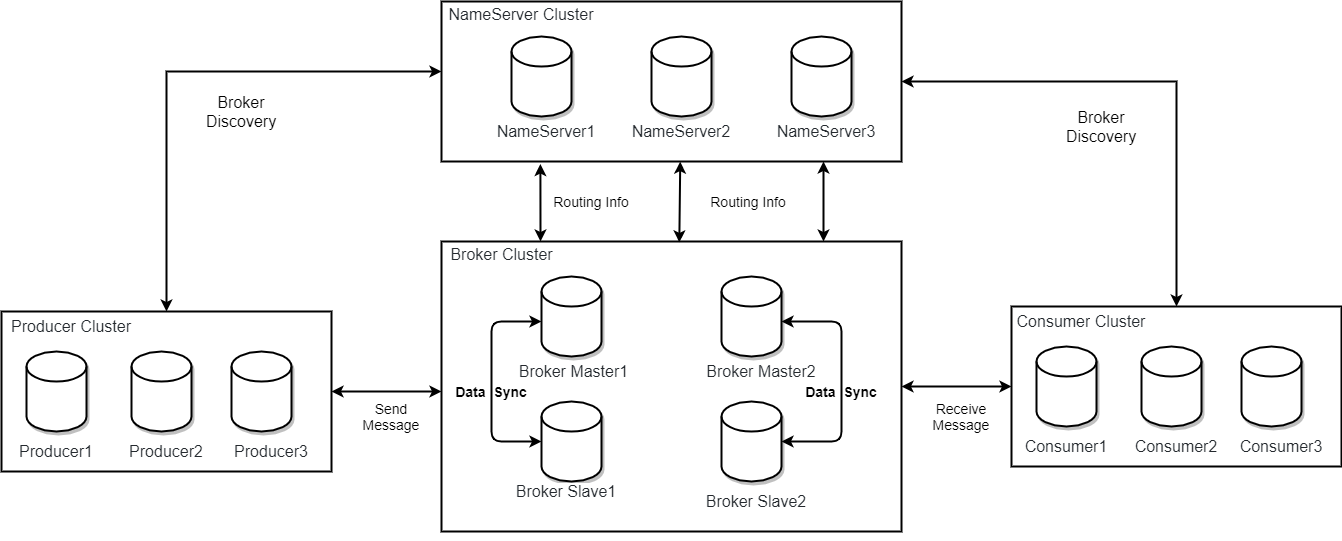
Producer:消息生产者,支持分布式集群部署。Producer通过MQ的负载均衡模块选择相应的Broker集群队列进行消息投递,投递的过程支持快速失败并且低延迟。
-
Consumer:消息消费者,支持分布式集群部署。支持以push推,pull拉两种模式对消息进行消费。同时也支持集群方式和广播方式的消费,它提供实时消息订阅机制,可以满足大多数用户的需求。
-
NameServer:NameServer是一个非常简单的Topic路由注册中心,其角色类似Dubbo中的zookeeper,支持Broker的动态注册与发现。主要包括两个功能:Broker管理,NameServer接受Broker集群的注册信息并且保存下来作为路由信息的基本数据。然后提供心跳检测机制,检查Broker是否还存活;路由信息管理,每个NameServer将保存关于Broker集群的整个路由信息和用于客户端查询的队列信息。然后Producer和Conumser通过NameServer就可以知道整个Broker集群的路由信息,从而进行消息的投递和消费。NameServer通常也是集群的方式部署,各实例间相互不进行信息通讯。Broker是向每一台NameServer注册自己的路由信息,所以每一个NameServer实例上面都保存一份完整的路由信息。当某个NameServer因某种原因下线了,Broker仍然可以向其它NameServer同步其路由信息,Producer和Consumer仍然可以动态感知Broker的路由的信息。
-
BrokerServer:Broker主要负责消息的存储、投递和查询以及服务高可用保证,为了实现这些功能,Broker包含了以下几个重要子模块。
- Remoting Module:整个Broker的实体,负责处理来自Client端的请求。
- Client Manager:负责管理客户端(Producer/Consumer)和维护Consumer的Topic订阅信息。
- Store Service:提供方便简单的API接口处理消息存储到物理硬盘和查询功能。
- HA Service:高可用服务,提供Master Broker 和 Slave Broker之间的数据同步功能。
- Index Service:根据特定的Message key对投递到Broker的消息进行索引服务,以提供消息的快速查询。
工作流程
- 启动NameServer,NameServer起来后监听端口,等待Broker、Producer、Consumer连上来,相当于一个路由控制中心。
- Broker启动,跟所有的NameServer保持长连接,定时发送心跳包。心跳包中包含当前Broker信息(IP+端口等)以及存储所有Topic信息。注册成功后,NameServer集群中就有Topic跟Broker的映射关系。
- 收发消息前,先创建Topic,创建Topic时需要指定该Topic要存储在哪些Broker上,也可以在发送消息时自动创建Topic。
- Producer发送消息,启动时先跟NameServer集群中的其中一台建立长连接,并从NameServer中获取当前发送的Topic存在哪些Broker上,轮询从队列列表中选择一个队列,然后与队列所在的Broker建立长连接从而向Broker发消息。
- Consumer跟Producer类似,跟其中一台NameServer建立长连接,获取当前订阅Topic存在哪些Broker上,然后直接跟Broker建立连接通道,开始消费消息。
下载
地址:https://rocketmq.apache.org/dowloading/releases/
source-release.zip为源码压缩包,需要编译后使用
bin-release.zip为二进制压缩包,推荐下载
安装
环境准备
- jdk:1.8+
- maven:3.2.x +
上传linux服务器,执行解压命令。
启动NameServer
# 进入bin目录
nohup sh mqnamesrv &
# 查看日志
tail -f ~/logs/rocketmqlogs/namesrv.log
- 1
- 2
- 3
- 4
启动Broker
# 进入bin目录
nohup sh mqbroker -n localhost:9876 &
# 若要按指定配置启动broker 则要加上 -c 指定文件目录 如:
nohup sh mqbroker -n localhost:9876 -c conf/broker.conf &
# 查看日志
tail -f ~/logs/rocketmqlogs/broker.log
- 1
- 2
- 3
- 4
- 5
- 6
测试生产/消费
- 配置
/etc/profile环境变量,并执行source /etc/profile
export NAMESRV_ADDR=localhost:9876
- 1
- 生产消息
sh bin/tools.sh org.apache.rocketmq.example.quickstart.Producer
- 1
- 消费消息
sh bin/tools.sh org.apache.rocketmq.example.quickstart.Consumer
- 1
客户端编写
案例:https://github.com/apache/rocketmq/blob/master/docs/cn/RocketMQ_Example.md
SpringBoot整合RocketMQ
引入依赖
<dependency>
  <groupId>org.apache.rocketmq</groupId>
  <artifactId>rocketmq-spring-boot-starter</artifactId>
  <version>2.2.2</version>
</dependency>
- 1
- 2
- 3
- 4
- 5
配置生产者
rocketmq:
  # namesrv 地址
  name-server: xx.xx.xx.xx:9876
  producer:
    # 生产者组
    group: producer-test
- 1
- 2
- 3
- 4
- 5
- 6
@Component
public class Producer {

    @Autowired
    private RocketMQTemplate rocketMQTemplate;

    public void sendMsg() {
        rocketMQTemplate.convertAndSend("boot-topic", "springboot消息!");
    }
}
- 1
- 2
- 3
- 4
- 5
- 6
- 7
- 8
- 9
- 10
测试
@SpringBootTest
class RocketmqApplicationTests {

	@Autowired
	private Producer producer;

	@Test
	void contextLoads() {
		producer.sendMsg();
	}

}
- 1
- 2
- 3
- 4
- 5
- 6
- 7
- 8
- 9
- 10
- 11
- 12
配置消费者
rocketmq:
  # namesrv 地址
  name-server: xx.xx.xx.xx:9876
- 1
- 2
- 3
@Component
@RocketMQMessageListener(topic = "boot-topic", consumerGroup = "consumer-group-test")
public class Consumer implements RocketMQListener<String> {


    @Override
    public void onMessage(String msg) {
        System.out.println("receive message: " + msg);
    }
}
- 1
- 2
- 3
- 4
- 5
- 6
- 7
- 8
- 9
- 10
- 实现RocketMQListener,重写onMessage()方法。
- 添加@RocketMQMessageListener注解
consumerGroup:消费者组名称,topic:订阅主题,selectorExpression:订阅消息tag
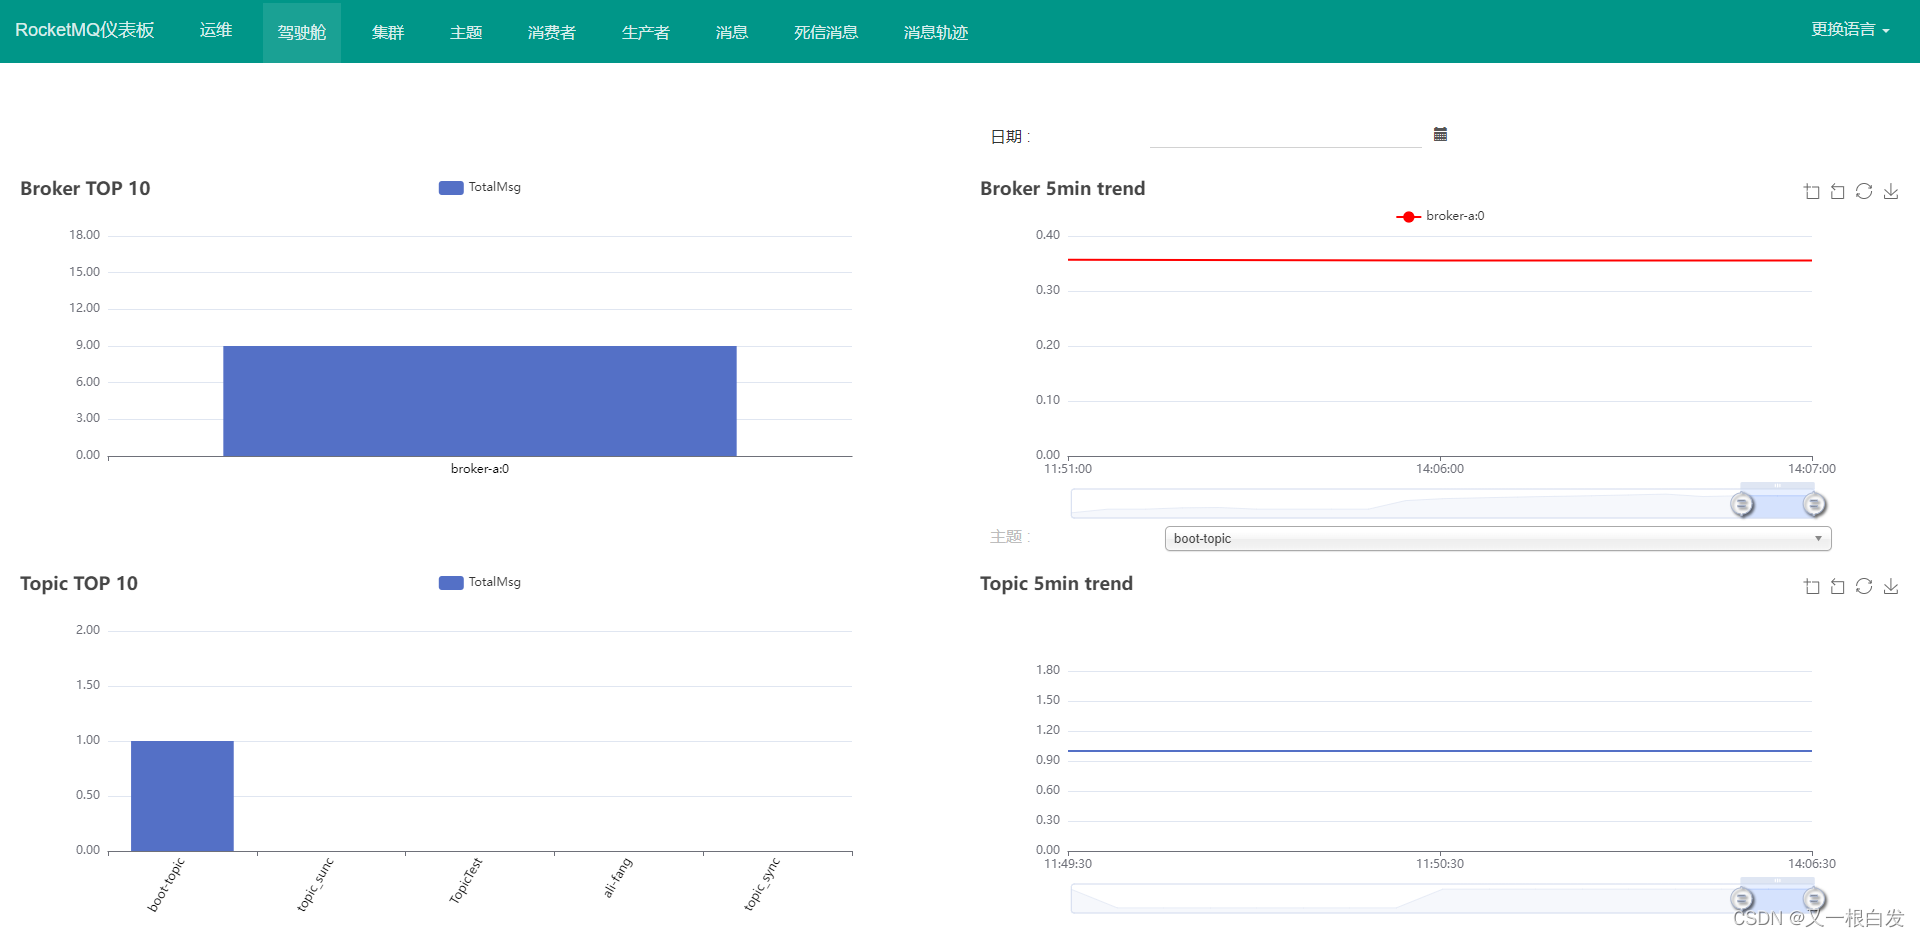
RocketMQ控制台
下载
项目地址:https://github.com/apache/rocketmq-dashboard
配置启动
#
# Licensed to the Apache Software Foundation (ASF) under one or more
# contributor license agreements.  See the NOTICE file distributed with
# this work for additional information regarding copyright ownership.
# The ASF licenses this file to You under the Apache License, Version 2.0
# (the "License"); you may not use this file except in compliance with
# the License.  You may obtain a copy of the License at
#
#     http://www.apache.org/licenses/LICENSE-2.0
#
# Unless required by applicable law or agreed to in writing, software
# distributed under the License is distributed on an "AS IS" BASIS,
# WITHOUT WARRANTIES OR CONDITIONS OF ANY KIND, either express or implied.
# See the License for the specific language governing permissions and
# limitations under the License.
#

server:
  port: 8080
  servlet:
    encoding:
      charset: UTF-8
      enabled: true
      force: true
## SSL setting
#  ssl:
#    key-store: classpath:rmqcngkeystore.jks
#    key-store-password: rocketmq
#    key-store-type: PKCS12
#    key-alias: rmqcngkey

spring:
  application:
    name: rocketmq-dashboard

logging:
  config: classpath:logback.xml

rocketmq:
  config:
    # if this value is empty,use env value rocketmq.config.namesrvAddr  NAMESRV_ADDR | now, default localhost:9876
    # configure multiple namesrv addresses to manage multiple different clusters
    namesrvAddrs:
      - 127.0.0.1:9876
      - 127.0.0.2:9876
    # if you use rocketmq version < 3.5.8, rocketmq.config.isVIPChannel should be false.default true
    isVIPChannel:
    # timeout for mqadminExt, default 5000ms
    timeoutMillis:
    # rocketmq-console's data path:dashboard/monitor
    dataPath: /tmp/rocketmq-console/data
    # set it false if you don't want use dashboard.default true
    enableDashBoardCollect: true
    # set the message track trace topic if you don't want use the default one
    msgTrackTopicName:
    ticketKey: ticket
    # must create userInfo file: ${rocketmq.config.dataPath}/users.properties if the login is required
    loginRequired: false
    useTLS: false
    # set the accessKey and secretKey if you used acl
    accessKey: # if version > 4.4.0
    secretKey: # if version > 4.4.0

threadpool:
  config:
    coreSize: 10
    maxSize: 10
    keepAliveTime: 3000
    queueSize: 5000
- 1
- 2
- 3
- 4
- 5
- 6
- 7
- 8
- 9
- 10
- 11
- 12
- 13
- 14
- 15
- 16
- 17
- 18
- 19
- 20
- 21
- 22
- 23
- 24
- 25
- 26
- 27
- 28
- 29
- 30
- 31
- 32
- 33
- 34
- 35
- 36
- 37
- 38
- 39
- 40
- 41
- 42
- 43
- 44
- 45
- 46
- 47
- 48
- 49
- 50
- 51
- 52
- 53
- 54
- 55
- 56
- 57
- 58
- 59
- 60
- 61
- 62
- 63
- 64
- 65
- 66
- 67
- 68
- 69
修改namesrvAddrs地址,dataPath日志文件缓存地址。启动服务即可