
热门标签
热门文章
- 12024年软件测试行发展趋势,“我“如何成为全栈测试工程师?_我国软件测试行业现状
- 22024年人工智能7大趋势_ai趋势
- 3AI系统Spark原理与代码实战案例讲解_sparkai系统
- 4YOLO 目标检测编程详解
- 51.2 编程语言选择 | 排行榜、对比、现状,java c++语言对比,哪个工资高、难度更高,mysql数据库对比,java入门怎么学_c和java薪资对比
- 6Python - 配置工作目录环境变量.env和getenv加载环境变量_python .env文件
- 71.RabbitMQ的安装、管理界面、Java-Client
- 8【mysql】 查看mysql服务状态_service mysql status
- 9Git 超详细学习教程 (附带有详细的图文安装教程,适用于新手阅读学习)
- 10【navicat导入多个sql文件】_navicat批量导入多个文件
当前位置: article > 正文
实时天气组件(纯前端实现)_vue-skycons
作者:酷酷是懒虫 | 2024-07-30 02:15:06
赞
踩
vue-skycons
天气查询是一个简单的HTTP接口,根据用户输入的adcode,查询目标区域当前/未来的天气情况,数据来源是中国气象局。
官方使用说明:
第一步,申请”web服务 API”密钥(Key);
第二步,拼接HTTP请求URL,第一步申请的Key需作为必填参数一同发送;
第三步,接收HTTP请求返回的数据(JSON或XML格式),解析数据。
如无特殊声明,接口的输入参数和输出数据编码全部统一为UTF-8。
详细流程步骤:
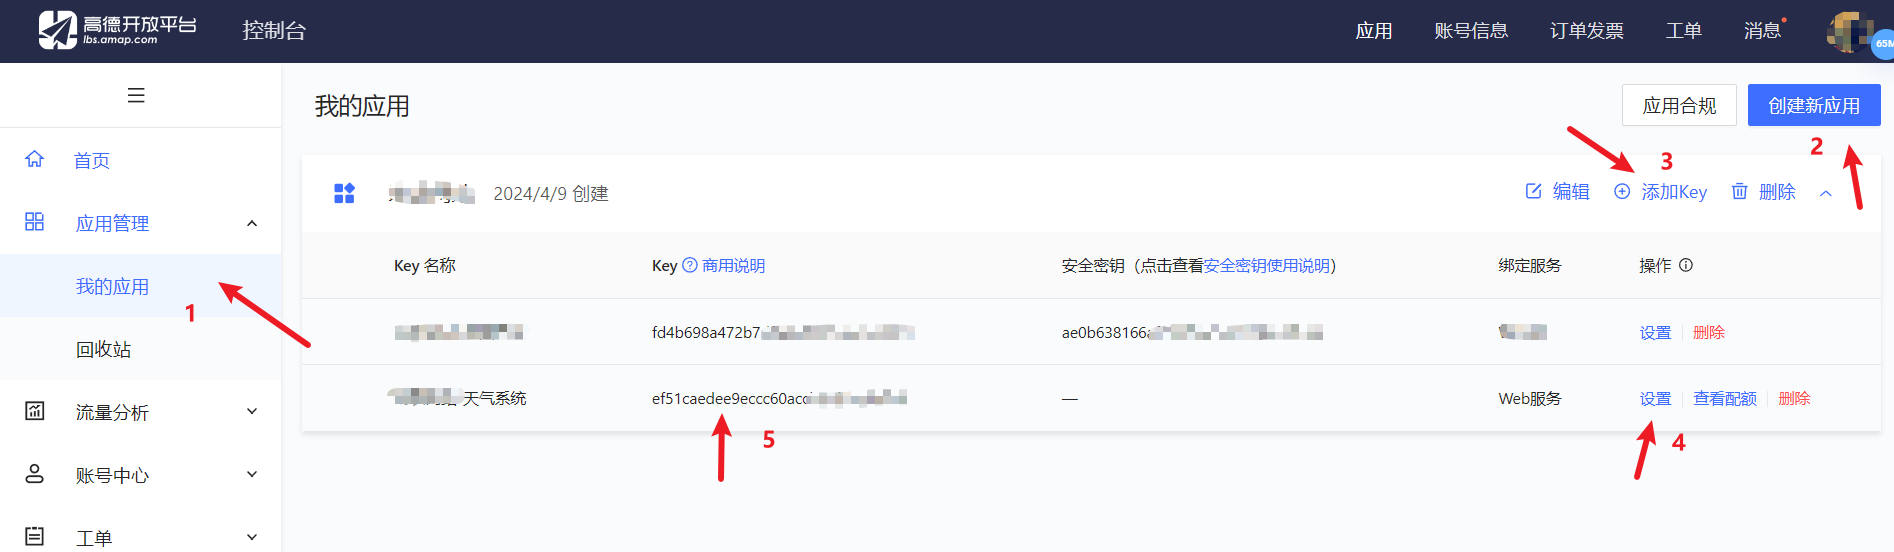
1. 先在高德天气控制台中创建出自己的应用,并选择Web服务,记住好key
2.在自己的vue项目页面中导入axios和Skycon,记得要先npm
- import axios from 'axios';
- import Skycon from 'vue-skycons';
3. 准备好数据
- export default {
- components: { Skycon },
- data() {
- return {
- key: 'ef51caedee9eccc60accb02fcb8*****', //自己的key,建议自己申请
- weather: {}, //用于存放天气相关的数据
- iconCondition: null, //icon值
- }
- },
4.mounted()方法自动加载
- mounted() {
- this.getLocationInfo();
- },
5.编写div
- <!--天气系统-->
- <div class="flex-center" style="margin-left: 650px; cursor: pointer;"
- @click="navTo('https://weather.cma.cn/web/weather/57516.html')">
-
- <div style="height: 60px; margin-top: -40px; margin-right: 6px;">
- <div style="height: 25px;">{{ formatDate(weather) }} </div>
- <div style="height: 25px; font-weight: bold; font-size: 20px; margin-left: 5px; color: Orange;">{{
- weather.city }}</div>
- </div>
- <skycon v-if="iconCondition" :condition="iconCondition" color="CornflowerBlue" size="40" />
- <div v-if="iconCondition" class="flex-center font-22" style="margin-left: 6px;">
- <span style="color: MediumTurquoise; margin-right: 6px;">{{ weather.temperature }}℃ </span>
- <span>{{ weather.weather }}</span>
- </div>
-
- </div>

6. 编写方法
- methods: {
- // 获取用户位置信息
- async getLocationInfo() {
- const params = {
- key: this.key,
- };
- const { data } = await axios.get('https://restapi.amap.com/v3/ip', { params });
- // data.adcode值为获取天气需要的city值
- this.getWeather(data.adcode);
- },
- // 获取天气详情
- async getWeather(adcode) {
- const params = {
- key: this.key,
- city: adcode,
- };
- const { data } = await axios.get(`https://restapi.amap.com/v3/weather/weatherInfo`, { params });
- this.weather = data.lives[0];
- this.iconCondition = this.setWeatherIcon(data.lives[0]?.weather);
- },
- //设置时间只显示年月日
- formatDate(weather) {
- const date = new Date(weather.reporttime);
- const year = date.getFullYear();
- const month = (1 + date.getMonth()).toString().padStart(2, '0');
- const day = date.getDate().toString().padStart(2, '0');
- return `${year}-${month}-${day}`;
- },
- // 设置icon
- setWeatherIcon(weather) {
- // 只处理了基础的天气,可以继续精细化处理
- if (weather === '晴') {
- return 'clear-day';
- } else if (weather.includes('云')) {
- return 'partly-cloudy-day';
- } else if (weather.includes('风')) {
- return 'wind';
- } else if (weather.includes('雨')) {
- return 'rain';
- } else if (weather.includes('雪')) {
- return 'snow';
- } else if (weather.includes('雾')) {
- return 'fog';
- }
- return 'cloudy';
- },
- }
到这里页面上就会显示出一个很好看的实时定位的天气小组件啦

声明:本文内容由网友自发贡献,不代表【wpsshop博客】立场,版权归原作者所有,本站不承担相应法律责任。如您发现有侵权的内容,请联系我们。转载请注明出处:https://www.wpsshop.cn/w/酷酷是懒虫/article/detail/901528
推荐阅读
相关标签

