
- 1BUUCTF做题Upload-Labs记录pass-01~pass-10_buuctf uploads-labs
- 2揭秘Kimi+:官方智能体提示词泄露_kimi 提示词泄露
- 3【论文笔记】Digital Twin in Industry: State-of-the-Art——Tao Fei
- 4IPC之 - C#中用Socket 实现进程间通信_c# ipc通讯
- 5Anaconda基本教程及常用命令(介绍、安装、基本操作、管理环境、管理包、conda和pip以及借助pqi换源)_anacondar的有关命令
- 6计算机网络网络层之层次化路由_层次化算力路由
- 7基于Hadoop与Spark大数据平台的个性化图书推荐系统搭建学习总结_基于spark的图书推荐系统实验报告
- 8dify-on-wechat中涉及企业微信几个函数解析_dify集成企业微信
- 9OpenSSL补丁安装(二)_openssl补丁怎么打
- 10【版本控制-TortoiseSVN】_svn删除分支
YOLOv8目标检测算法在地平线Bernoulli2架构BPU上高效部署参考(PTQ方案)——RDK X3(旭日X3派)30fps!
赞
踩
—— 以RDK X3为例,修改Head部分,8ms疾速Python后处理程序,30fps稳稳当当
本文在地平线对YOLOv8s的Backbone修改的基础上,提出一种在地平线Bernoulli2架构BPU上部署YOLOv8的后处理思路。使用640×640分辨率,80类别基于COCO数据集的预训练权重,让BPU加速Backbone的Neck的部分,推理时间约62ms,使用numpy优化的后处理部分,约8ms。并使用高效的Dataflow,充分利用X3的计算资源,Python多进程推理+Web推流的方式完成了一个30fps的实时目标检测demo。本文所有程序均开源。
1.前言
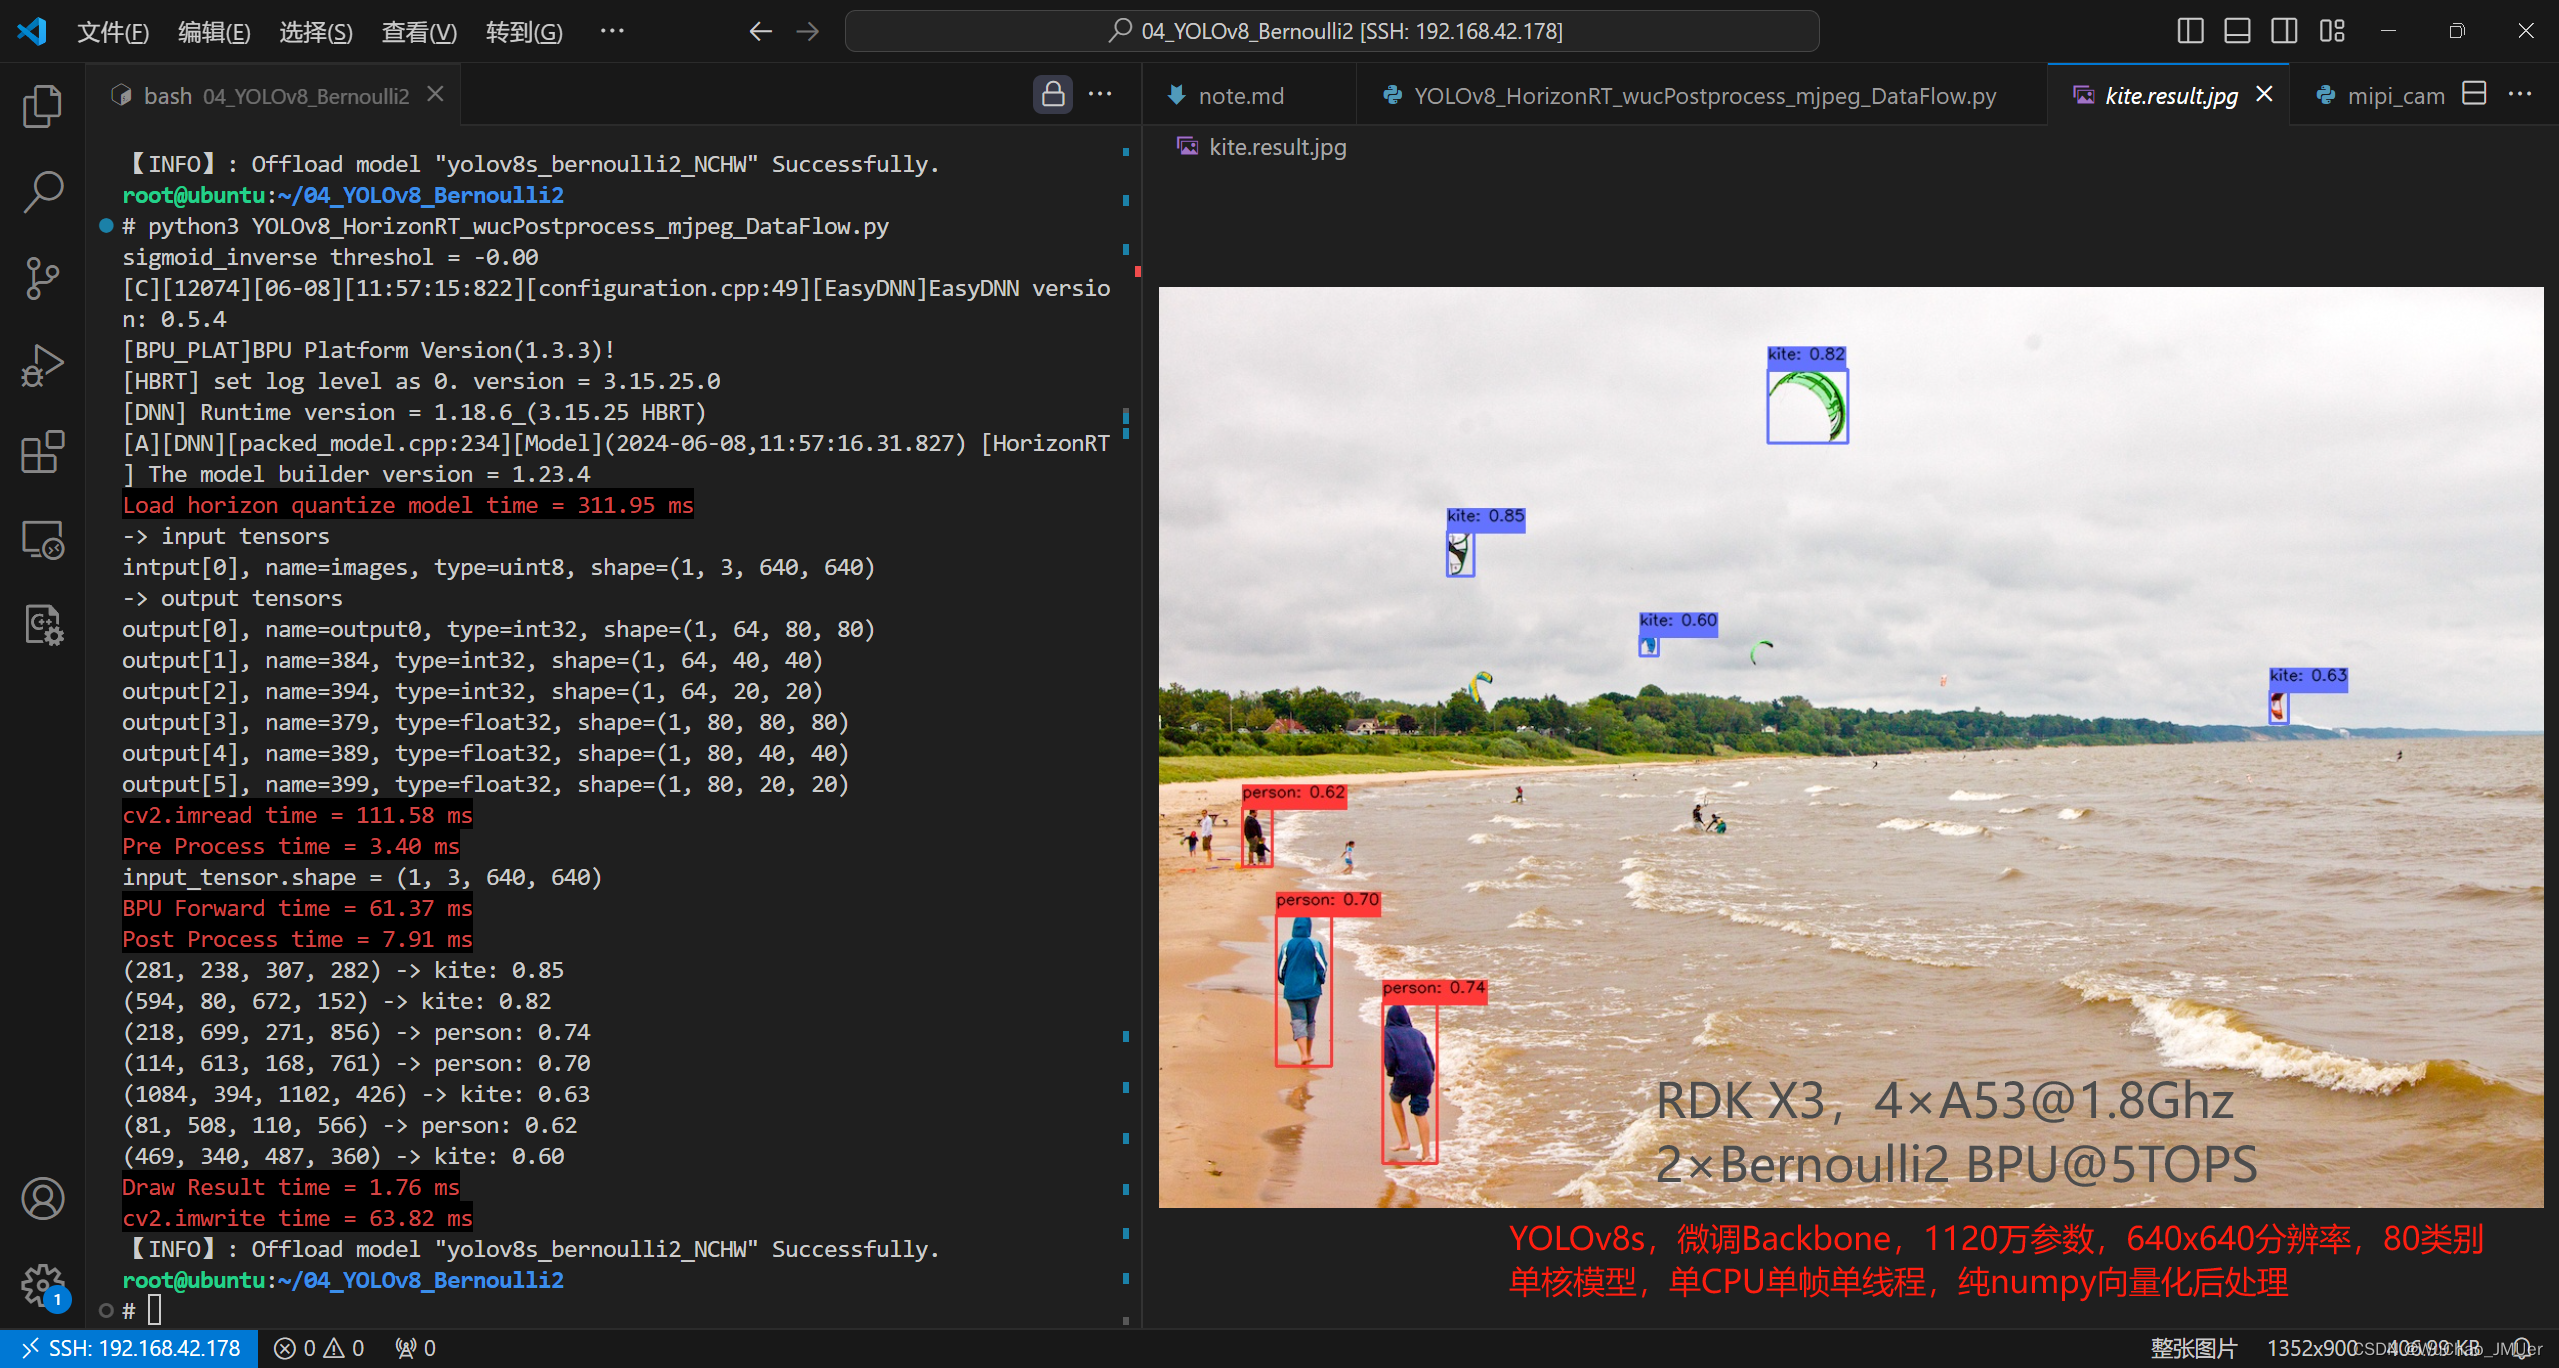
串行程序设计效果如下图所示,RDK X3,4×A53@1.8Ghz,2×Bernoulli2 BPU@5TOPS,YOLOv8s,微调Backbone,1120万参数,640x640分辨率,80类别,单核模型,单CPU单帧单线程,纯numpy向量化后处理。
利用OpenCV从本地读取一张图片,调整为NCHW的输入给bin模型,使用numpy后处理,最后绘制检测结果。
并行程序设计抛弃了OpenCV的BGR8的Mat,使用了nv12的数据作为关键数据,将bin模型配置为了nv12的输入,并且使用Python多进程来推理,利用TROS相关工具完成可视化,最终在X3上将YOLOv8跑到了30fps。
【RDK X3开发板 推理YOLOv8s,30fps,Python多进程】 https://www.bilibili.com/video/BV1rz421B7jL/?share_source=copy_web&vd_source=5b24829d168bb2d02896ddeeaa6a20d2
2.后处理优化
如下图所示,Backbone和Neck部分的算子均能较好的被Bernoulli2架构的BPU加速。
Head部分不能较好的被BPU加速,所以只能完全摘出来放到后处理中,用CPU实现。同时由于部署时只考虑前向传播,所以不需要对8400个Grid Cell的信息全部计算。主要的优化加速思路为先筛选,再计算,这个计算包括Classify部分的Sigmoid,Bounding Box部分的DFL计算(SoftMax回归 + Conv卷积求期望)和特征解码计算(dist2bbox, ltrb2xyxy)。
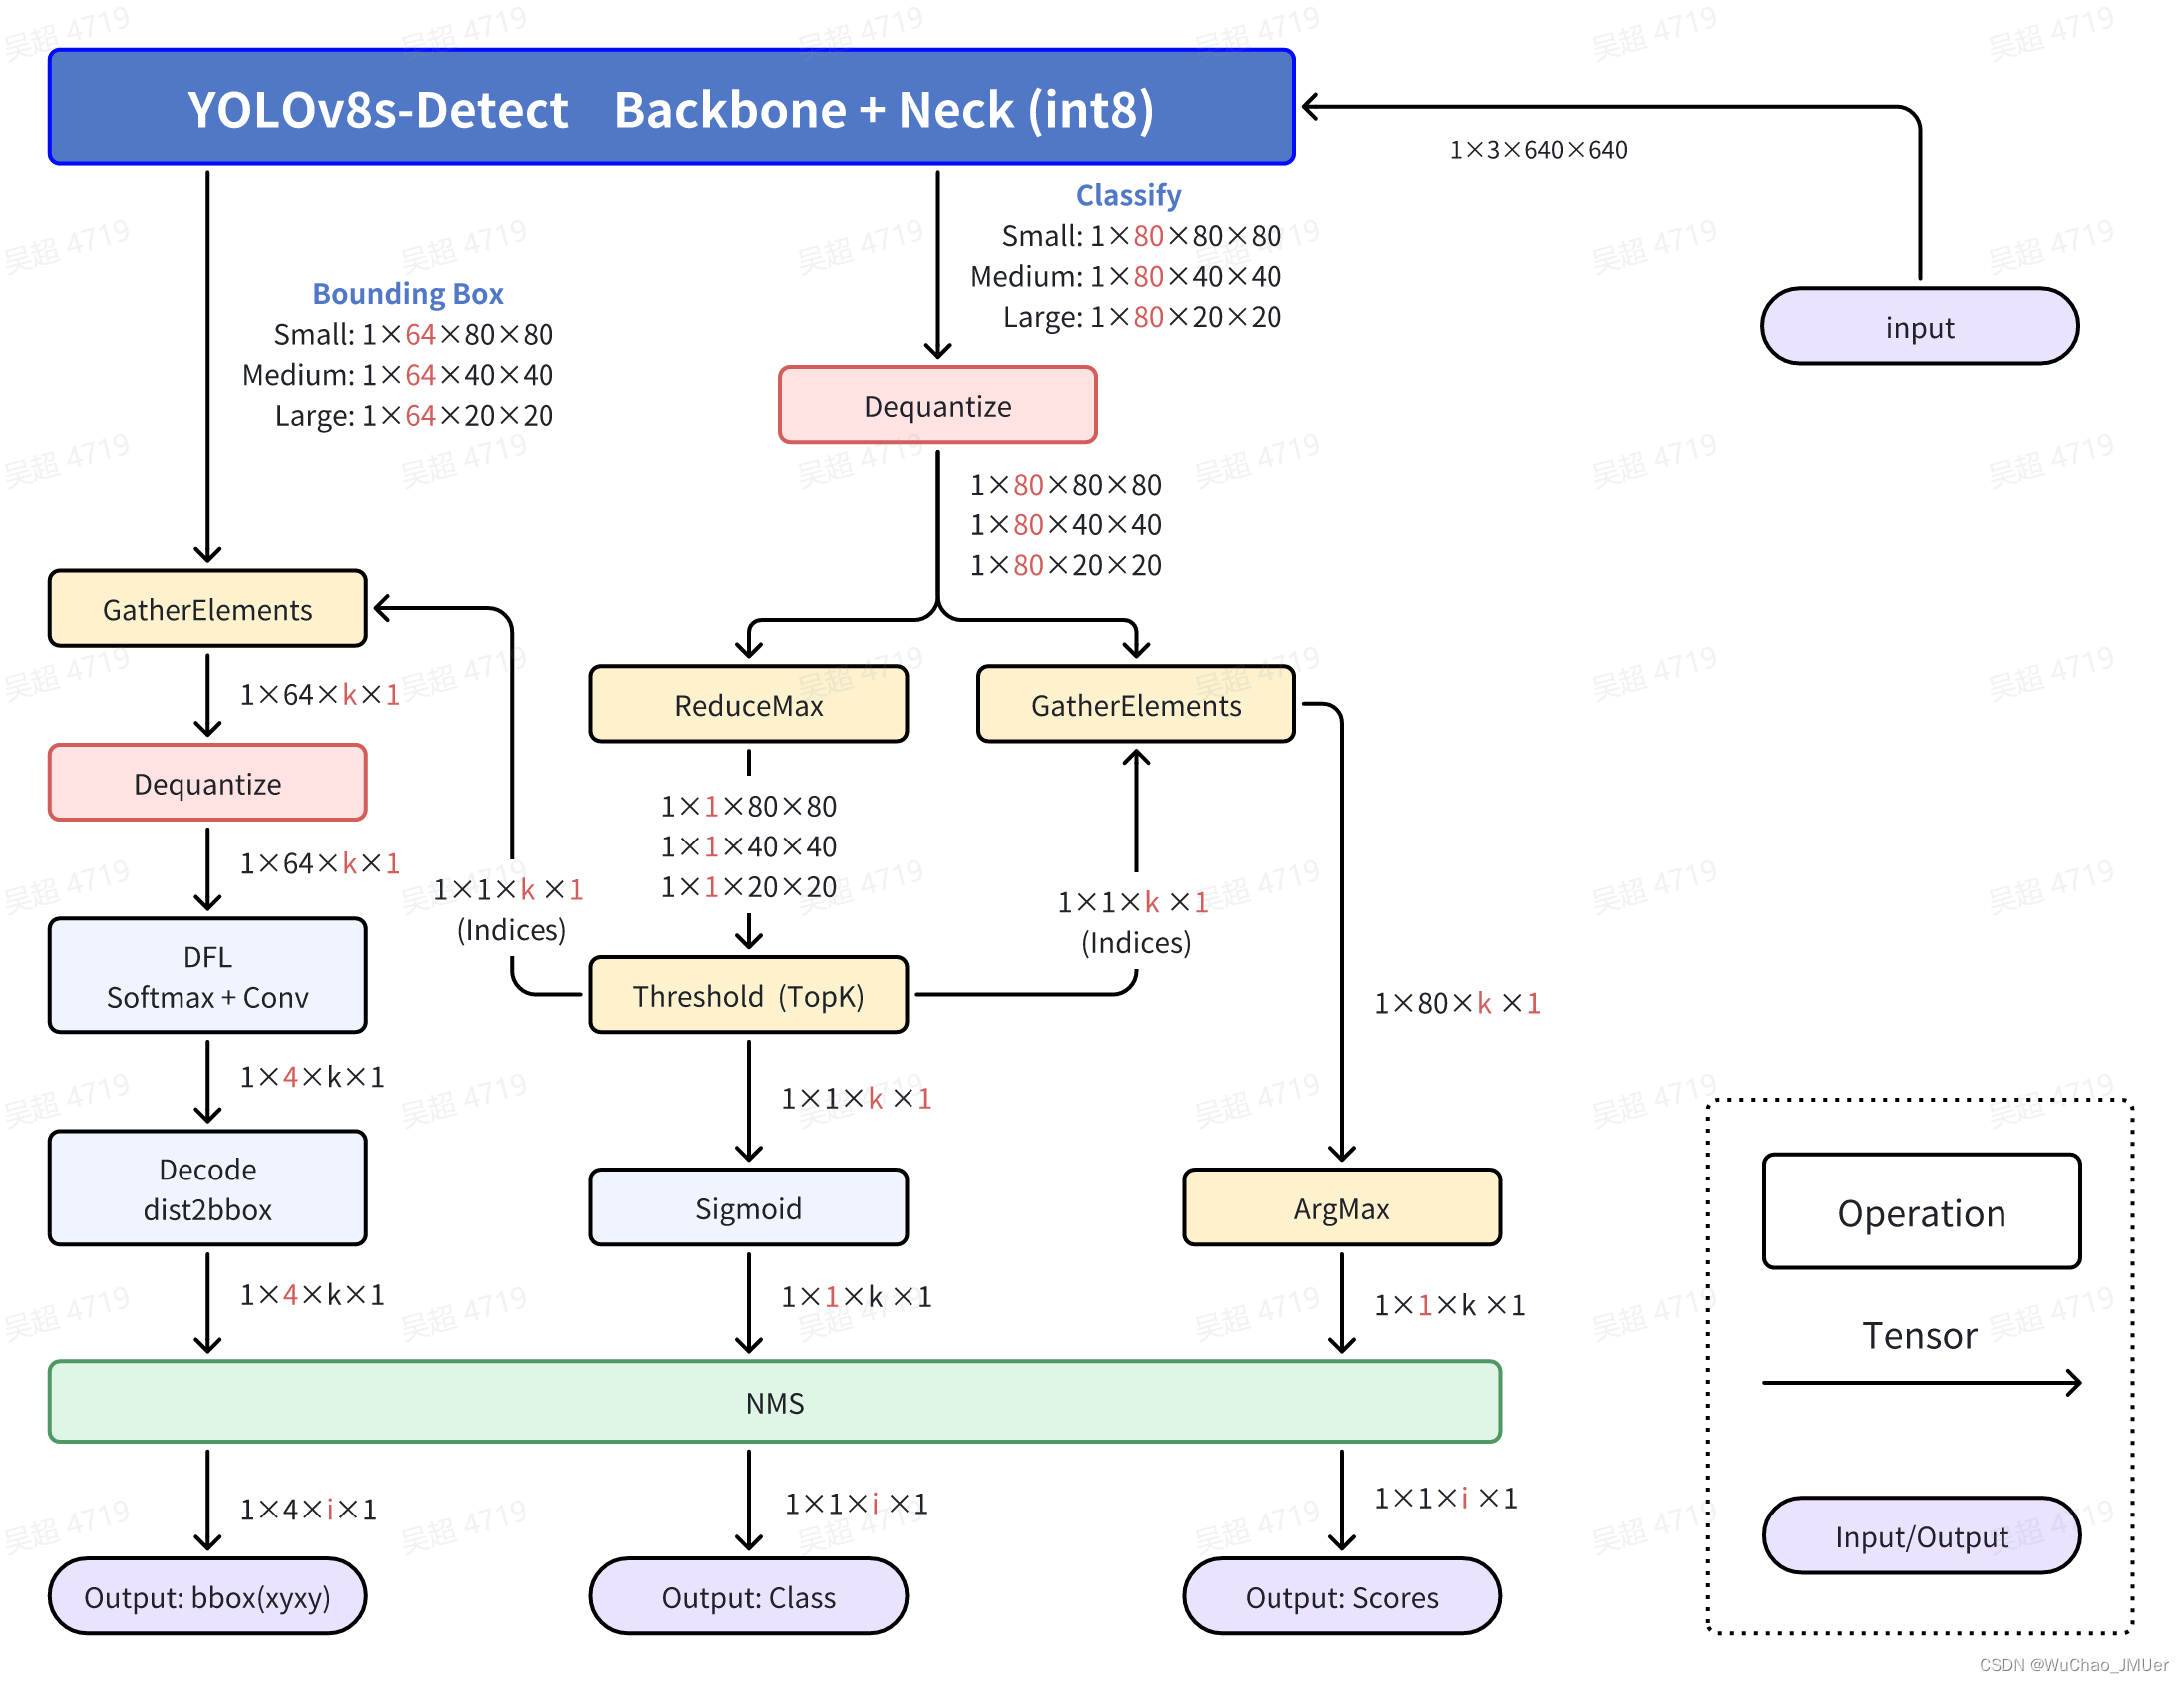
除NMS外的解释请参考作者YOLOv10的文章。
NMS操作:去掉重复识别的目标,得到最终的检测结果了,包括类别(id),分数(score)和位置(xyxy)。
3. 步骤参考
注:任何No such file or directory, No module named "xxx", command not found.等报错请仔细检查,请勿逐条复制运行,如果对修改过程不理解请前往地平线开发者社区从YOLOv5开始了解。
下载地平线优化过的Backbone的仓库,并参考YOLOv8官方文档,配置好环境
相关权重文件存储在HorizonRDK组织的model_zoo仓库,相关的修改步骤和性能、精度等数据请参考:【前沿算法】地平线适配 YOLOv8 -v1.0.0 (horizon.cc)
$ git clone https://github.com/HorizonRDK/model_zoo.git
- 1
卸载yolo相关的命令行命令,这样直接修改./ultralytics/ultralytics目录即可生效。
$ conda list | grep ultralytics
$ pip list | grep ultralytics # 或者
# 如果存在,则卸载
$ conda uninstall ultralytics
$ pip uninstall ultralytics   # 或者
- 1
- 2
- 3
- 4
- 5
修改Detect的输出头,直接将三个特征层的Bounding Box信息和Classify信息分开输出,一共6个输出头。
文件目录:./ultralytics/ultralytics/nn/modules/head.py,约第43行,Detect类的forward函数替换成以下内容:
def forward(self, x):
    bbox = []
    cls = []
    for i in range(self.nl):
        bbox.append(self.cv2[i](x[i]))
        cls.append(self.cv3[i](x[i]))
    return (bbox, cls)
- 1
- 2
- 3
- 4
- 5
- 6
- 7
运行以下Python脚本,如果有No module named onnxsim报错,安装一个即可
from ultralytics import YOLO
YOLO('yolov8s.pt').export(format='onnx', simplify=True, opset=11)
- 1
- 2
参考天工开物工具链手册和OE包的参考,对模型进行检查,所有算子均在BPU上,进行编译即可:
(bpu) $ hb_mapper checker --model-type onnx --march bayes --model yolov8s.onnx
(bpu) $ hb_mapper makertbin --model-type onnx --config ./yolov8s.yaml
- 1
- 2
如果您需要使用OpenCV,建议使用NCHW的输入,编译时的yaml配置文件
model_parameters:
  onnx_model: './yolov8s_bernoulli2.onnx'
  march: "bernoulli2"
  layer_out_dump: False
  working_dir: 'yolov8s_bernoulli2_NCHW'
  output_model_file_prefix: 'yolov8s_bernoulli2_NCHW'
  # remove_node_type: "Dequantize;"
input_parameters:
  input_name: ""
  input_type_rt: 'rgb'
  input_layout_rt: 'NCHW'
  input_type_train: 'rgb'
  input_layout_train: 'NCHW'
  norm_type: 'data_scale'
  scale_value: 0.003921568627451
calibration_parameters:
  cal_data_dir: './calibration_data_rgb_f32'
  cal_data_type: 'float32'
compiler_parameters:
  compile_mode: 'latency'
  debug: False
  optimize_level: 'O3'

- 1
- 2
- 3
- 4
- 5
- 6
- 7
- 8
- 9
- 10
- 11
- 12
- 13
- 14
- 15
- 16
- 17
- 18
- 19
- 20
- 21
- 22
如果您使用实时视频流检测,建议使用nv12为主的DataFlow设计,配合hobot_dnn或者本文的hobot_py_dnn使用,编译时的yaml配置文件
model_parameters:
  onnx_model: './yolov8s_bernoulli2.onnx'
  march: "bernoulli2"
  layer_out_dump: False
  working_dir: 'yolov8s_bernoulli2_nv12'
  output_model_file_prefix: 'yolov8s_bernoulli2_nv12'
input_parameters:
  input_name: ""
  input_type_rt: 'nv12'
  input_type_train: 'rgb'
  input_layout_train: 'NCHW'
  norm_type: 'data_scale'
  scale_value: 0.003921568627451
calibration_parameters:
  cal_data_dir: './calibration_data_rgb_f32'
  cal_data_type: 'float32'
compiler_parameters:
  compile_mode: 'latency'
  debug: False
  optimize_level: 'O3'
- 1
- 2
- 3
- 4
- 5
- 6
- 7
- 8
- 9
- 10
- 11
- 12
- 13
- 14
- 15
- 16
- 17
- 18
- 19
- 20
查看bbox信息的3个输出头的反量化节点名称
通过hb_mapper makerbin时的日志,看到大小为[1, 64, 80, 80], [1, 64, 40, 40], [1, 64, 20, 20]的三个输出的名称为output0, 384, 394。
ONNX IR version:          6
Opset version:            ['ai.onnx v11', 'horizon v1']
Producer:                 pytorch v2.2.0
Domain:                   None
Model version:            None
Graph input:
    images:               shape=[1, 3, 640, 640], dtype=FLOAT32
Graph output:
    output0:              shape=[1, 64, 80, 80], dtype=FLOAT32
    384:                  shape=[1, 64, 40, 40], dtype=FLOAT32
    394:                  shape=[1, 64, 20, 20], dtype=FLOAT32
    379:                  shape=[1, 80, 80, 80], dtype=FLOAT32
    389:                  shape=[1, 80, 40, 40], dtype=FLOAT32
    399:                  shape=[1, 80, 20, 20], dtype=FLOAT32
- 1
- 2
- 3
- 4
- 5
- 6
- 7
- 8
- 9
- 10
- 11
- 12
- 13
- 14
移除bbox信息的3个输出头的反量化节点
进入编译产物的目录
$ cd yolov8s_bernoulli2
- 1
查看可以被移除的反量化节点
$ hb_model_modifier yolov8s_bernoulli2_nv12.bin
$ hb_model_modifier yolov8s_bernoulli2_NCHW.bin
- 1
- 2
输出日志如下,其中output0_HzDequantize, 384_HzDequantize, 394_HzDequantize三个节点是我们要移除的。
2024-06-08 06:53:54,548 INFO log will be stored in /ws/yolov8s_bernoulli2/hb_model_modifier.log
2024-06-08 06:53:54,566 INFO Nodes that can be deleted: ['output0_HzDequantize', '379_HzDequantize', '384_HzDequantize', '389_HzDequantize', '394_HzDequantize', '399_HzDequantize']
- 1
- 2
使用以下命令移除上述三个反量化节点,注意,导出时这些名称可能不同,请仔细确认。
$ hb_model_modifier yolov8s_bernoulli2_nv12.bin -r output0_HzDequantize -r 384_HzDequantize -r 394_HzDequantize
$ hb_model_modifier yolov8s_bernoulli2_NCHW.bin -r output0_HzDequantize -r 384_HzDequantize -r 394_HzDequantize
- 1
- 2
板端性能测试
利用scp等工具将bin模型拷贝到板端,使用以下命令测试性能。大约单线程能跑到17fps,占用BPU一个核到100%,双线程34fps,双核BPU占用到200%,推理的部分能超过30fps,不构成瓶颈,接下来着重优化后处理。
hrt_model_exec perf --model_file yolov8s_bernoulli2.bin \
                      --model_name="" \
                      --core_id=0 \
                      --frame_count=200 \
                      --perf_time=0 \
                      --thread_num=2 \
                      --profile_path="."
- 1
- 2
- 3
- 4
- 5
- 6
- 7
4. 串行程序设计
使用以下程序时记得修改图片和模型文件路径,缺包少库请自行pip install安装。注意,此时使用的是NCHW输入的模型。
# Copyright (c) 2024,WuChao D-Robotics.
#
# Licensed under the Apache License, Version 2.0 (the "License");
# you may not use this file except in compliance with the License.
# You may obtain a copy of the License at
#
#     http://www.apache.org/licenses/LICENSE-2.0
#
# Unless required by applicable law or agreed to in writing, software
# distributed under the License is distributed on an "AS IS" BASIS,
# WITHOUT WARRANTIES OR CONDITIONS OF ANY KIND, either express or implied.
# See the License for the specific language governing permissions and
# limitations under the License.

import cv2
import numpy as np
from scipy.special import softmax
from time import time
from hobot_dnn import pyeasy_dnn as dnn

img_path = "kite.jpg"
result_save_path = "kite.result.jpg"
quantize_model_path = "./yolov8s_bernoulli2_NCHW_modified.bin"
input_image_size = 640
conf=0.5
iou=0.5
conf_inverse = -np.log(1/conf - 1)
print("sigmoid_inverse threshol = %.2f"%conf_inverse)

# 一些常量或函数
coco_names = [
    "person", "bicycle", "car", "motorcycle", "airplane",
    "bus", "train", "truck", "boat", "traffic light",
    "fire hydrant", "stop sign", "parking meter", "bench", "bird",
    "cat", "dog", "horse", "sheep", "cow",
    "elephant", "bear", "zebra", "giraffe", "backpack",
    "umbrella", "handbag", "tie", "suitcase", "frisbee",
    "skis", "snowboard", "sports ball", "kite", "baseball bat",
    "baseball glove", "skateboard", "surfboard", "tennis racket", "bottle",
    "wine glass", "cup", "fork", "knife", "spoon",
    "bowl", "banana", "apple", "sandwich", "orange",
    "broccoli", "carrot", "hot dog", "pizza", "donut",
    "cake", "chair", "couch", "potted plant", "bed",
    "dining table", "toilet", "tv", "laptop", "mouse",
    "remote", "keyboard", "cell phone", "microwave", "oven",
    "toaster", "sink", "refrigerator", "book", "clock",
    "vase", "scissors", "teddy bear", "hair drier", "toothbrush"
    ]

yolo_colors = [
    (56, 56, 255), (151, 157, 255), (31, 112, 255), (29, 178, 255),
    (49, 210, 207), (10, 249, 72), (23, 204, 146), (134, 219, 61),
    (52, 147, 26), (187, 212, 0), (168, 153, 44), (255, 194, 0),
    (147, 69, 52), (255, 115, 100), (236, 24, 0), (255, 56, 132),
    (133, 0, 82), (255, 56, 203), (200, 149, 255), (199, 55, 255)]

def draw_detection(img, box, score, class_id):
    x1, y1, x2, y2 = box
    color = yolo_colors[class_id%20]
    cv2.rectangle(img, (x1, y1), (x2, y2), color, 2)
    label = f"{coco_names[class_id]}: {score:.2f}"
    (label_width, label_height), _ = cv2.getTextSize(label, cv2.FONT_HERSHEY_SIMPLEX, 0.5, 1)
    label_x = x1
    label_y = y1 - 10 if y1 - 10 > label_height else y1 + 10
    # Draw a filled rectangle as the background for the label text
    cv2.rectangle(
        img, (label_x, label_y - label_height), (label_x + label_width, label_y + label_height), color, cv2.FILLED
    )
    # Draw the label text on the image
    cv2.putText(img, label, (label_x, label_y), cv2.FONT_HERSHEY_SIMPLEX, 0.5, (0, 0, 0), 1, cv2.LINE_AA)

# 读取horizon_quantize模型, 并打印这个horizon_quantize模型的输入输出Tensor信息
begin_time = time()
quantize_model = dnn.load(quantize_model_path)
print("\033[0;31;40m" + "Load horizon quantize model time = %.2f ms"%(1000*(time() - begin_time)) + "\033[0m")

print("-> input tensors")
for i, quantize_input in enumerate(quantize_model[0].inputs):
    print(f"intput[{i}], name={quantize_input.name}, type={quantize_input.properties.dtype}, shape={quantize_input.properties.shape}")

print("-> output tensors")
for i, quantize_input in enumerate(quantize_model[0].outputs):
    print(f"output[{i}], name={quantize_input.name}, type={quantize_input.properties.dtype}, shape={quantize_input.properties.shape}")

# 准备一些常量
# 提前将反量化系数准备好
s_bboxes_scale = quantize_model[0].outputs[0].properties.scale_data[:,np.newaxis]
m_bboxes_scale = quantize_model[0].outputs[1].properties.scale_data[:,np.newaxis]
l_bboxes_scale = quantize_model[0].outputs[2].properties.scale_data[:,np.newaxis]

# DFL求期望的系数, 只需要生成一次
weights_static = np.array([i for i in range(16)]).astype(np.float32)[np.newaxis, :, np.newaxis]

# 提前准备一些索引, 只需要生成一次
static_index = np.arange(8400)

# anchors, 只需要生成一次
s_anchor = np.stack([np.tile(np.linspace(0.5, 79.5, 80), reps=80),
                     np.repeat(np.arange(0.5, 80.5, 1), 80)], axis=0)
m_anchor = np.stack([np.tile(np.linspace(0.5, 39.5, 40), reps=40),
                     np.repeat(np.arange(0.5, 40.5, 1), 40)], axis=0)
l_anchor = np.stack([np.tile(np.linspace(0.5, 19.5, 20), reps=20),
                     np.repeat(np.arange(0.5, 20.5, 1), 20)], axis=0)

# 读取图片并利用resize的方式进行前处理
begin_time = time()
img = cv2.imread(img_path)
print("\033[0;31;40m" + "cv2.imread time = %.2f ms"%(1000*(time() - begin_time)) + "\033[0m")


begin_time = time()
input_tensor = cv2.resize(img, (input_image_size, input_image_size), interpolation=cv2.INTER_NEAREST)
input_tensor = cv2.cvtColor(input_tensor, cv2.COLOR_BGR2RGB)
# input_tensor = np.array(input_tensor) / 255.0
input_tensor = np.transpose(input_tensor, (2, 0, 1))
input_tensor = np.expand_dims(input_tensor, axis=0)# .astype(np.float32)  # NCHW
print("\033[0;31;40m" + "Pre Process time = %.2f ms"%(1000*(time() - begin_time)) + "\033[0m")
print(f"{input_tensor.shape = }")

img_h, img_w = img.shape[0:2]
y_scale, x_scale = img_h/input_image_size, img_w/input_image_size

# 推理
begin_time = time()
quantize_outputs = quantize_model[0].forward(input_tensor)
print("\033[0;31;40m" + "BPU Forward time = %.2f ms"%(1000*(time() - begin_time)) + "\033[0m")


begin_time = time()

# bbox: 转为numpy, reshape
s_bboxes = quantize_outputs[0].buffer.reshape(64, -1) # (64,6400)
m_bboxes = quantize_outputs[1].buffer.reshape(64, -1) # (64,1600)
l_bboxes = quantize_outputs[2].buffer.reshape(64, -1) # (64,400)
# classify: 转为numpy, reshape
s_clses = quantize_outputs[3].buffer.reshape(80, -1)
m_clses = quantize_outputs[4].buffer.reshape(80, -1)
l_clses = quantize_outputs[5].buffer.reshape(80, -1)

# classify: 利用numpy向量化操作完成阈值筛选(优化版 2.0)
s_max_scores = np.max(s_clses, axis=0)
#s_valid_indices = np.where(s_max_scores >= conf_inverse)
s_valid_indices = np.flatnonzero(s_max_scores >= conf_inverse)  # 得到大于阈值分数的索引,此时为小数字
s_ids = np.argmax(s_clses[:,s_valid_indices], axis=0)
s_scores = s_max_scores[s_valid_indices]

m_max_scores = np.max(m_clses, axis=0)
#m_valid_indices = np.where(m_max_scores >= conf_inverse)
m_valid_indices = np.flatnonzero(m_max_scores >= conf_inverse)  # 得到大于阈值分数的索引,此时为小数字
m_ids = np.argmax(m_clses[:,m_valid_indices], axis=0)
m_scores = m_max_scores[m_valid_indices]

l_max_scores = np.max(l_clses, axis=0)
#l_valid_indices = np.where(l_max_scores >= conf_inverse)
l_valid_indices = np.flatnonzero(l_max_scores >= conf_inverse)  # 得到大于阈值分数的索引,此时为小数字
l_ids = np.argmax(l_clses[:,l_valid_indices], axis=0)
l_scores = l_max_scores[l_valid_indices]

# 3个Classify分类分支:Sigmoid计算
s_scores = 1 / (1 + np.exp(-s_scores))
m_scores = 1 / (1 + np.exp(-m_scores))
l_scores = 1 / (1 + np.exp(-l_scores))

# 3个Bounding Box分支:反量化
s_bboxes_float32 = s_bboxes[:,s_valid_indices].astype(np.float32) * s_bboxes_scale
m_bboxes_float32 = m_bboxes[:,m_valid_indices].astype(np.float32) * m_bboxes_scale
l_bboxes_float32 = l_bboxes[:,l_valid_indices].astype(np.float32) * l_bboxes_scale

# 3个Bounding Box分支:dist2bbox(ltrb2xyxy)
s_ltrb_indices = np.sum(softmax(s_bboxes_float32.reshape(4, 16,-1), axis=1) * weights_static, axis=1)
s_anchor_indices = s_anchor[:,s_valid_indices]
s_x1y1 = s_anchor_indices - s_ltrb_indices[0:2]
s_x2y2 = s_anchor_indices + s_ltrb_indices[2:4]
s_dbboxes = np.vstack([s_x1y1, s_x2y2]).transpose(1,0)*8

m_ltrb_indices = np.sum(softmax(m_bboxes_float32.reshape(4, 16,-1), axis=1) * weights_static, axis=1)
m_anchor_indices = m_anchor[:,m_valid_indices]
m_x1y1 = m_anchor_indices - m_ltrb_indices[0:2]
m_x2y2 = m_anchor_indices + m_ltrb_indices[2:4]
m_dbboxes = np.vstack([m_x1y1, m_x2y2]).transpose(1,0)*16

l_ltrb_indices = np.sum(softmax(l_bboxes_float32.reshape(4, 16,-1), axis=1) * weights_static, axis=1)
l_anchor_indices = l_anchor[:,l_valid_indices]
l_x1y1 = l_anchor_indices - l_ltrb_indices[0:2]
l_x2y2 = l_anchor_indices + l_ltrb_indices[2:4]
l_dbboxes = np.vstack([l_x1y1, l_x2y2]).transpose(1,0)*32


# 大中小特征层阈值筛选结果拼接
dbboxes = np.concatenate((s_dbboxes, m_dbboxes, l_dbboxes), axis=0)
scores = np.concatenate((s_scores, m_scores, l_scores), axis=0)
ids = np.concatenate((s_ids, m_ids, l_ids), axis=0)

# nms
indices = cv2.dnn.NMSBoxes(dbboxes, scores, conf, iou)
print("\033[0;31;40m" + "Post Process time = %.2f ms"%(1000*(time() - begin_time)) + "\033[0m")


# 绘制
begin_time = time()
for index in indices:
    score = scores[index]
    class_id = ids[index]
    x1, y1, x2, y2 = dbboxes[index]
    x1, y1, x2, y2 = int(x1*x_scale), int(y1*y_scale), int(x2*x_scale), int(y2*y_scale)
    print("(%d, %d, %d, %d) -> %s: %.2f"%(x1,y1,x2,y2, coco_names[class_id], score))
    draw_detection(img, (x1, y1, x2, y2), score, class_id)
print("\033[0;31;40m" + "Draw Result time = %.2f ms"%(1000*(time() - begin_time)) + "\033[0m")


# 保存图片到本地
begin_time = time()
cv2.imwrite(result_save_path, img)
print("\033[0;31;40m" + "cv2.imwrite time = %.2f ms"%(1000*(time() - begin_time)) + "\033[0m")
- 1
- 2
- 3
- 4
- 5
- 6
- 7
- 8
- 9
- 10
- 11
- 12
- 13
- 14
- 15
- 16
- 17
- 18
- 19
- 20
- 21
- 22
- 23
- 24
- 25
- 26
- 27
- 28
- 29
- 30
- 31
- 32
- 33
- 34
- 35
- 36
- 37
- 38
- 39
- 40
- 41
- 42
- 43
- 44
- 45
- 46
- 47
- 48
- 49
- 50
- 51
- 52
- 53
- 54
- 55
- 56
- 57
- 58
- 59
- 60
- 61
- 62
- 63
- 64
- 65
- 66
- 67
- 68
- 69
- 70
- 71
- 72
- 73
- 74
- 75
- 76
- 77
- 78
- 79
- 80
- 81
- 82
- 83
- 84
- 85
- 86
- 87
- 88
- 89
- 90
- 91
- 92
- 93
- 94
- 95
- 96
- 97
- 98
- 99
- 100
- 101
- 102
- 103
- 104
- 105
- 106
- 107
- 108
- 109
- 110
- 111
- 112
- 113
- 114
- 115
- 116
- 117
- 118
- 119
- 120
- 121
- 122
- 123
- 124
- 125
- 126
- 127
- 128
- 129
- 130
- 131
- 132
- 133
- 134
- 135
- 136
- 137
- 138
- 139
- 140
- 141
- 142
- 143
- 144
- 145
- 146
- 147
- 148
- 149
- 150
- 151
- 152
- 153
- 154
- 155
- 156
- 157
- 158
- 159
- 160
- 161
- 162
- 163
- 164
- 165
- 166
- 167
- 168
- 169
- 170
- 171
- 172
- 173
- 174
- 175
- 176
- 177
- 178
- 179
- 180
- 181
- 182
- 183
- 184
- 185
- 186
- 187
- 188
- 189
- 190
- 191
- 192
- 193
- 194
- 195
- 196
- 197
- 198
- 199
- 200
- 201
- 202
- 203
- 204
- 205
- 206
- 207
- 208
- 209
- 210
- 211
- 212
- 213
- 214
5.并行程序设计
并行程序采用了如下图所示的DataFlow,利用X3的硬件解码器和VPS来完成图像前处理的部分操作,抛弃了OpenCV。如果您要使用OpenCV的思路来完成,可以参考YOLOv10的帖子,注意,这样只能跑25fps左右,且CPU已经完全被占满。当然,目前实现的30fps的效果只支持USB摄像头以640×480的分辨率来进行。
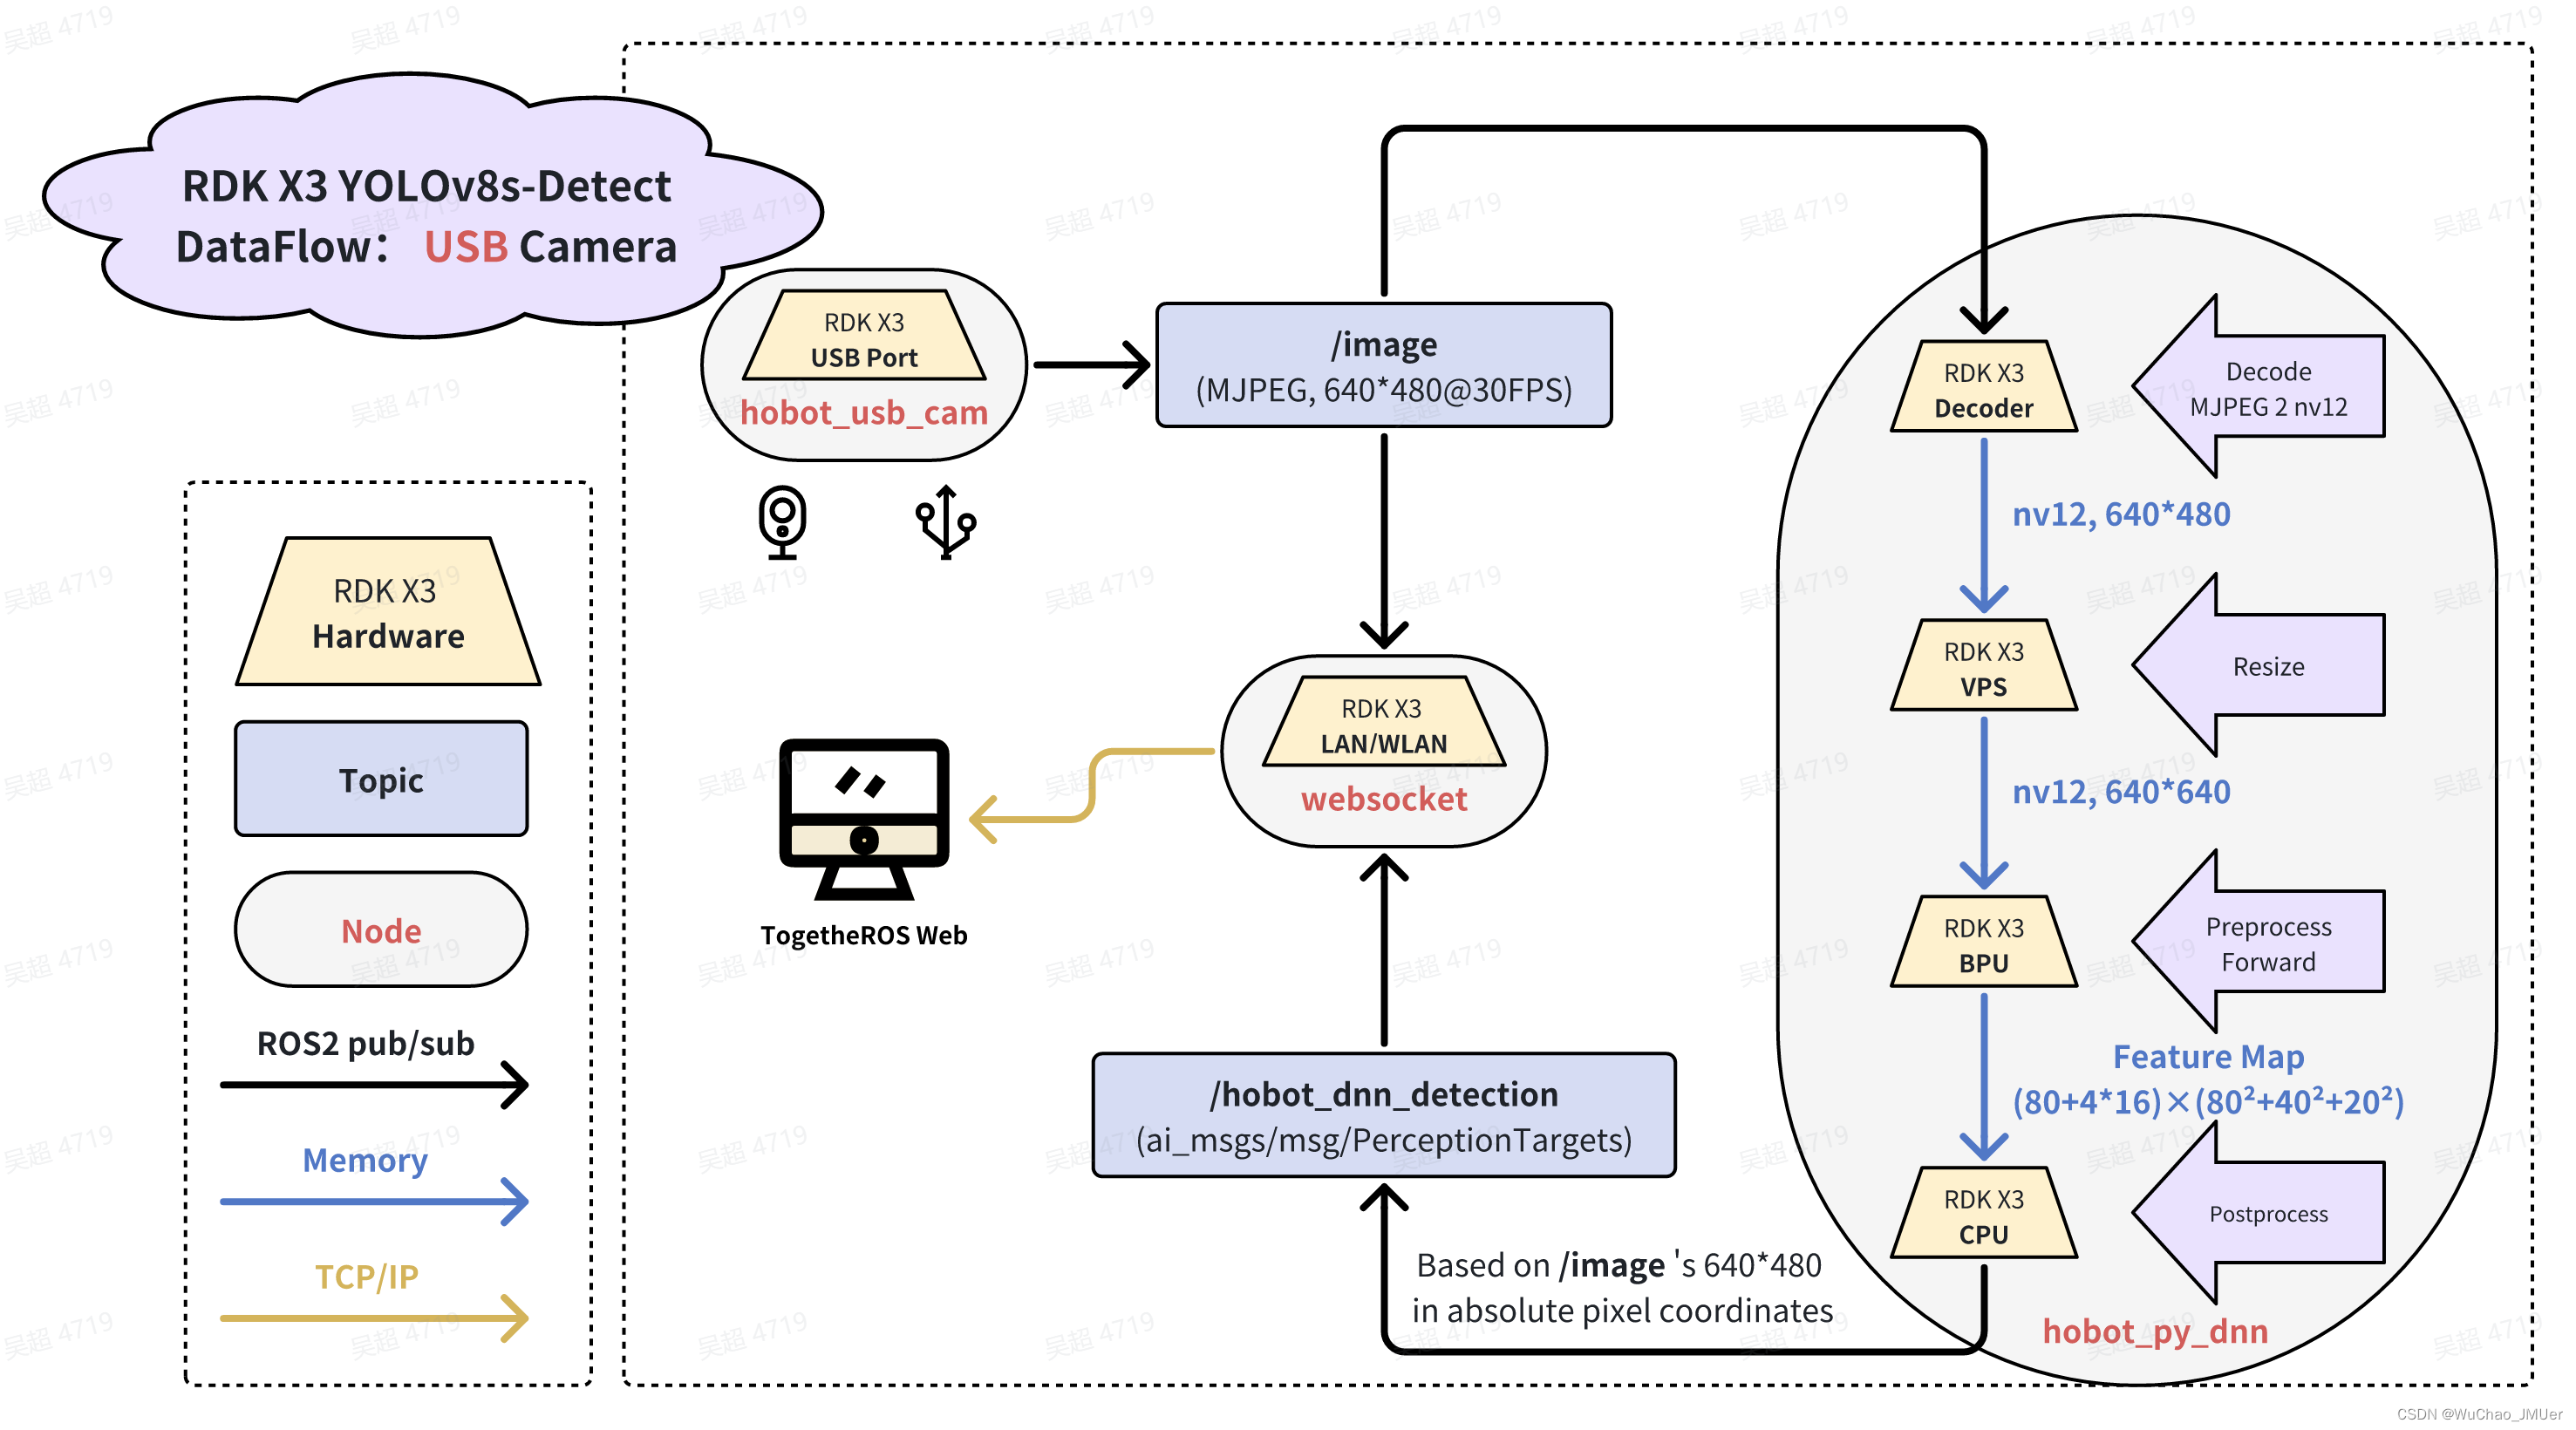
由于Python的V4L2不是很好装,OpenCV又会强制转BGR8,无法获得MJPEG数据,所以采用了一种折中的思路,使用TROS的hobot_usb_cam节点来发布MJPEG数据。新开一个终端,运行一下命令:
source /opt/tros/setup.bash
ros2 run hobot_usb_cam hobot_usb_cam \
--ros-args --log-level warn \
--ros-args -p zero_copy:=False \
--ros-args -p io_method:=mmap \
--ros-args -p video_device:=/dev/video8 \
--ros-args -p pixel_format:=mjpeg \
--ros-args -p image_height:=480 \
--ros-args -p image_width:=640
- 1
- 2
- 3
- 4
- 5
- 6
- 7
- 8
- 9
然后运行以下Python脚本,这实际上是一个没有编译的ROS2 Node,我给它暂时取名为hobot_py_dnn,注意,此时使用的是nv12输入的模型。
source /opt/tros/setup.bash
python3 yolov8_detect_x3_usb_mjpeg.py
- 1
- 2
# Copyright (c) 2024,WuChao D-Robotics.
#
# Licensed under the Apache License, Version 2.0 (the "License");
# you may not use this file except in compliance with the License.
# You may obtain a copy of the License at
#
#     http://www.apache.org/licenses/LICENSE-2.0
#
# Unless required by applicable law or agreed to in writing, software
# distributed under the License is distributed on an "AS IS" BASIS,
# WITHOUT WARRANTIES OR CONDITIONS OF ANY KIND, either express or implied.
# See the License for the specific language governing permissions and
# limitations under the License.

# ros2
import rclpy
from rclpy.node import Node

# tros
from ai_msgs.msg import PerceptionTargets, Target, Roi, Perf
from sensor_msgs.msg import CompressedImage

# hobot
from hobot_vio.libsrcampy import Camera, Decoder, bind
from hobot_dnn import pyeasy_dnn as dnn

# sci
from scipy.special import softmax
from multiprocessing import Process, Manager
from time import time, sleep
import numpy as np
import cv2, os

class YOLOv8_detect_x3_usb_mjpeg(Node):
    def __init__(self, name):
        super().__init__(name)
        # configs
        self.process_num = 5 # 推理进程数
        self.bin_input_siz = 640    # bin模型的宽高
        self.usb_width, self.usb_height = 640, 480  # 摄像头节点的宽高,写死了
        y_scale, x_scale = self.usb_height/self.bin_input_siz, self.usb_width/self.bin_input_siz
        self.bin_path = "/root/04_YOLOv8_Bernoulli2/yolov8s_bernoulli2_nv12_modified.bin"
        self.conf = 0.25
        self.iou = 0.45
        self.decoder_chn = 0   # MJPEG 转 nv12 硬件解码器的通道, 0~31
        self.vps_pipe_id = 0   # VPS 的通道, 0~7
        # ros2
        self.jpeg_sub = self.create_subscription(CompressedImage, 'image', self.jpeg_sub_callback, 10)
        self.result_pub = self.create_publisher(PerceptionTargets, 'yolov8_results', 10)

        # decoder(mjpeg 2 nv12)
        self.decoder = Decoder()
        ret = self.decoder.decode("", self.decoder_chn, 3, self.usb_width, self.usb_height)# 3 -> mjpeg
        if ret[0] == 0:
            self.get_logger().info(f"Decoder Open Success, chn={self.decoder_chn}, (w,h)=({self.usb_width}, {self.usb_height})")
        else:
            self.get_logger().error("Decoder Open Failed!")
            exit()

        # vps(resize)
        self.vps1 = Camera()
        self.vps2 = Camera()
        ret1 = self.vps1.open_vps(0, 1, 640, 480, 672, 672)
        ret2 = self.vps2.open_vps(1, 1, 672, 672, 640, 640)
        # ret = self.vps.open_vps(self.vps_pipe_id, 1, 736, self.usb_width, self.bin_input_siz, self.bin_input_siz)
        if ret1 == 0 and ret2 == 0:
            self.get_logger().info(f"vps Open Success")#, pipe_id={self.decoder_chn}, in: (w,h)=({self.usb_width}, {self.usb_height}), out: (w,h)=({self.bin_input_siz}, {self.bin_input_siz})")
        else:
            self.get_logger().error("vps Open Failed!")
            exit()

        # bind
        bind(self.decoder, self.vps1)

        # MultiProcess
        manager = Manager()
        self.task_queue = manager.Queue(30)
        self.save_queue = manager.Queue(30)

        is_running = manager.Value("i", True)
        self.frame_counter = manager.Value("i", 0)
        self.frame_infer_time = manager.Value("i", 0)
        self.frame_postProcess_time = manager.Value("i", 0)
        self.smart_fps = manager.Value("f", 0.0)
        inference_Processes = []
        for _ in range(self.process_num):
            p = Process(target=self.inference,
                        args=(_,
                              self.task_queue,
                              self.save_queue,
                              0.005,
                              self.frame_counter,
                              self.frame_infer_time,
                              self.frame_postProcess_time,
                              is_running,
                              self.bin_path,
                              self.bin_input_siz,
                              self.conf,
                              self.iou,
                              y_scale,
                              x_scale))
            inference_Processes.append(p)
            p.start()
        # datas
        self.sub_id = 0
        self.sub_counter = manager.Value("i", 0)
        self.sub_fps = manager.Value("f", 0.0)
        self.begin_time = time()
        self.create_timer(1, self.logger_callback) # 每间隔1秒发布信息

        # pub
        self.create_timer(0.001, self.pub_result)

    def pub_result(self):
        if not self.save_queue.empty():
            result = self.save_queue.get()
            result.fps = int(self.smart_fps.value)
            self.result_pub.publish(result)

    def logger_callback(self):
        delta_time = time() - self.begin_time
        # sub img fps
        sub_fps = self.sub_counter.value/delta_time
        self.sub_counter.value = 0
        # smart fps
        f_c = self.frame_counter.value
        f_c = 1 if f_c==0 else f_c
        self.frame_counter.value = 0
        self.smart_fps.value = f_c/delta_time
        # mean: infer time
        m_i_t = self.frame_infer_time.value/f_c
        self.frame_infer_time.value = 0
        # mean: postProcess time
        m_p_t = self.frame_postProcess_time.value/f_c
        self.frame_postProcess_time.value = 0
        # log
        self.get_logger().info("sub/smart: %.1f/\033[1;31m%.1f\033[0m FPS, task/result queue: %d/%d, infer/post: %d/%d ms."%(sub_fps, self.smart_fps.value,self.task_queue.qsize(),self.save_queue.qsize(),m_i_t,m_p_t))
        self.begin_time = time()


    def jpeg_sub_callback(self, msg):
        if not self.task_queue.full():
            begin_time = time()
            self.decoder.set_img(msg.data.tobytes(), self.decoder_chn, 0)
            self.vps2.set_img(self.vps1.get_img())
            self.task_queue.put([self.vps2.get_img(), msg.header.stamp.sec, msg.header.stamp.nanosec, self.sub_id])
            self.sub_counter.value += 1
            self.sub_id += 1
            self.get_logger().debug("mjpeg 2 nv12 time = %.2f ms"%(1000*(time() - begin_time)))

    def inference(self,
                  i,
                  task_queue,
                  save_queue,
                  delay_time,
                  frame_counter,
                  i_t,
                  p_t,
                  is_running,
                  bin_path,
                  bin_input_siz,
                  conf,
                  iou,
                  y_scale,
                  x_scale
                  ):
        self.get_logger().info(f"Inference Process {i} started with pid {os.getpid()}")

        core = 1
        model = YOLOv8_Detect(bin_path, conf, iou, bin_input_siz)
        while is_running.value:
            if not task_queue.empty():
                # get img from queue
                input_data = task_queue.get()
                # infer
                b_t = time()
                core = 1 if core==2 else 2
                output_tensors = model.forward(input_data[0], core)
                i_t.value += (time() - b_t)*1000
                # PostProcess
                b_t = time()
                dbboxes, scores, ids, indices = model.postprocess(output_tensors)
                p_t.value += (time() - b_t)*1000
                # Results
                result = PerceptionTargets()
                result.header.stamp.sec = input_data[1]
                result.header.stamp.nanosec = input_data[2]
                result.header.frame_id = str(input_data[3])
                for index in indices:
                    roi = Roi()
                    target = Target()
                    roi.confidence = float(scores[index])
                    roi.type = coco_names[ids[index]]
                    x1, y1, x2, y2 = np.clip(dbboxes[index], 0, bin_input_siz)
                    x1, y1, x2, y2 = int(x1*x_scale), int(y1*y_scale), int(x2*x_scale), int(y2*y_scale)
                    roi.rect.x_offset, roi.rect.y_offset = x1, y1
                    roi.rect.height, roi.rect.width = y2-y1, x2-x1
                    target.type = roi.type
                    # print(roi)
                    target.rois.append(roi)
                    result.targets.append(target)
                # in queue
                if not save_queue.full():
                    frame_counter.value += 1
                    save_queue.put(result)

            sleep(delay_time)
        self.get_logger().info(f"[INFO] Inference Process {i} exited with pid {os.getpid()}")


class YOLOv8_Detect():
    def __init__(self,
                 quantize_model_path,
                 conf,
                 iou,
                 bin_siz
                 ):
        self.input_image_size = bin_siz
        self.conf=conf
        self.iou=iou
        self.conf_inverse = -np.log(1/self.conf - 1)
        # 读取horizon_quantize模型
        self.quantize_model = dnn.load(quantize_model_path)

        # 准备一些常量
        # 提前将反量化系数准备好
        self.s_bboxes_scale = self.quantize_model[0].outputs[0].properties.scale_data[:,np.newaxis]
        self.m_bboxes_scale = self.quantize_model[0].outputs[1].properties.scale_data[:,np.newaxis]
        self.l_bboxes_scale = self.quantize_model[0].outputs[2].properties.scale_data[:,np.newaxis]
        # DFL求期望的系数, 只需要生成一次
        self.weights_static = np.array([i for i in range(16)]).astype(np.float32)[np.newaxis, :, np.newaxis]
        # 提前准备一些索引, 只需要生成一次
        self.static_index = np.arange(8400)
        # anchors, 只需要生成一次
        self.s_anchor = np.stack([np.tile(np.linspace(0.5, 79.5, 80), reps=80),
                                np.repeat(np.arange(0.5, 80.5, 1), 80)], axis=0)
        self.m_anchor = np.stack([np.tile(np.linspace(0.5, 39.5, 40), reps=40),
                                np.repeat(np.arange(0.5, 40.5, 1), 40)], axis=0)
        self.l_anchor = np.stack([np.tile(np.linspace(0.5, 19.5, 20), reps=20),
                                np.repeat(np.arange(0.5, 20.5, 1), 20)], axis=0)

    def forward(self, input_tensor, core):
        return self.quantize_model[0].forward(input_tensor, core_id=core)

    def postprocess(self, quantize_outputs):
        # bbox: 转为numpy, reshape
        s_bboxes = quantize_outputs[0].buffer.reshape(64, -1) # (64,6400)
        m_bboxes = quantize_outputs[1].buffer.reshape(64, -1) # (64,1600)
        l_bboxes = quantize_outputs[2].buffer.reshape(64, -1) # (64,400)
        # classify: 转为numpy, reshape
        s_clses = quantize_outputs[3].buffer.reshape(80, -1)
        m_clses = quantize_outputs[4].buffer.reshape(80, -1)
        l_clses = quantize_outputs[5].buffer.reshape(80, -1)
        # classify: 利用numpy向量化操作完成阈值筛选(优化版 2.0)
        s_max_scores = np.max(s_clses, axis=0)
        s_valid_indices = np.flatnonzero(s_max_scores >= self.conf_inverse)
        s_ids = np.argmax(s_clses[:,s_valid_indices], axis=0)
        s_scores = s_max_scores[s_valid_indices]

        m_max_scores = np.max(m_clses, axis=0)
        m_valid_indices = np.flatnonzero(m_max_scores >= self.conf_inverse)
        m_ids = np.argmax(m_clses[:,m_valid_indices], axis=0)
        m_scores = m_max_scores[m_valid_indices]

        l_max_scores = np.max(l_clses, axis=0)
        l_valid_indices = np.flatnonzero(l_max_scores >= self.conf_inverse)
        l_ids = np.argmax(l_clses[:,l_valid_indices], axis=0)
        l_scores = l_max_scores[l_valid_indices]

        # 3个Classify分类分支:Sigmoid计算
        s_scores = 1 / (1 + np.exp(-s_scores))
        m_scores = 1 / (1 + np.exp(-m_scores))
        l_scores = 1 / (1 + np.exp(-l_scores))

        # 3个Bounding Box分支:反量化
        s_bboxes_float32 = s_bboxes[:,s_valid_indices].astype(np.float32) * self.s_bboxes_scale
        m_bboxes_float32 = m_bboxes[:,m_valid_indices].astype(np.float32) * self.m_bboxes_scale
        l_bboxes_float32 = l_bboxes[:,l_valid_indices].astype(np.float32) * self.l_bboxes_scale

        # 3个Bounding Box分支:dist2bbox(ltrb2xyxy)
        s_ltrb_indices = np.sum(softmax(s_bboxes_float32.reshape(4, 16,-1), axis=1) * self.weights_static, axis=1)
        s_anchor_indices = self.s_anchor[:,s_valid_indices]
        s_x1y1 = s_anchor_indices - s_ltrb_indices[0:2]
        s_x2y2 = s_anchor_indices + s_ltrb_indices[2:4]
        s_dbboxes = np.vstack([s_x1y1, s_x2y2]).transpose(1,0)*8

        m_ltrb_indices = np.sum(softmax(m_bboxes_float32.reshape(4, 16,-1), axis=1) * self.weights_static, axis=1)
        m_anchor_indices = self.m_anchor[:,m_valid_indices]
        m_x1y1 = m_anchor_indices - m_ltrb_indices[0:2]
        m_x2y2 = m_anchor_indices + m_ltrb_indices[2:4]
        m_dbboxes = np.vstack([m_x1y1, m_x2y2]).transpose(1,0)*16

        l_ltrb_indices = np.sum(softmax(l_bboxes_float32.reshape(4, 16,-1), axis=1) * self.weights_static, axis=1)
        l_anchor_indices = self.l_anchor[:,l_valid_indices]
        l_x1y1 = l_anchor_indices - l_ltrb_indices[0:2]
        l_x2y2 = l_anchor_indices + l_ltrb_indices[2:4]
        l_dbboxes = np.vstack([l_x1y1, l_x2y2]).transpose(1,0)*32

        # 大中小特征层阈值筛选结果拼接
        dbboxes = np.concatenate((s_dbboxes, m_dbboxes, l_dbboxes), axis=0)
        scores = np.concatenate((s_scores, m_scores, l_scores), axis=0)
        ids = np.concatenate((s_ids, m_ids, l_ids), axis=0)

        # nms
        indices = cv2.dnn.NMSBoxes(dbboxes, scores, self.conf, self.iou)

        return dbboxes, scores, ids, indices


coco_names = [
    "person", "bicycle", "car", "motorcycle", "airplane",
    "bus", "train", "truck", "boat", "traffic light",
    "fire hydrant", "stop sign", "parking meter", "bench", "bird",
    "cat", "dog", "horse", "sheep", "cow",
    "elephant", "bear", "zebra", "giraffe", "backpack",
    "umbrella", "handbag", "tie", "suitcase", "frisbee",
    "skis", "snowboard", "sports ball", "kite", "baseball bat",
    "baseball glove", "skateboard", "surfboard", "tennis racket", "bottle",
    "wine glass", "cup", "fork", "knife", "spoon",
    "bowl", "banana", "apple", "sandwich", "orange",
    "broccoli", "carrot", "hot dog", "pizza", "donut",
    "cake", "chair", "couch", "potted plant", "bed",
    "dining table", "toilet", "tv", "laptop", "mouse",
    "remote", "keyboard", "cell phone", "microwave", "oven",
    "toaster", "sink", "refrigerator", "book", "clock",
    "vase", "scissors", "teddy bear", "hair drier", "toothbrush"
    ]

def main(args=None):                                        # ROS2节点主入口main函数
    rclpy.init(args=args)                                   # ROS2 Python接口初始化
    node = YOLOv8_detect_x3_usb_mjpeg("v8_Det")                # 创建ROS2节点对象并进行初始化
    rclpy.spin(node)                                        # 循环等待ROS2退出
    node.destroy_node()                                     # 销毁节点对象
    rclpy.shutdown()
if __name__ == "__main__":
    main()
- 1
- 2
- 3
- 4
- 5
- 6
- 7
- 8
- 9
- 10
- 11
- 12
- 13
- 14
- 15
- 16
- 17
- 18
- 19
- 20
- 21
- 22
- 23
- 24
- 25
- 26
- 27
- 28
- 29
- 30
- 31
- 32
- 33
- 34
- 35
- 36
- 37
- 38
- 39
- 40
- 41
- 42
- 43
- 44
- 45
- 46
- 47
- 48
- 49
- 50
- 51
- 52
- 53
- 54
- 55
- 56
- 57
- 58
- 59
- 60
- 61
- 62
- 63
- 64
- 65
- 66
- 67
- 68
- 69
- 70
- 71
- 72
- 73
- 74
- 75
- 76
- 77
- 78
- 79
- 80
- 81
- 82
- 83
- 84
- 85
- 86
- 87
- 88
- 89
- 90
- 91
- 92
- 93
- 94
- 95
- 96
- 97
- 98
- 99
- 100
- 101
- 102
- 103
- 104
- 105
- 106
- 107
- 108
- 109
- 110
- 111
- 112
- 113
- 114
- 115
- 116
- 117
- 118
- 119
- 120
- 121
- 122
- 123
- 124
- 125
- 126
- 127
- 128
- 129
- 130
- 131
- 132
- 133
- 134
- 135
- 136
- 137
- 138
- 139
- 140
- 141
- 142
- 143
- 144
- 145
- 146
- 147
- 148
- 149
- 150
- 151
- 152
- 153
- 154
- 155
- 156
- 157
- 158
- 159
- 160
- 161
- 162
- 163
- 164
- 165
- 166
- 167
- 168
- 169
- 170
- 171
- 172
- 173
- 174
- 175
- 176
- 177
- 178
- 179
- 180
- 181
- 182
- 183
- 184
- 185
- 186
- 187
- 188
- 189
- 190
- 191
- 192
- 193
- 194
- 195
- 196
- 197
- 198
- 199
- 200
- 201
- 202
- 203
- 204
- 205
- 206
- 207
- 208
- 209
- 210
- 211
- 212
- 213
- 214
- 215
- 216
- 217
- 218
- 219
- 220
- 221
- 222
- 223
- 224
- 225
- 226
- 227
- 228
- 229
- 230
- 231
- 232
- 233
- 234
- 235
- 236
- 237
- 238
- 239
- 240
- 241
- 242
- 243
- 244
- 245
- 246
- 247
- 248
- 249
- 250
- 251
- 252
- 253
- 254
- 255
- 256
- 257
- 258
- 259
- 260
- 261
- 262
- 263
- 264
- 265
- 266
- 267
- 268
- 269
- 270
- 271
- 272
- 273
- 274
- 275
- 276
- 277
- 278
- 279
- 280
- 281
- 282
- 283
- 284
- 285
- 286
- 287
- 288
- 289
- 290
- 291
- 292
- 293
- 294
- 295
- 296
- 297
- 298
- 299
- 300
- 301
- 302
- 303
- 304
- 305
- 306
- 307
- 308
- 309
- 310
- 311
- 312
- 313
- 314
- 315
- 316
- 317
- 318
- 319
- 320
- 321
- 322
- 323
- 324
- 325
- 326
- 327
- 328
- 329
- 330
- 331
- 332
- 333
- 334
- 335
- 336
最后,使用以下命令运行TROS的WebSocket节点,进行可视化。
source /opt/tros/setup.bash
ros2 run websocket websocket \
--ros-args --log-level warn \
--ros-args -p only_show_image:=False \
--ros-args -p image_topic:=image \
--ros-args -p smart_topic:=yolov8_results \
--ros-args -p image_type:=mjpeg \
- 1
- 2
- 3
- 4
- 5
- 6
- 7
6.源代码文件下载
请前往地平线开发者社区下载:https://developer.horizon.cc/forumDetail/232083318810890142

