
- 1区块链应用实例_区块链应用实践的实例分析
- 2c语言自动阅卷系统概要设计,VC++自动阅卷系统设计与实现(源代码及全套资料).doc...
- 3关于如何自定义spring-boot-starter起步依赖_aliyun-oss-spring-boot-starter
- 4创建 vite+vue3+ts 移动端项目_vue 3.0 搭建移动端项目
- 5Windows下使用海康相机SDK获取图像并在Qt显示_海康mvs
- 6CVE-2018-8120漏洞提权:Windows 7的安全剖析与实战应用
- 7django的继承(extends)和包含(include)_pycharm中django咋用继承
- 8word2vec论文翻译(5000字)
- 9深度学习图绘制工具汇总_convnetdraw
- 10使用pip安装TensorFlow & 相关问题_pip 3.12 可以下载tensorflow2.3.0吗
pdf坐标及其显示(深入研究)_wps pdf 文字坐标
赞
踩
这一篇文章紧接着上一篇文章深入研究,上一篇文章如下。https://blog.csdn.net/k650d/article/details/126794818?spm=1001.2014.3001.5502
上一篇文章想要观察pdf文件的坐标需要在Acrobat观察,并不直观,我们可以将pdf转换为图片,并在图片中展示坐标方框(opencv),图片使用opencv库和pdf文件使用pdfminer库或者pdfplumber库,需要注意的是pdf转换为图片的时候需保持像素一直,即图片的长和宽的像素一致。pdf转换为图片的时候使用的是fitz,pdfplumber本身也能转换,但是图片质量太差了(像素一致)。代码如下。
- import pdfplumber
- import fitz
- import numpy as np
- import cv2
-
- list3 = []
- path = r'you.pdf'
- with pdfplumber.open(path) as pdf:
- # 获取第一页
- page = pdf.pages[0]
- width = page.width
- height = page.height
- # ================================================
- for i in page.chars: # .rects .chars
- list3.append([i['x0'] ,height - i['y1'], i['x1'] , height - i['y0']])
- # ======================pdf转换==========================
- pdf_document = fitz.open(path)
- page = pdf_document[0] # 获取当前页
- image = page.get_pixmap() # 将当前页转换为图像
- image_data = image.samples # 获取图像数据
- image_np = np.frombuffer(image_data, dtype=np.uint8).reshape(image.height, image.width, 3) # 将图像数据转换为NumPy数组
- image_cv2 = cv2.cvtColor(image_np, cv2.COLOR_RGB2BGR)
- # ====================所有的字符显示=======================
- for j in list3:
- top_left = (int(j[0]), int(j[1])) # 左上角的坐标 (x, y)
- bottom_right = (int(j[2]), int(j[3])) # 右下角的坐标 (x, y)
- color = (0, 255, 0) # BGR颜色,这里是绿色
- thickness = 1 # 线宽
- cv2.rectangle(image_cv2, top_left, bottom_right, color, thickness)
- cv2.imshow(r'result', image_cv2)
- cv2.waitKey(0)

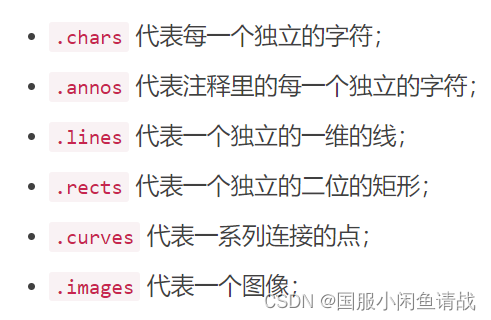
上述代码中的.chars可以自由替换为下面图片中的类,以展示所有pdf文件内的所有结构元素。
如果想要在图片中画框,显示其坐标,也可以使用这段代码。代码如下。
- import cv2
- import random
- import argparse
-
- clicked = False
- g_rectangle = [0, 0, 0, 0]
- g_startPoint = [0, 0]
-
-
- def onMouse(event, x, y, flags, param):
- global clicked
- global g_rectangle
- global g_startPoint
- if event == cv2.EVENT_MOUSEMOVE:
- if clicked == True:
-
- g_rectangle[0] = min(g_startPoint[0], x)
- g_rectangle[1] = min(g_startPoint[1], y)
- g_rectangle[2] = max(g_startPoint[0], x)
- g_rectangle[3] = max(g_startPoint[1], y)
- print(g_startPoint)
-
- # 左键按下事件
- if event == cv2.EVENT_LBUTTONDOWN:
- g_startPoint[0] = x
- g_startPoint[1] = y
- clicked = True
- # 左键弹起事件
- if event == cv2.EVENT_LBUTTONUP:
- print("====================选中框的坐标:===========================")
- print("矩形框左上角坐标:")
- print(g_rectangle[0], g_rectangle[1])
- print("矩形框右下角坐标:")
- print(g_rectangle[2], g_rectangle[3])
- clicked = False
-
-
- def startRoi(path):
- cv2.namedWindow("MyWindow", 0)
- cv2.resizeWindow("MyWindow", 1280, 720) # 设置长和宽
- cv2.setMouseCallback("MyWindow", onMouse)
-
- # 按"Esc"退出
- print("Press Esc if you want to exit ...")
- while cv2.waitKey(30) != 27:
- global frame
- frame = cv2.imread(path)
- # 画矩形
- cv2.rectangle(frame, (g_rectangle[0], g_rectangle[1]), (g_rectangle[2], g_rectangle[3]), (0, 255, 0), 2)
- cv2.imshow("MyWindow", frame)
-
- cv2.destroyWindow("MyWindow")
-
-
- if __name__ == '__main__':
- path = r"you.jpg"
- startRoi(path)
pdfplumber中的表格也有其坐标,注意这里是坐标而不是字符串列表输出。表格的坐标和上述代码中的.chars,.rects等类的坐标原点不一致,部分代码如下。
- # =========================表格的坐标=====================
- # 获取页面的所有表格
- tables = page.find_tables()
- for table in tables:
- for cell in table.cells:
- print(cell)
- # =========================坐标添加=====================
- list5.extend([[int(list(cell)[1]), int(list(cell)[3]), int(list(cell)[0]), int(list(cell)[2])]])
pdf文件及其扫描版pdf文件(测试用例和人工执行测试用例扫描版)位置发生了一些变换,通过平移和倾斜使其结构相似度最高,然后再做处理(检查扫描版pdf人工填写的一些错误)。代码如下,遍历平移和倾斜求最高结构相似度。
- import cv2
- import numpy as np
- from skimage.metrics import structural_similarity as ssim
-
- # 读取两张图片
- img1 = cv2.imread(r"you.jpg", cv2.IMREAD_GRAYSCALE)
- img2 = cv2.imread(r"you.jpg", cv2.IMREAD_GRAYSCALE)
-
- # 初始化最佳SSIM值和最佳变换参数
- best_ssim = -1
- best_translation = (0, 0)
- best_rotation = 0
-
- # 定义平移和倾斜的范围
- translation_range = 8
- rotation_range = 2
-
- # 遍历平移和倾斜范围
- for dx in range(0, translation_range+1):
- for dy in range(0, translation_range+1):
- for angle in range(0, rotation_range+1):
- # 平移和旋转图像
- M = cv2.getRotationMatrix2D((img2.shape[1] / 2, img2.shape[0] / 2), angle, 1)
- img2_translated = cv2.warpAffine(img2, M, (img2.shape[1], img2.shape[0]))
- img2_translated = np.roll(img2_translated, dx, axis=1)
- img2_translated = np.roll(img2_translated, dy, axis=0)
-
- # 计算SSIM值
- score, _ = ssim(img1, img2_translated, full=True)
-
- # 更新最佳SSIM值和参数
- if score > best_ssim:
- best_ssim = score
- best_translation = (dx, dy)
- best_rotation = angle
-
- print("最佳SSIM值:", best_ssim)
- print("最佳平移:", best_translation)
- print("最佳倾斜:", best_rotation)
-
- # 应用最佳平移和倾斜参数
- M = cv2.getRotationMatrix2D((img2.shape[1] / 2, img2.shape[0] / 2), best_rotation, 1)
- img2 = cv2.warpAffine(img2, M, (img2.shape[1], img2.shape[0]))
- img2 = np.roll(img2, best_translation[0], axis=1)
- img2 = np.roll(img2, best_translation[1], axis=0)
-
- # 显示具有最佳SSIM值时的图像
- cv2.imwrite(r"you.jpg", img2)
- cv2.imshow('Best Translated Image (SSIM: %.2f)' % best_ssim, img2)
- cv2.waitKey(0)
- cv2.destroyAllWindows()
经过几千页的测试用例的矫正,即pdf文件及其扫描版pdf文件(测试用例和人工执行测试用例扫描版)参数比对,发现上述遍历平移和旋转的方法,效率低(即便多线程提升效率,也较慢),正确率不够高,正确率在90%以上,但无法达到接近100%。于是提出通过仿射变换矫正扫描版pdf文件,提取最大方框的四角坐标,执行仿射变换。如何拿到准确的四角坐标是一件困难的事情,这里不做解释。
- import pdfplumber
- import fitz
- import cv2
- import numpy as np
- import math
- # ================================================
- path = r'pdf原件位置'
- with pdfplumber.open(path) as pdf:
- # 获取第一页
- page = pdf.pages[0]
- # ================================================
- tables = page.find_tables()
- for table in tables:
- table1 = table.cells[0]
- table2 = table.cells[-1]
- goal_top_left_tuple = (table1[0], table1[1])
- goal_top_right_tuple = (table2[2], table1[1])
- goal_bottom_left_tuple = (table1[0], table2[3])
- goal_bottom_right_tuple = (table2[2], table2[3])
-
-
- # ================================================
- # 打开 PDF 文件
- pdf_document = fitz.open(r'pdf原件扫描版位置')
- # 选择要处理的页面(例如第一页)
- page = pdf_document[0]
- # ================================================
- image = page.get_pixmap() # 将当前页转换为图像
- image_data = image.samples # 获取图像数据
- image_np = np.frombuffer(image_data, dtype=np.uint8).reshape(image.height, image.width, 3) # 将图像数据转换为NumPy数组
- image_cv2 = cv2.cvtColor(image_np, cv2.COLOR_RGB2BGR) # 将图像数据转换为OpenCV格式
- # ================================================
- # 转换为灰度图像
- gray_image = cv2.cvtColor(image_cv2, cv2.COLOR_BGR2GRAY)
- _, binary = cv2.threshold(gray_image, 200, 255, cv2.THRESH_BINARY) # 二值化处理
- # 使用 Canny 边缘检测算法
- edges = cv2.Canny(binary, 50, 150)
- # 查找轮廓
- contours, _ = cv2.findContours(edges, cv2.RETR_EXTERNAL, cv2.CHAIN_APPROX_SIMPLE)
- # 初始化极值点
- top_left = (0, 0) # 初始化为左上角
- top_right = (binary.shape[1], 0) # 初始化为右上角
- bottom_left = (0, binary.shape[0]) # 初始化为左下角
- bottom_right = (binary.shape[1], binary.shape[0]) # 初始化为右下角
- # ================================================
- # 找到高度大于一定值的轮廓的极值点
- list1=[]
- list2=[]
- list3=[]
- list4=[]
- for contour in contours:
- for point in contour:
- x, y = point[0].astype(float)
- if 80 < y < binary.shape[0] - 80: # 设定高度阈值为50(可以根据需要调整)
- top_left_distance = math.sqrt((x - top_left[0])**2 + (y - top_left[1])**2)
- list1.append((top_left_distance , x ,y))
- top_right_distance = math.sqrt((top_right[0] - x)**2 + (y - top_right[1])**2)
- list2.append((top_right_distance, x, y))
- bottom_left_distance = math.sqrt((x - bottom_left[0])**2 + (bottom_left[1] - y)**2)
- list3.append((bottom_left_distance, x, y))
- bottom_right_distance = math.sqrt((bottom_right[0] - x)**2 + (bottom_right[1] - y)**2)
- list4.append((bottom_right_distance, x, y))
- a = min(list1, key=lambda x:x[0])
- b = min(list2, key=lambda x:x[0])
- c = min(list3, key=lambda x:x[0])
- d = min(list4, key=lambda x:x[0])
- top_left_tuple = (a[1],a[2])
- top_right_tuple = (b[1],b[2])
- bottom_left_tuple = (c[1],c[2])
- bottom_right_tuple = (d[1],d[2])
- # ================================================
- # 定义原始图像中四个角的坐标
- pts_src = np.array([top_left_tuple, top_right_tuple, bottom_left_tuple, bottom_right_tuple], dtype=np.float32)
- # 定义目标图像中的四个角点,使其形成一个矩形
- points_dst = np.array([goal_top_left_tuple, goal_top_right_tuple, goal_bottom_left_tuple, goal_bottom_right_tuple], dtype=np.float32)
- # 计算仿射变换矩阵
- matrix = cv2.getPerspectiveTransform(pts_src, points_dst)
- # 应用仿射变换
- image_corrected = cv2.warpPerspective(image_cv2, matrix, (image_cv2.shape[1], image_cv2.shape[0]))
- # 显示校正后的图像
- cv2.imshow('Corrected Image', image_corrected)
- cv2.waitKey(0)
- cv2.destroyAllWindows()
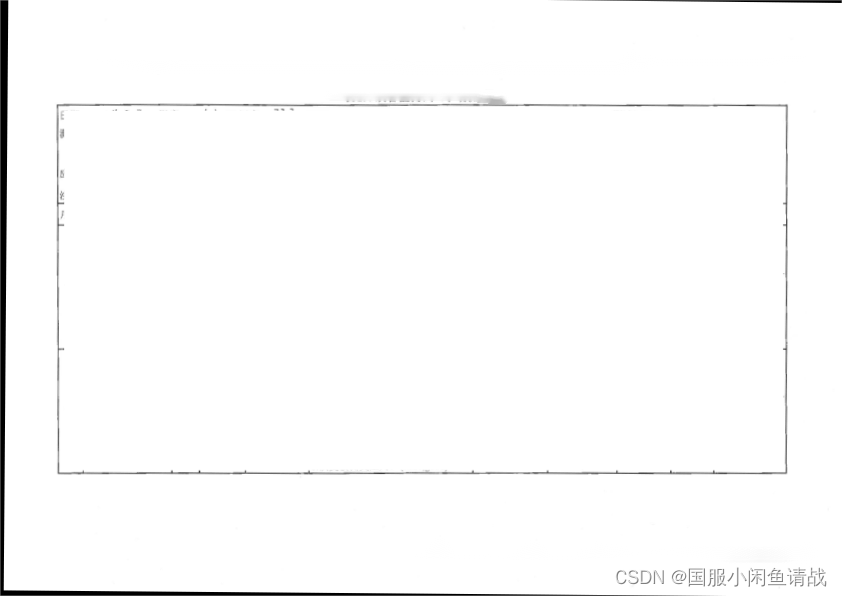
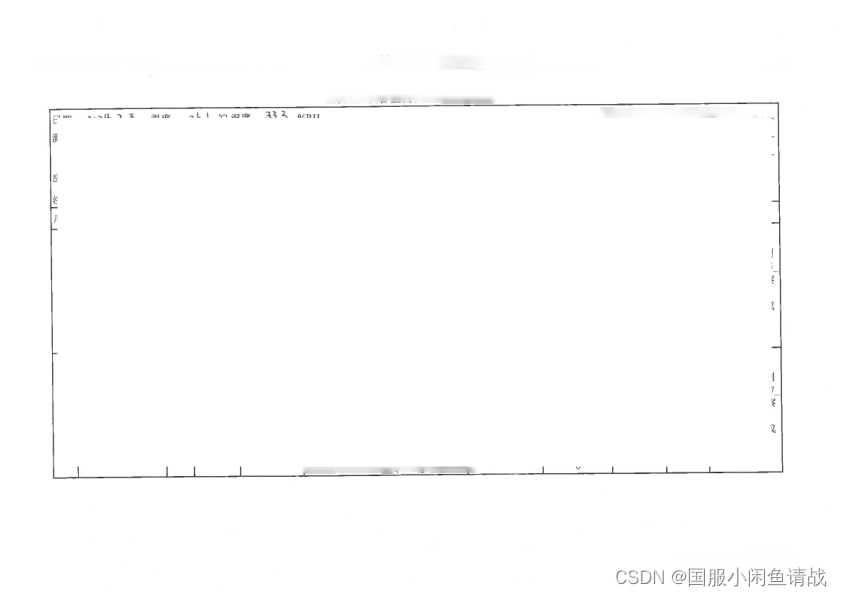
如下是效果图对比,左边是处理后的图像,右边是扫描pdf文件。
在处理pdf文件数据的时候还发现一件事情,两张图片对比,一张在人眼看上去不相似的局部图像结构相似度竟然很高,结构相似度只关注代表结构构成的部分图像,然后我自定义了一个相似度计算方法。另外fitz,win10和win7不兼容,需要相应版本的库,需要注意。
我现在的编程方式,文心一言,chatgpt,智谱一起跑,都是很好的老师,不知道哪一款gpt可以胜出。


