
热门标签
热门文章
- 1Hadoop学习笔记1
- 2npm、yarn、pnpm 最新国内镜像源设置和常见问题解决_npm 镜像
- 3安全中心报错“页面不可用”,可以尝试以下方法解决_windows安全中心页面不可用
- 4利用禁用账户创建windows隐藏用户_kali windows创建隐藏账户
- 5李彦宏在2024世界人工智能大会上的发言解读_ai人工智能大会上的发言稿
- 6ceph相关论文/译文_ceph 论文
- 7MYSQL 根据条件order by 动态排序
- 8Win11登录Microsoft账户使用office踩坑_为什么win11登录不了office
- 9ModuleNotFoundError: No module named ‘requests‘ 解决办法_repo no module named requests
- 10docker容器权限设置--cap-add | --cap-drop | privileged
当前位置: article > 正文
SpringtBoot实现文件上传_spring boot multipartfile
作者:运维做开发 | 2024-07-30 05:33:46
赞
踩
spring boot multipartfile
SpringtBoot实现文件上传
一.前言
我们这一篇文章主要来讲解如何用SpringBoot实现文件上传,在此之前我们需要了解一些知识点。
1.1.MultipartFile类
org.springframework.web.multipart.MultipartFile类主要是用表单的形式进行文件上传,在接收到文件时,可以获取文件的相关属性,比如文件类型、文件大小、文件名等等。
常用的方法:
- String getOriginalFilename():获取文件的完整名称,文件名+后缀名。
- String getName():文件传参的参数名称。
- long getSize():文件大小,单位:字节。
- String getContentType():获取文件类型,并非文件后缀名。
- void transferTo(File dest):把内存中File类对象信息写入磁盘
1.2.File类
java.io.File类是文件和目录路径名称的抽象表示,主要用于文件和目录的创建、查找和删除等操作。
常用方法:
- public File(String pathname):通过将给定的路径名(字符串)转换为抽象类路径来创建新的实例。
- public File(File parent,String child):从父抽象路径名和子路径名字符串创建新的File实例。
- public boolean exists():此File标识的文件或目录是否实际存在。
- public boolean mkdirs():创建由File表示的目录,包括任何必须但不存在的父目录。
- public File getParentFile():获取父文件或文件夹
二.代码实现
2.1.导入依赖
首先我们导入项目所需的依赖。
        <!--糊涂工具类-->
        <dependency>
            <groupId>cn.hutool</groupId>
            <artifactId>hutool-all</artifactId>
            <version>4.5.11</version>
        </dependency>

        <dependency>
            <groupId>org.springframework.boot</groupId>
            <artifactId>spring-boot-starter</artifactId>
        </dependency>

        <!--web-->
        <dependency>
            <groupId>org.springframework.boot</groupId>
            <artifactId>spring-boot-starter-web</artifactId>
        </dependency>

- 1
- 2
- 3
- 4
- 5
- 6
- 7
- 8
- 9
- 10
- 11
- 12
- 13
- 14
- 15
- 16
- 17
2.2.创建服务层
我依次创建文件的上传的服务层接口和其实现类。
接口
package com.temperature.humidity.system.common.utils.test.upload.service;

import org.springframework.web.multipart.MultipartFile;

import java.io.IOException;

public interface UploadService {

    String coversUpload(MultipartFile file, String dataPath) throws IOException;

}
- 1
- 2
- 3
- 4
- 5
- 6
- 7
- 8
- 9
- 10
- 11
实现类
package com.temperature.humidity.system.common.utils.test.upload.service.impl;

import cn.hutool.core.util.IdUtil;
import com.temperature.humidity.system.common.utils.test.upload.service.UploadService;
import org.springframework.stereotype.Service;
import org.springframework.web.multipart.MultipartFile;

import java.io.File;
import java.io.IOException;

@Service
public class UploadServiceImpl implements UploadService {
    /**
     * 文件上传
     *
     * @param file     前端传入的文件
     * @param dataPath 存放文件的文件夹路径
     */
    @Override
    public String coversUpload(MultipartFile file, String dataPath) throws IOException {
        //通过将给定的路径名(dataPath)转换为抽象类路径来创建新的实例。
        File imageFolder = new File(dataPath);
        //获取文件后缀名
        String fileSuffix = file.getOriginalFilename().substring(file.getOriginalFilename().lastIndexOf("."));
        //上传文件名生成规则-UUID前六位+文件后缀名
        String newFileName = IdUtil.simpleUUID().substring(0, 6) + fileSuffix;
        //从父抽象路径名和子路径名字符串创建新的File实例
        File newFile = new File(imageFolder, newFileName);
        //判断父路径是否存在,如果不存在则新建。
        if (!newFile.getParentFile().exists()) {
            newFile.getParentFile().mkdirs();
        }
        //把内存中File类对象信息写入磁盘
        file.transferTo(newFile);
        //返回文件路径
        return newFile.getPath();
    }

}
- 1
- 2
- 3
- 4
- 5
- 6
- 7
- 8
- 9
- 10
- 11
- 12
- 13
- 14
- 15
- 16
- 17
- 18
- 19
- 20
- 21
- 22
- 23
- 24
- 25
- 26
- 27
- 28
- 29
- 30
- 31
- 32
- 33
- 34
- 35
- 36
- 37
- 38
- 39
2.3.创建控制层
我们创建控制层用来接收前端传过来的文件和对应的上传路径。
package com.temperature.humidity.system.common.utils.test.upload.controller;

import com.temperature.humidity.system.common.utils.test.upload.service.UploadService;
import org.springframework.beans.factory.annotation.Autowired;
import org.springframework.web.bind.annotation.RequestMapping;
import org.springframework.web.bind.annotation.RestController;
import org.springframework.web.multipart.MultipartFile;

import java.io.IOException;

@RestController
@RequestMapping("/api")
public class UploadController {

    @Autowired
    private UploadService uploadService;

    @RequestMapping("/upload")
    public String upload(MultipartFile file, String dataPath) throws IOException {
       return uploadService.coversUpload(file, dataPath);
    }

}
- 1
- 2
- 3
- 4
- 5
- 6
- 7
- 8
- 9
- 10
- 11
- 12
- 13
- 14
- 15
- 16
- 17
- 18
- 19
- 20
- 21
- 22
- 23
三.测试
3.1.Postman
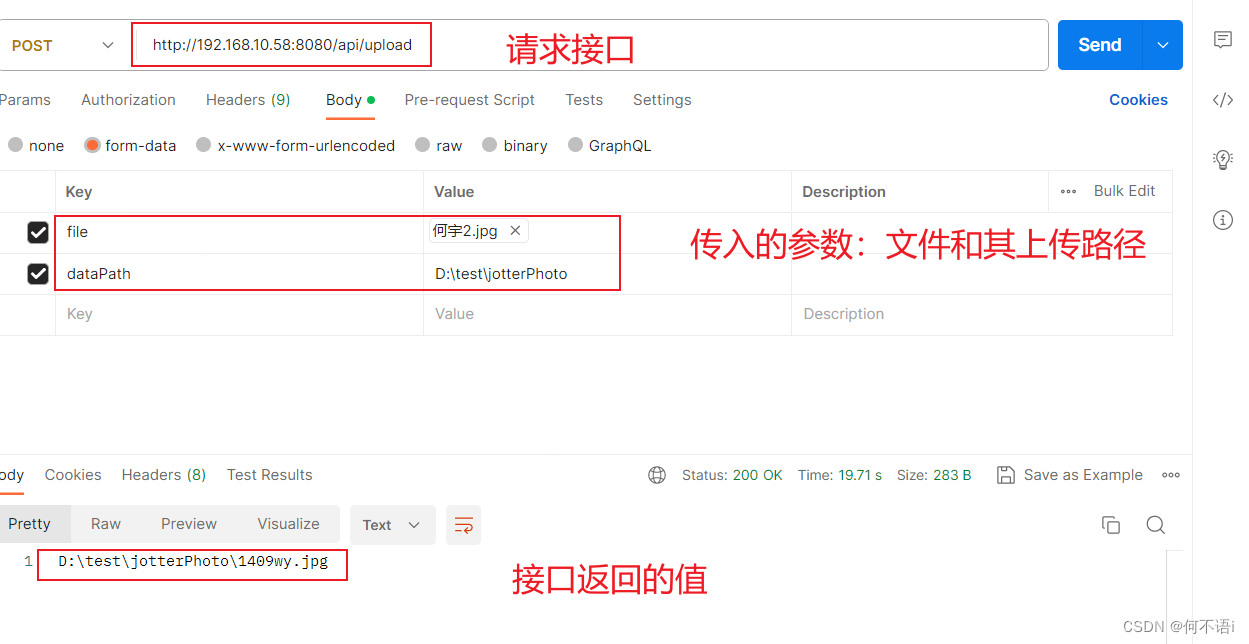
首先我们打开Postman输入我们的接口和对应的传参类型。
3.2.查看文件
我们可以通过图3.1接口返回值这块可以看到我们将该文件上传到D盘的目录下,我们打开此目录,可以看到该文件如我们所想的,在这里。

声明:本文内容由网友自发贡献,不代表【wpsshop博客】立场,版权归原作者所有,本站不承担相应法律责任。如您发现有侵权的内容,请联系我们。转载请注明出处:https://www.wpsshop.cn/w/运维做开发/article/detail/902184
推荐阅读
相关标签

