- 1中国跨过数据库这座大山了吗?
- 2垂直起降飞行器的设计与控制:固定翼和四旋翼整合自主飞行研究(Matlab代码实现)_vtol matlab
- 3springboot校园便利平台
- 4好程序员:学Java真的找不到工作吗?2023年Java就业情况如何?_java还能找到工作吗
- 5python中tkinter使用text组件添加多行文本并自动换行、添加多行文字、添加按钮、添加图片_tkinter 文本框添加按钮
- 6RocketMQ消息发送常见错误与解决方案_defaultmqproducer send exception
- 7Java使用POI导出Excel_java poi导出excel
- 8在无字体时使用word样式,并设置字体样式_xwpfstyles
- 9苹果iOS设备解锁软件:iToolab UnlockGo_强制解除苹果监管锁的软件
- 107 年+积累、 Elastic 创始人Shay Banon 等 15 位专家推荐的 Elasticsearch 8.X新书已上线...
Java项目【仿牛客网1-2】_仿牛客网数据库
赞
踩
仿牛客网第一章
一、技术架构
- Spring Boot
- Spring、Spring MVC、MyBatis
- Redis、Kafka、Elasticsearch
- Spring Security、Spring Actuator
说明:
1.SpringBoot是Spring的简化,更方便管理对象,对其他技术整合
2.SpringMVC用于处理浏览器的请求
3.MyBatis用来访问数据库
4.Redis用作缓存,默认存在内存,性能好【对系统监控、运维人员掌握系统状态】
5.Kafka用作消息队列
6.Elasticsearch用作全文搜索
7.Spring Security可以管理系统权限
8.Spring Actuator用作系统上线后的状态监控
开发环境
构架工具Maven【最流行,创建、编译、测试、打包项目、生成文档】
集成开发工具:IDEA
数据库:MySQL【关系型】、Redis【NoSQL数据库】
版本控制工具Git【备份、团队协作】
二、环境搭建
1.Apache Maven:可以帮助我们构建项目、管理项目中的jar包
安装且配置环境变量后使用命令mvn -version检查如下图:
 maven常用命令:
mvn compile : 编译maven项目,会出现target目录
mvn clean   : 删除编译后的内容,target目录会被删除
mvn test    :执行test中的方法,会首先编译test类
- 1
- 2
- 3
2.IDE:IntelliJ IDEA
3.快速构建springboot项目:Spring Initializer
4.Spring boot的核心作用:起步依赖,自动配置,端点监控
随时记:
server.port=80  //设置访问端口号
server.servlet.context-path=/community
    //设置默认路径 项目的访问路径
- 1
- 2
- 3
- 4
三、Spring入门
1.Spring Framework
- Spring Core : IoC、AOP
- Spring Data Access : Transactions、Spring MyBatis
- Web Servlet : Spring MVC
- Integration : Email、Scheduling、AMQP、Security
2.Spring IoC
- Inversion of Control - 控制反转,是一种面向对象编程的设计思想。
- Dependency Injection - 依赖注入,是IoC思想的实现方式。
- IoC Container - IoC容器,是实现依赖注入的关键,本质上是一个工厂。
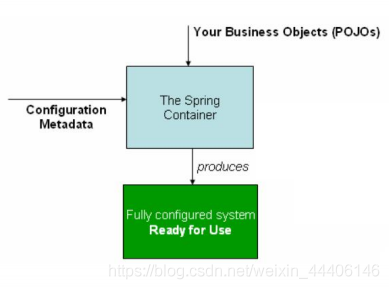
3.Ioc展示
此类其实是一个配置类
package com.hsw.community;
import org.springframework.boot.SpringApplication;
import org.springframework.boot.autoconfigure.SpringBootApplication;
@SpringBootApplication  //表示是一个配置文件
public class CommunityApplication {

    public static void main(String[] args) {

        SpringApplication.run(CommunityApplication.class, args);
        //启动Tomcat,自动创建Spring容器、自动扫描对象,将对象装配到容器中
        //扫描配置类以及子包下的对象,同时要有类似Controller的注解
    }
}
- 1
- 2
- 3
- 4
- 5
- 6
- 7
- 8
- 9
- 10
- 11
- 12
- 13
如何使用spring容器?
@SpringBootTest  //标识程序入口 配置类
@ContextConfiguration(classes = CommunityApplication.class)  //使用配置类
//实现ApplicationContaxtAware接口并实现相应方法即可从参数中获取ApplicationContext
class CommunityApplicationTests implements ApplicationContextAware {

    private ApplicationContext applicationContext;
    @Override
    public void setApplicationContext(ApplicationContext applicationContext) throws BeansException {

        this.applicationContext = applicationContext;
    }
    @Test
    public void testApplication(){

        System.out.println(applicationContext);
        //常用方法
        applicationContext.getBean(Dao.class);
        applicationContext.getBean("mybatisDao",Dao.class);
    }
}
随时记
/**使用场景比如我们有Dao接口下有两个实现类hibernateDao和mybatisDao
*我们用applicationContext获取bean时希望获取mybatisDao则加入此注解即可
*/
@Primary
@Repority("mybatisDao")  //自定义bean的名字
@PostConstruct  //在构造器之后调用
@PreDestroy  //销毁之前调用
@Scope("prototype")  //spring默认的bean都是单例的加此注解会在每次getBean方法调用时实例化对象
- 1
- 2
- 3
- 4
- 5
- 6
- 7
- 8
- 9
- 10
- 11
- 12
- 13
- 14
- 15
- 16
- 17
- 18
- 19
- 20
- 21
- 22
- 23
- 24
- 25
- 26
- 27
- 28
- 29
在配置类中配置要使用的bean(很笨拙的方法)
@Configuration //标识配置类
public class AlphaConfig {

    @Bean
    public SimpleDateFormat simpleDateFormat(){

        return new SimpleDateFormat("yyyy-MM-dd");
    }
}
随时记
@bean  //bean的名称就是方法名如上simpleDateFormat
@Autowired  //依赖注入,获取bean
@Qualifier("xxx")  //把名字为xxx的bean注入,一般和Autowired一起使用
- 1
- 2
- 3
- 4
- 5
- 6
- 7
- 8
- 9
- 10
- 11
- 12
- 13
四、SpringMVC入门
Spring MVC 用于Web开发
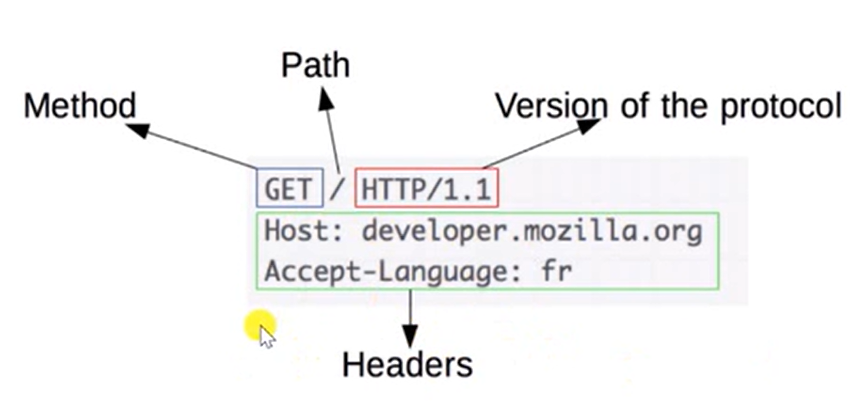
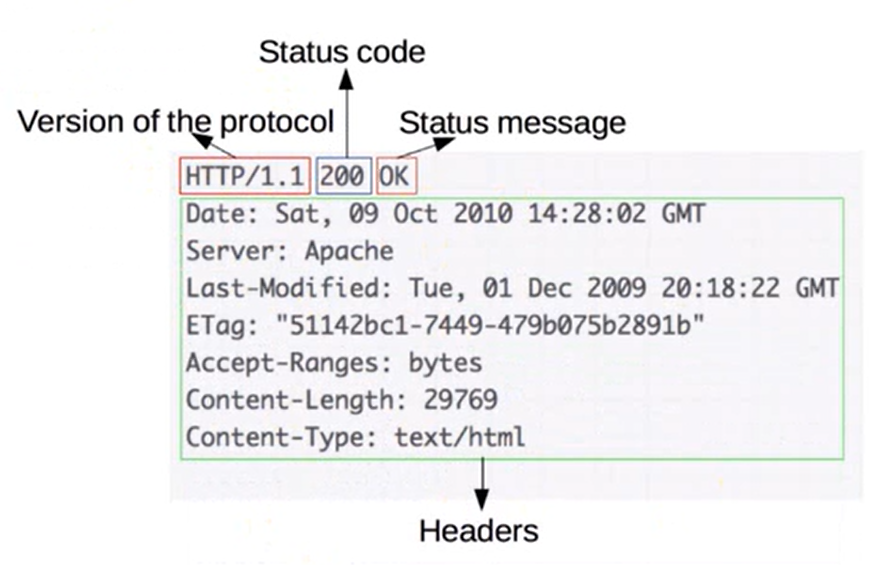
HTTP:HyperText Transfer Protocol。
用于传输HTML等内容的应用层协议。
规定了浏览器和服务器之间如何通信,以及通信时的数据格式。
浏览器和服务器通信的步骤:
①建立TCP连接
②发送HTTP请求报文
③服务器返回响应报文信息
④关闭连接或者保持开启
-
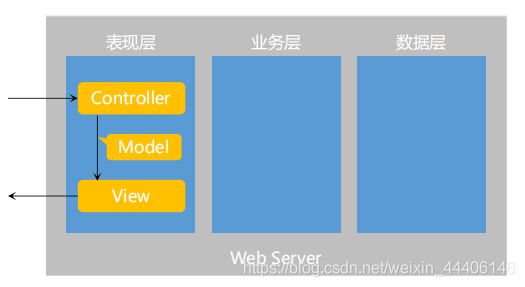
三层架构 - 表现层、业务层、数据访问层【分层目的:解耦、有利于代码维护】
-
MVC是一种设计模式,解决的是表现层的问题
- Model:模型层
- View:视图层
- Controller:控制层
-
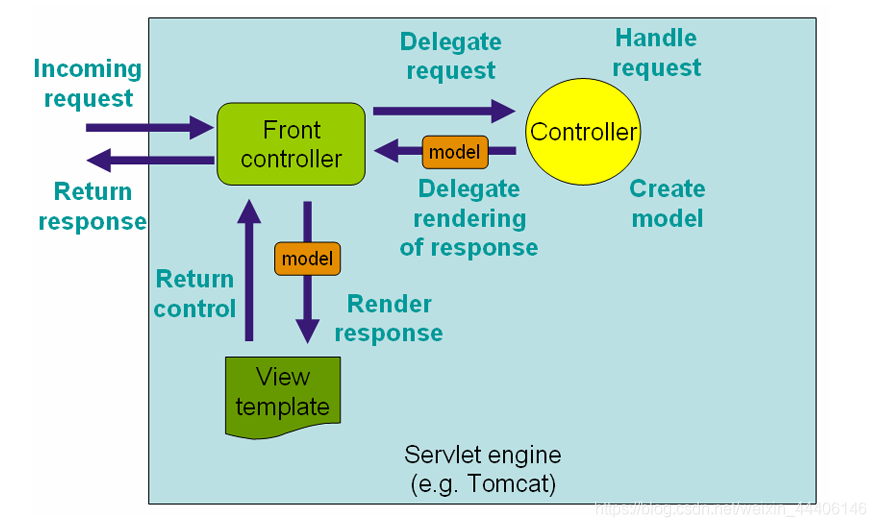
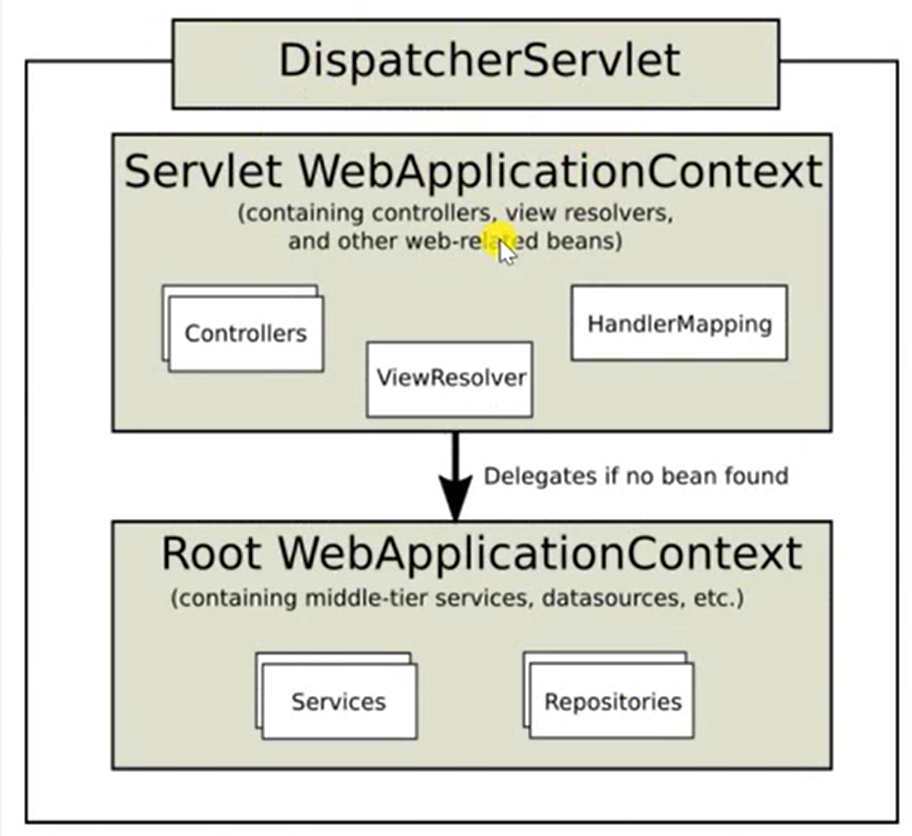
核心组件【实际就是一个类】 - 前端控制器:DispatcherServlet
DispatcherServlet管理是基于Spring容器Servlet WebApplicationContext
管理Controller、视图以及映射相关注解
DispatcherServlet工作流程
请求、处理都由DispatcherServlet前端控制器处理
1.根据映射注解或方法,找到controller,并调用
2.controller把数据封装到model中返回给前端控制器
3.控制器调用视图模板,并把model传递给视图模板
4.视图模板动态替换、生成html,返回给前端控制器
5.前端控制器将html返回给浏览器
Thymeleaf 模板引擎:生成动态的HTML。
-
Thymeleaf【理念先进】
- 倡导自然模板,即以HTML文件为模板。
-
常用语法
随时记 实际为配置类
spring.thymeleaf.cache=false  //开发中关闭thymeleaf的缓存,上线后开启[降低服务器压力]
//有缓存,开发时,页面可能有延迟
//Thymeleaf配置类,实际配置过程就是给某个bean设置属性【给一个配置类注入数据】
@EnableConfigurationProperties(ThymeleafProperties.class)
public class ThymeleafAutoConfiguration
@ConfigurationProperties(prefix = "spring.thymeleaf")
public class ThymeleafProperties {
- 1
- 2
- 3
- 4
- 5
- 6
- 7
- 8
- 9
简单举几个例子
1.mvc 底层对象直观了解
@Controller
@RequestMapping("/demo")
public class AlphaController {

    @RequestMapping("/test")
    public void demo(HttpServletRequest request, HttpServletResponse response){
   //声明请求对象、响应对象
        //获取请求数据
        System.out.println(request.getContextPath());
        System.out.println(request.getMethod());
        Enumeration<String> headerNames = request.getHeaderNames();//请求行
        while(headerNames.hasMoreElements()){

            String name = headerNames.nextElement();
            String value = request.getHeader(name);
            System.out.println("header:"+name+"  的值是->"+value);
        }
        //返回响应数据
        response.setContentType("text/html;charset=utf-8");//声明类型
        try(PrintWriter writer = response.getWriter()) {

            writer.write("我会变强的");
        } catch (IOException e) {

            e.printStackTrace();
        }
    }
}
- 1
- 2
- 3
- 4
- 5
- 6
- 7
- 8
- 9
- 10
- 11
- 12
- 13
- 14
- 15
- 16
- 17
- 18
- 19
- 20
- 21
- 22
- 23
- 24
- 25
- 26
- 27
- 28
2.快速获取request中的参数【get 获取浏览器中一些参数】
/students?current=1&limit=20
@RequestMapping(path = "/testRequestParam",method = RequestMethod.GET)//声明请求路径、请求方式
@ResponseBody //响应
//  /testRequestParam?i=10&j=100
public String testRequestParam(
    //request中i这个参数赋值给i,也可以不传值,不传值默认为1【不传值的情况、第一次访问】
    @RequestParam(name = "i",required = false,defaultValue = "1") int i,
    @RequestParam(name = "j",required = false,defaultValue = "100")int j){

    System.out.println(i);
    System.out.println(j);
    return "hello world";
    }
- 1
- 2
- 3
- 4
- 5
- 6
- 7
- 8
- 9
- 10
- 11
- 12
3.快速获取路径中的值【get 浏览器输入时,直接将参数放到路径上】
get请求,在地址栏上传递数据,且传递数据量有限
/students/123
@RequestMapping(path = "/testPathVariable/{id}",method = RequestMethod.GET)
@ResponseBody
//  /testPathVariable/123
public String testPathVariable(@PathVariable("id") int id){
   //路径变量,赋值给id
    System.out.println(id);  //123
    return "hello world";
}
随时记:
@RequestParam  //经过DispatcherServlet处理后会从request对象中获取参数
@PathVariable("xxx")  //快速获取路径中的值如上所示
- 1
- 2
- 3
- 4
- 5
- 6
- 7
- 8
- 9
- 10
- 11
4.表单中数据的获取【post 浏览器向服务器提交数据】
<form method="post" action="/demo/testPost">
        <p>
            名字:<input name="name" type="text" >
        </p>
        <p>
            年龄:<input name="age" type="text">
        </p>
        <p>
            <input type="submit" value="submit">
        </p>
    </form>
@RequestMapping(path = "/testPost",method = RequestMethod.POST)
@ResponseBody
public String testPost(String name,int age){
    System.out.println(name);
    System.out.println(age);
    return "hello world";
}
随时记:
直接让方法参数名和表单中定义的名字相等即可获取
- 1
- 2
- 3
- 4
- 5
- 6
- 7
- 8
- 9
- 10
- 11
- 12
- 13
- 14
- 15
- 16
- 17
- 18
- 19
- 20
5.填充模板数据【响应HTML数据】
@RequestMapping(path = "/teacher",method = RequestMethod.GET)//声明请求路径、请求方式
    public ModelAndView testThymeleaf(){

        ModelAndView mv = new ModelAndView();//返回数据,返回model数据以及View数据
        //动态传值
        mv.addObject("name","狂徒张三");
        mv.addObject("age","100");
        mv.setViewName("teacher.html");//模板的路径和名字
        return mv;
    }
- 1
- 2
- 3
- 4
- 5
- 6
- 7
- 8
- 9
- 10
teacher.html位于templates下
<!DOCTYPE html>
<html lang="en"  xmlns:th="http://www.thymeleaf.org"><!--让服务器知道是一个模板-->
<head>
    <meta charset="UTF-8">
    <title>Title</title>
</head>
<body>
    <p th:text="${name}"></p>
    <p th:text="${age}"></p>
</body>
</html>
- 1
- 2
- 3
- 4
- 5
- 6
- 7
- 8
- 9
- 10
- 11
简化controller中的方式【更方便、简洁】
@RequestMapping(path = "/teacher",method = RequestMethod.GET)
    public String testThymeleaf(Model model){
   //返回数据,类型为model
        model.addAttribute("name","电棍");
        model.addAttribute("age","1000");
        return "teacher.html";//返回view的路径
    }
- 1
- 2
- 3
- 4
- 5
- 6
- 7
6.响应json数据(用于异步请求,java对象->json字符串->js对象)
异步请求:当前网页不刷新,但是访问服务器、数据库
@RequestMapping(path = "/testJson",method = RequestMethod.GET)//请求访问路径,请求方式
@ResponseBody //返回json字符串,不加默认返回html
public Map<String,Object> testJson(){

    Map<String,Object> map = new HashMap<>();//声明类型
    map.put("name","猪猪侠");
    map.put("age",19);
    return map;//返回json字符串、【属性:属性值】
}

//返回一个集合
@RequestMapping(path = "/testJsons",method = RequestMethod.GET)//请求访问路径,请求方式
@ResponseBody //返回json字符串,不加默认返回html
public List<Map<String,Object>> testJsons(){

    List<Map<String,Object>> list = new ArrayList<>();//声明类型

    Map<String,Object> map = new HashMap<>();
    map.put("name","猪猪侠");
    map.put("age",19);
    list.add(map);

  	map = new HashMap<>();
    map.put("name","迷糊老师");
    map.put("age",55);
    list.add(map);

    return list;
}
- 1
- 2
- 3
- 4
- 5
- 6
- 7
- 8
- 9
- 10
- 11
- 12
- 13
- 14
- 15
- 16
- 17
- 18
- 19
- 20
- 21
- 22
- 23
- 24
- 25
- 26
- 27
- 28
- 29
五、MyBatis入门
提前安装MySQL Server以及MySQL WorkBench【比较好用的客户端】
初始化、安装服务、启动服务==》访问MySQL
第一次登录MySQL之后不能做任何操作,需要修改临时密码
MyBatis
使用MyBatis,底层能够自动的实现接口【前提:每个增删改查的方法依赖的SQL】
- 核心组件 【Spring Boot会自动创建前3个】
- SqlSessionFactory:用于创建SqlSession的工厂类。
- SqlSession:MyBatis的核心组件,用于向数据库执行SQL。
- 主配置文件:XML配置文件,可以对MyBatis的底层行为做出详细的配置。【连接数据库参数、连接池等配置】
- Mapper接口:就是DAO接口,在MyBatis中习惯性的称之为Mapper。
- Mapper映射器:用于编写SQL,并将SQL和实体类映射的组件,采用XML、注解均可实现。
- 示例
- 使用MyBatis对用户表进行CRUD操作。
		<dependency>
            <groupId>mysql</groupId>
            <artifactId>mysql-connector-java</artifactId>
            <version>5.1.47</version>
        </dependency>
        <dependency>
            <groupId>org.mybatis.spring.boot</groupId>
            <artifactId>mybatis-spring-boot-starter</artifactId>
            <version>2.0.1</version>
        </dependency>
- 1
- 2
- 3
- 4
- 5
- 6
- 7
- 8
- 9
- 10
添加配置【application.properties文件里配置】
# DataSourceProperties 配置MySQL连接池【又叫数据源:统一管理连接、管理连接上限(避免数据库瘫痪)】
spring.datasource.driver-class-name=com.mysql.jdbc.Driver
spring.datasource.url=jdbc:mysql://localhost:3306/community?characterEncoding=utf-8&useSSL=false&serverTimezone=Hongkong
spring.datasource.username=root
spring.datasource.password=123456
spring.datasource.type=com.zaxxer.hikari.HikariDataSource
spring.datasource.hikari.maximum-pool-size=15
spring.datasource.hikari.minimum-idle=5
spring.datasource.hikari.idle-timeout=30000
# MybatisProperties
#resources目录下新建一个mapper目录存放xml文件
mybatis.mapper-locations=classpath:mapper/*.xml
mybatis.type-aliases-package=com.hsw.community.entity
#启动自动设置主键
mybatis.configuration.useGeneratedKeys=true
#下划线命名方式和驼峰命名方式匹配 如:header_url==headerUrl
mybatis.configuration.mapUnderscoreToCamelCase=true
- 1
- 2
- 3
- 4
- 5
- 6
- 7
- 8
- 9
- 10
- 11
- 12
- 13
- 14
- 15
- 16
- 17
创建entity包并创建User类
import java.util.Date;
public class User {

    private int id;
    private String username;
    private String password;
    private String salt;
    private String email;
    private int type;
    private int status;
    private String activationCode;
    private String headerUrl;
    private Date createTime;
- 1
- 2
- 3
- 4
- 5
- 6
- 7
- 8
- 9
- 10
- 11
- 12
- 13
写完属性之后,按【Alt】+【Insert】添加属性的get和set方法
生成toString的方法,方便观察打印数据
访问数据库,只用写接口,不需要写具体的类
在dao包下创建UserMapper接口【①注解②方法】
@Mapper
@Repository
public interface UserMapper {

    User selectById(int id);
    User selectByName(String username);
    User selectByEmail(String email);
    int insertUser(User user);
    int updateStatus(int id, int status);
    int updateHeader(int id, String headerUrl);
    int updatePassword(int id, String password);
}
- 1
- 2
- 3
- 4
- 5
- 6
- 7
- 8
- 9
- 10
- 11
- 12
在mapper文件夹下建立user-mapper.xml文件【mapper映射结构】
<?xml version="1.0" encoding="UTF-8" ?>
<!DOCTYPE mapper
        PUBLIC "-//mybatis.org//DTD Mapper 3.0//EN"
        "http://mybatis.org/dtd/mybatis-3-mapper.dtd">
<mapper namespace="com.hsw.community.dao.UserMapper"> <!--权限名-->
    <!--定义sql,方便复用-->
    <sql id="insertFields">
        username, password, salt, email, type, status, activation_code, header_url, create_time
    </sql>
    <sql id="selectFields">
        id, username, password, salt, email, type, status, activation_code, header_url, create_time
    </sql>
    <!--写标签,对应接口中的方法-->
    <select id="selectById" resultType="User"> <!--id对应方法名 返回的类型-->
        select <include refid="selectFields"></include>
        from user
        where id = #{id}
    </select>
    <select id="selectByName" resultType="User">
        select <include refid="selectFields"></include>
        from user
        where username = #{username}
    </select>
    <select id="selectByEmail" resultType="User">
        select <include refid="selectFields"></include>
        from user
        where email = #{email}
    </select>
	<!--如果所用参数时bean需要用parameterType表示出来
        keyProperty的值写的是bean中对应表中主键名称,用于插入数据后把主键写回bean中
    -->
    <insert id="insertUser" parameterType="User" keyProperty="id"> <!--id对应方法名 参数类型 id主键对应的属性-->
        insert into user (<include refid="insertFields"></include>)
        values(#{username}, #{password}, #{salt}, #{email}, #{type}, #{status}, #{activationCode}, #{headerUrl}, #{createTime})
    </insert>
    <update id="updateStatus">
        update user set status = #{status} where id = #{id}
    </update>
    <update id="updateHeader">
        update user set header_url = #{headerUrl} where id = #{id}
    </update>
    <update id="updatePassword">
        update user set password = #{password} where id = #{id}
    </update>
</mapper>
- 1
- 2
- 3
- 4
- 5
- 6
- 7
- 8
- 9
- 10
- 11
- 12
- 13
- 14
- 15
- 16
- 17
- 18
- 19
- 20
- 21
- 22
- 23
- 24
- 25
- 26
- 27
- 28
- 29
- 30
- 31
- 32
- 33
- 34
- 35
- 36
- 37
- 38
- 39
- 40
- 41
- 42
- 43
- 44
- 45
测试一波
@SpringBootTest
@ContextConfiguration(classes = - 1
- 代码编程教学入门 ...
赞
踩


