
- 1AI搜索引擎再吸金5.28亿,英伟达贝佐斯入股,LeCun一众大佬夹道祝贺!网友:干翻谷歌...
- 2Hadoop---(5)Hive(数据仓库)_hive数仓搭建二手房信息
- 3AAAI 2024 时序和时空论文总结_aaai2024
- 4计算机毕业设计(附源码)python学生实验报告管理系统_毕业设计 管理系统 python
- 5软考中级数据库系统工程师好考吗?_数据库系统工程师 通过率
- 6nltk_data Error loading punkt: urlopen error_[nltk_data] error loading .:
- 7android studio如何让按钮,Android Studio:如何让多个按钮在布局中自动流动?
- 8Appium环境安装_appium 安装
- 9windows11彻底关闭Microsoft Defender 安装注册机_win11注册机
- 10使用动态模型编和JSoup编写网络爬虫_动态模型时脚本编写
【Android】正确使用资源res文件
赞
踩
观看此文注意
首先有的UI改颜色,没用,发现无法更改按钮背景颜色。
我的AS下载的是最新版本,Button按钮的背景颜色一直都是亮紫色,无法更改。
为什么呢?
首先在你的清单文件中看你应用的是哪个主题。
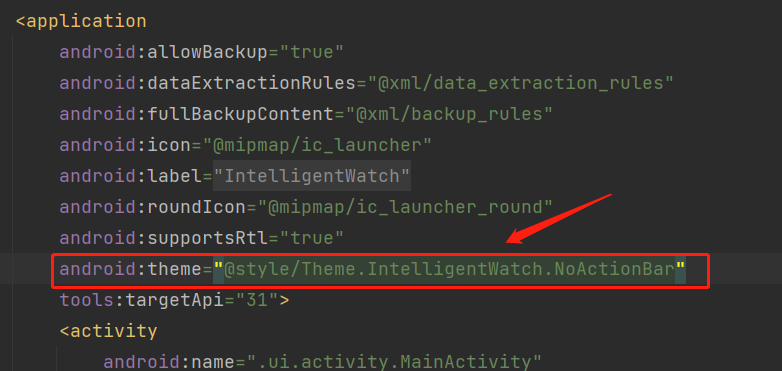
我现在用的是这个

可能你的主题用的是上面的默认的原因。
方法一:
将app/res/themes目录下默认的themes代码加上.Bridge即可。
修改前
<style name="Theme.IntelligentWatch" parent="Theme.MaterialComponents.DayNight.DarkActionBar">修改后
<style name="Theme.IntelligentWatch" parent="Theme.MaterialComponents.DayNight.DarkActionBar.Bridge">方法二:
自己定义一个主题,就是类似(我用的),但是我这个是没有ActionBar标题栏的,你需要自己再去定义一个标题栏,然后去清单文件中使用自己定义的主题。
- <style name="Theme.IntelligentWatch.NoActionBar">
- <item name="windowActionBar">false</item>
- <item name="windowNoTitle">true</item>
- </style>
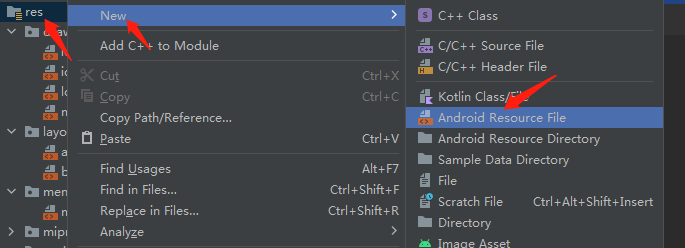
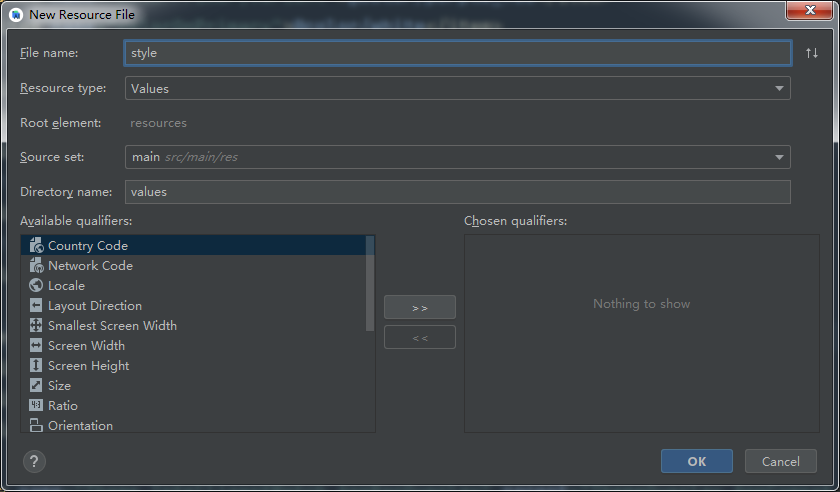
创建res文件
首先我们创建一个res文件。
右键res文件夹
(一)Resource type:Values
都是放在res\values文件夹下。

其Root element(父节点):只有resources。
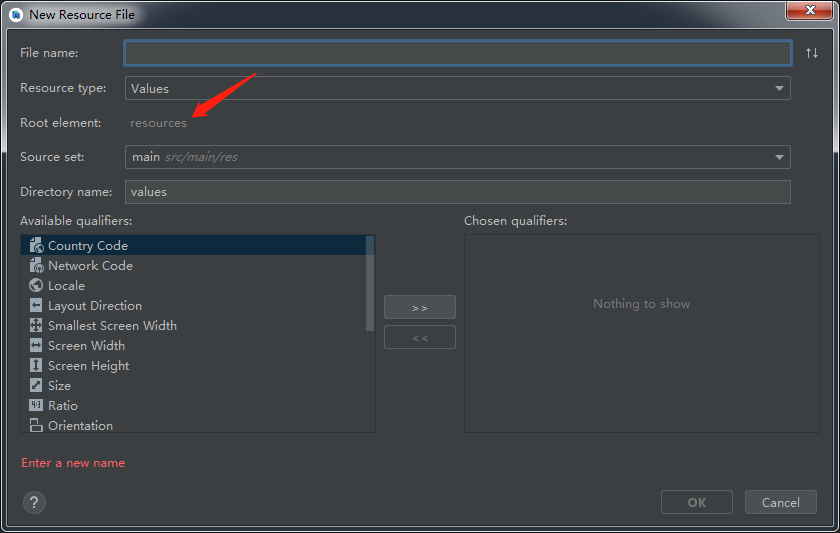

Alt+回车可以自动生成。
- <resources>
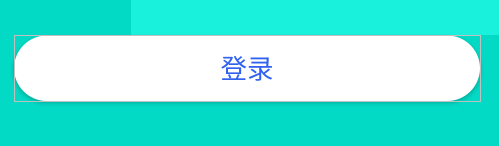
- <string name="title">登录</string>
-
- <string-array name="ddd">
- <item>"dddd"</item>
- <item>"2222"</item>
- </string-array>
- </resources>
双引号可加可不加。
打印出来默认去除,如果想要双引号,则加上转义字符。
- <string-array name="ddd">
- <item>\"dddd\"</item>
- <item>\"2222\"</item>
- </string-array>
怎么使用呢?
在布局文件里:@String
在Java文件里:getResources().getStringArray(...)
2.子元素@Color
一般是在XML布局文件中使用。
组成部分:# +透明度+红+绿+蓝(ARGB)
每个部分的值:0-256
- <resources>
- <color name="purple_200">#FFBB86FC</color>
- <color name="purple_500">#FF6200EE</color>
- <color name="purple_700">#FF3700B3</color>
- <color name="teal_200">#FF03DAC5</color>
- <color name="teal_700">#FF018786</color>
- <color name="black">#FF000000</color>
- <color name="white">#FFFFFFFF</color>
- <color name="ivory">#EEEEEE</color>象牙白
- <color name="blue">#3161EF</color>蓝色
- <color name="gray">#B3B1B1</color>灰色
- </resources>
3.子元素@dimen
尺寸。比如字体大小等等。
- <resources>
- <dimen name="fab_margin">16dp</dimen>
- </resources>
(二)Resource type:Drawable
放在res\drawable文件夹下。

其Root element(父节点,这里叫做根元素):有很多,这里主要来讲解其中常用的几个。

形状。在UI控件的background中设置。
比如我们想要为按钮创建一个背景。
android:shape="rectangle"
ring:圆环 oval:椭圆 rectangle:长方形 line:线
1)子元素@solid
中间内容填充的颜色。
2)子元素@corners
拐角的弯曲的弧度
3)子元素@size
大小。
4)子元素@stroke
描边,一般给EditText输入框给一个背景的时候会用到,这个中间不会填充。
5)子元素@gradient
线性渐变。
6)子元素@padding
间距。
- <?xml version="1.0" encoding="utf-8"?>
- <shape xmlns:android="http://schemas.android.com/apk/res/android">
- <solid android:color="@color/white"/>
- <corners android:radius="100dp"/>
- </shape>
- <Button
- android:id="@+id/button_first"
- android:layout_width="match_parent"
- android:layout_height="50dp"
- android:text="@string/title"
- android:textSize="20dp"
- android:textColor="@color/blue"
- android:background="@drawable/loading_btn"
- android:layout_margin="28dp"
- app:layout_constraintBottom_toBottomOf="parent"
- app:layout_constraintEnd_toEndOf="parent"
- app:layout_constraintStart_toStartOf="parent"
- app:layout_constraintTop_toBottomOf="@id/textview_first" />
一般设置在XML布局文件的UI控件的background里面,用@drawable/xxx就可以了。
1)子元素@item
选择器。在UI控件的background中设置。
比如我们想要点击按钮的时候是蓝色,不点击的时候是黑色。
不写 android:state_pressed="false"也可以,因为默认是false。
- <?xml version="1.0" encoding="utf-8"?>
- <selector xmlns:android="http://schemas.android.com/apk/res/android">
- <item android:state_pressed="true" android:drawable="@color/blue"/>
- <item android:state_pressed="false" android:drawable="@color/black"/>
- </selector>
帧动画。
drawable:显示哪张图片。
duration:显示此图片的时间,以ms为单位。、
设置在background上。
- <?xml version="1.0" encoding="utf-8"?>
- <animation-list xmlns:android="http://schemas.android.com/apk/res/android"
- android:oneshot="false">
- <item android:drawable="@drawable/image01" android:duration="500"/>
- <item android:drawable="@drawable/image02" android:duration="500"/>
- <item android:drawable="@drawable/image03" android:duration="500"/>
- </animation-list>
注意:动画需要启动,不然只会显示第一张图片。
- Button button = (Button) findViewById(R.id.bt_001);
- //把Drawable设置为button的背景,也可以设置为根布局的背景
- button.setBackgroundResource(R.drawable.frame_animation);
- //拿到这个我们定义的Drawable,实际也就是AnimationDrawable
- AnimationDrawable anim = (AnimationDrawable) button.getBackground();
- //开启动画
- anim.start();
AnimationDrawable是一个Drawable的子类,所以我们定义的xml文件也是防在res/rawable目录下的。
anim.close();//关闭动画(三)Resources type(文件夹):anim
New Animation Resources File 补间动画。

1)子元素@alpha
- <?xml version="1.0" encoding="utf-8"?>
- <alpha xmlns:android="http://schemas.android.com/apk/res/android"
- android:duration="2000"
- android:fromAlpha="1.0"
- android:interpolator="@android:anim/accelerate_decelerate_interpolator"
- android:toAlpha="0.0" />
从不透明变成透明,花费2秒钟。
interpolator表示动画插值器, 可以控制动画的变化速率, 比如前200ms很慢,中间600ms很快,最后200ms又很慢。
2)子元素@rotate
- <?xml version="1.0" encoding="utf-8"?>
- <rotate xmlns:android="http://schemas.android.com/apk/res/android"
- android:fromDegree="0"
- android:toDegree="360"
- android:pivotX = "50%"
- android:pivotY="50%"
- android:duration = "3000"/>
从0度转360度,转一圈。
轴点是中心,花费3秒。
3)子元素@scale
- <?xml version="1.0" encoding="utf-8"?>
- <scale xmlns:android="http://schemas.android.com/apk/res/android"
- android:duration="1000"
- android:fromXScale="0.0"
- android:fromYScale="0.0"
- android:pivotX="50%"
- android:pivotY="50%"
- android:toXScale="1.0"
- android:toYScale="1.0"/>
0.0表示没有显示,1.0表示原始大小。
从0变到1,就是没显示到显示。
以左上角为原点进行移动,50%就是中心点位置。
从中间从远到近显示出来,花费一秒。
4)子元素@translate
- <?xml version="1.0" encoding="utf-8"?>
- <translate xmlns:android="http://schemas.android.com/apk/res/android"
- android:duration="1000"
- android:fromXDelta="100"
- android:fromYDelta="0"
- android:toXDelta="0"
- android:toYDelta="0"/>
fromXDelta:X方向的初始值是多少
fromYDelta:Y方向的初始值是多少
toXDelta:X方向的目标值是多少
pivot 属性主要在translate 和 scale 动画中,这两种动画都牵扯到view 的“物理位置“发生变化,所以需要一个参考点。 而pivotX和pivotY就共同决定了这个点;它的值可以是float或者是百分比数值。
以 pivotX 为例:
10:距离动画所在view自身左边缘10像素
10% :距离动画所在view自身左边缘 的距离是整个view宽度的10%
10%p:距离动画所在view父控件左边缘的距离是整个view宽度的10%
属性动画就不需要设置res文件了,
(四)特殊Resources type:Values
Style与Themes
根元素都是resources。
其实你可以发现这两个的子元素都是style,而且效果也差不多。
那这两个有什么区别呢?
1.style
针对某个控件,你可以为你的按钮,文字定制一个样式,属于比较小的点。
注意要加android:,不然不会生效,因为也不会报错。
- <?xml version="1.0" encoding="utf-8"?>
- <resources>
-
- <style name="MyBtnStyle" parent="Theme.MaterialComponents.DayNight.DarkActionBar.Bridge">
- <item name="android:layout_height">50dp</item>
- <item name="android:textSize">25dp</item>
- <item name="android:textColor">@color/blue</item>
- <item name="android:background">@drawable/loading_btn</item>
- </style>
-
- </resources>
在XML布局中使用的时候只需要在UI控件属性中加入下面这句话即可。
style="@style/MyBtnStyle"style优先级<布局文件属性优先级
也就是说你在XML布局文件中再次写了字体颜色,会覆盖掉style里面的字体颜色。
2.themes
针对整个应用,app是一个怎么样的样式。
在最开始的观看此文有介绍。
[详细] -->赞
踩

