
- 1Android Jectpack-ViewBinding 实践(kotlin实现)_reified viewbinding
- 2人工智能视频新时代:Sora 的技术突破、应用场景与未来展望
- 3第二十三篇 Android通过原生Api获取经纬度以及百度定位注意点_android 原生gps经纬度坐标和百度地图经纬度
- 4【Python未来趋势篇】——AI引领量化交易新时代_ai时代python量化交易实战
- 5Harmonyos能用python开发么,鸿蒙OS设备上python开发学习实践
- 6【年少的风】GUI计算器--四则混合运算
- 7android 获取外部存储卡路径,Android获得内/外置存储卡路径的方法
- 8用Java写计算器界面
- 9视觉SLAM实践入门——(20)视觉里程计之直接法_getpixelvalue slam
- 10wincc上位机与1200组态步骤_组态上位机WINCC与PLC通讯连接
1.Spring Boot + 物业管理项目-配置+登陆_物业管理项目springboot
赞
踩
1.Spring Boot 概念
自动处理应用程序幕后的各种杂事(Spring框架的应用程序的配置和部署过程),让你专注于做那些使应用程序独特的工作

1.1 Spring Boot的核心功能
1.1.1 自动配置
Spring Boot根据应用程序的依赖和配置信息,自动进行各种功能的配置,如数据源、缓存、安全等。开发者只需要添加相应的依赖和配置,即可轻松使用这些功能。

1.1.2 起步依赖
Spring Boot提供了一系列预定义的"起步依赖"(Starter Dependencies),这些依赖项封装了特定功能的依赖和配置,简化了项目的依赖管理。
1.1.3 命令行界面
Spring Boot提供了一个命令行界面(CLI)工具,用于在命令行中快速创建、运行和管理Spring Boot应用程序。CLI是Spring Boot的非必要组成部分
1.1.4 Actuator
Spring Boot的Actuator模块提供了对应用程序运行时的监控和管理功能,包括健康检查、性能指标、日志查看等,方便开发者进行运维和监控。
1.1.5 内嵌服务器
Spring Boot可以将应用程序打包为可执行的JAR文件,并内置了多个常用的服务器(如Tomcat、Jetty等),使得应用程序可以独立运行,不需要外部服务器的支持。
1.2 初始化Spring Boot项目
1.2.1 用IDEA创建Spring Boot项目
Server URL是Initializr Web服务的位置,默认为spring官网提供的,国内使用可能会慢些,可以使用阿里提供的 http://start.aliyun.com/
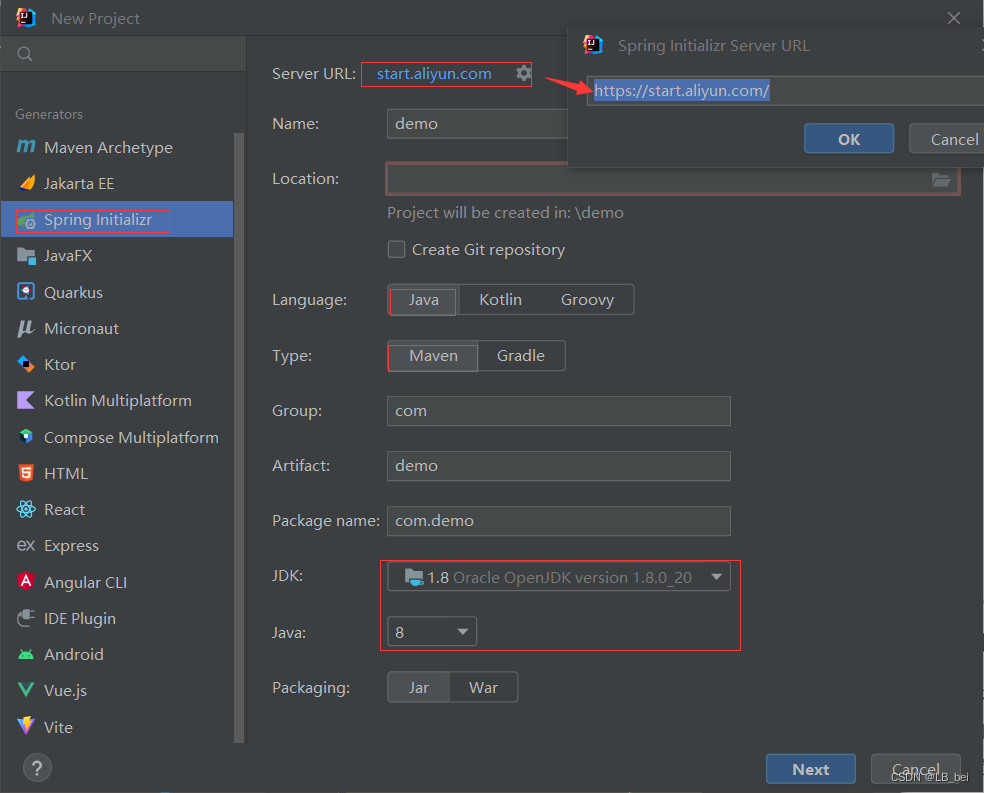
选择next后会让你选择需要添加的项目依赖
2.用Spring Boot创建一个物业管理项目
2.1 项目功能
登录功能、主页、费用管理、住户管理、商铺管理、车位管理、保修管理、投诉建议
2.2 根据需求创建需要的数据库
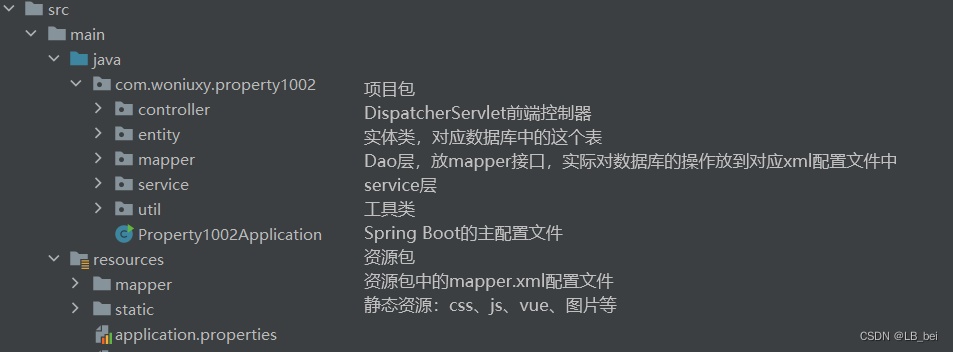
2.3 开始搭建项目结构
2.4 登录页面
index.html是启动页面,作为登录页面,获取用户的数据利用axios向controller发送请求,再根据controller的响应决定是否登录成功,是否跳转页面
2.4.1 导入需要的vue、axios、element-ui组件
- <!--
- vue:替代JavaScript
- axios:发请求的工具,作用与$.ajax一样
- elsement-ui:基于vue的组件库
- -->
- <script src="js/vue/vue.js"></script>
- <script src="js/vue/axios.min.js"></script>
- <link rel="stylesheet" href="css/vue/element-index.css">
- <script src="js/vue/element-index.js"></script>
2.4.2 设计登录前端界面
使用v-model给输入框双向绑定某个vue中data定义的值,从而能获取到用户输入的信息;给登录等按钮添加点击事件@click并设置对应的触发函数,函数在vue的method中定义
2.4.2.1 html
- <body>
- <div id="app">
- <div class="container" id="container">
- <div class="form-container sign-up-container">
- <form action="#">
- <h1>创建用户</h1>
- <input type="text" placeholder="用户名" />
- <input type="email" placeholder="手机号" />
- <input type="password" placeholder="密码" />
- <button>确认注册</button>
- </form>
- </div>
- <div class="form-container sign-in-container">
- <form action="#">
- <h1>登录</h1>
- <el-input v-model="user.cellphone" placeholder="请输入账号" class="elinput"></el-input>
- <el-input v-model="user.password" placeholder="请输入密码" class="elinput" show-password></el-input>
- <a href="#">忘记密码?</a>
- <el-button @click="login()" icon="el-icon-ice-cream-square" class="elbutton" round>登录</el-button>
- </form>
- </div>
- <div class="overlay-container">
- <div class="overlay">
- <div class="overlay-panel overlay-left">
- <h1>欢迎回来!</h1>
- <p>只有登录才能访问我们的页面,请输入登录信息</p>
- <button class="ghost" id="signIn">登录</button>
- </div>
- <div class="overlay-panel overlay-right">
- <h1>你好啊,朋友!</h1>
- <p>输入你的信息,快来加入我们吧</p>
- <button class="ghost" id="signUp">注册</button>
- </div>
- </div>
- </div>
- </div>
- </div>
- </body>

2.4.2.2 css
设置前端元素的样式、动画效果,这里复制的网上的资源做了些点修改
- <style>
- @import url('https://fonts.googleapis.com/css?family=Montserrat:400,800');
-
- * {
- box-sizing: border-box;
- }
- body {
- background: #f6f5f7;
- display: flex;
- justify-content: center;
- align-items: center;
- flex-direction: column;
- font-family: 'Montserrat', sans-serif;
- height: 100vh;
- margin: -20px 0 50px;
- }
- h1 {
- font-weight: bold;
- margin: 0;
- }
- h2 {
- text-align: center;
- }
- p {
- font-size: 14px;
- font-weight: 100;
- line-height: 20px;
- letter-spacing: 0.5px;
- margin: 20px 0 30px;
- }
- span {
- font-size: 12px;
- }
- a {
- color: #333;
- font-size: 14px;
- text-decoration: none;
- margin: 15px 0;
- }
- button {
- border-radius: 20px;
- border: 1px solid #FF4B2B;
- background-color: #FF4B2B;
- color: #FFFFFF;
- font-size: 12px;
- font-weight: bold;
- padding: 12px 45px;
- letter-spacing: 1px;
- text-transform: uppercase;
- transition: transform 80ms ease-in;
- }
- .elbutton {
- border-radius: 20px;
- border: 1px solid #FF4B2B;
- background: linear-gradient(to right, #fd545c,#FF65A7);
- color: #FFFFFF;
- font-size: 12px;
- font-weight: bold;
- padding: 12px 45px;
- letter-spacing: 1px;
- text-transform: uppercase;
- transition: transform 80ms ease-in;
- }
- button:active {
- transform: scale(0.95);
- }
- button:focus {
- outline: none;
- }
- button.ghost {
- background-color: transparent;
- border-color: #FFFFFF;
- }
- form {
- background-color: #FFFFFF;
- display: flex;
- align-items: center;
- justify-content: center;
- flex-direction: column;
- padding: 0 50px;
- height: 100%;
- text-align: center;
- }
- input {
- background-color: #eee;
- border: none;
- padding: 12px 15px;
- margin: 8px 0;
- width: 100%;
- }
- .container {
- background-color: #fff;
- border-radius: 10px;
- box-shadow: 0 14px 28px rgba(0,0,0,0.25),
- 0 10px 10px rgba(0,0,0,0.22);
- position: relative;
- overflow: hidden;
- width: 768px;
- max-width: 100%;
- min-height: 480px;
- }
- .form-container {
- position: absolute;
- top: 0;
- height: 100%;
- transition: all 0.6s ease-in-out;
- }
- .sign-in-container {
- left: 0;
- width: 50%;
- z-index: 2;
- }
- .container.right-panel-active .sign-in-container {
- transform: translateX(100%);
- }
- .sign-up-container {
- left: 0;
- width: 50%;
- opacity: 0;
- z-index: 1;
- }
- .container.right-panel-active .sign-up-container {
- transform: translateX(100%);
- opacity: 1;
- z-index: 5;
- animation: show 0.6s;
- }
- @keyframes show {
- 0%, 49.99% {
- opacity: 0;
- z-index: 1;
- }
-
- 50%, 100% {
- opacity: 1;
- z-index: 5;
- }
- }
- .overlay-container {
- position: absolute;
- top: 0;
- left: 50%;
- width: 50%;
- height: 100%;
- overflow: hidden;
- transition: transform 0.6s ease-in-out;
- z-index: 100;
- }
- .container.right-panel-active .overlay-container{
- transform: translateX(-100%);
- }
- .overlay {
- background: #FF416C;
- background: -webkit-linear-gradient(to right, #FF4B2B, #FF416C);
- background: linear-gradient(to right, #FF4B2B, #FF416C);
- background-repeat: no-repeat;
- background-size: cover;
- background-position: 0 0;
- color: #FFFFFF;
- position: relative;
- left: -100%;
- height: 100%;
- width: 200%;
- transform: translateX(0);
- transition: transform 0.6s ease-in-out;
- }
- .container.right-panel-active .overlay {
- transform: translateX(50%);
- }
- .overlay-panel {
- position: absolute;
- display: flex;
- align-items: center;
- justify-content: center;
- flex-direction: column;
- padding: 0 40px;
- text-align: center;
- top: 0;
- height: 100%;
- width: 50%;
- transform: translateX(0);
- transition: transform 0.6s ease-in-out;
- }
- .overlay-left {
- transform: translateX(-20%);
- }
- .container.right-panel-active .overlay-left {
- transform: translateX(0);
- }
- .overlay-right {
- right: 0;
- transform: translateX(0);
- }
- .container.right-panel-active .overlay-right {
- transform: translateX(20%);
- }
- .social-container {
- margin: 20px 0;
- }
- .social-container a {
- border: 1px solid #DDDDDD;
- border-radius: 50%;
- display: inline-flex;
- justify-content: center;
- align-items: center;
- margin: 0 5px;
- height: 40px;
- width: 40px;
- }
- </style>
2.4.2.3 vue
定义需要的属性,定义函数,使用axios带着属性向后台Controller层发起请求,根据的到的响应数据决定是否登陆成功跳转页面
- <script>
- //创建vue对象
- new Vue({
- el:"#app", //vue作用于指定的元素及其子元素
- data:{ //用来声明vue的属性,页面上需要的东西
- user:{
- cellphone:"",
- password:""
- }
- },
- methods:{
- login: function (){
- console.log("登录")
- console.log("账号"+this.user.cellphone)
- console.log("密码"+this.user.password)
- //利用axios发送请求
- // then等于ajax的success
- axios.post("employee/login",this.user).then(res =>{
- //res后台返回的结果
- console.log(res)
- if(res.data.code == 200){
- window.location.href = "html/main.html"
- }else{
- this.$message.error(res.data.message);
- }
- })
- }
- }
- })
- const signUpButton = document.getElementById('signUp');
- const signInButton = document.getElementById('signIn');
- const container = document.getElementById('container');
- signUpButton.addEventListener('click', () => {
- container.classList.add("right-panel-active");
- });
- signInButton.addEventListener('click', () => {
- container.classList.remove("right-panel-active");
- });
- </script>
2.4.3 搭建后端处理业务
2.4.3.1 Controller层
1.添加所需的注解
- @Controller
- @RequestMapping("/employee")
- @Slf4j
- public class EmployeeController {}
2.处理前端请求(其实大部分业务逻辑应该在service层处理)
获取响应service层对象,定义map存储用户登录数据,定义方法,添加方法所需的注解,接收前端所传的数据,设置单态登录
- @Resource
- private EmployeeService employeeService;
- //记录当前登录的用户有哪些
- //ConcurrentHashMap是一个线程安全的Map,效率比hashmap低,比hashtable高
- private static final ConcurrentHashMap<String,HttpSession> sessions = new ConcurrentHashMap<>();
-
- @RequestMapping("/login") // employee/login
- @ResponseBody
- //在处理请求的方法中如果想要request、response、session只需在形参指定
- public ResponseResult<Boolean> login(@RequestBody EmployeeVo employee, HttpSession session){
- log.debug("处理登录请求");
- log.debug(employee.toString());
- Employee byCellphone = employeeService.findByCellphone(employee.getCellphone());
- if(byCellphone!=null&&byCellphone.getPassword().equals(employee.getPassword())) {
- log.debug(byCellphone.toString());
- session.setAttribute("eid",byCellphone.getId());
- // 查看当前账号是否在其他地方登录过,有登录则让之前的下线
- log.debug("session:"+session.isNew());
- if(sessions.containsKey(byCellphone.getCellphone())){
- log.debug(byCellphone.getCellphone());
- //获取之前的session
- HttpSession old = sessions.get(byCellphone.getCellphone());
- try {
- old.removeAttribute("eid");
- session.setAttribute("eid",byCellphone.getId());
- }catch (IllegalStateException e){
- sessions.put(byCellphone.getCellphone(),session);
- return new ResponseResult<>(200,"登录成功",true);
- }
- }
- //将当前的session放入map
- sessions.put(byCellphone.getCellphone(),session);
- return new ResponseResult<>(200,"登录成功",true);
- }else{
- return new ResponseResult<>(500,"账号或密码有误",false);
- }
- }
2.4.3.2 service层
- @Data
- @Slf4j
- @Service
- public class EmployeeServiceimpl implements EmployeeService {
- @Resource
- private EmployeeMapper employeeMapper;
- @Override
- public Employee findByCellphone(String cellphone) {
- log.info("调用 mapper执行sql");
- return employeeMapper.findByCellphone(cellphone);
- }
- }
2.4.3.3 mapper层(dao层)
- @Mapper
- public interface EmployeeMapper {
- Employee findByCellphone(String cellphone);
- }
mapper.xml
- <?xml version="1.0" encoding="UTF-8" ?>
- <!DOCTYPE mapper
- PUBLIC "-//mybatis.org//DTD Mapper 3.0//EN"
- "https://mybatis.org/dtd/mybatis-3-mapper.dtd">
- <!--namespace:命名空间,用来避免id相同的sql语句冲突
- 一般使用一个完整的类名
- -->
- <mapper namespace="com.woniuxy.property1002.mapper.EmployeeMapper">
- <select id="findByCellphone" resultType="com.property.entity.Employee">
- select * from employee where cellphone = #{cellphone}
- </select>
- </mapper>


