
热门标签
热门文章
- 1IP风险画像有哪些应用?
- 2uniapp+vue3+setup语法糖开发微信小程序时不能定义globalData的解决方法_uniapp setup globaldata
- 3wget 工具使用
- 4【超详细前后端项目搭建】前端vue3+ts项目(引入ElementPlus、Axios)、后端springboot搭建(创建接口操作mysql数据库)实现前后端联调_前端后端搭建流程
- 5关闭BMC Share NIC默认Vlan 401_shared nic
- 6MySql查询关联ID为逗号隔开的字符串的数据_mysql ids字符串关联
- 7深度学习疲劳检测 驾驶行为检测
- 8vue this.$router.push 跳转新页面 传参_router.push 新开业
- 9iOS多语言本地化(国际化)设置_xcode 10.1多语言设置在哪里
- 10AI男神,单月变现2w+_小红书1元1千粉丝
当前位置: article > 正文
Linux——ELK日志分析系统
作者:花生_TL007 | 2024-03-13 08:24:04
赞
踩
Linux——ELK日志分析系统
实验环境
虚拟机三台CentOS 7.9,
组件包
elasticsearch-5.5.0.rpm elasticsearch-head.tar.gz node-v8.2.1.tar.gz
phantomjs-2.1.1-linux-x86_64.tar.bz2 logstash-5.5.1.rpm kibana-5.5.1-x86_64.rpm
初始化配置
三台主机都需安装Java运行环境jdk
[root@chicken ~]# yum -y install java
安装elasticsearch,Node1 Node2 都配置
- [root@chicken ~]# cat <<EOF>> /etc/hosts
- > 192.168.223.123 chicken
- > 192.168.223.124 chicken
- > EOF
上传安装包elasticsearch-5.5.0.rpm,并使用rpm安装
[root@chicken ~]# rpm -ivh elasticsearch-5.5.0.rpm
编辑elasticsearch 配置文件
- [root@chicken ~]# vim /etc/elasticsearch/elasticsearch.yml
- cluster.name: my-elk-cluster #群集名称
- node.name: node1 #节点名称,不同节点修改编号
- path.data: /data/elk_data #日志收集目录
- path.logs: /data/elk_log #日志存放路径
- bootstrap.memory_lock: false #不锁定内存
- network.host: 0.0.0.0 #监听IP
- http.port: 9200 #监听端口
- discovery.zen.ping.unicast.hosts: ["node1", "node2"] #单播实现群集
- [root@chicken ~]# mkdir -p /data/elk_data && mkdir -p /data/elk_log
- [root@chicken ~]# chown -R elasticsearch:elasticsearch /data
- [root@chicken ~]# systemctl start elasticsearch.service
Node1部署elasticearch-head插件,安装node组件
- [root@chicken ~]# tar zxf node-v8.2.1.tar.gz
- [root@chicken ~]# cd node-v8.2.1/
- [root@chicken node-v8.2.1]# ./configure && make && make install
安装phantomjs 组件
- [root@chicken ~]# tar jxf phantomjs-2.1.1-linux-x86_64.tar.bz2
- [root@chicken ~]# mv phantomjs-2.1.1-linux-x86_64 /usr/src/phantomjs2.1
- [root@chicken ~]# ln -s /usr/src/phantomjs2.1/bin/* /usr/local/bin/
安装 elasticsearch-head 组件
- [root@chicken ~]# tar zxf elasticsearch-head.tar.gz
- [root@chicken ~]# cd elasticsearch-head/
- [root@chicken elasticsearch-head]# npm install
- [root@chicken elasticsearch-head]# cat <<EOF>> /etc/elasticsearch/elasticsearch.yml
- > http.cors.enabled: true
- > http.cors.allow-origin: "*"
- > http.cors.allow-headers: Authorization,Content-Type
- > EOF
- [root@chicken ~] systemctl restart elasticsearch
- [root@chicken elasticsearch-head]# npm run start &
-
Node3上部署httpd+logstash,上传安装包使用rpm安装
- [root@chicken ~]# yum -y install httpd
- [root@chicken ~]# systemctl enable httpd.service --now
- [root@chicken ~]# rpm -ivh logstash-5.5.1.rpm
- [root@chicken ~]# ln -s /usr/share/logstash/bin/logstash /usr/local/sbin/
编辑自定义提交日志配置
- [root@chicken ~]# vim /etc/logstash/conf.d/httpd_log.conf
- input {
- file {
- path => "/var/log/httpd/access_log"
- type => "access"
- start_position => "beginning"
- }
- file {
- path => "/var/log/httpd/error_log"
- type => "error"
- start_position => "beginning"
- }
- }
- output {
- if [type] == "access" {
- elasticsearch {
- hosts => ["192.168.223.123:9200"]
- index => "httpd_access-%{+YYYY.MM.dd}"
- }
- }
- if [type] == "error" {
- elasticsearch {
- hosts => ["192.168.223.123:9200"]
- index => "httpd_error-%{+YYYY.MM.dd}"
- }
- }
- }
- ####启动日志传递######
- [root@chicken ~]# nohup logstash -f /etc/logstash/conf.d/httpd_log.conf &

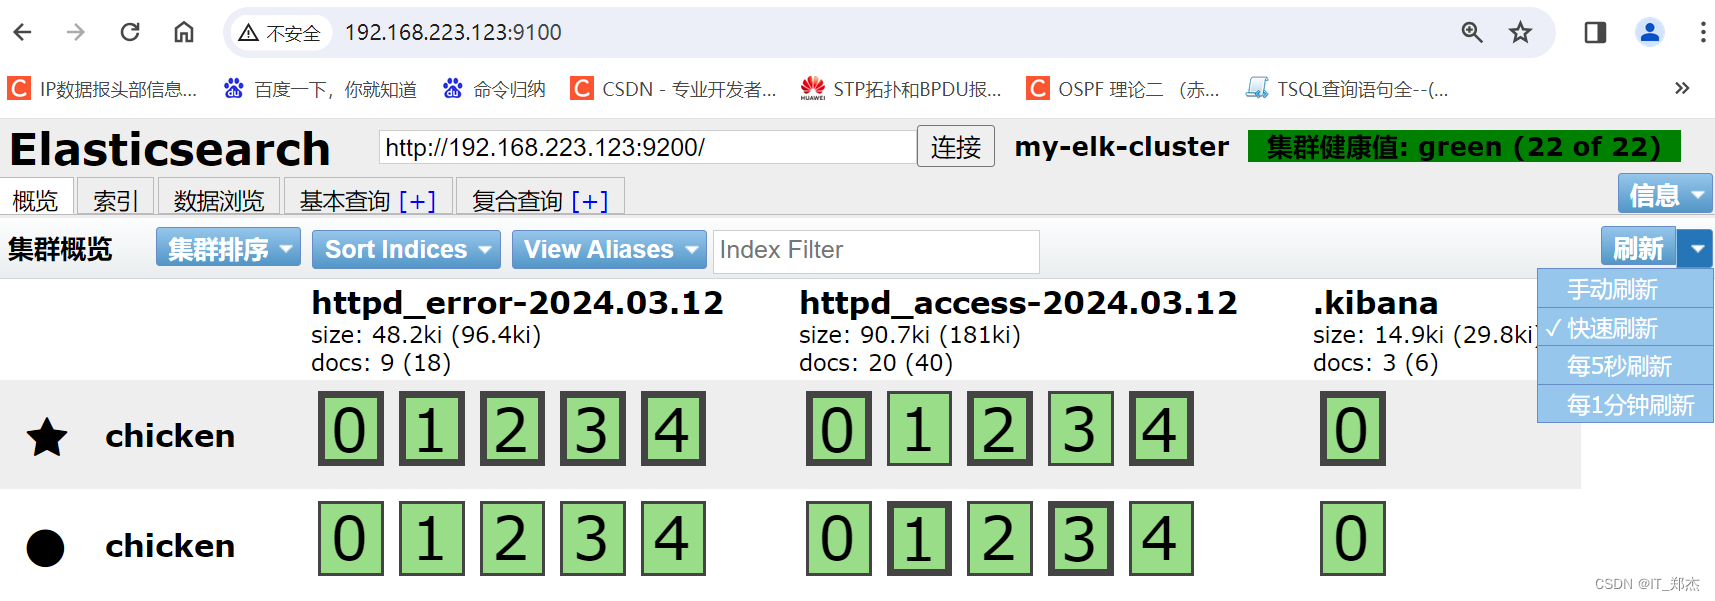
访问http://192.168.223.123:9200
Node2安装kibana图形化查看工具
- [root@chicken ~]# rpm -ivh kibana-5.5.1-x86_64.rpm
- [root@chicken ~]# vim /etc/kibana/kibana.yml
- server.port: 5601
- server.host: "0.0.0.0"
- elasticsearch.url: "http://192.168.223.123:9200"
- kibana.index: ".kibana"
- [root@chicken ~]# systemctl enable kibana.service --now
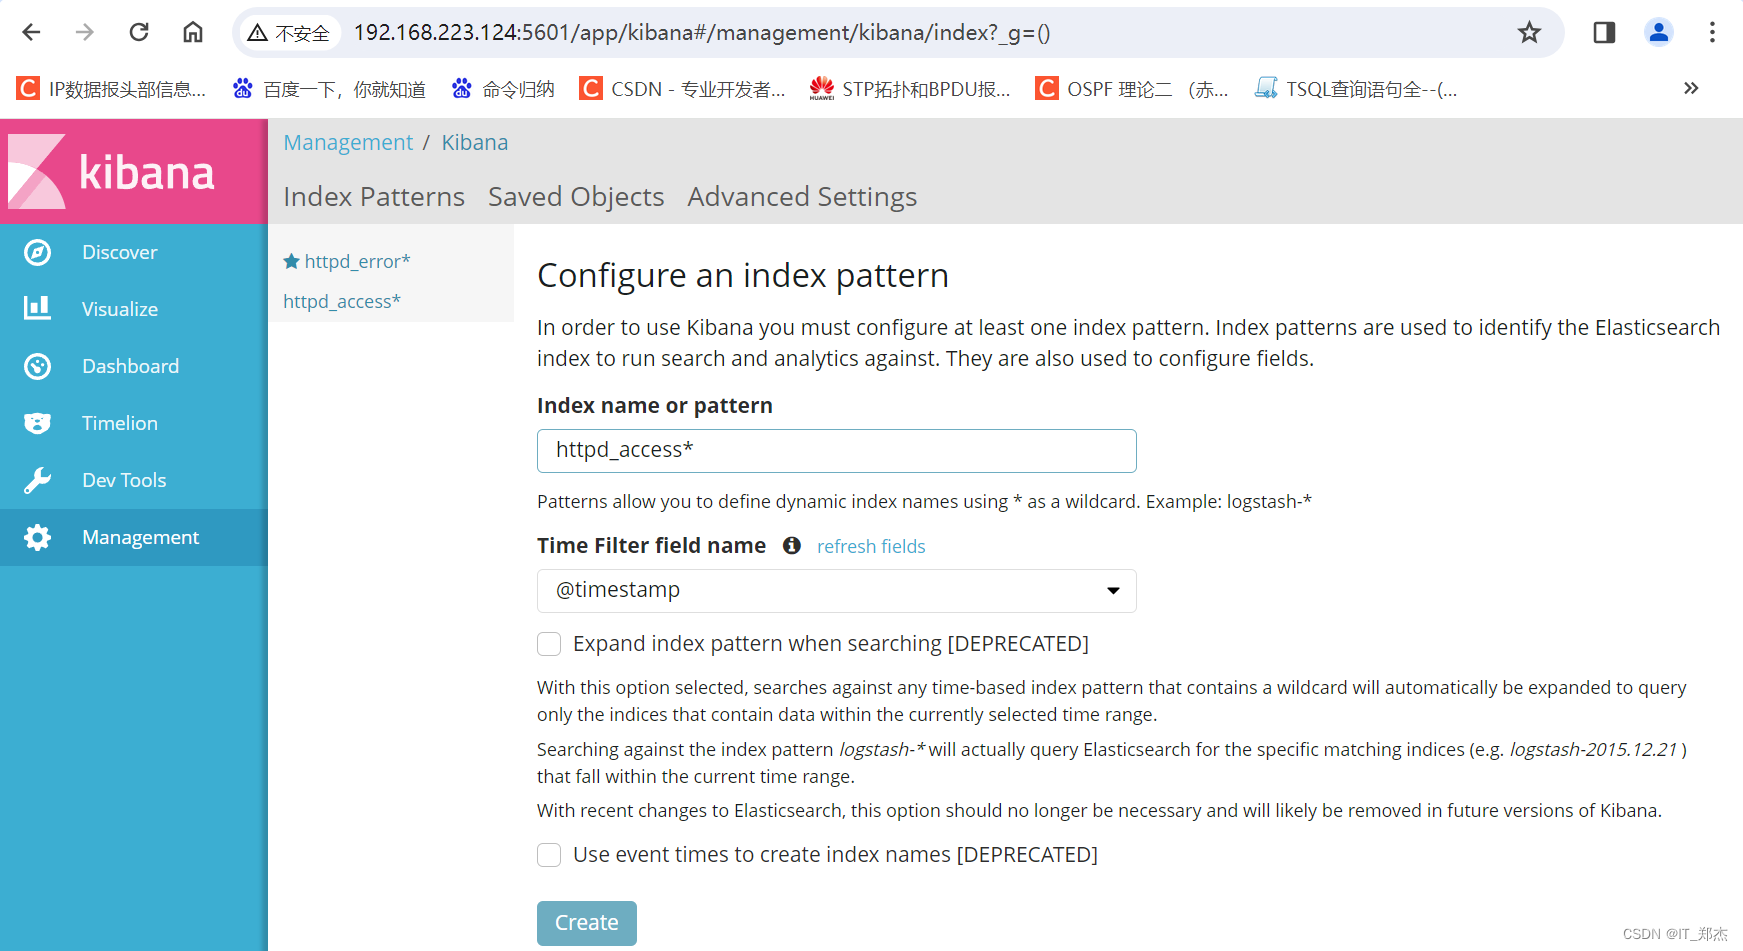
访问http://192.168.223.124:5601
声明:本文内容由网友自发贡献,转载请注明出处:【wpsshop博客】
推荐阅读

相关标签

