- 12019计算机视觉论文精选速递(2019/1/23-2018/1/28)_combinational q-learning for dou di zhu[j]. arxiv
- 2gd 动态 圆角矩形水印 + 抗锯齿_矩形圆角抗锯齿
- 3adb命令 logcat日志抓取_logcat抓取日志命令
- 4错误1920, Windows Font Cache Service(FontCache)。错误1083。_无法启动 windows font cache service
- 5Android系统常用的调试工具_安卓调试工具
- 6Linux音频设置_amixer: unable to find simple control 'master',0
- 7react实现HTML调摄像头拍照功能_react 拍照
- 8Transformer 架构逐层功能介绍和详细解释_逐层特征外化
- 9docker 镜像重命名_docker容器命名和重命名
- 10flex布局
基于华为Atlas200DK合设环境的花卉识别_python-acllite
赞
踩
前言
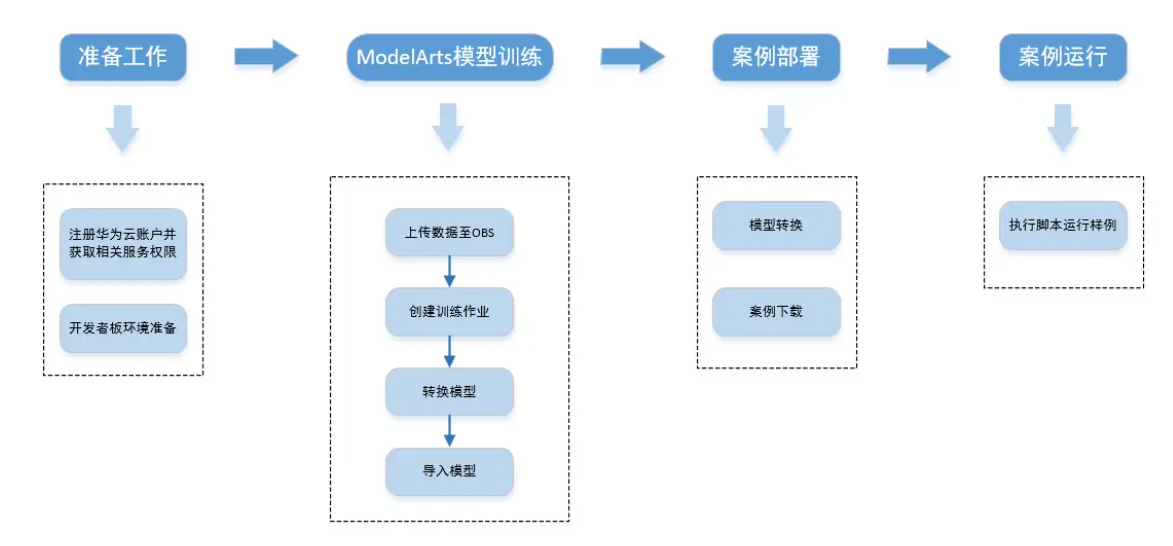
本文在上一篇文章的基础上进一步讲述案例开发部署
一、合设环境部署
与人脸识别demo部署相同
1.烧录dd镜像
-
进入昇腾论坛dd镜像帖子
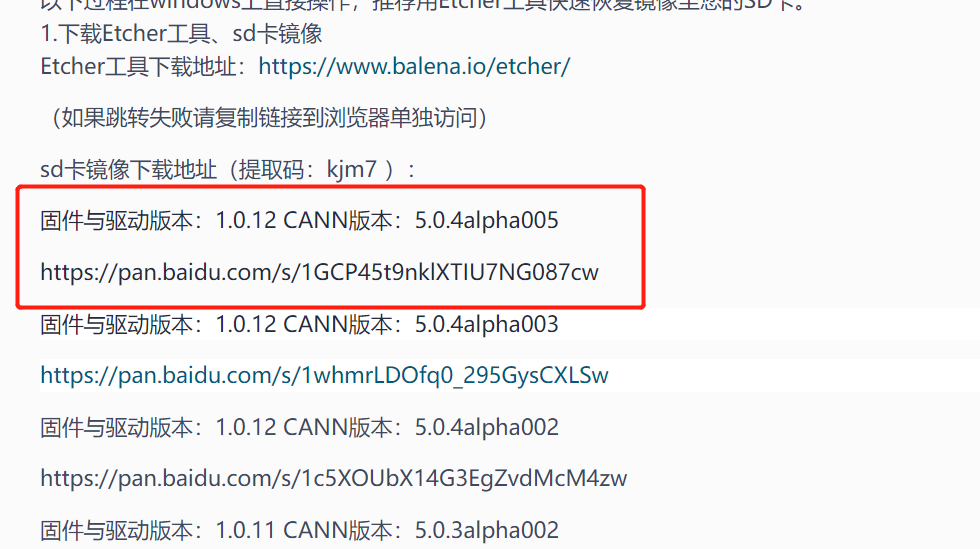
建议下载最新版本,运行demo的依赖项支持CANN>=5.0.4以上的版本
如果使用MindStudio,建议烧录5.0.4版本,目前MindStudio不支持cann5.0.5

dd镜像文件较大,下载需要一些时间 -
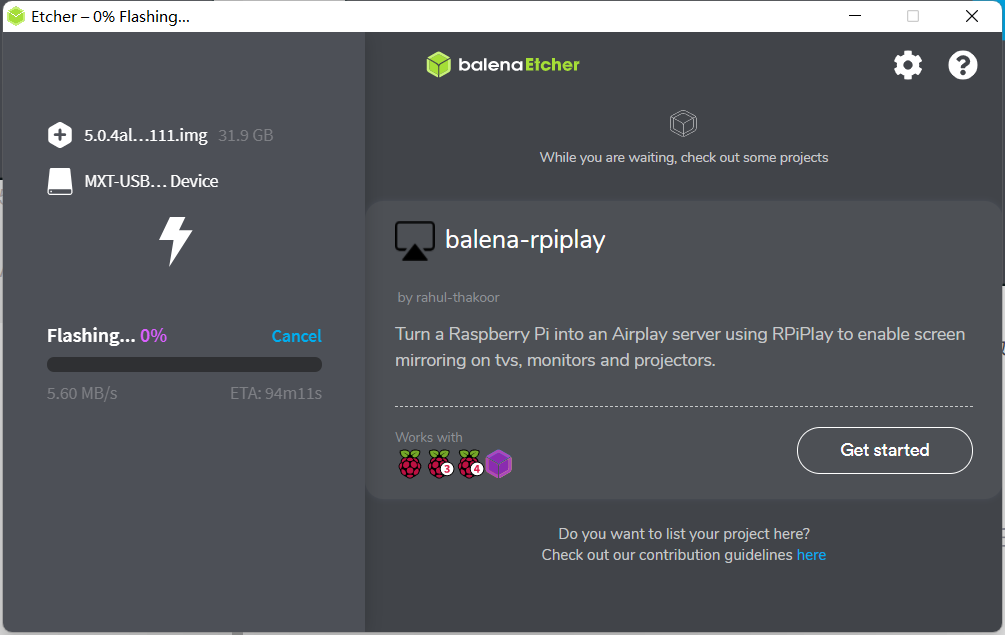
下载完成后打开balenaEtcher
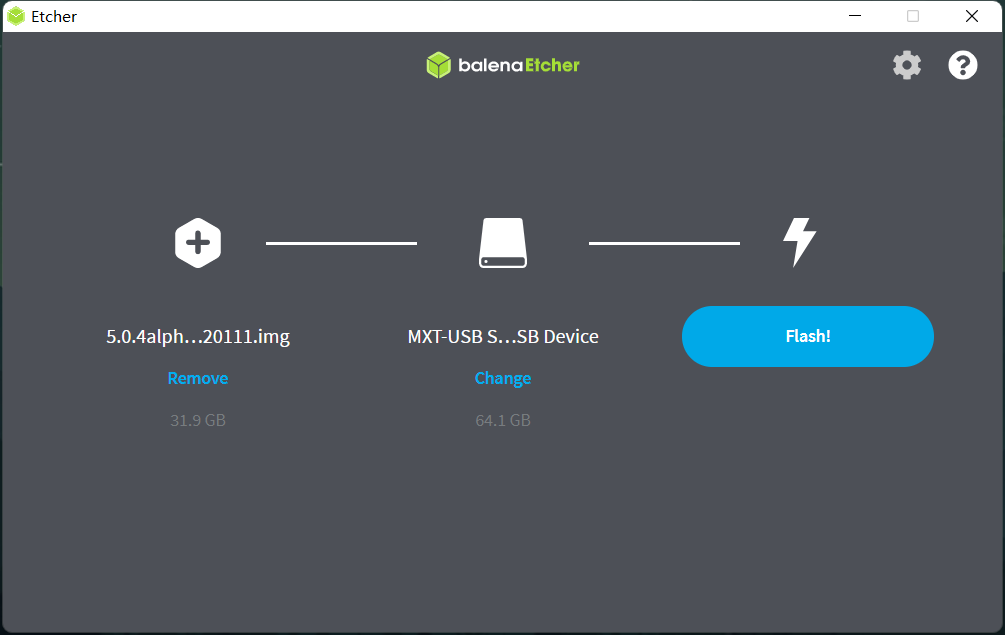
选择好已经下载好的dd镜像包和需要烧录的sd卡,点击Flash!,开始烧录
-
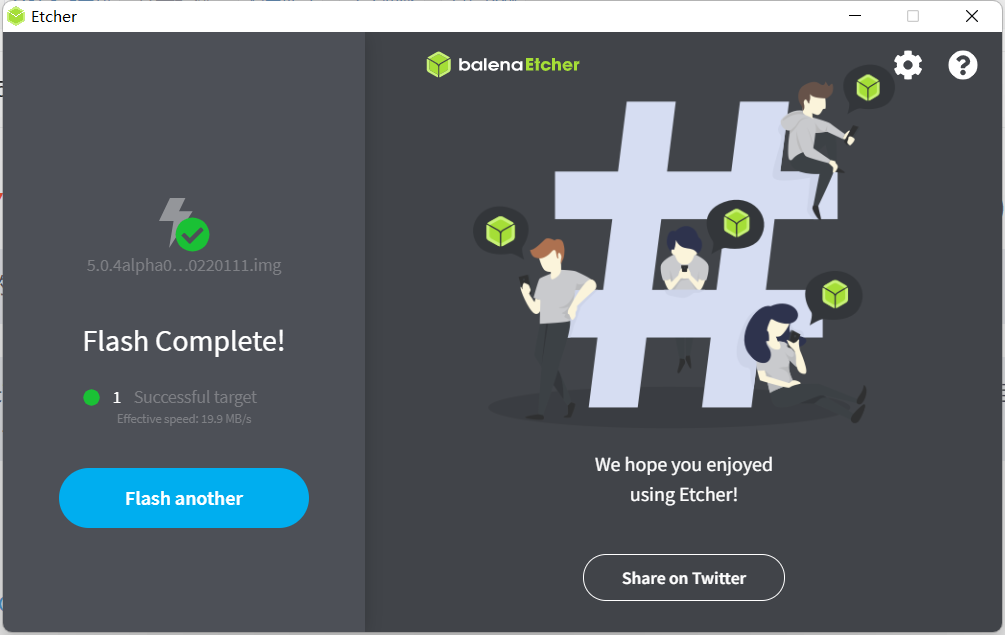
烧录成功
2.开发板启动
-
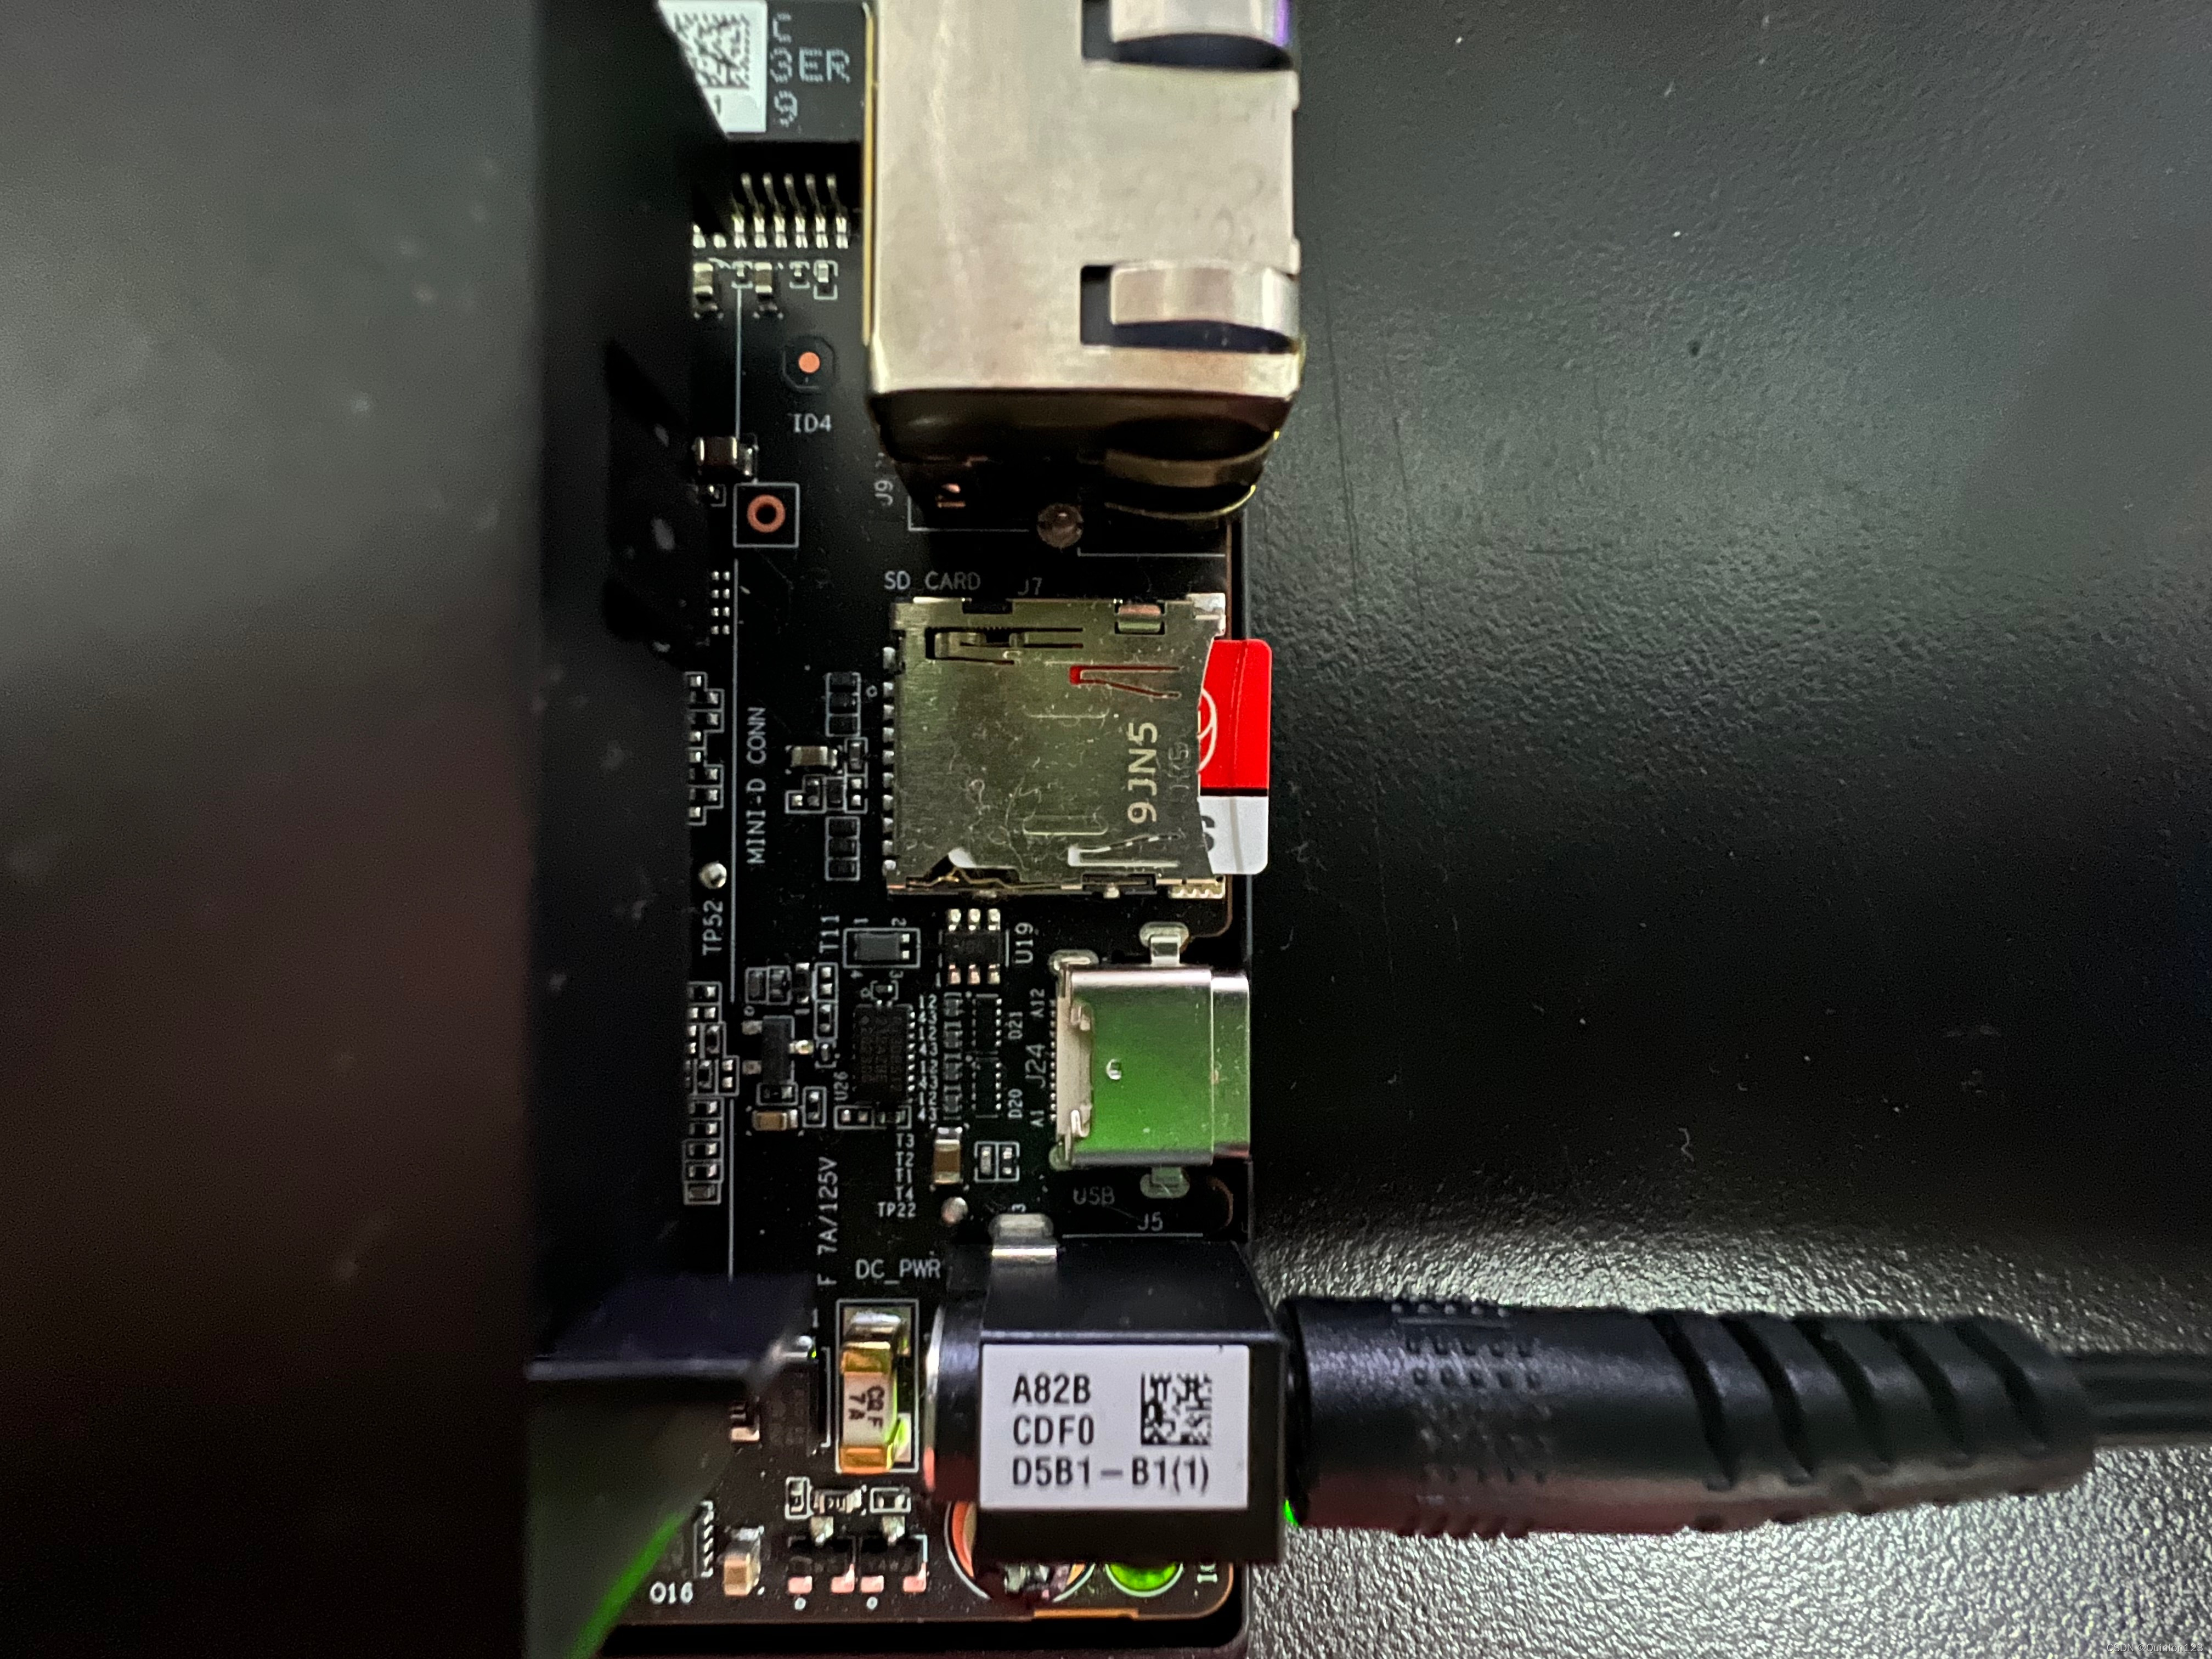
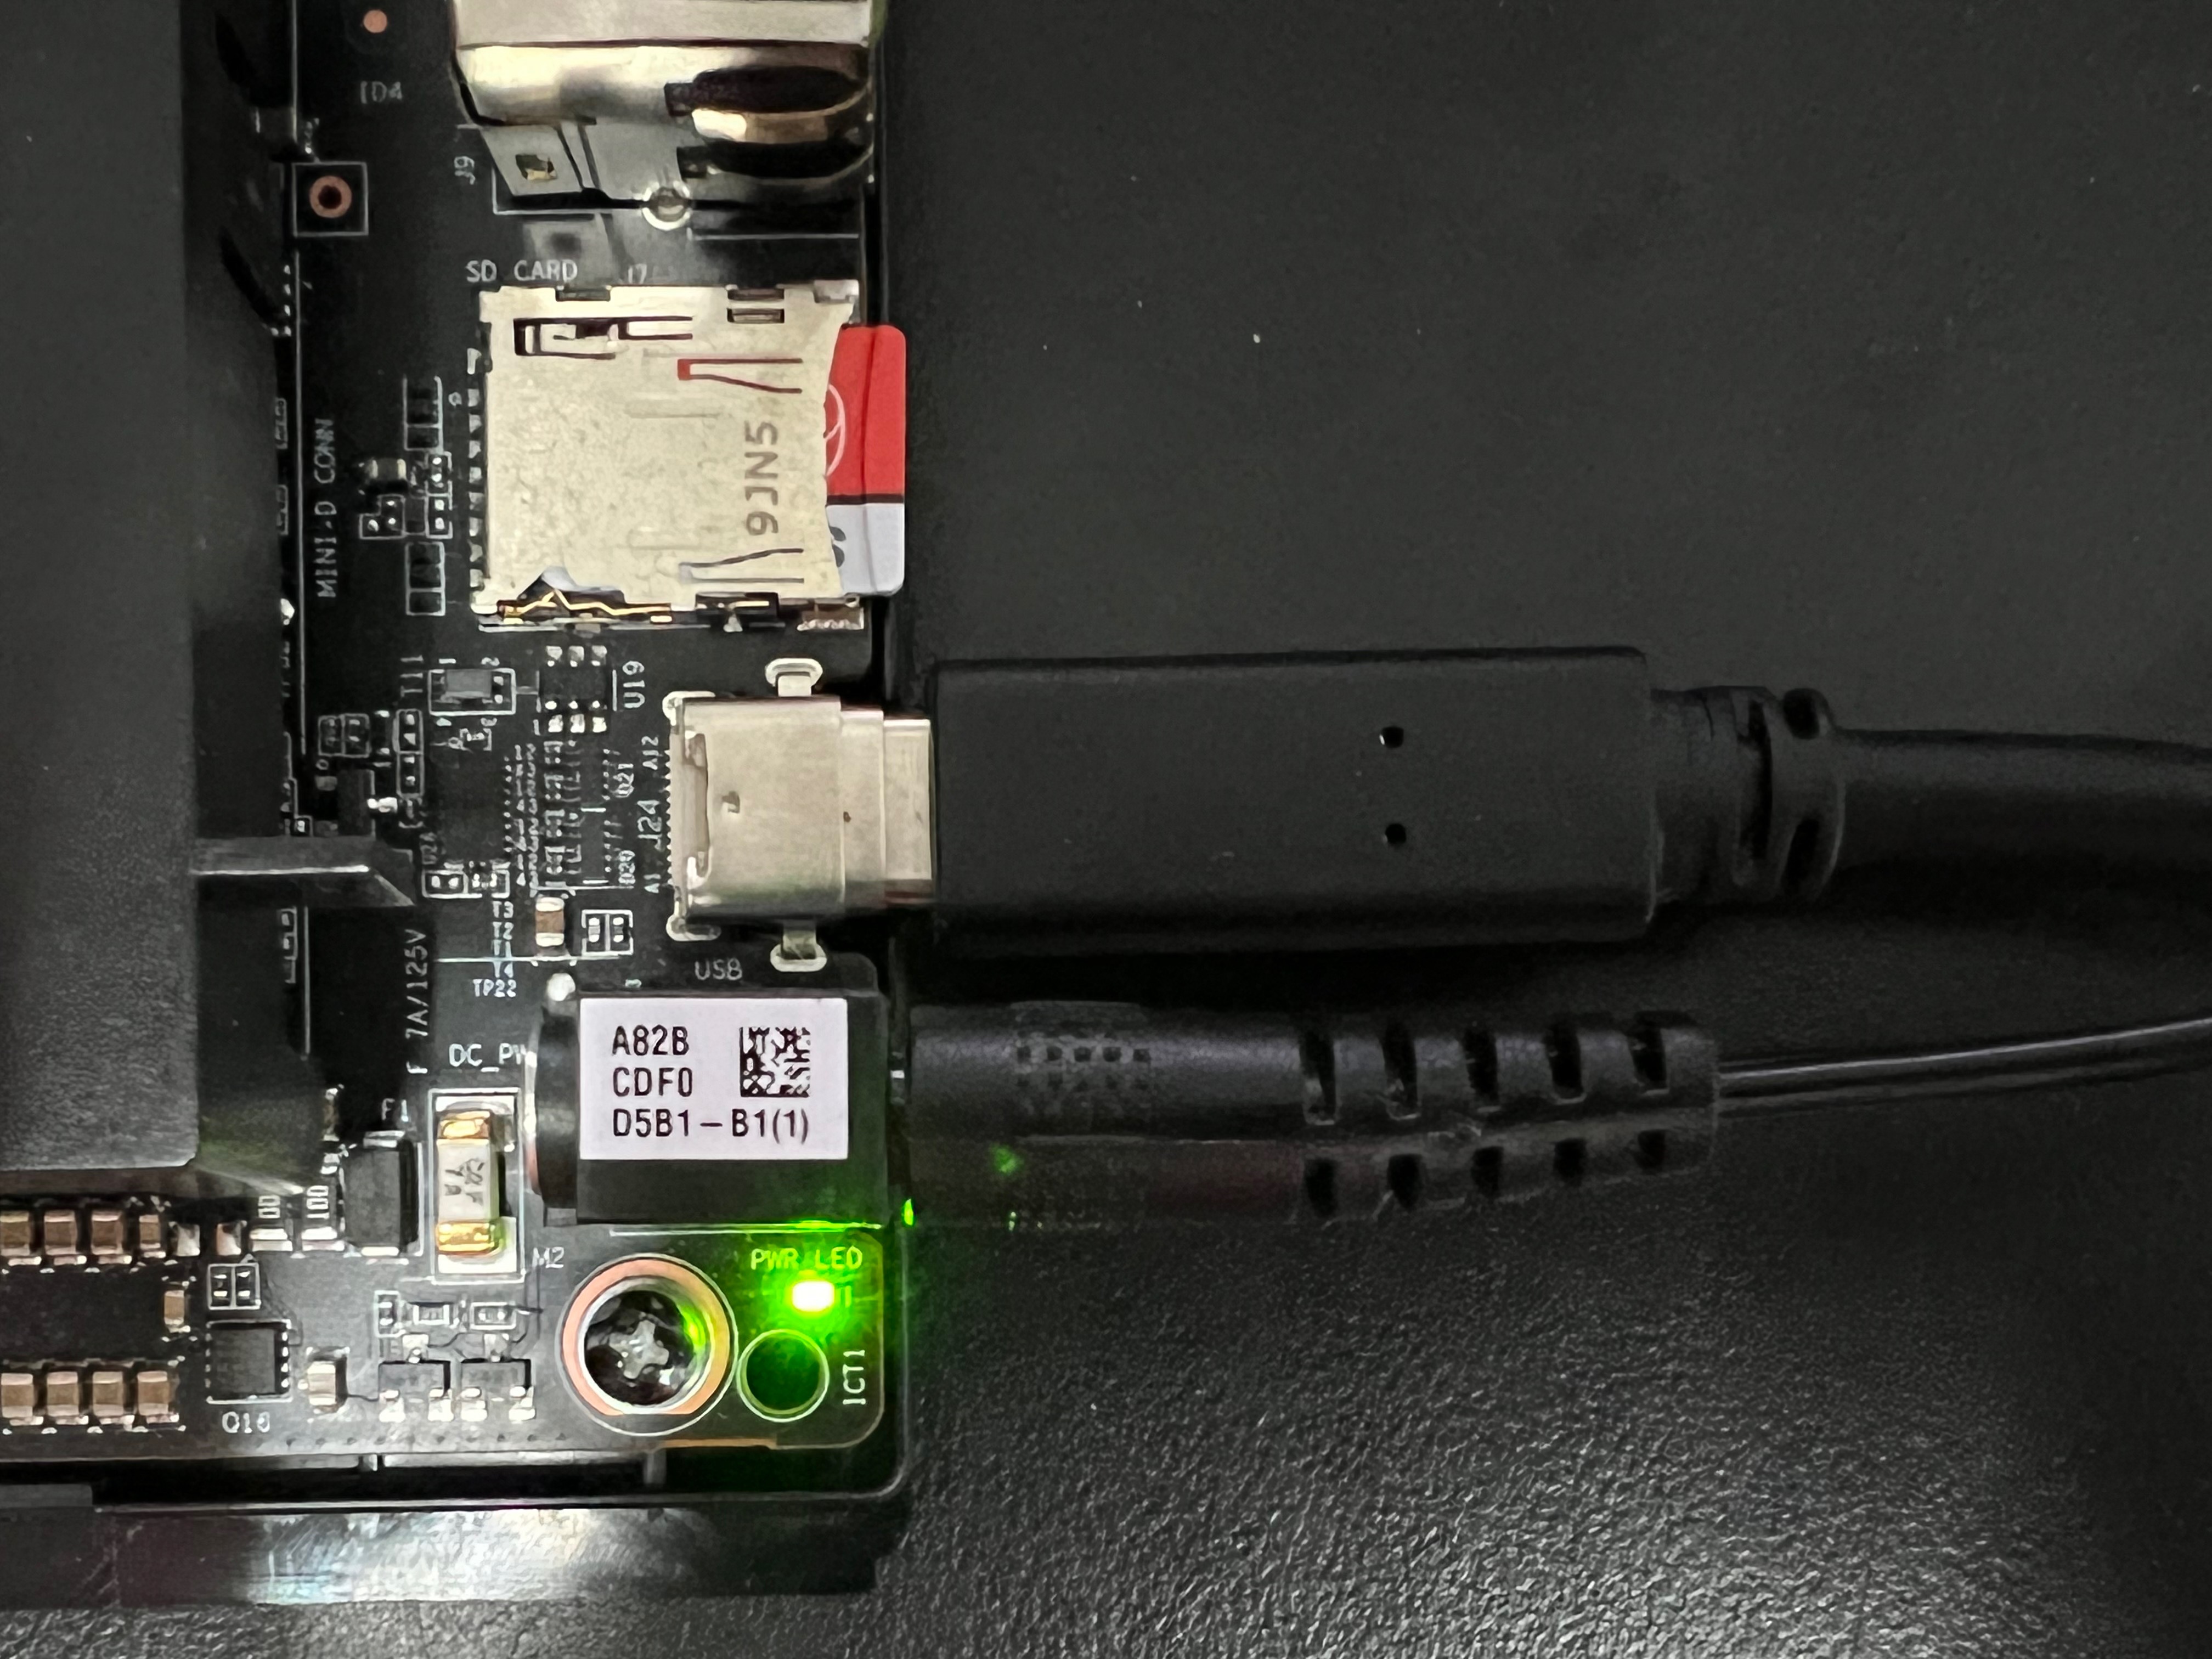
将烧录成功的sd卡插入Atlas200dk,接入电源上电,电源接口旁边的led灯亮起说明能够成功上电
-
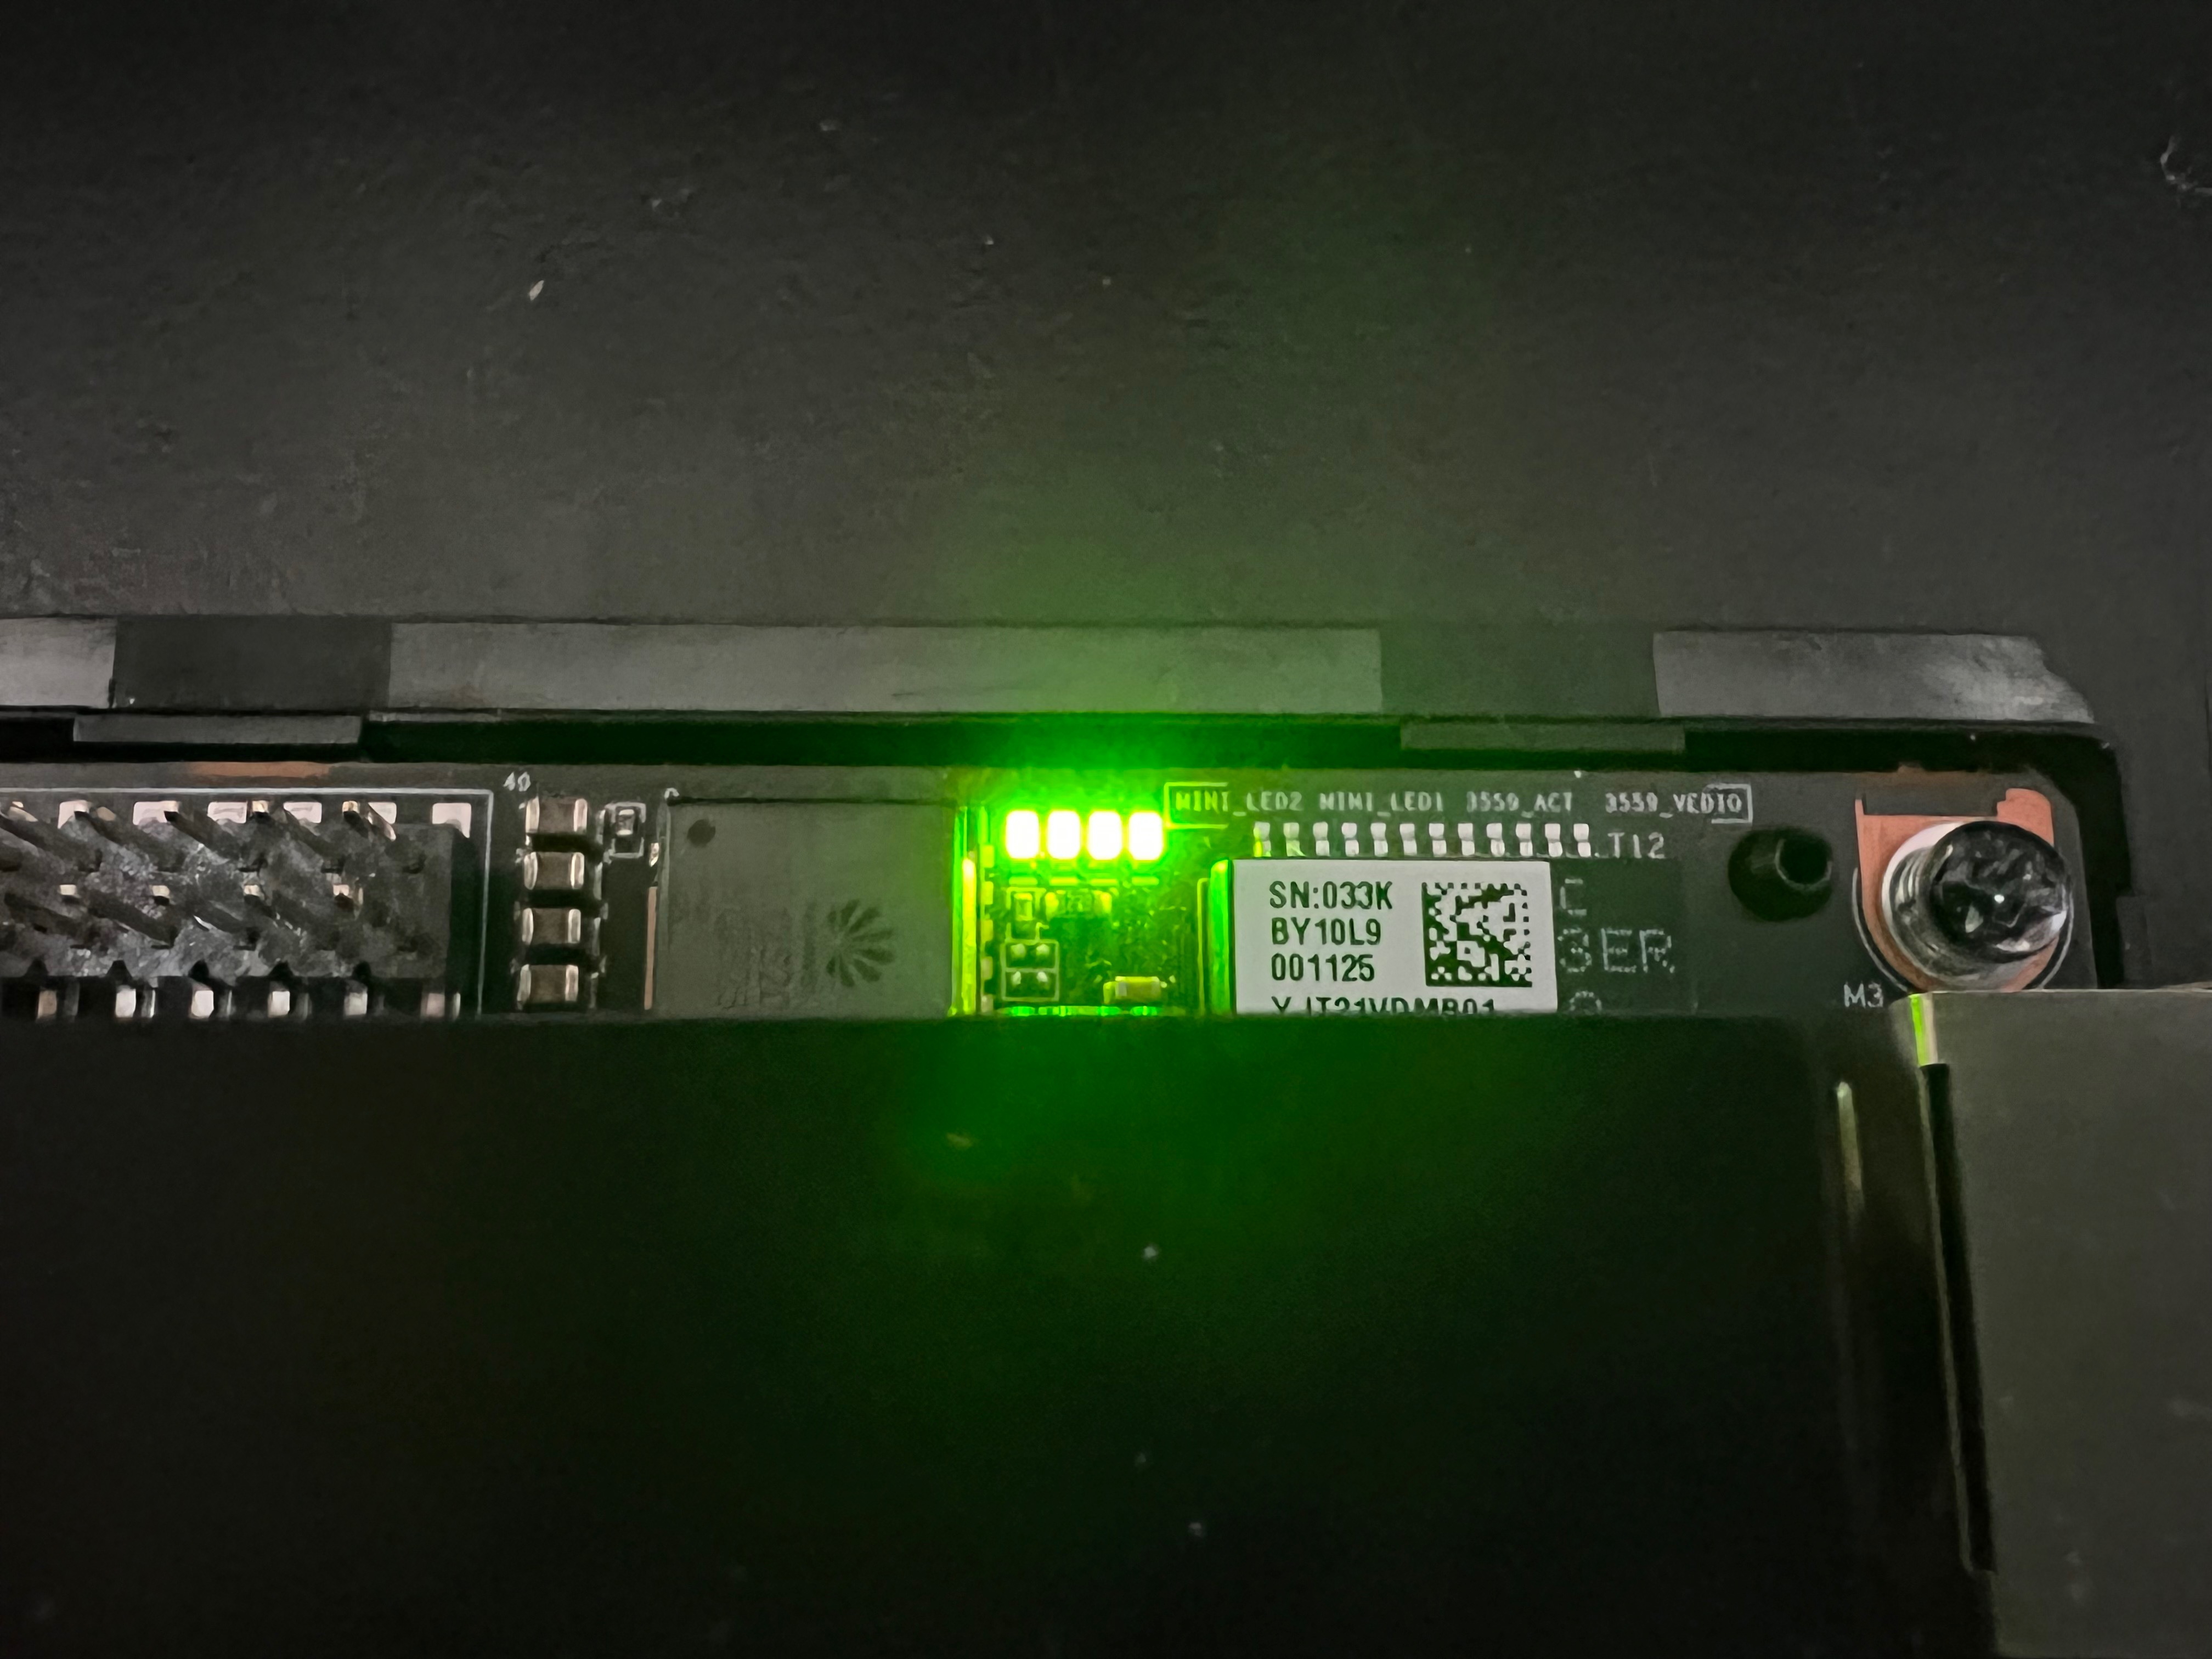
四个led灯亮起,说明开发板成功启动
3.开发板连接PC机
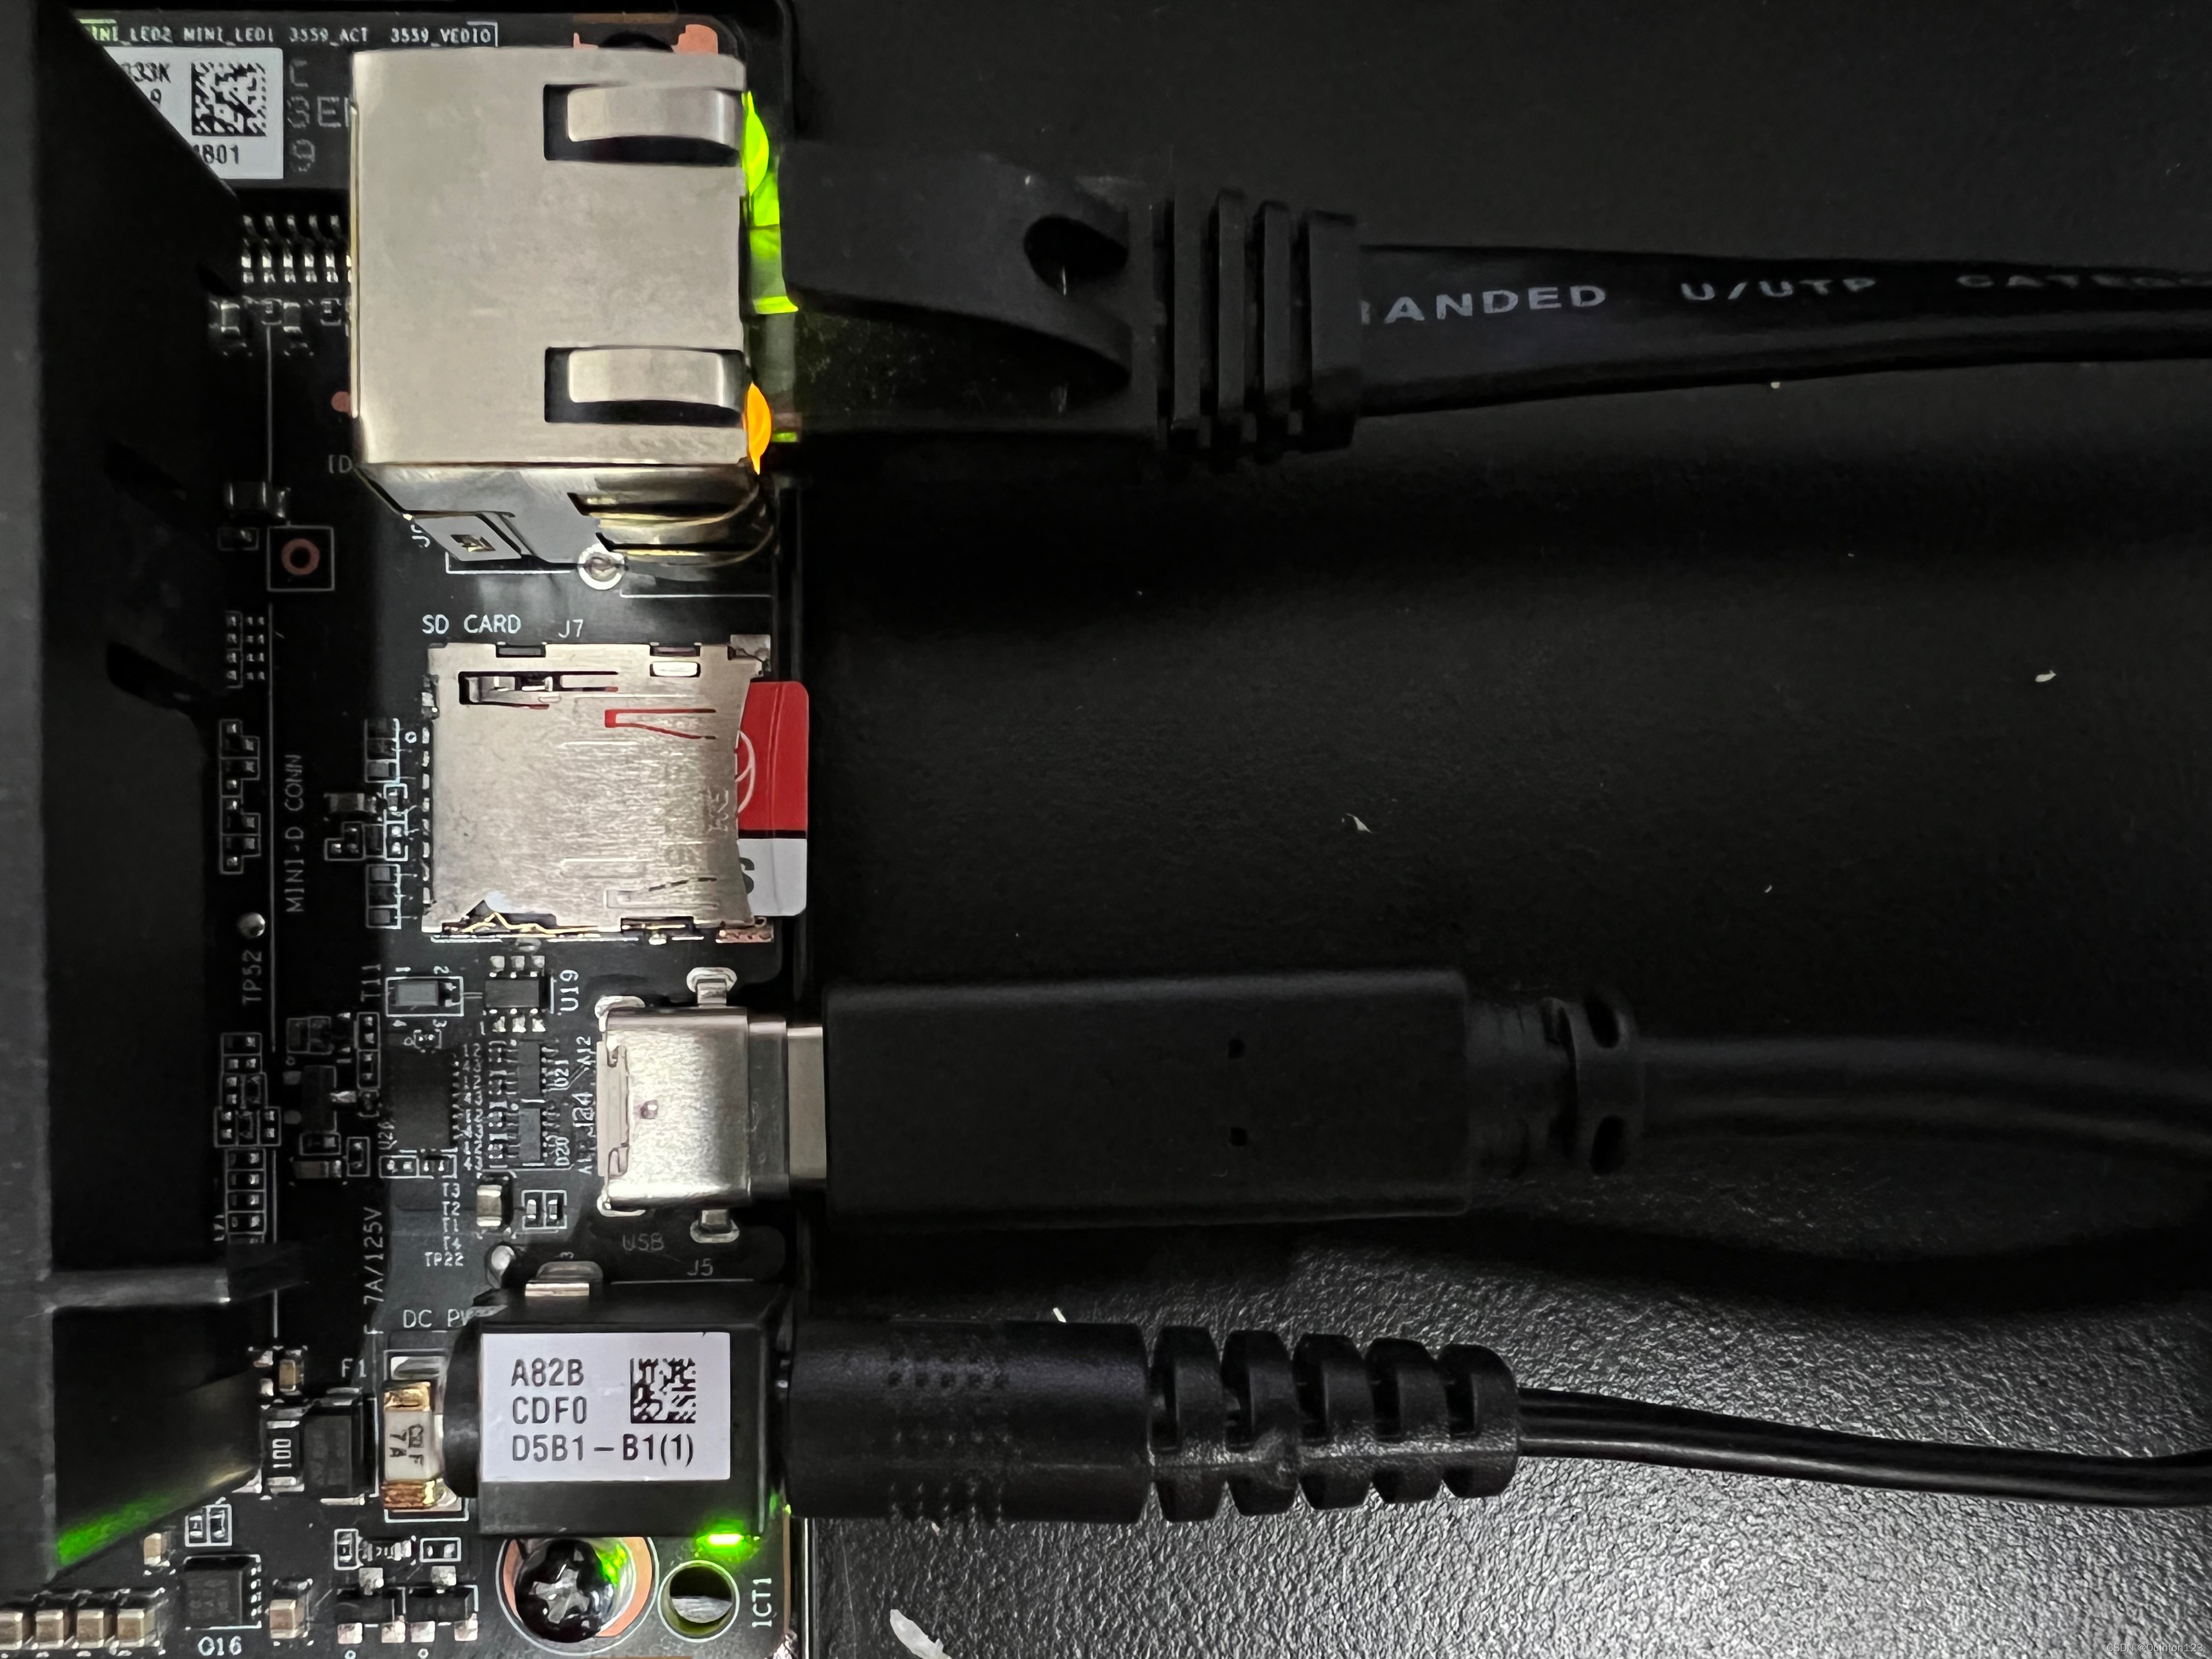
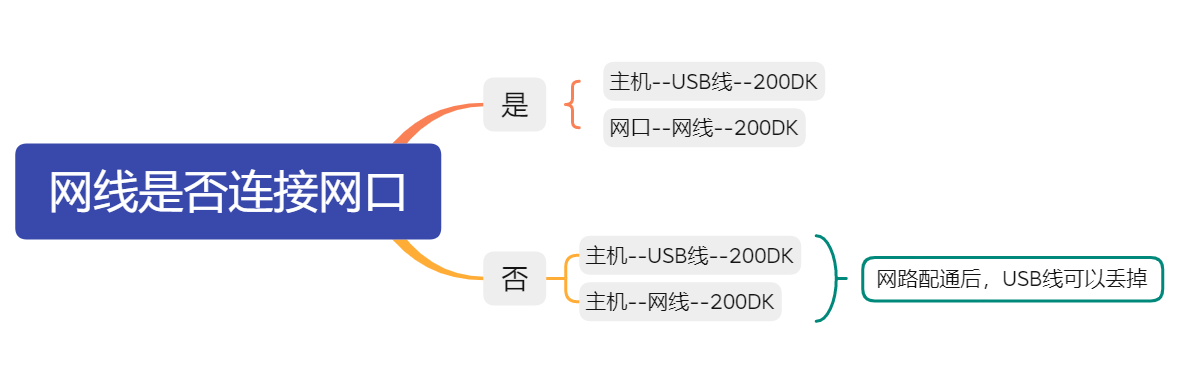
Atlas 200 DK开发者板支持通过USB端口或者网线与PC机进行连接
Atlas 200 DK与PC机连接图:
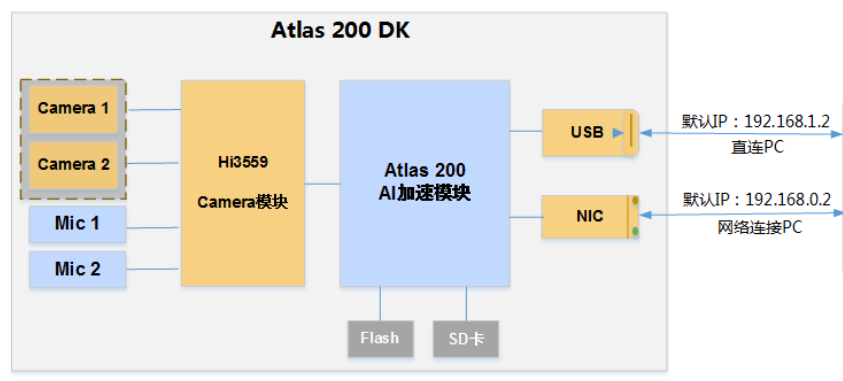
需要配置好USB端口连接,才能配置网线连接
1.USB端口连接
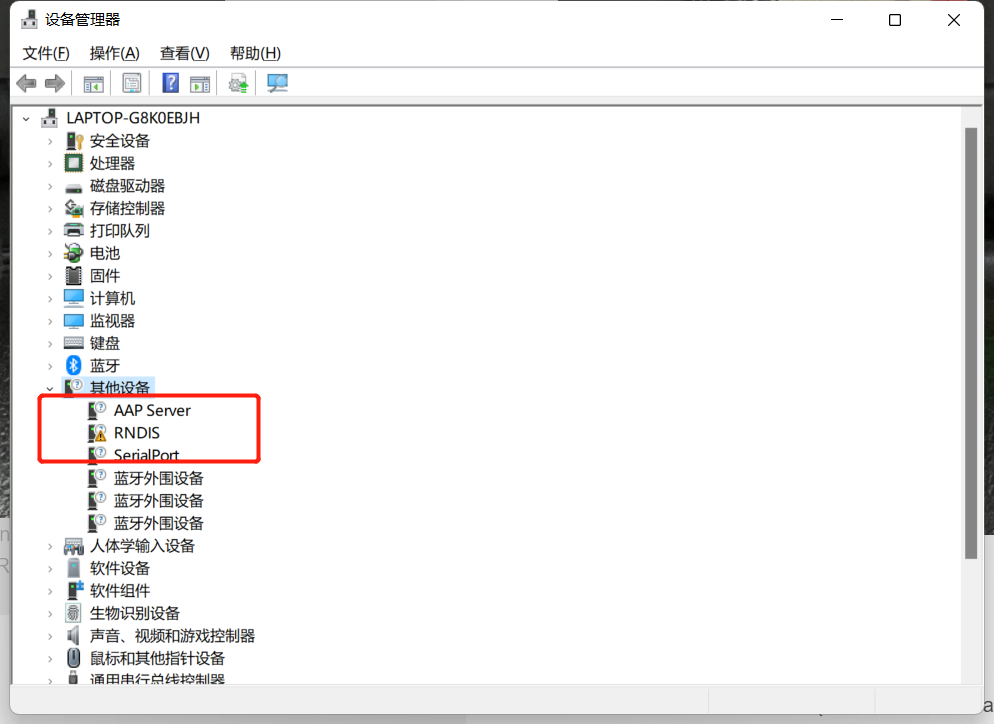
- 使用套件内的黑色USB-Type-C数据线连接开发板和PC机
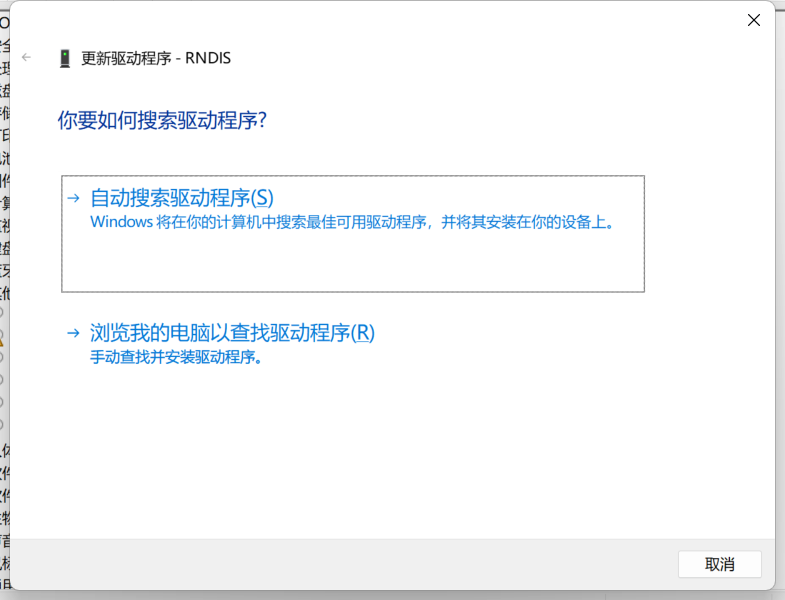
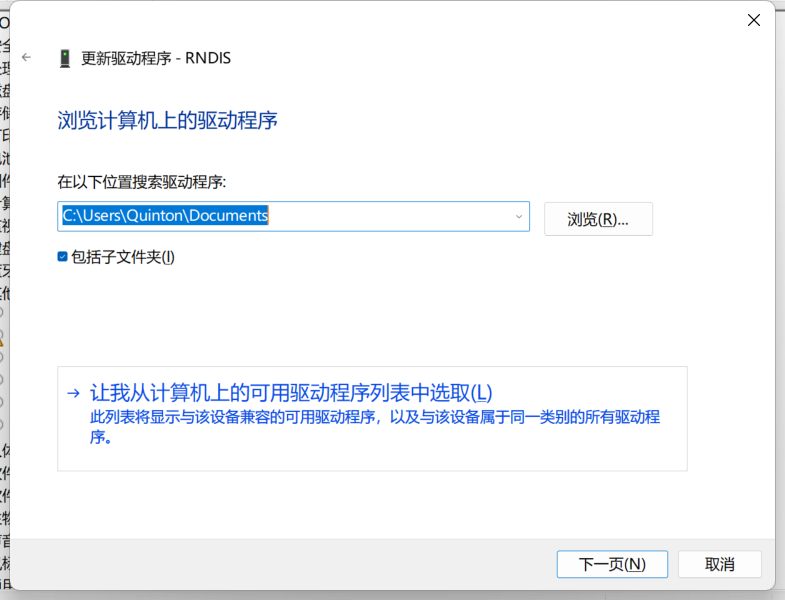
- PC机打开设备管理器->其他设备,可以看到带有警报标志的RNDIS, 右键点击RNDIS->更新驱动程序
- 选择“浏览我的电脑以查找驱动程序”
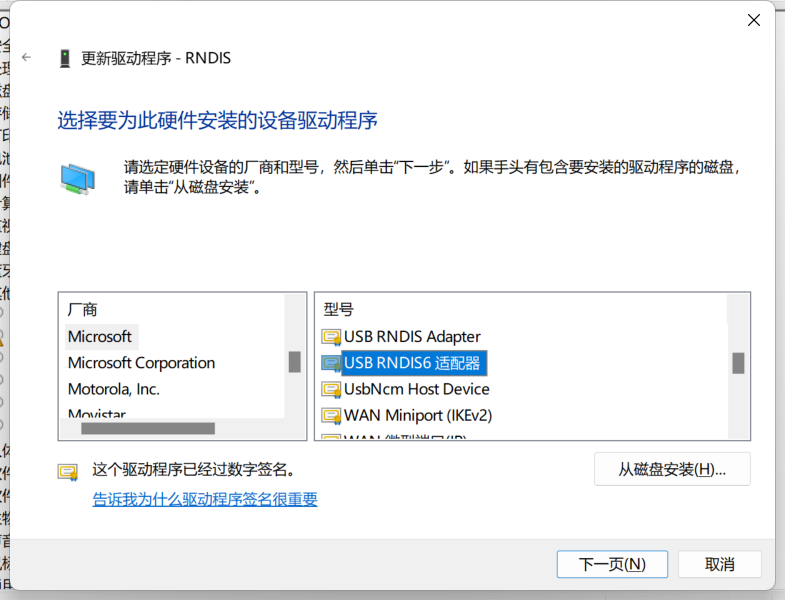
- 选择“让我从计算机上的可用驱动程序列表中选取”
- 向下滑动,选择“网络适配器”,然后下一页

- 厂商选择Microsoft,型号选择USB RNDIS6 适配器,然后下一页
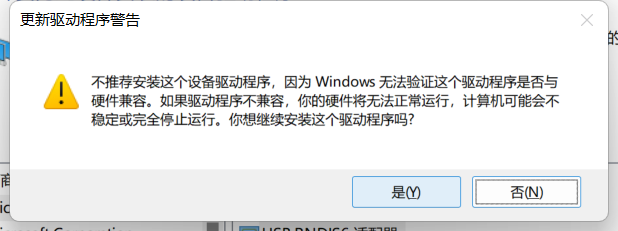
- 出现警告,选择“是”
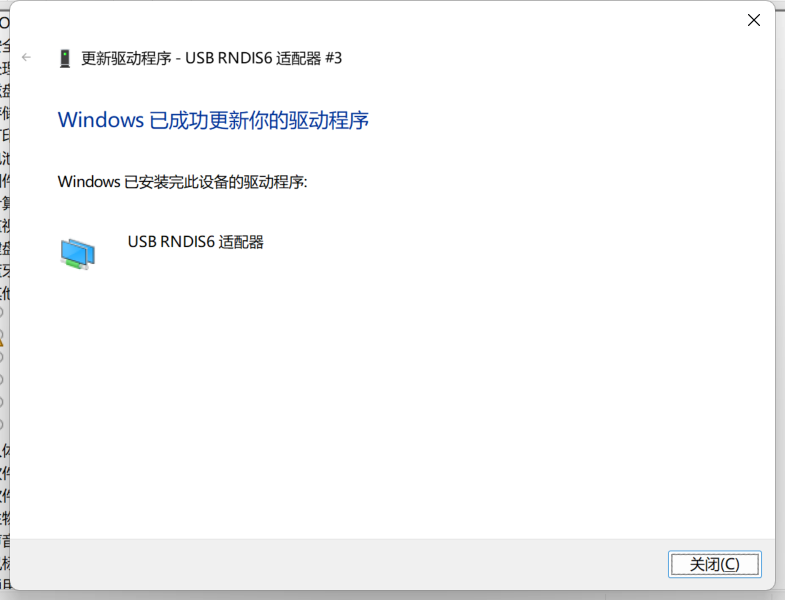
- 更新驱动程序完成
- 进入网络和Internet->高级网络设置->更多网络适配器选项,可以查看到USB RNDIS6 适配器
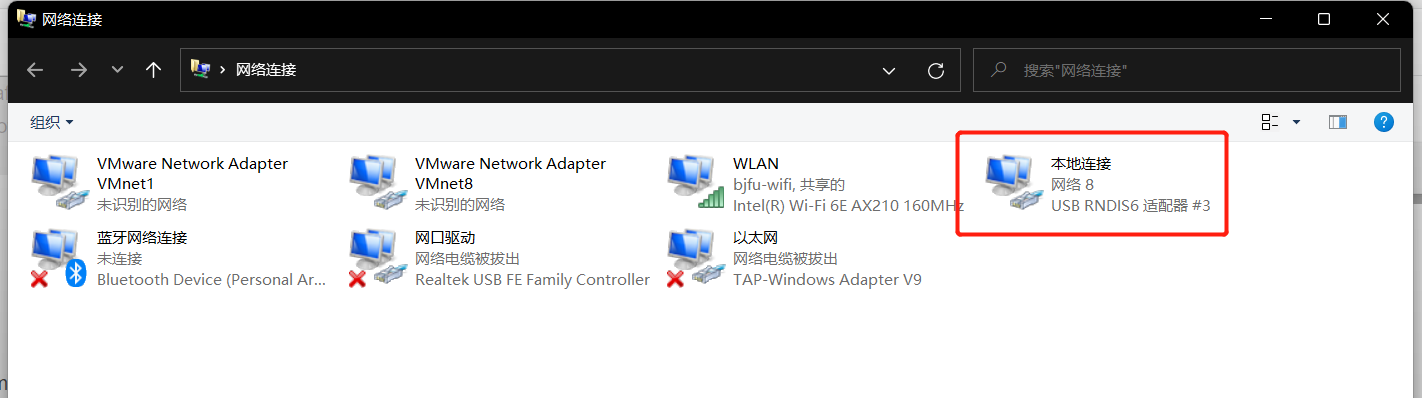
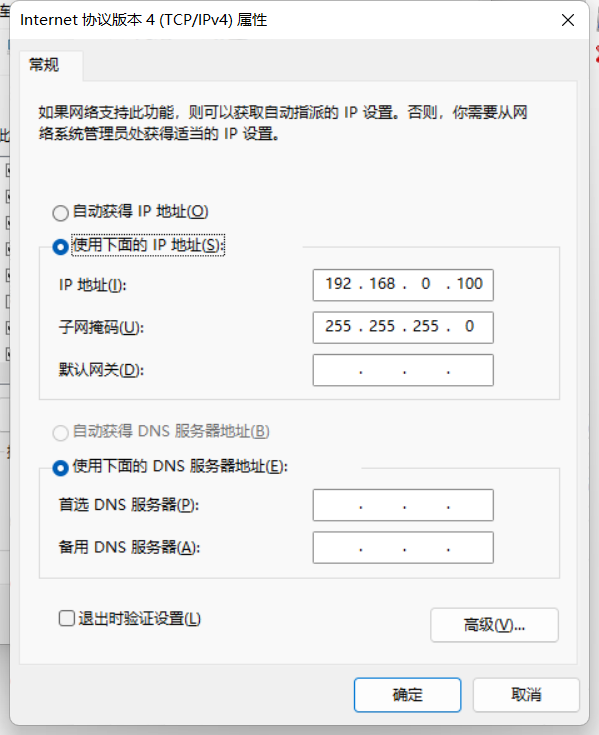
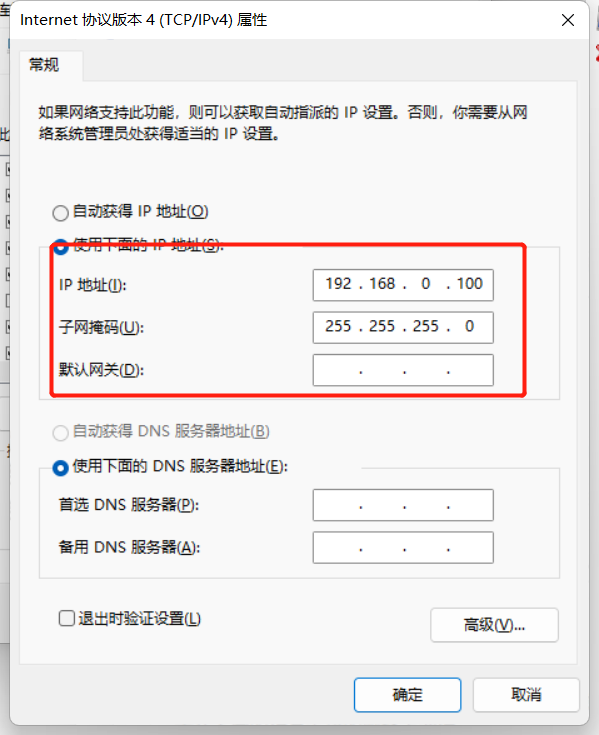
- 右键点击查看属性,双击ipv4协议
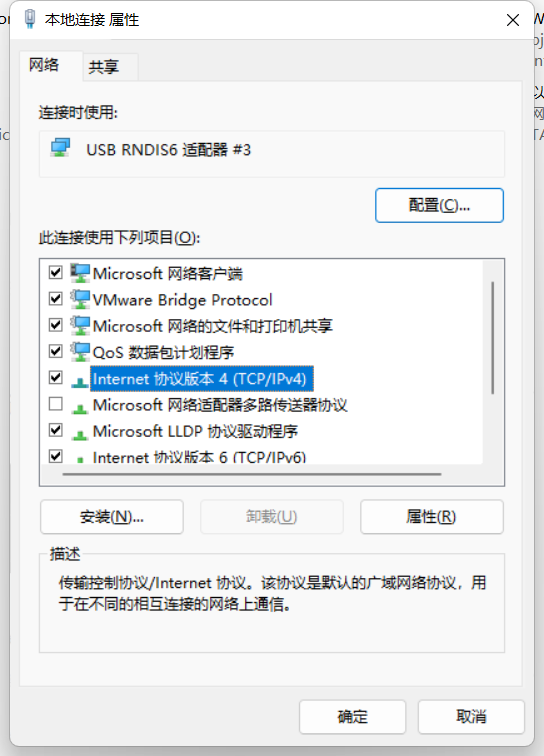 2
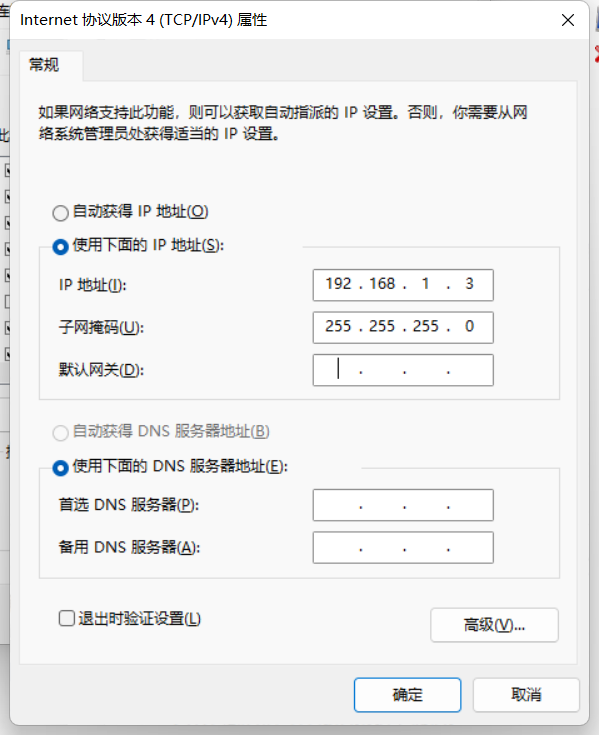
2 - 选择”使用下面的ip地址“,将ip地址更改为192.168.1.X, X为0~255除了2以外的数字,点击子网掩码填写框会自动生成子网掩码,点击确定
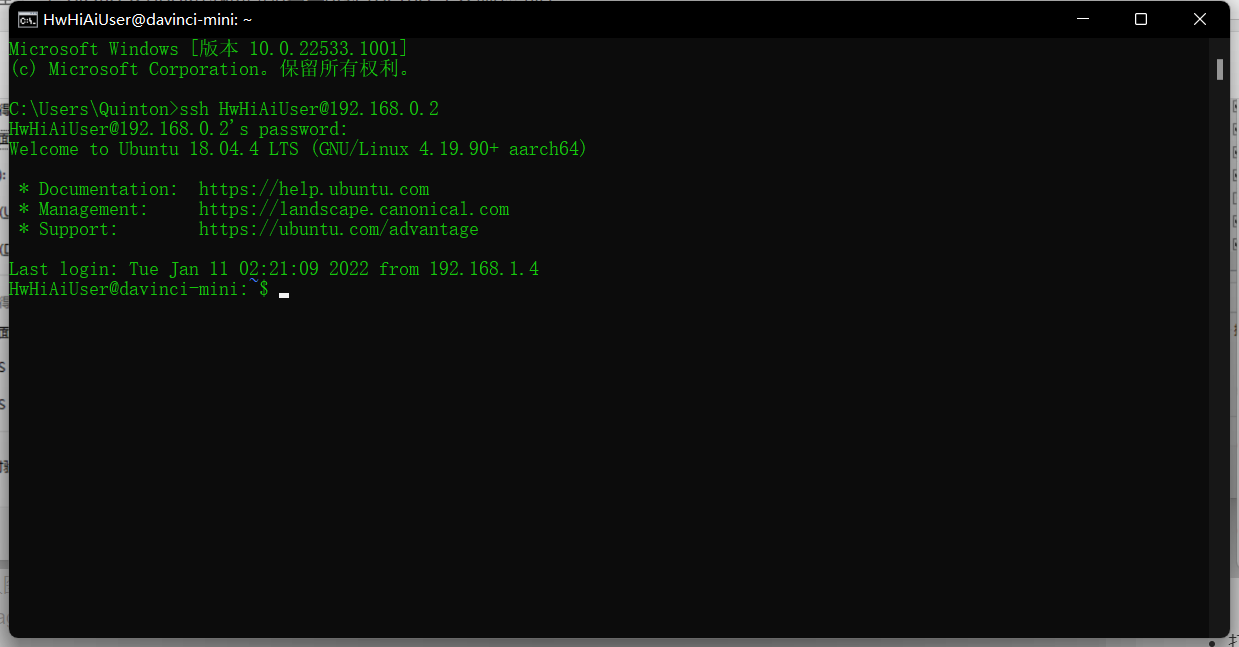
使用USB端口连接的默认ip为192.168.1.2,所以要将PC机网络适配器ipv4的ip地址更改为和其同个网段下
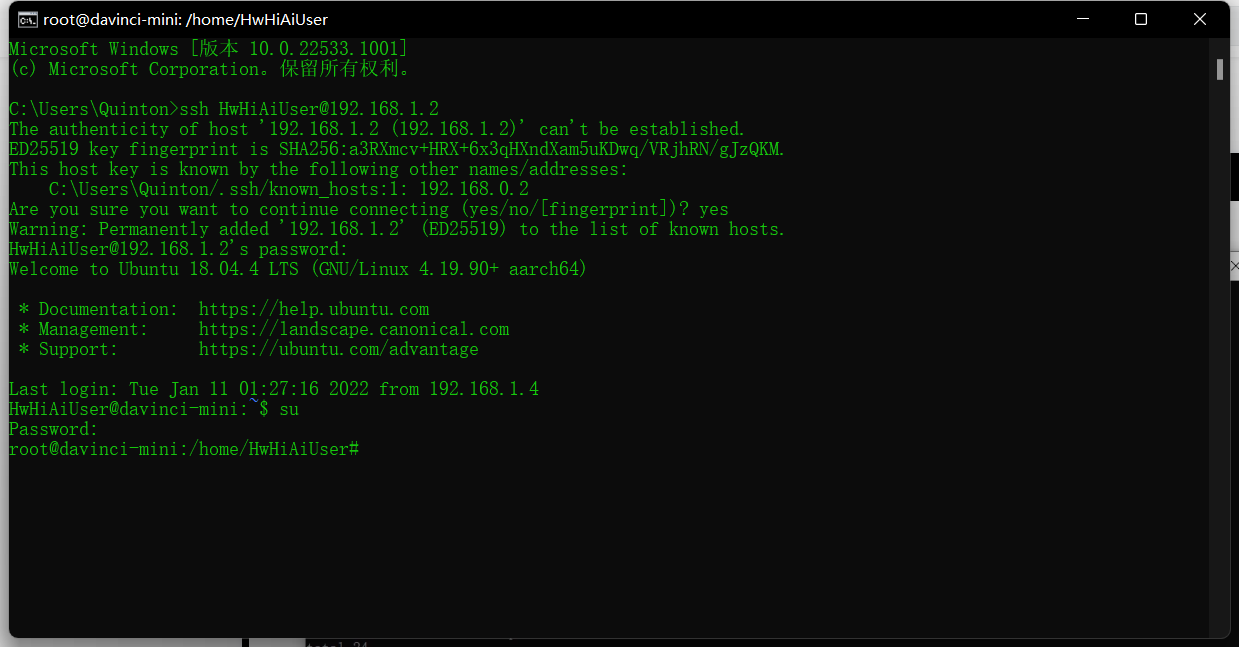
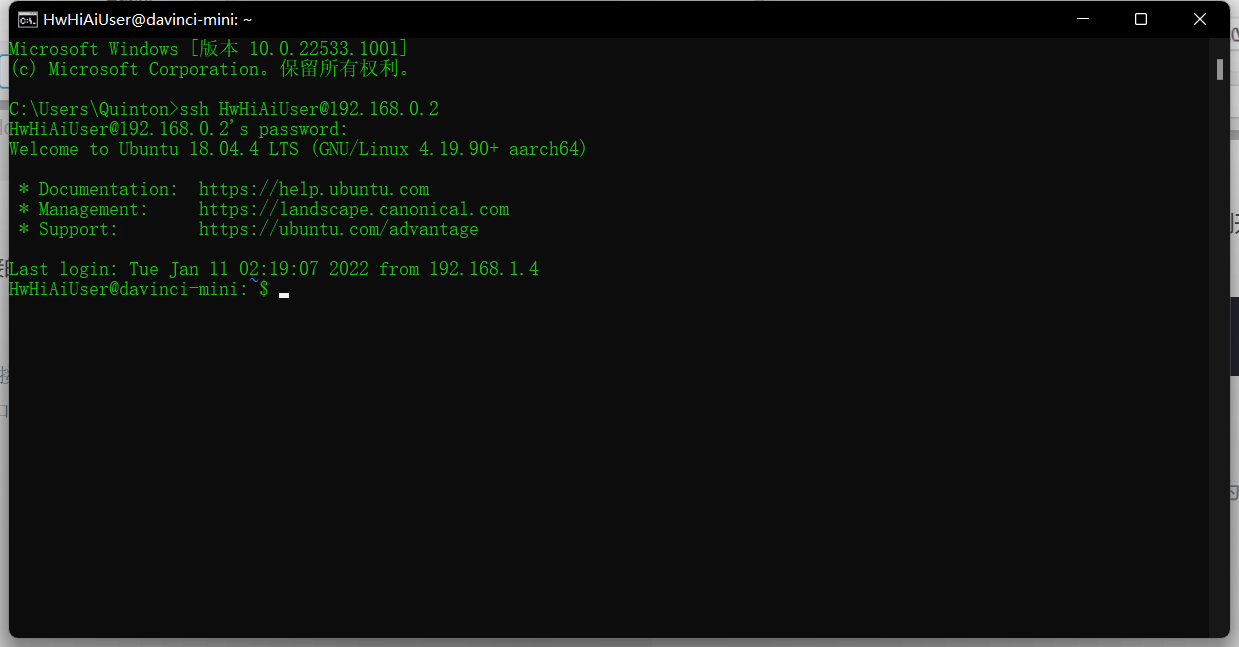
- PC机打开cmd或者其它终端(这里使用的是MobaXterm),输入:
ssh HwHiAiUser@192.168.1.2
- 1
- 按下回车键,连接成功
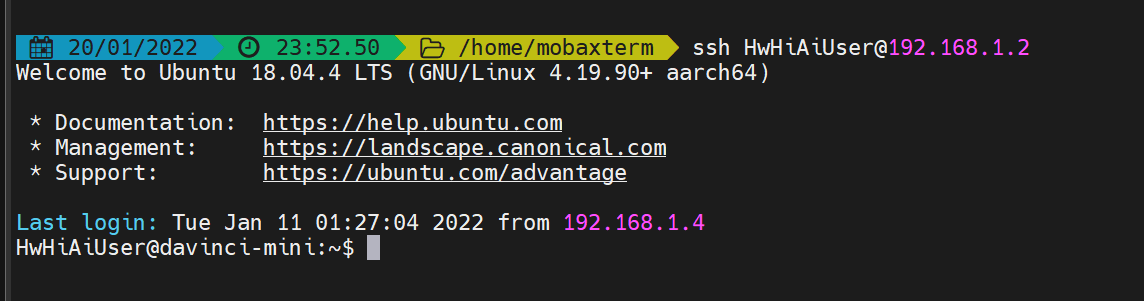
如果连接需要输入密码,默认密码为Mind@123,进入root模式也是使用这个密码
2.网线连接
- 使用套件内的网线和USB-Type-C数据线连接开发板和PC机
使用USB端口连接进入开发板更改网络参数
如果能够使用USB端口连接PC,网线接入网口或者路由器再接入开发板的方式联网,不用配置网线连接
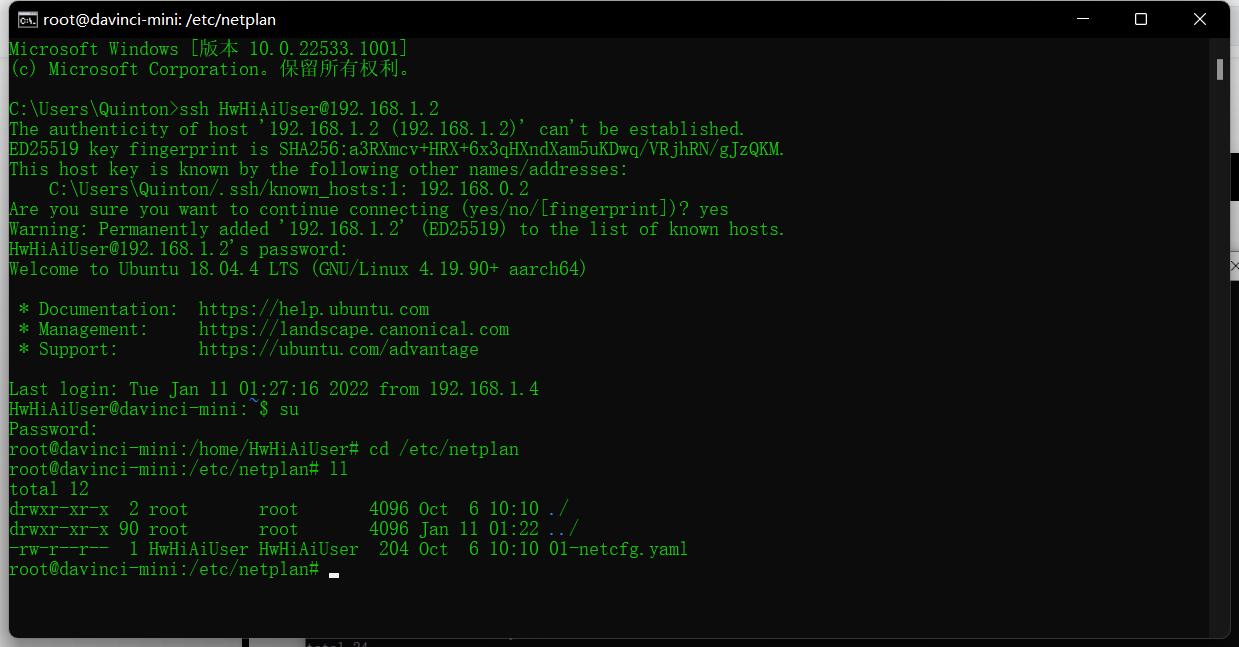
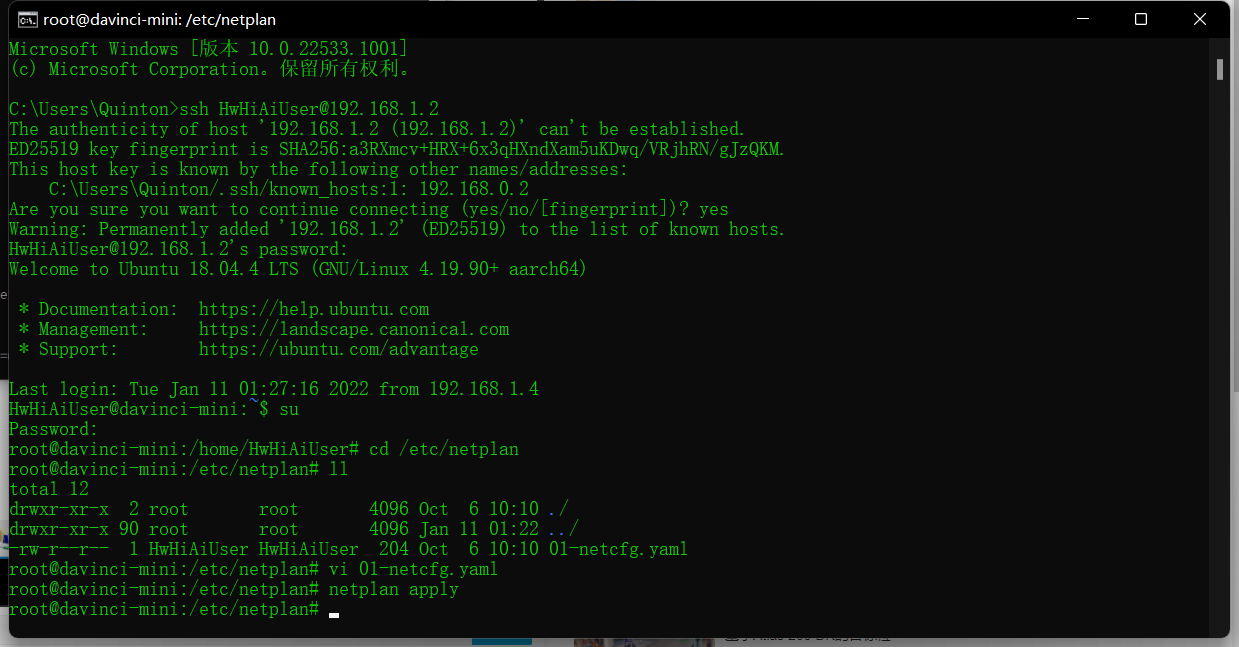
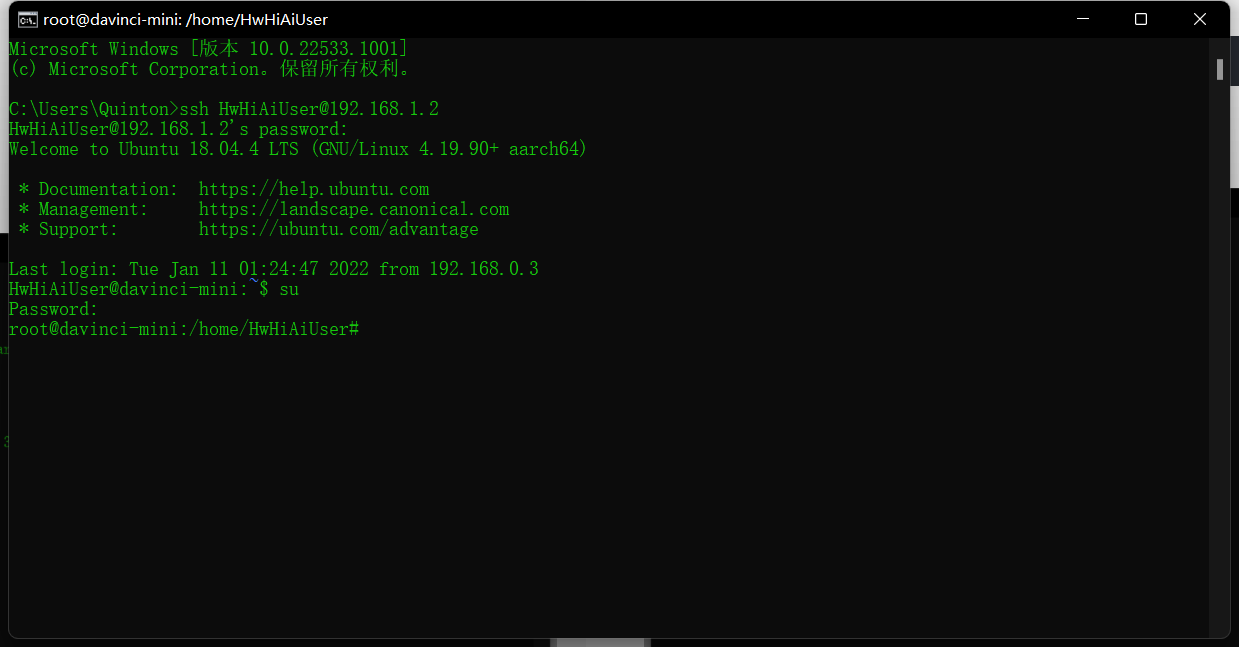
- 连接开发板,输入su,然后回车,进入root模式,密码为MInd@123,注意输入密码时页面并不会出现字符
- 执行cd命令进入netplan文件夹,并查看文件夹下文件
cd /etc/netplan #进入netplan文件夹
ll #查看文件夹下文件
- 1
- 2
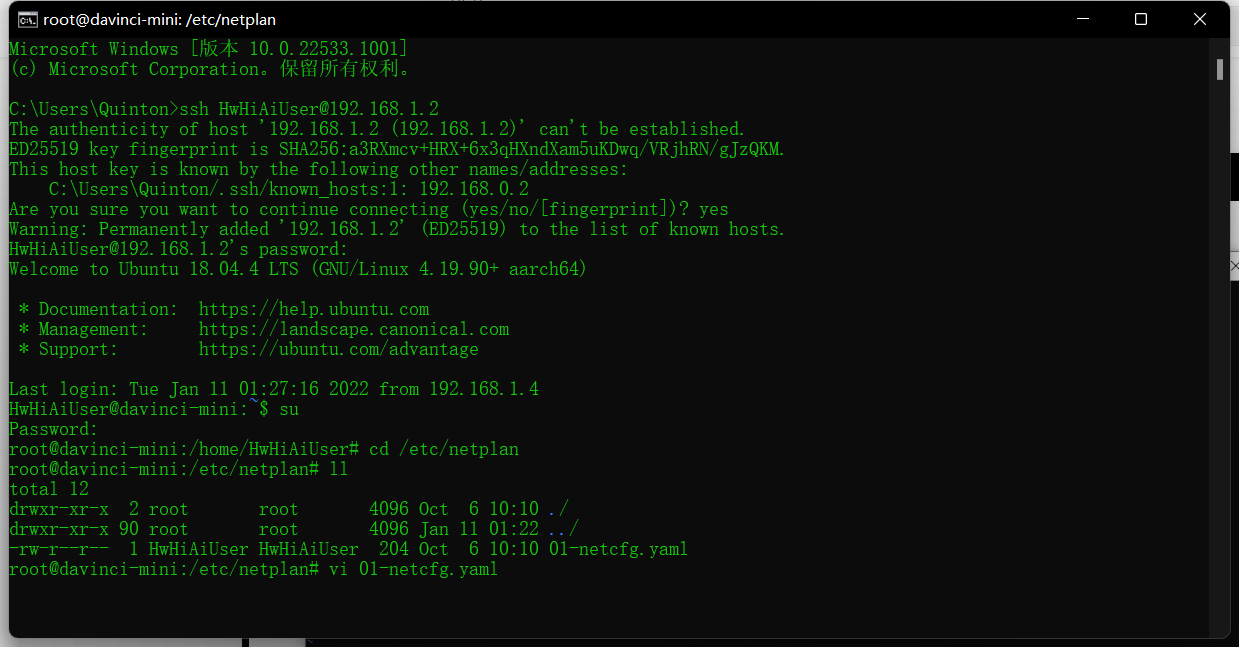
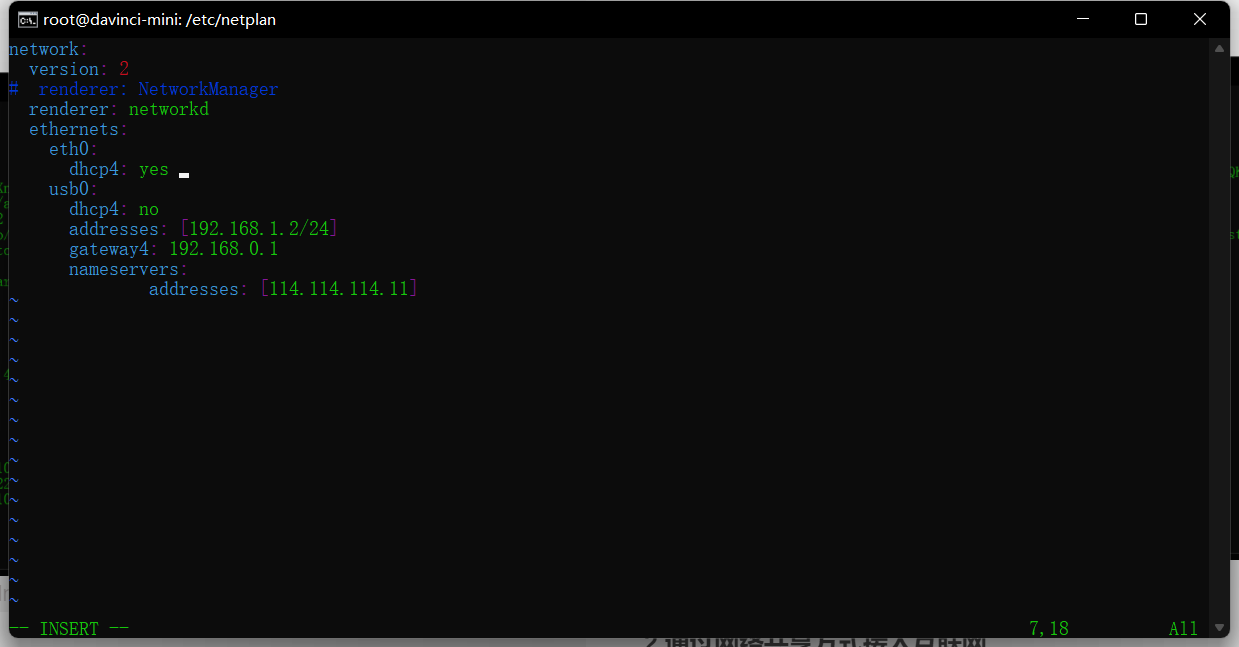
- 使用vi命令打开网络配置文件
vi 01-netcfg.yaml
- 1
- 在网络配置文件中设置好网线连接的参数,将dhcp4设置为no,设置ip以及网关gateway4,网关可以设置为192.168.0.X,X为0~255中除了2的任何一个数字,后面步骤中也要使用这个网关配置PC端上的网络适配器,然后保存退出
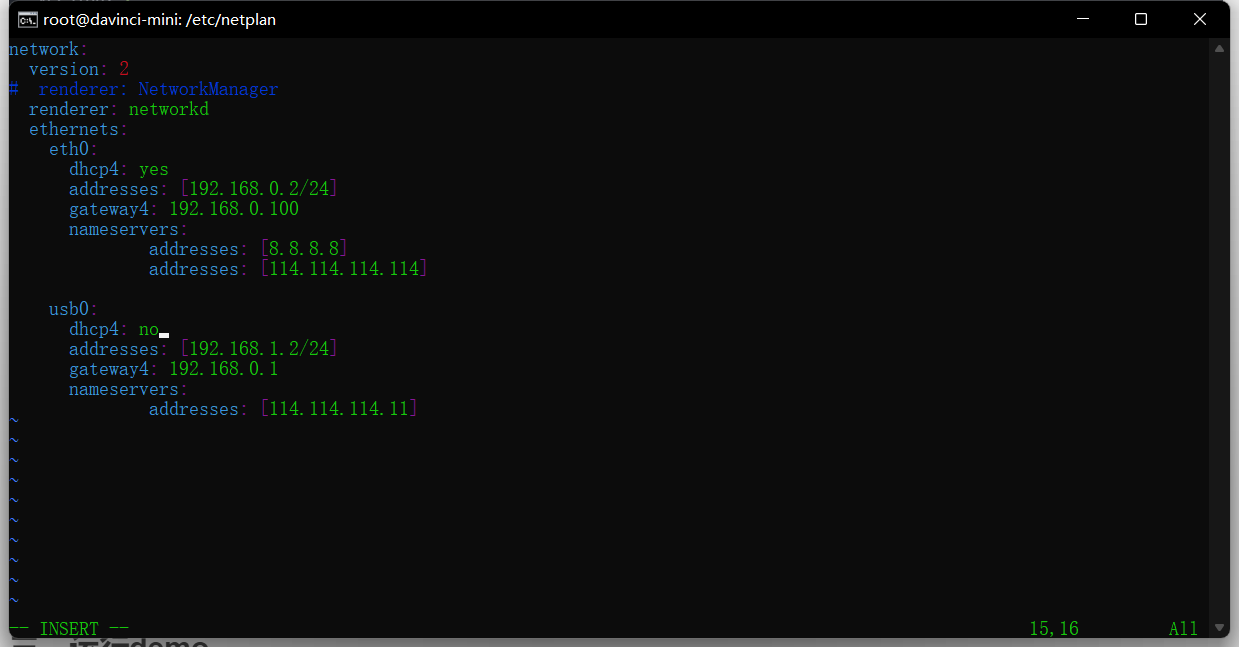
network:
  version: 2
#  renderer: NetworkManager
  renderer: networkd
  ethernets:
    eth0:
      dhcp4: yes
      addresses: [192.168.0.2/24]
      gateway4: 192.168.0.100 #可以设置为192.168.0.X,X为0~255中除了2的任何一个数字
      nameservers:
              addresses: [8.8.8.8]
              addresses: [114.114.114.114]

    usb0:
      dhcp4: no
      addresses: [192.168.1.2/24]
      gateway4: 192.168.0.1
      nameservers:
              addresses: [114.114.114.11]

- 1
- 2
- 3
- 4
- 5
- 6
- 7
- 8
- 9
- 10
- 11
- 12
- 13
- 14
- 15
- 16
- 17
- 18
- 19
使用vi进入yaml文件后,按字母”i“键进入插入编辑模式,编辑完成后按”Esc“退出编辑模式,输入冒号”:",然后输入“wq!”,回车,成功保存退出
- 使设置的网络参数生效,使用此命令:
netplan apply
- 1
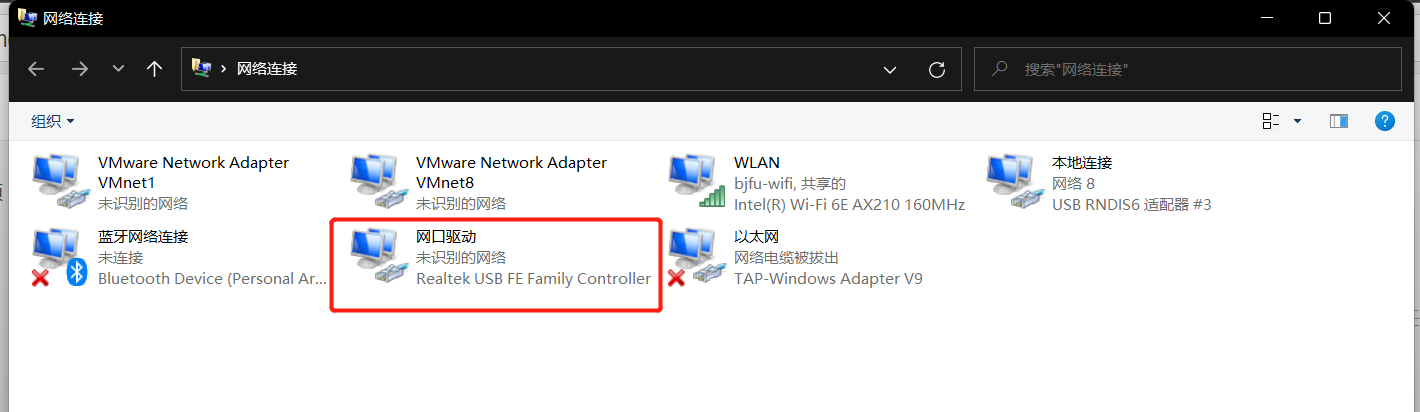
- 进入网络和Internet->高级网络设置->更多网络适配器选项,确定好网口的网络适配器(这里已经重命名为网口驱动)
拔插USB和网线,观察哪个适配器消失,可以确定对应的网络适配器
- 进入ipv4设置页面,将ip地址设置为在开发板中设置的gateway4,或者设置为192.168.1.X, X为0~255除了2以外的数字,确定
如果设置为gateway4相同,便于开发板使用共享网络的方式进行联网
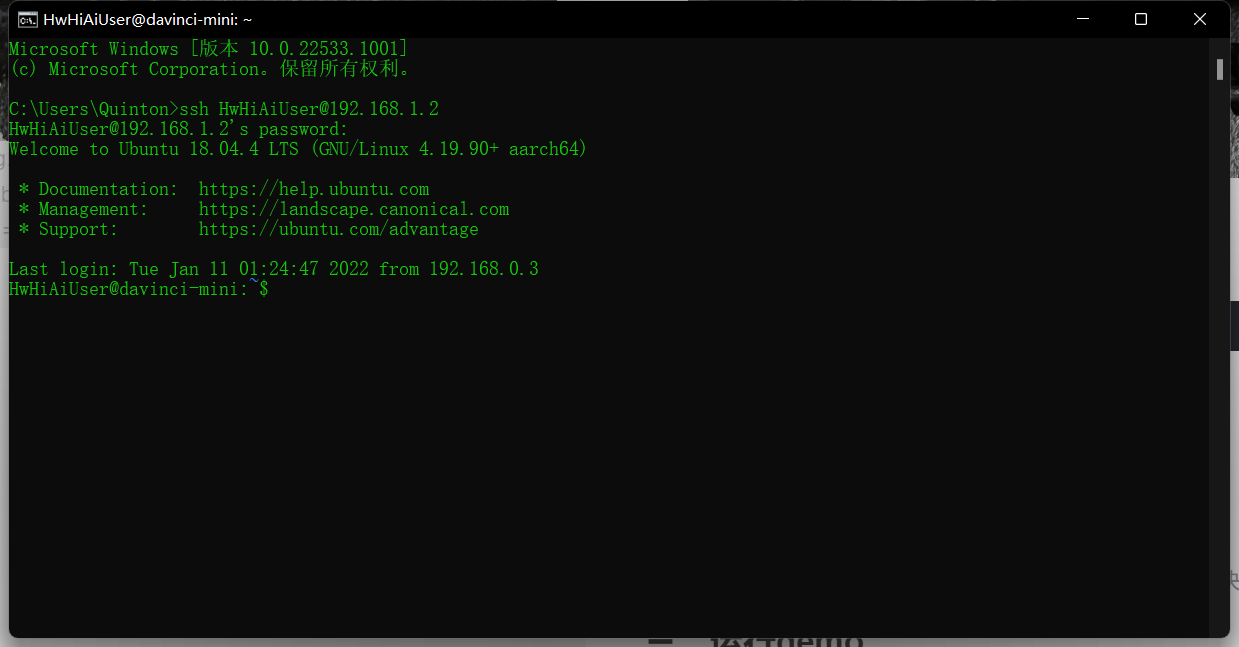
- 打开终端,输入:
ssh HwHiAiUser@192.168.0.2
- 1
成功通过网线连接Atlas200dk
通过网线连接成功后,可以将USB线拔掉
4.开发板联网
开发板不能联网的情况下,需要在PC中下载好相关依赖文件,再拷贝入SD卡相应位置,非常麻烦
1.通过网线连接网口的方式接入互联网
- 使用套件内的USB-Type-C数据线连接开发板和PC机,网线接入网口后连接开发板
使用USB端口连接进入开发板更改网络参数
- 打开终端,输入:
ssh HwHiAiUser@192.168.1.2
- 1
连接开发板
- 输入su,进入root模式,默认密码为MInd@123
- 执行cd命令进入netplan文件夹,并查看文件夹下文件
cd /etc/netplan #进入netplan文件夹
ll #查看文件夹下文件
- 1
- 2
- 使用vi命令打开网络配置文件
vi 01-netcfg.yaml
- 1
- 将dhcp4设置为yes,保存退出
使用vi进入yaml文件后,按字母”i“键进入插入编辑模式,编辑完成后按”Esc“退出编辑模式,输入冒号”:",然后输入“wq!”,回车,成功保存退出 - 使设置的网络参数生效,使用此命令:
netplan apply
- 1
- 重启开发板,连接进入,ping百度测试是否联网成功
2.通过网络共享方式接入互联网
-
首先按照前面步骤,设置好网线连接开发板,确定对应网络适配器ipv4协议的ip地址设置为在开发板中设置的gateway4
本文在开发板中配置eth0下gateway4为192.168.0.100,所以ip地址设置为相同的192.168.0.100
-
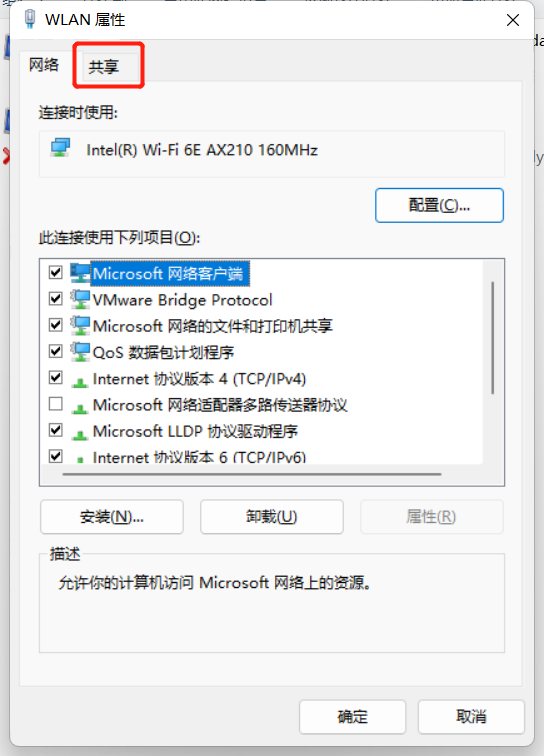
打开已接入网络的WLAN或者本地连接,点击共享
-
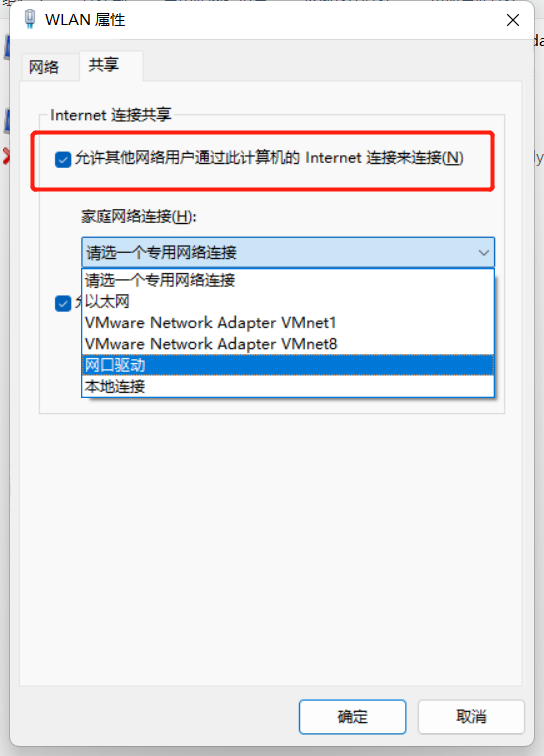
选择“允许其他网路用户通过此计算机的Internet连接来连接”,选择好对应的网络适配器,确定
-
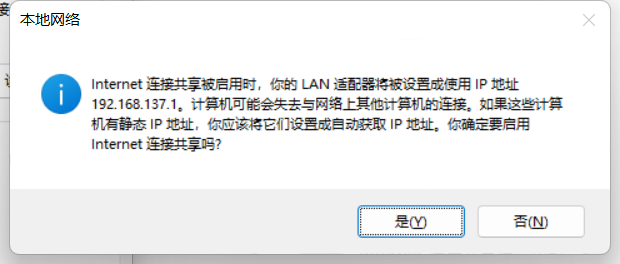
选择“是”
-
此时对应的网口驱动网络适配器会重置,回到网口驱动的属性页,再次将ipv4协议的ip地址设置为在开发板中设置的gateway4,确定
-
打开终端,使用USB或者网线连接的默认ip连接到开发板
ssh HwHiAiUser@192.168.0.2 #网线连接默认ip
ssh HwHiAiUser@192.168.1.2 #USB端口连接默认ip
- 1
- 2
这里使用网线连接,配置好后可以只使用网线
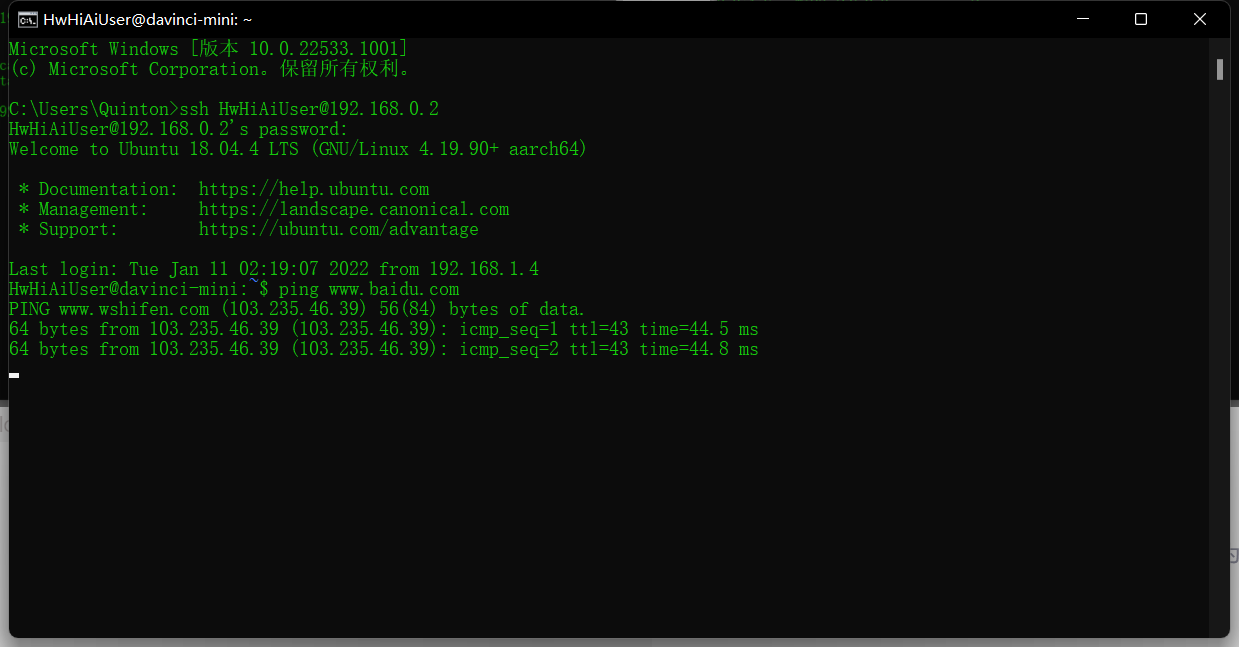
- ping百度测试网络连接,开发板成功联网
ping www.baidu.com
- 1
 如果按照步骤不能连接网络,是因为网络环境变化,再次进行一次操作,首先把wifi共享关掉,这时网口驱动会重置。再次开启wifi共享给网口驱动,将分配给网口驱动的IP改成eth0 gateway4的,就联网成功了
二、YOLOV3花卉识别模型
也可以使用其他方式训练模型文件,这里使用华为官方工具ModelArts
1.ModelArts准备工作
1.注册华为云账号
- 注册华为云账号
进入官网,选择注册登录。

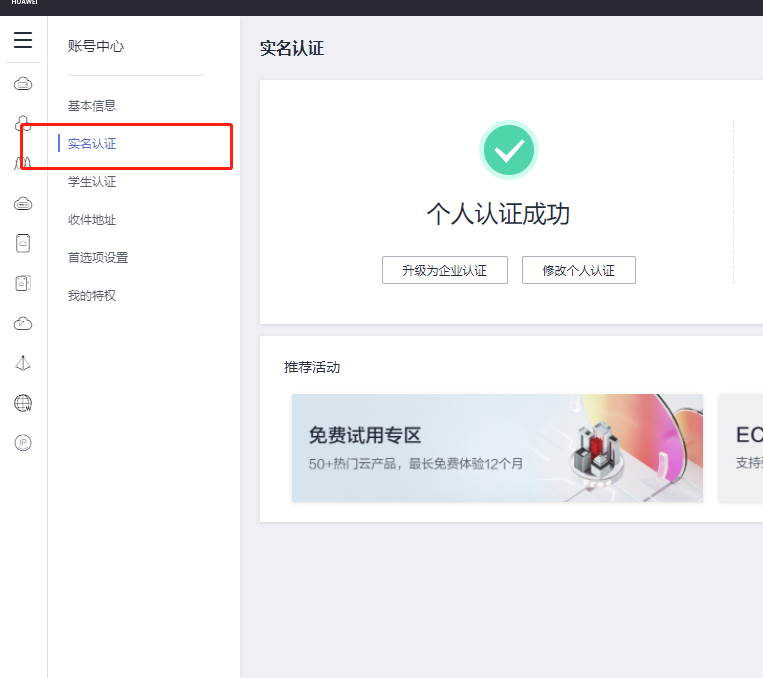
- 实名认证
登录后进入账号中心,选择左栏中的实名认证。
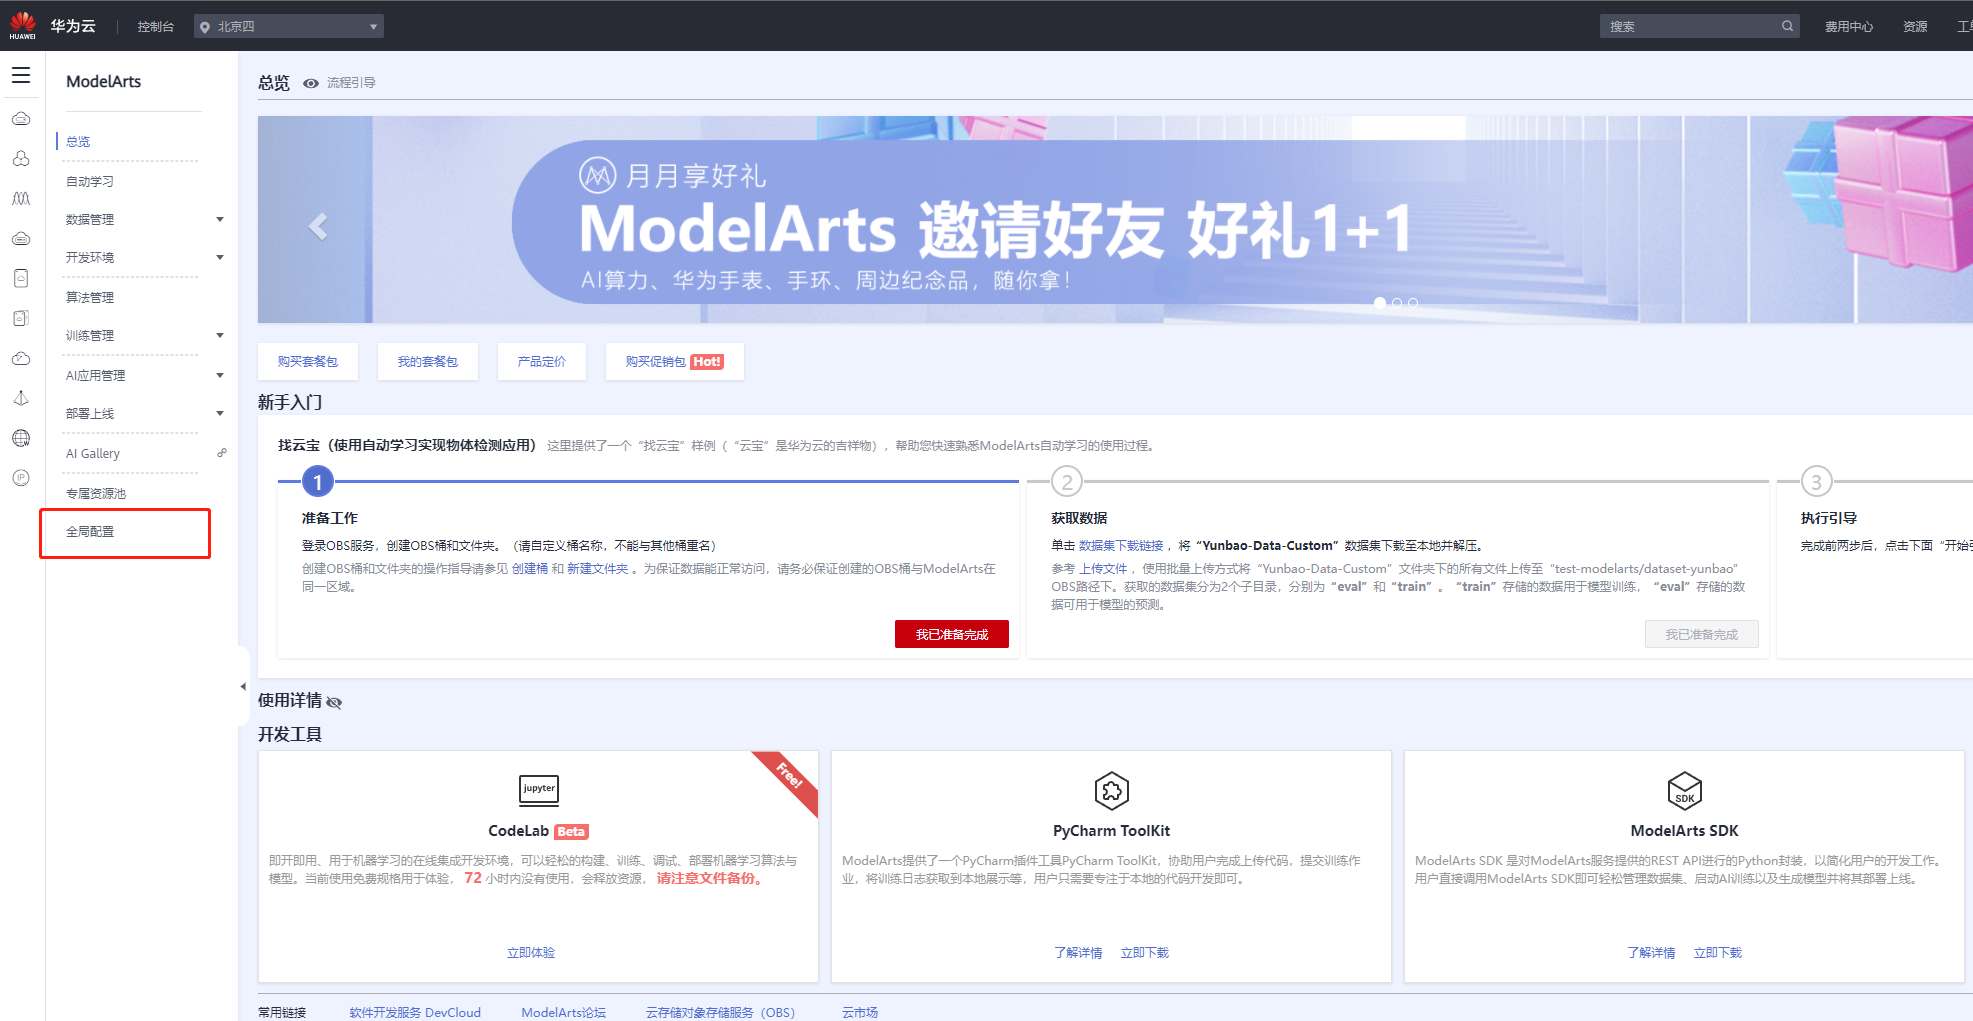
- 完成ModelArts全局配置
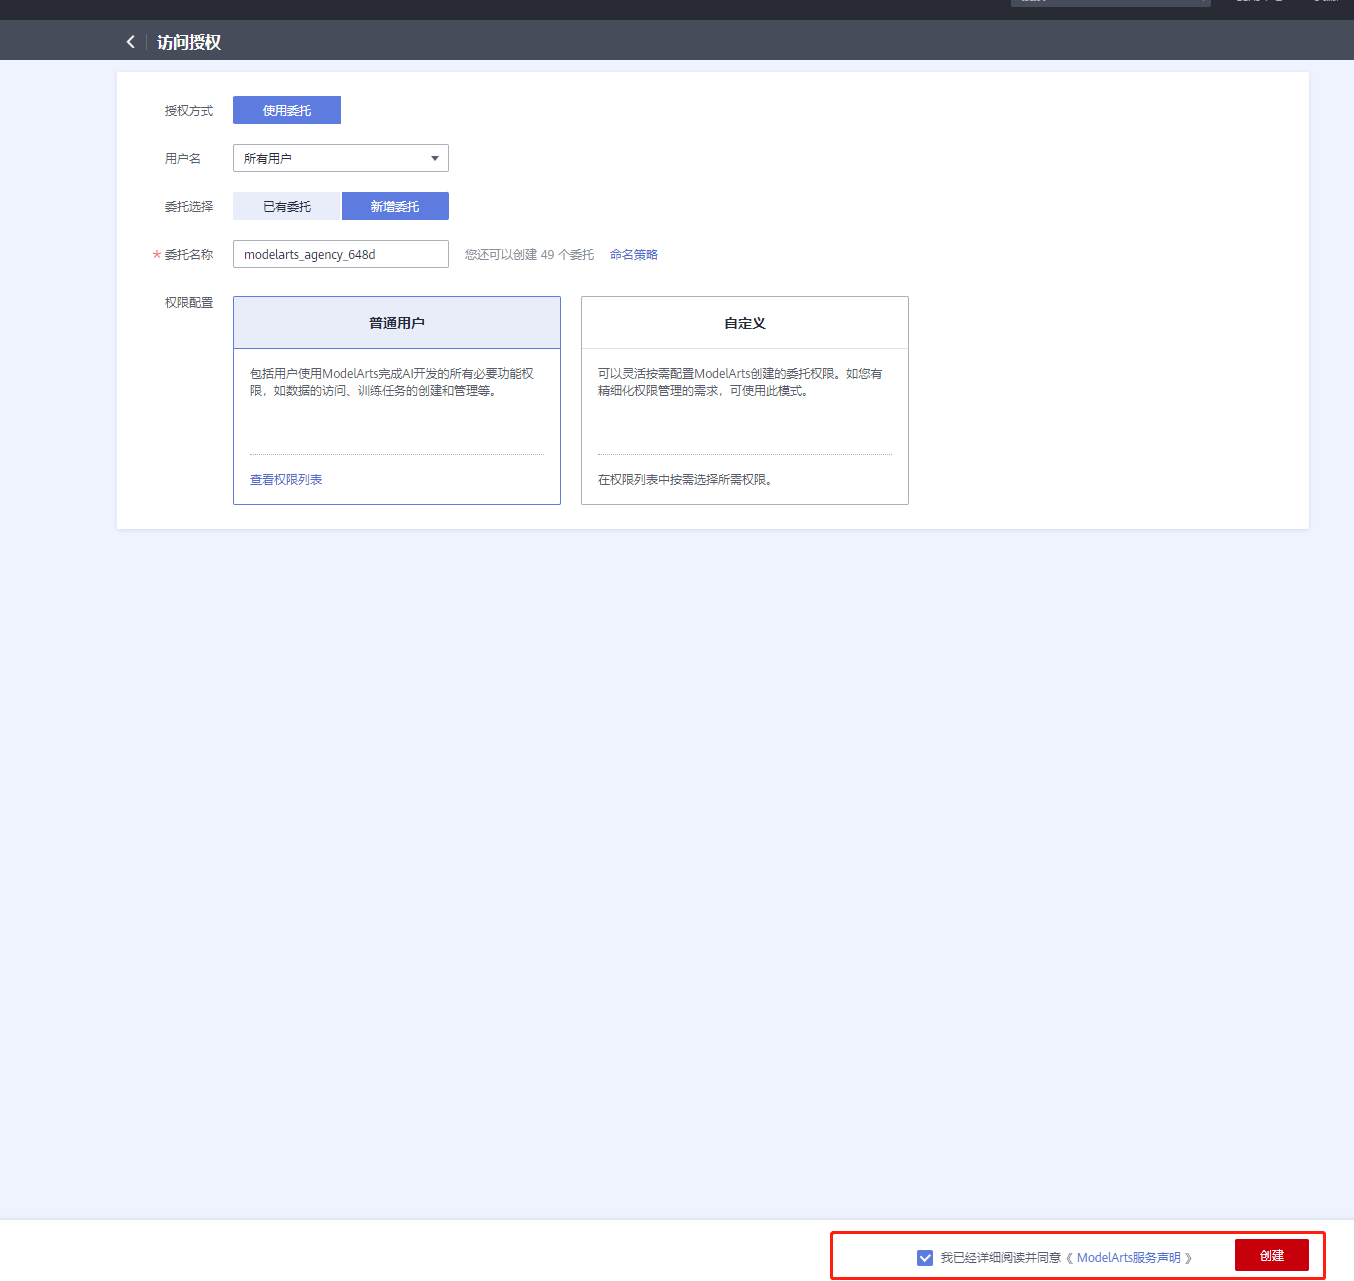
1.登录ModelArts管理控制台,在左侧导航栏选择“全局配置”,进入“全局配置”页面。
2.单击“添加授权”,进入“访问授权”页面,根据参数说明进行配置。
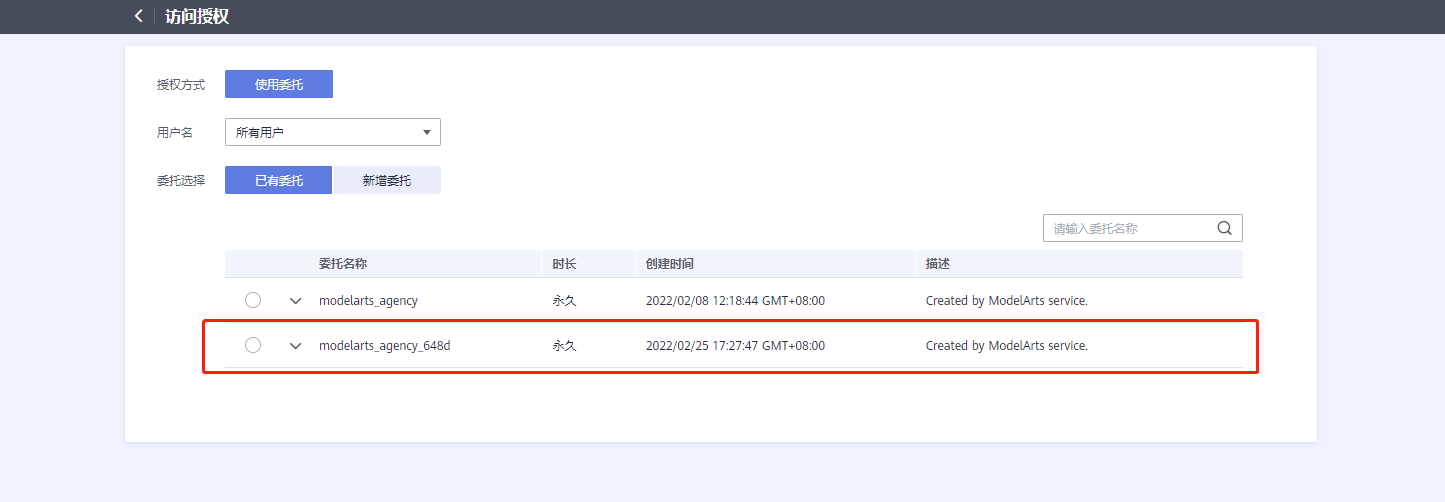
3.添加委托成功
2.OBS操作
- 创建OBS桶
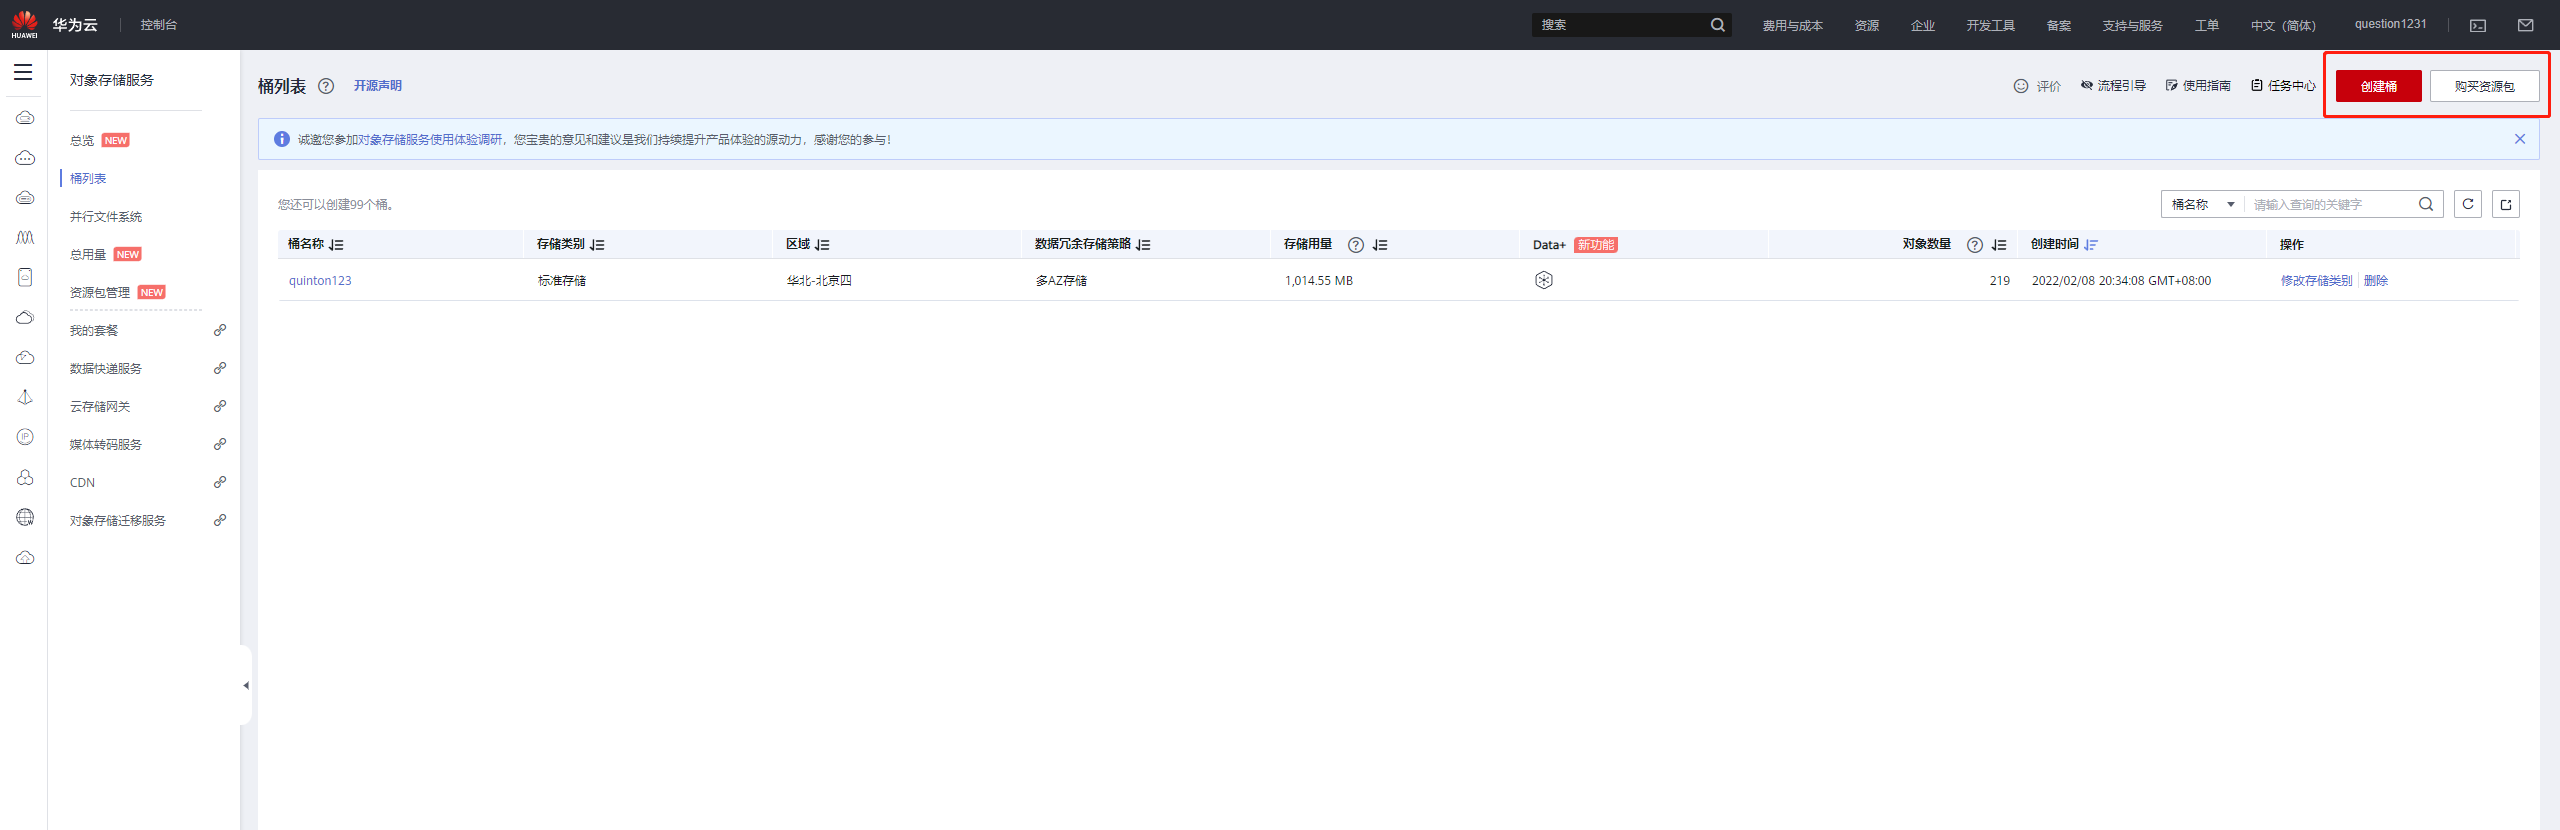
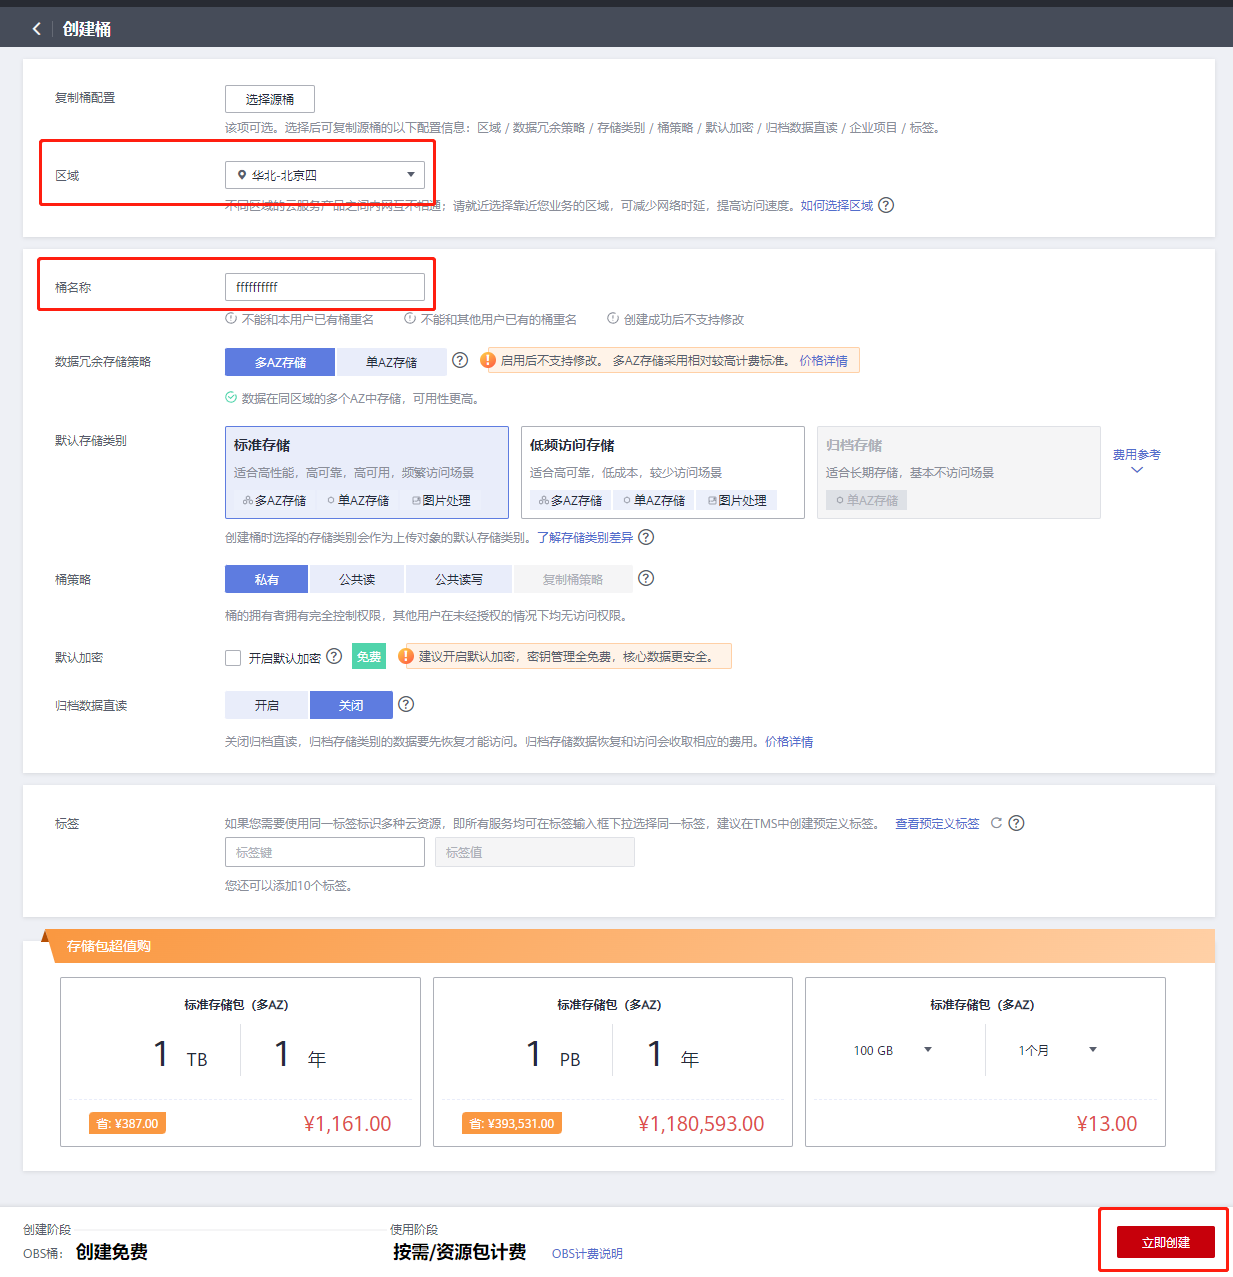
OBS,即Object Storage Service,对象存储服务,是华为云提供云上数据储存的服务,在使用ModelArts之前您需要创建一个OBS桶。
登录OBS管理控制台, 单击页面右上角"创建桶"按钮。
- 系统弹出如下图所示的对话框,根据自己所在区域选择"区域",输入自定义的桶名称,其他选项保持默认即可,最后点击页面下方"立即创建"按钮。
- 新建OBS文件夹
可以在OBS桶列表中,找到创建的OBS桶并进入,然后进入对象页面,点击“新建文件夹”按钮即可新建文件夹。

2 .准备数据集
1.本地准备数据集图片
本文章需要训练花卉识别的数据,所以寻找花卉图片作为数据集。
并使用ReNamer工具对图片文件名进行有序化排列。
2.标注数据集
本文使用labelimg工具进行标注,也可以使用其他标注工具,注意格式为VOC,将标注文件和图片发在同一文件夹。
也可以上传到ModelArts进行标注
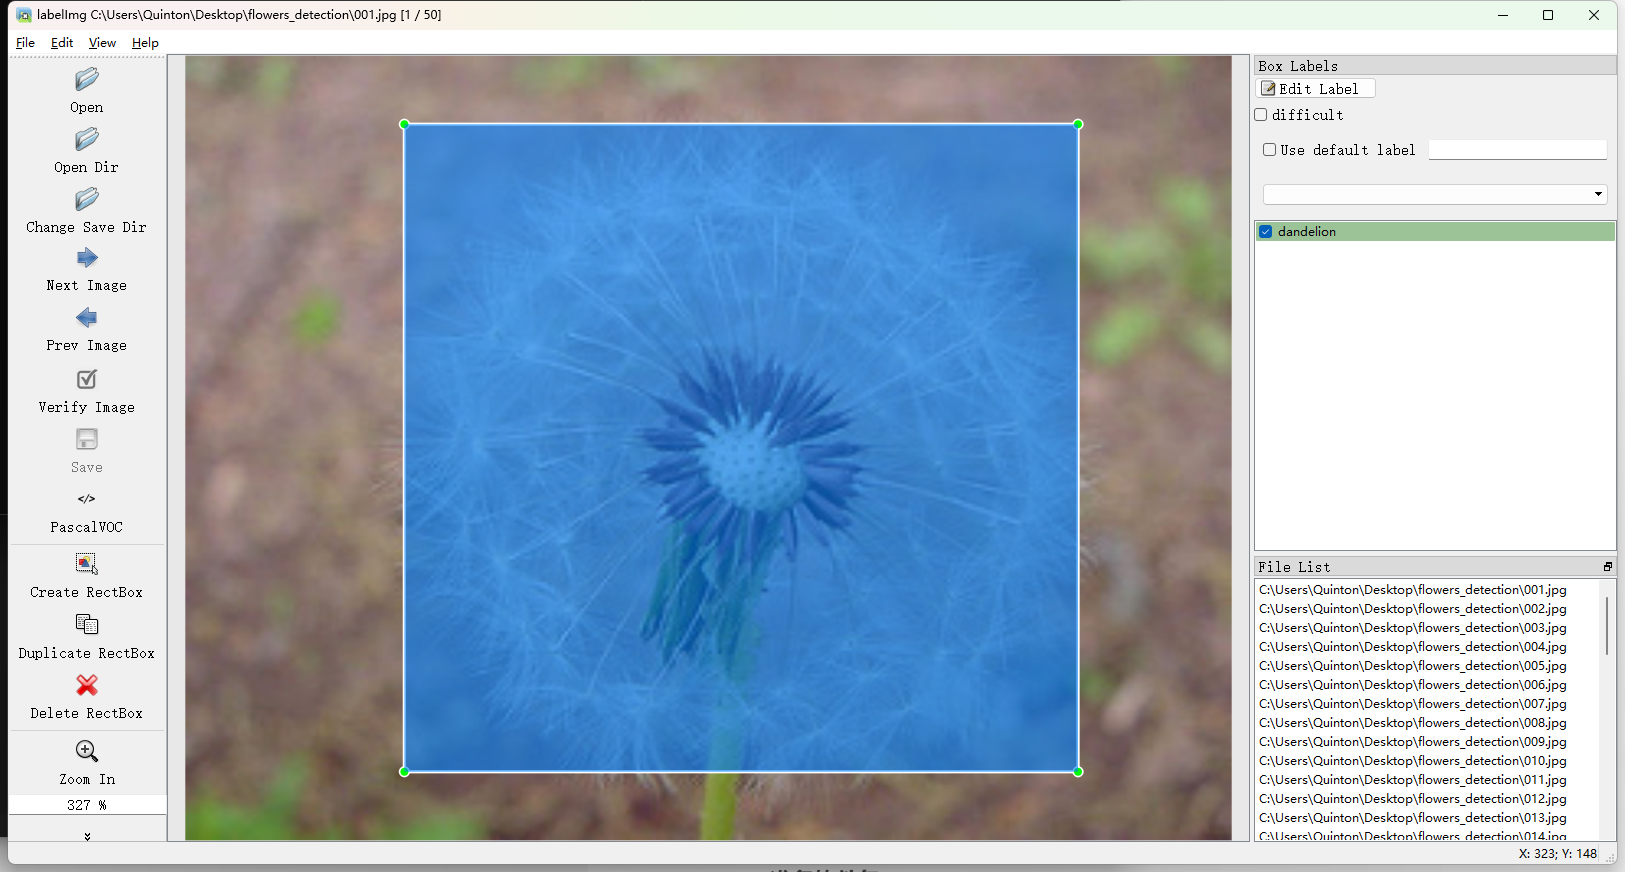
标注完成。

3.上传数据集
上传数据集至OBS
进入到已创建的OBS桶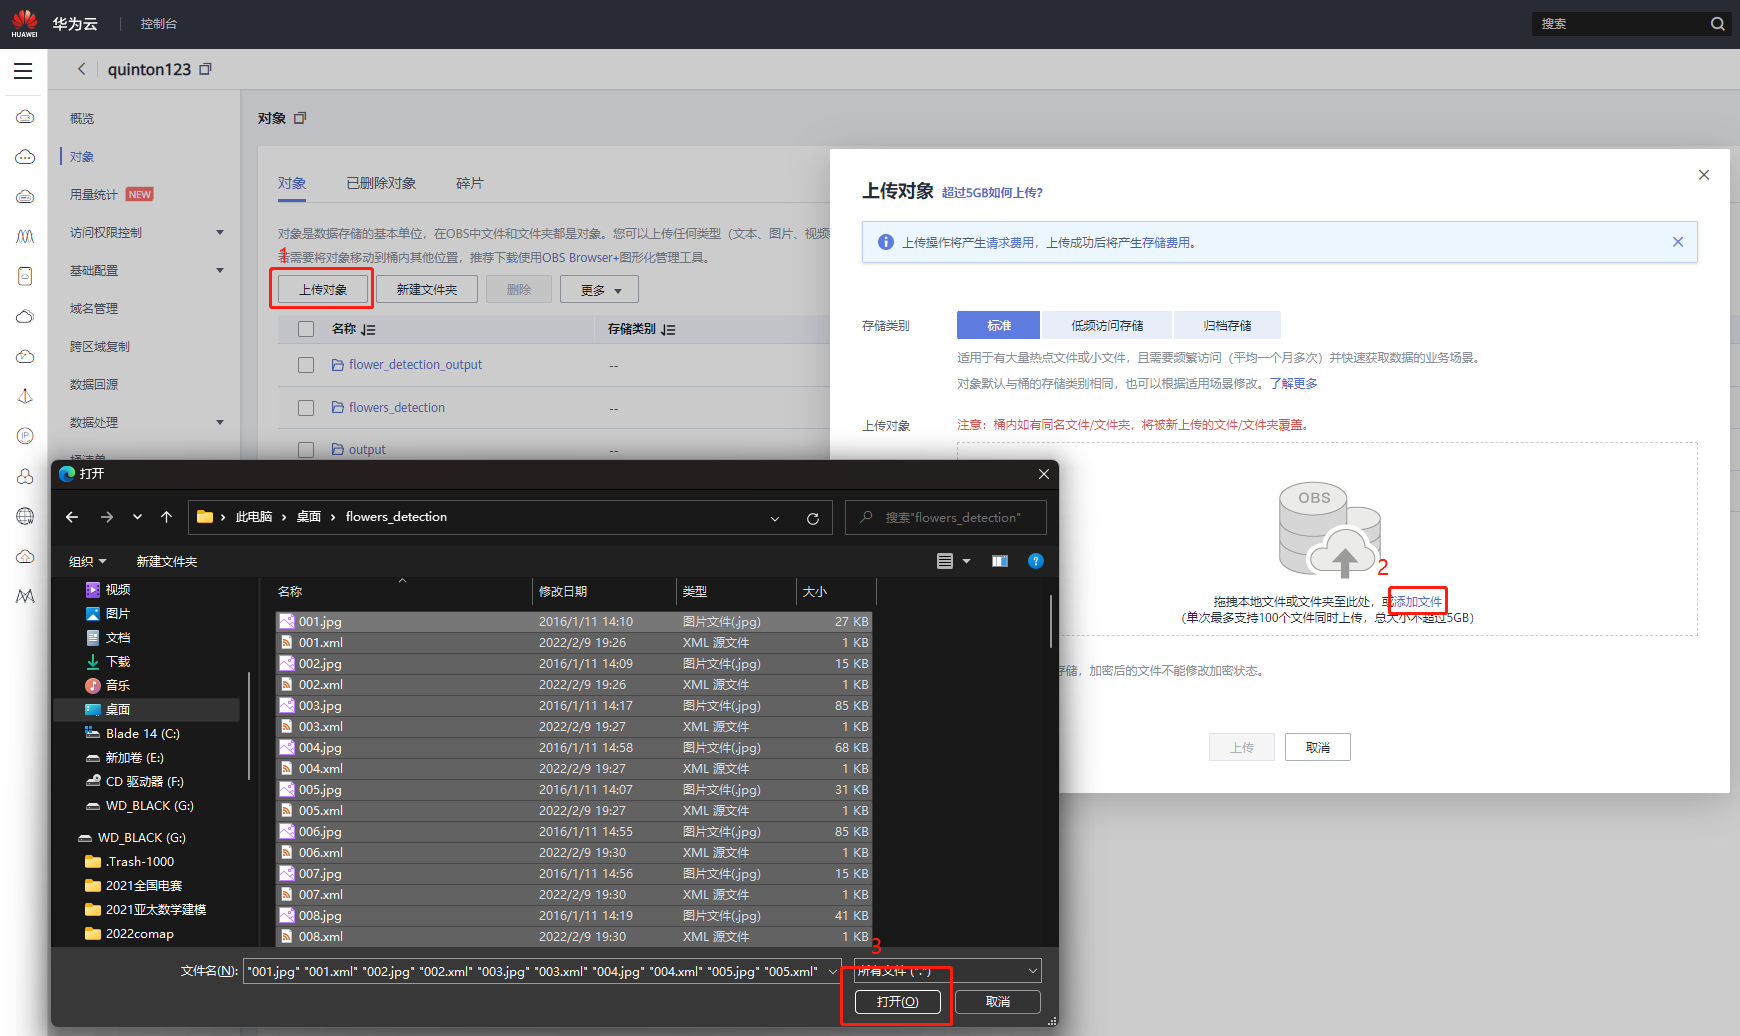
- 在ModelArts上创建数据集
进入ModelArts控制台,打开数据集界面
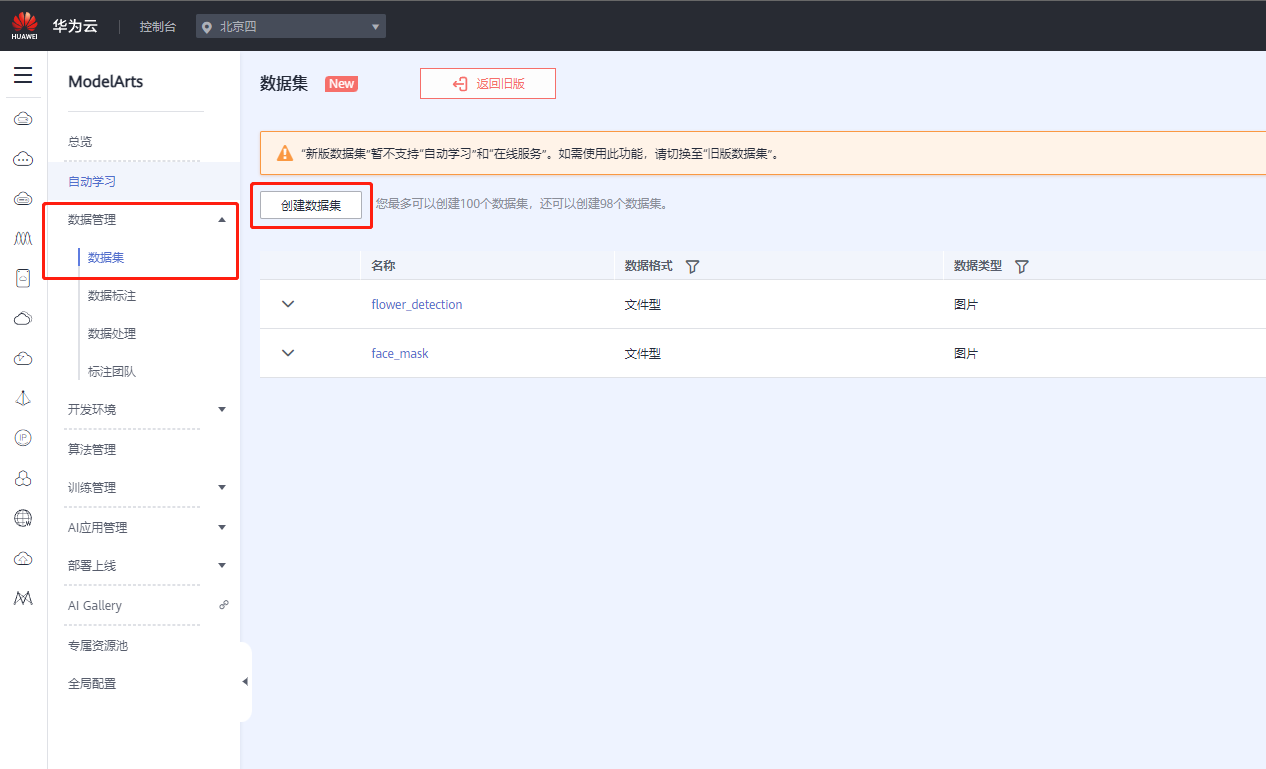
进入到创建数据集界面,填好名称和数据集输出位置,点击下一步
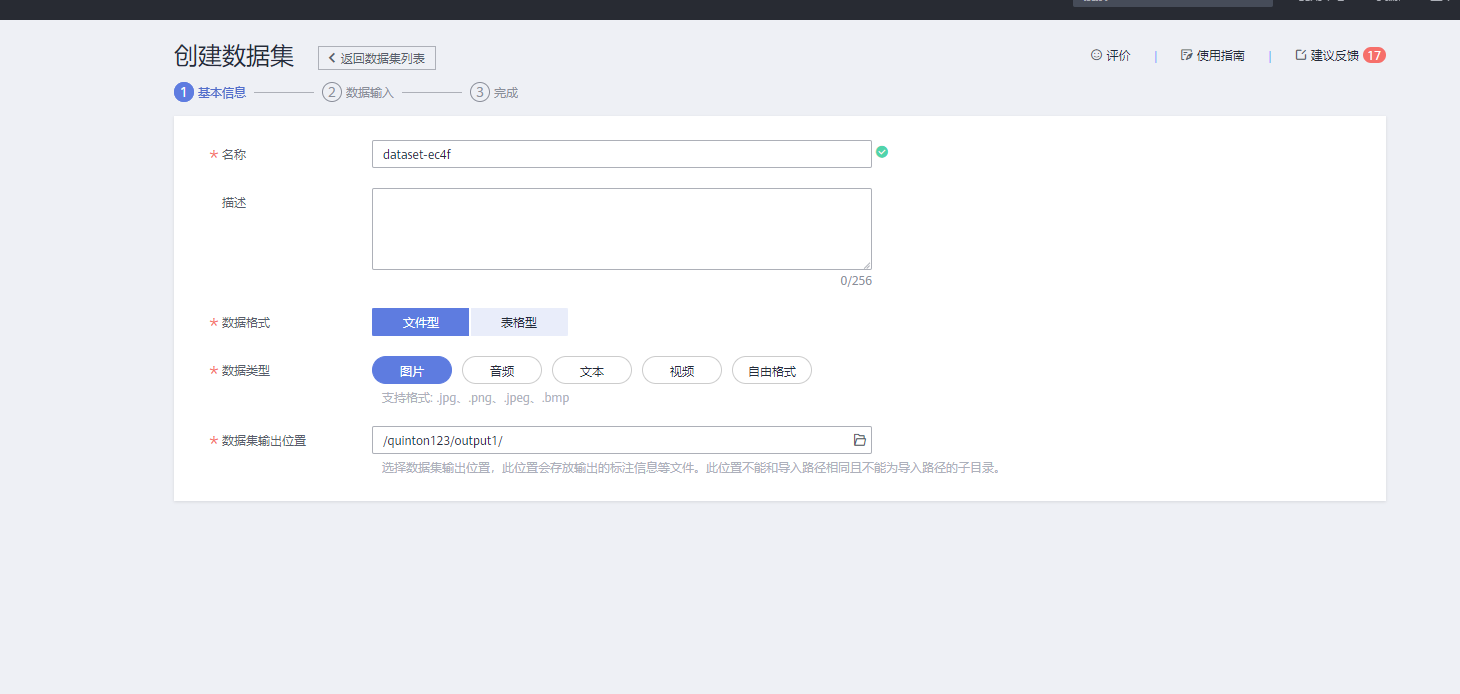
选择好导入路径为刚刚的数据集,右下方点击创建

回到数据管理,可以看到创建好的数据集,点击右边的发布
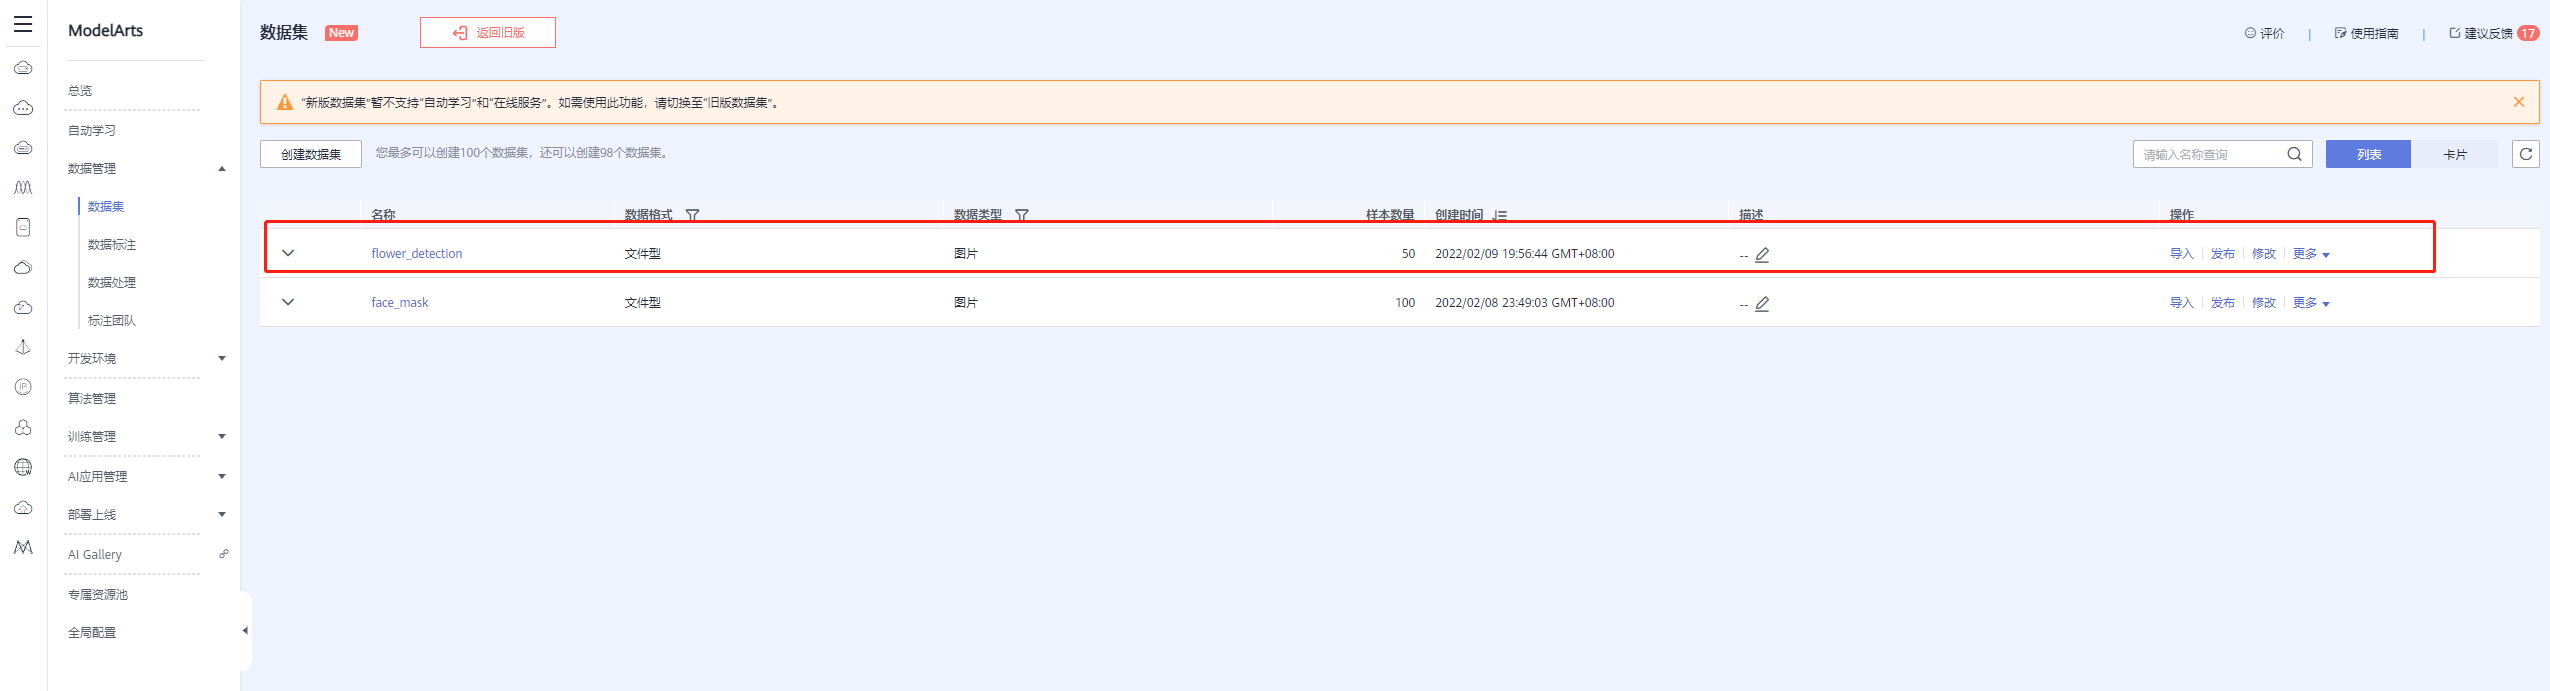
点击发布,一般将比例设置为0.8,花卉识别使用标注类型为物体检测,确定

3.模型训练
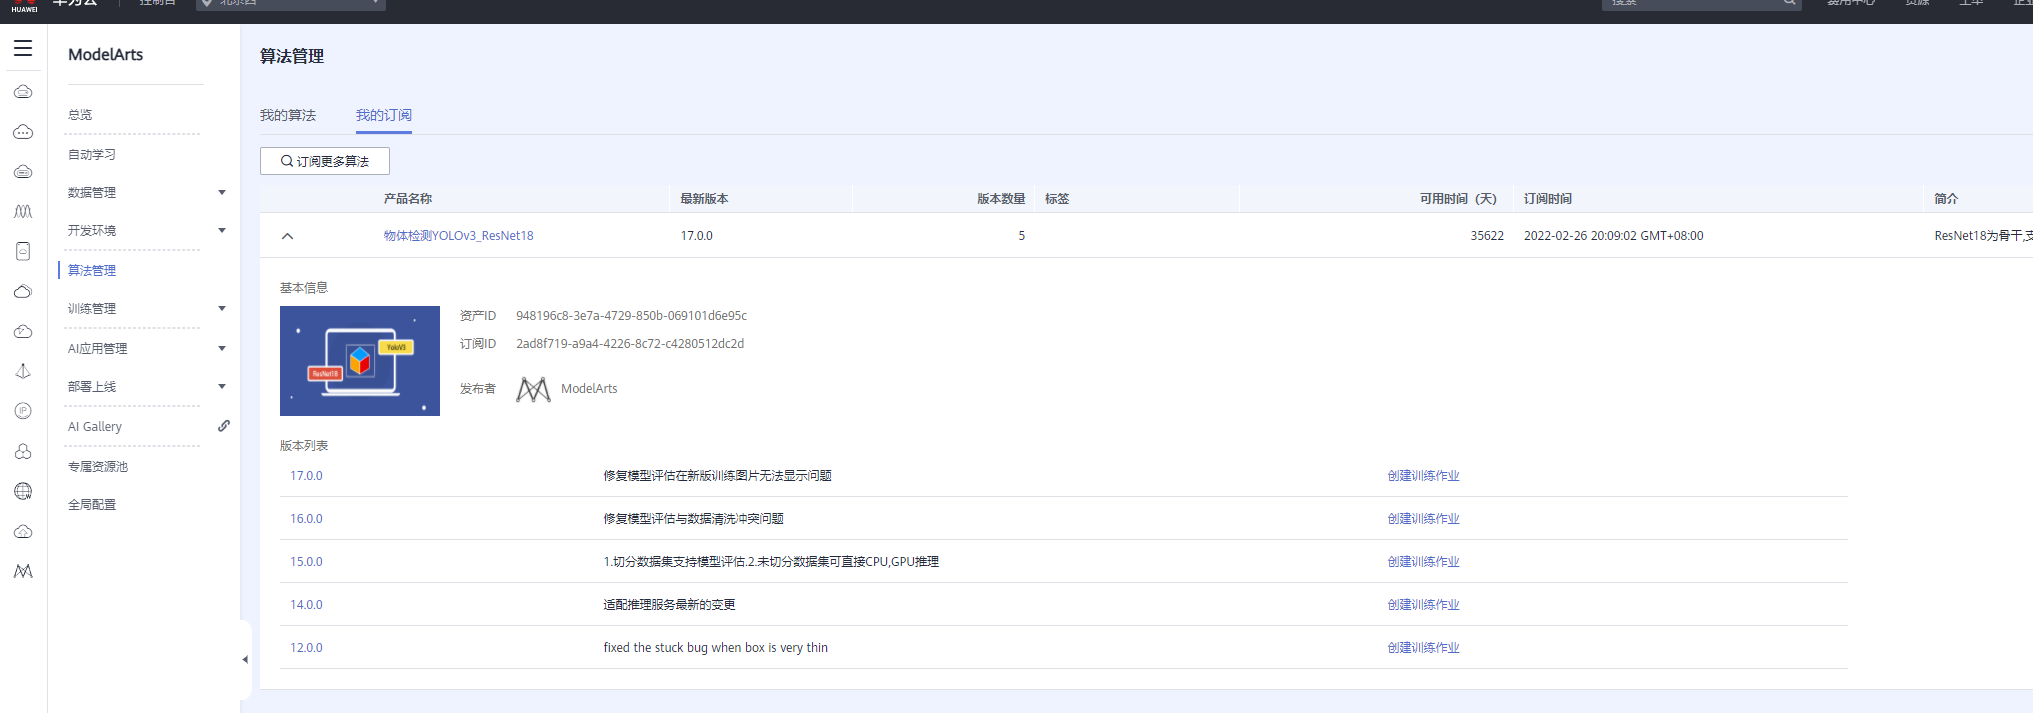
1.订阅算法
- 进入ModelArts控制台,订阅更多算法
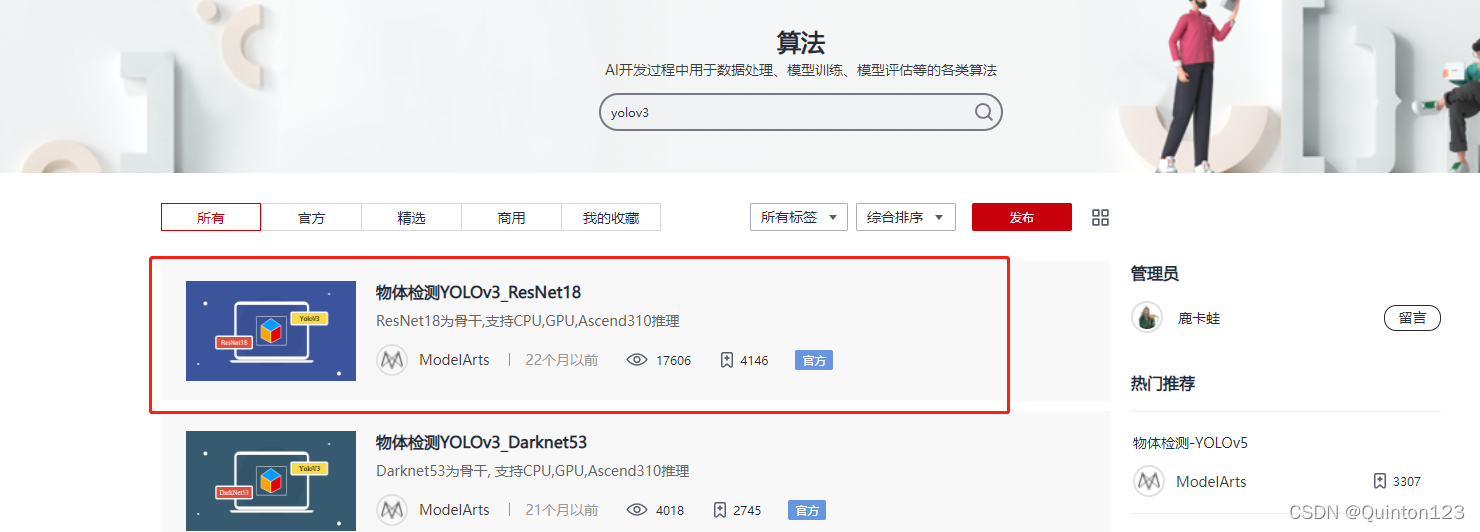
- 搜索yolov3,选择第一个算法进入
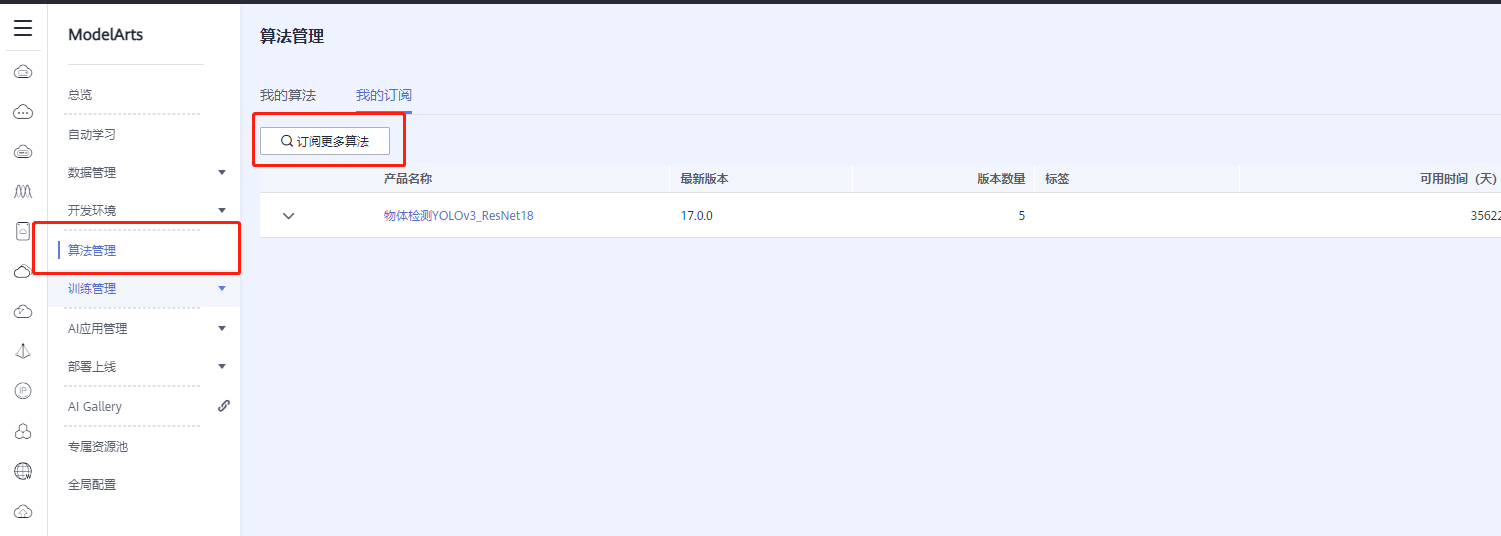
- 将其选择为已订阅
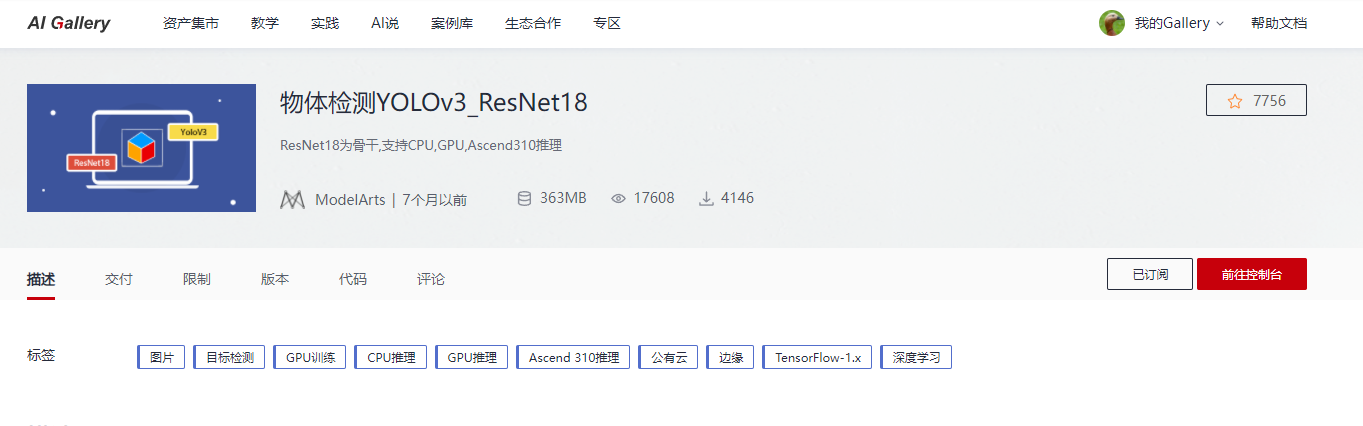
- 回到控制台算法管理,即可看到已订阅的算法
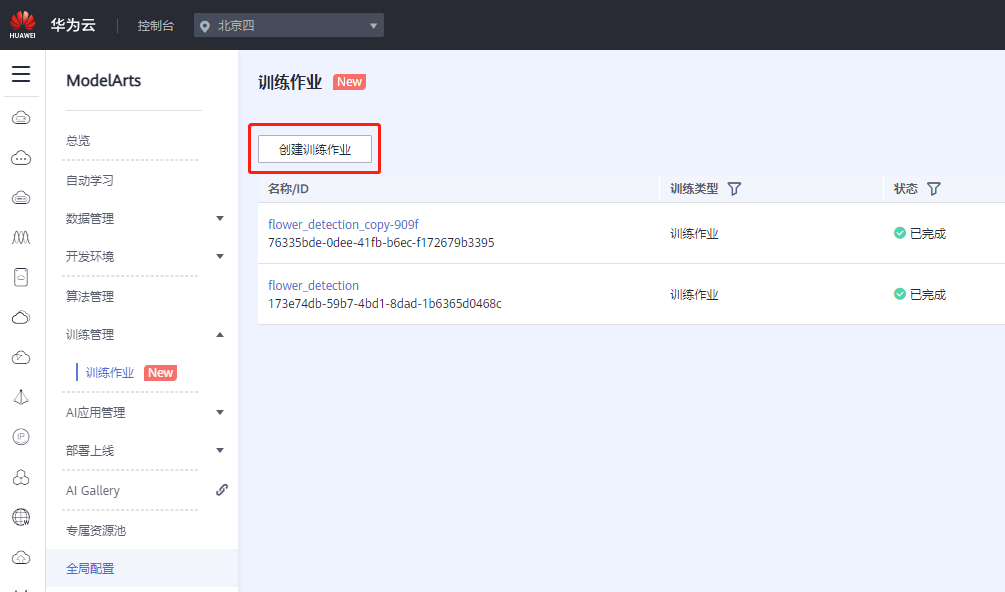
2.训练作业
- 进入ModelArts管理控制台,选择左栏中的训练作业,创建训练作业
- 选择算法、训练输入和训练输出
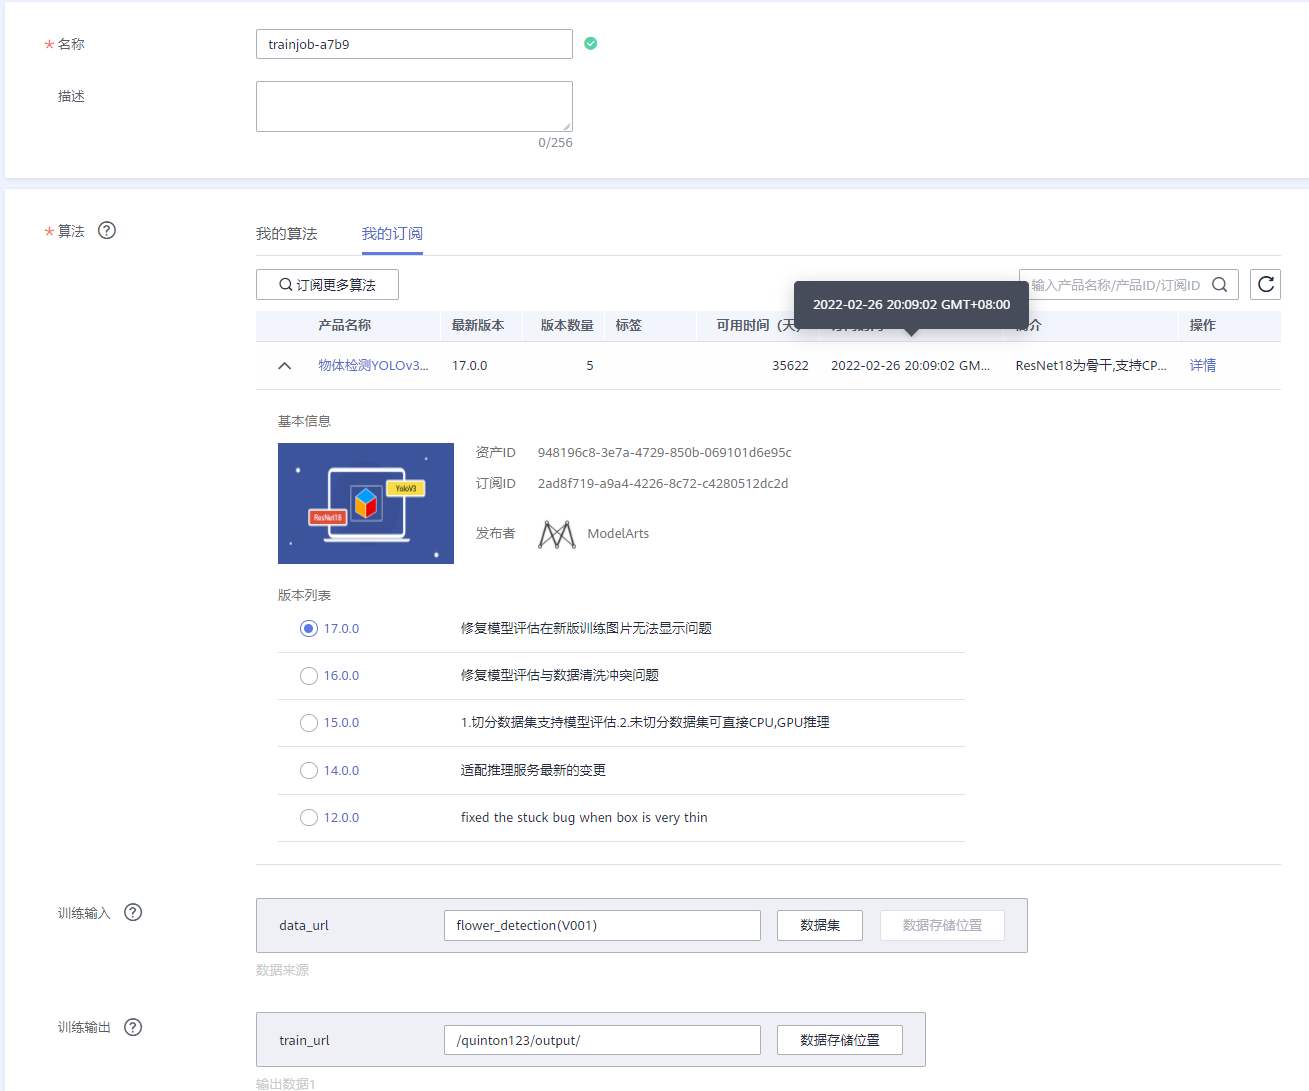
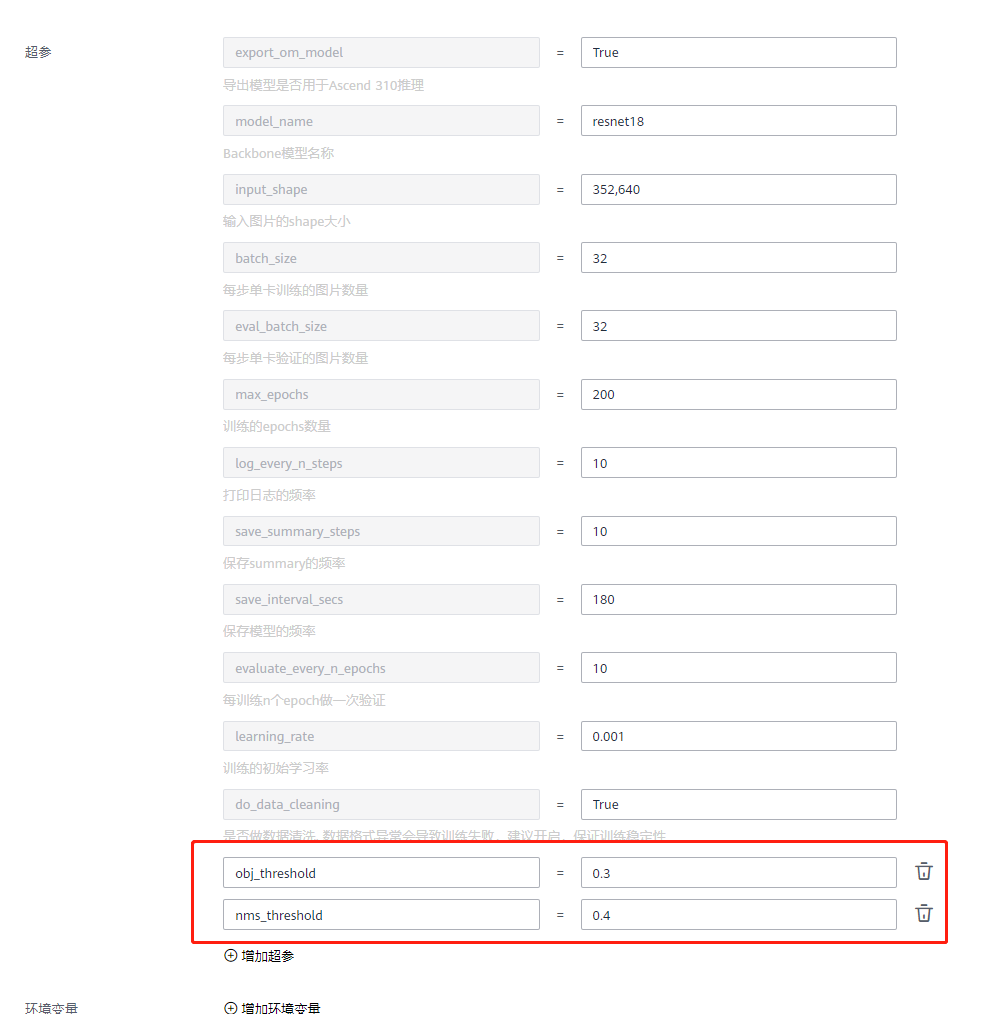
- 根据自己的需要增加超参
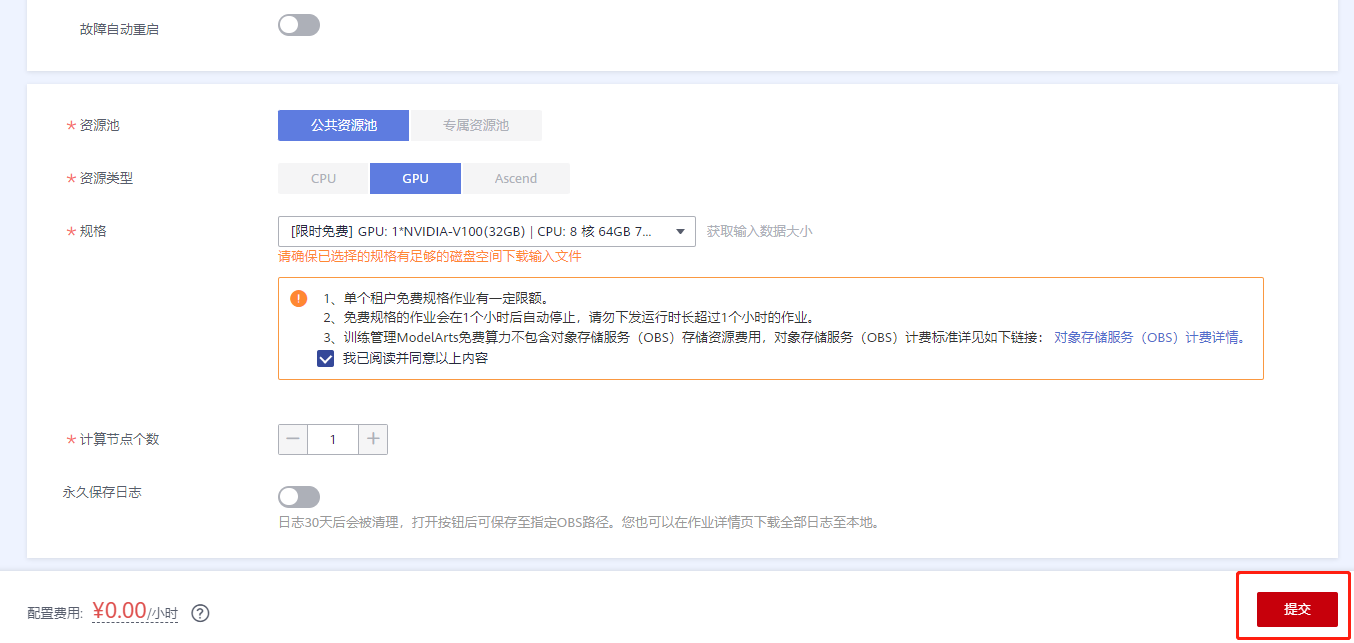
- 如果数据集不是很大,使用免费的资源训练即可,最后点击提交
- 等待训练完成即可
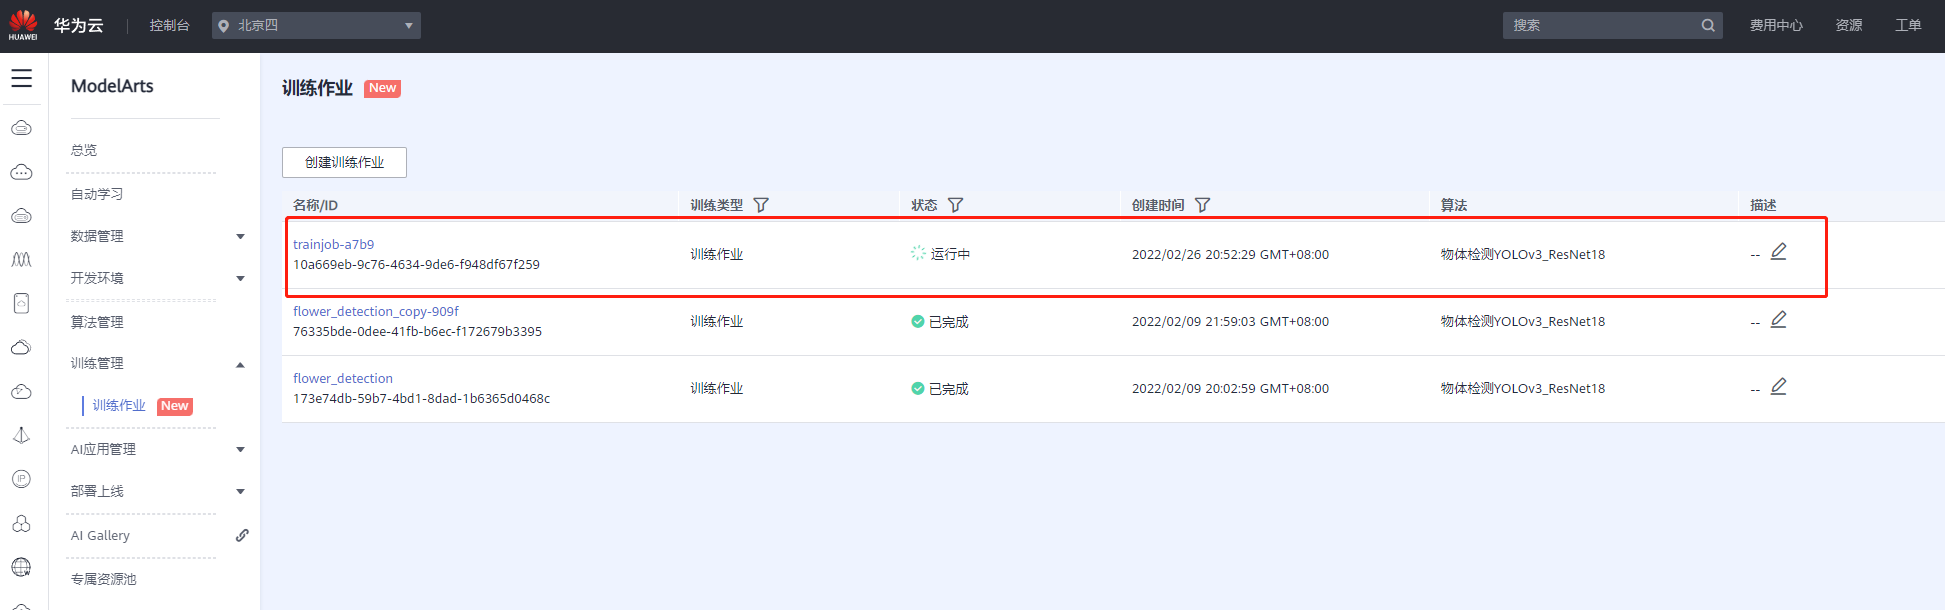
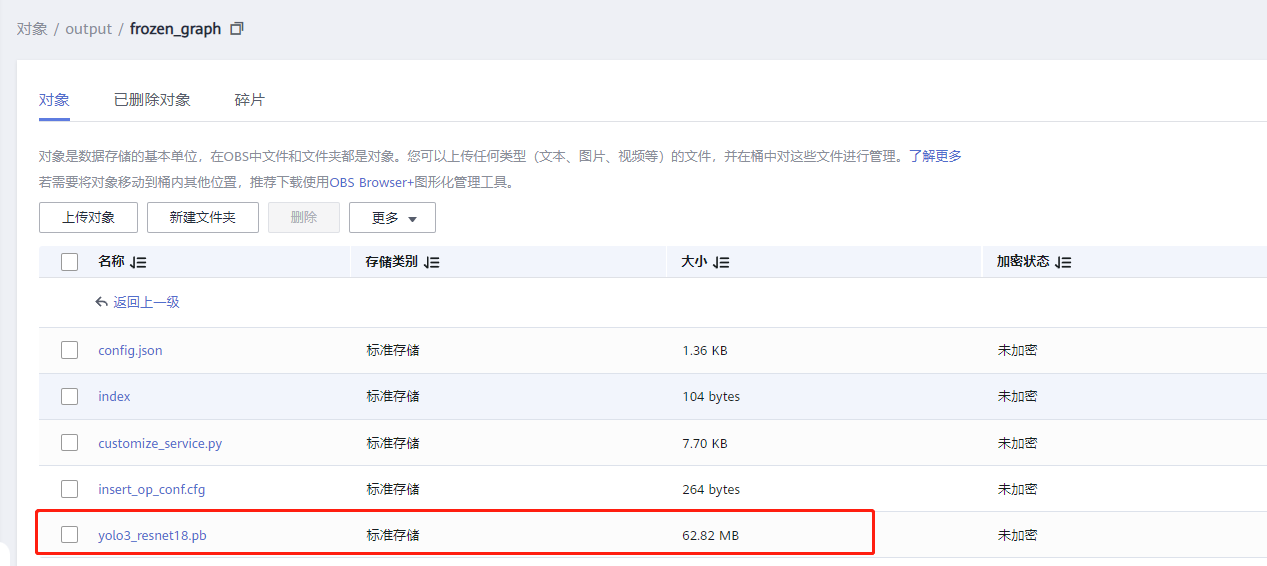
- 训练完成后,可以在训练输出目录中找到pb文件
4.模型转换
需要使用atc工具将模型转换为200dk可以离线推理的om模型
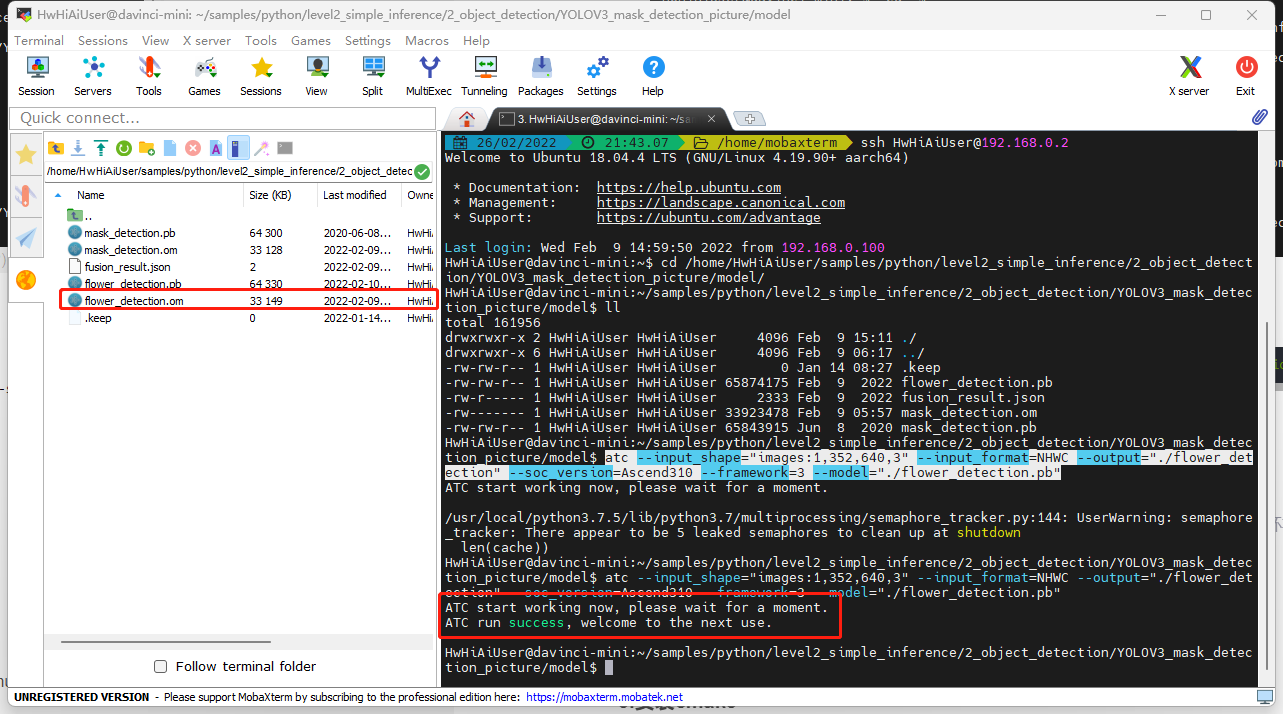
- 将训练得到的pb文件上传至atlas200dk服务器上,并cd进入到所在文件夹
此处已将pb文件更名
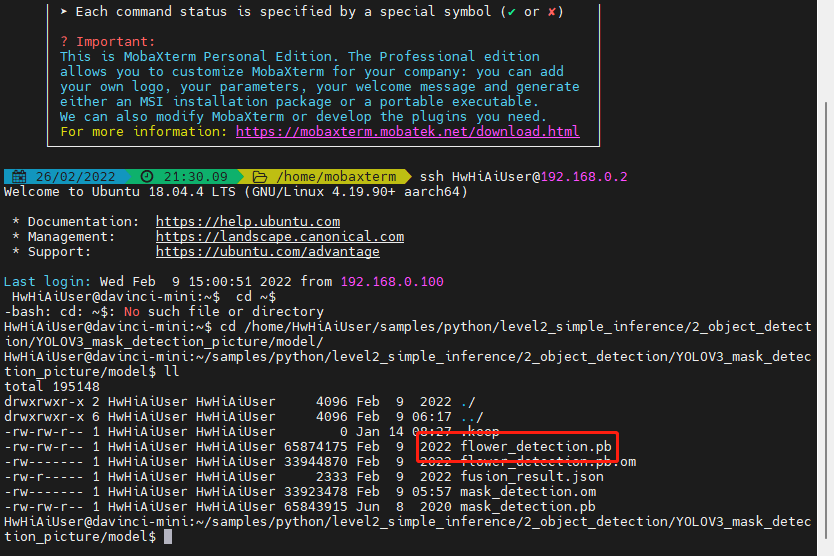
- 执行以下命令进行模型转换
atc --input_shape="images:1,352,640,3" --input_format=NHWC --output="./flower_detection" --soc_version=Ascend310 --framework=3 --model="./flower_detection.pb"
- 1
- 转换完成
三、工程部署
使用官方口罩检测样例源码进行工程部署
1.第三方依赖安装(python)
1.安装准备
- 环境变量与第三方依赖文件
# 以安装用户在任意目录下执行以下命令,打开.bashrc文件。
vi ~/.bashrc

# 在文件最后一行后面添加如下内容。
export CPU_ARCH=`arch`
export THIRDPART_PATH=${HOME}/Ascend/thirdpart/${CPU_ARCH}  #代码编译时链接第三方库
export PYTHONPATH=${THIRDPART_PATH}/acllite:$PYTHONPATH #设置pythonpath为固定目录
export INSTALL_DIR=${HOME}/Ascend/ascend-toolkit/latest #latest为一个软连接,注意更改为cann软件实际路径

# 执行命令保存文件并退出。
:wq!

# 执行命令使其立即生效。
source ~/.bashrc

# 创建第三方依赖文件夹
mkdir -p ${THIRDPART_PATH}

# 拷贝公共文件到第三方依赖文件夹
cd ${HOME}
git clone https://gitee.com/ascend/samples.git
cp -r ${HOME}/samples/common ${THIRDPART_PATH}

# 如果是200DK场景还需要执行以下命令拷贝media_mini头文件及媒体库。
mkdir -p ${INSTALL_DIR}/driver
cp /usr/lib64/libmedia_mini.so ${INSTALL_DIR}/driver
cp /usr/local/Ascend/include/peripheral_api.h  ${INSTALL_DIR}/driver
- 1
- 2
- 3
- 4
- 5
- 6
- 7
- 8
- 9
- 10
- 11
- 12
- 13
- 14
- 15
- 16
- 17
- 18
- 19
- 20
- 21
- 22
- 23
- 24
- 25
- 26
- 27
- 安装Archiconda
# 下载安装脚本
wget https://github.com/Archiconda/build-tools/releases/download/0.2.3/Archiconda3-0.2.3-Linux-aarch64.sh

# 将安装脚本上传至200dk运行
bash Archiconda3-0.2.3-Linux-aarch64.sh
- 1
- 2
- 3
- 4
- 5
2.安装过程
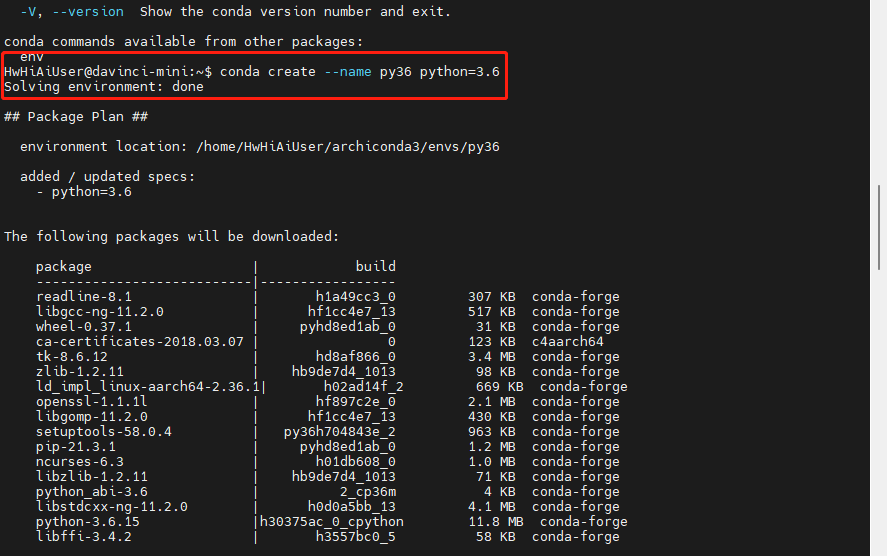
- 创建python3.6虚拟环境
conda create --name py36 python=3.6
- 1
- 安装opencv
# 说明:使用pip3.7.5安装opencv,会导致视频处理功能不可用。所以使用apt安装。
# 但apt只能安装到python3.6中,所以第三方依赖需要使用python3.6。
# 安装pip3
sudo apt-get install python3-pip

# 安装python库
python3.6 -m pip install --upgrade pip --user -i https://mirrors.huaweicloud.com/repository/pypi/simple
python3.6 -m pip install Cython numpy tornado==5.1.0 protobuf --user -i https://mirrors.huaweicloud.com/repository/pypi/simple

# 安装python3-opencv
sudo apt-get install python3-opencv
- 1
- 2
- 3
- 4
- 5
- 6
- 7
- 8
- 9
- 10
- 11
- 安装python-acllite所需依赖
# 安装ffmpeg
sudo apt-get install -y libavformat-dev libavcodec-dev libavdevice-dev libavutil-dev libswscale-dev libavresample-dev

# 安装其它依赖
python3.6 -m pip install --upgrade pip
python3.6 -m pip install Cython
sudo apt-get install pkg-config libxcb-shm0-dev libxcb-xfixes0-dev

# 安装pyav
python3.6 -m pip install av==6.2.0

# 安装pillow 的依赖
sudo apt-get install libtiff5-dev libjpeg8-dev zlib1g-dev libfreetype6-dev liblcms2-dev libwebp-dev tcl8.6-dev tk8.6-dev python-tk

# 安装numpy和PIL
python3.6 -m pip install numpy
python3.6 -m pip install Pillow
- 1
- 2
- 3
- 4
- 5
- 6
- 7
- 8
- 9
- 10
- 11
- 12
- 13
- 14
- 15
- 16
- 17
- 安装python-acllite
# python acllite库以源码方式提供,安装时将acllite目录拷贝到运行环境的第三方库目录
# 将acllite目录拷贝到第三方文件夹中。后续有变更则需要替换此处的acllite文件夹
cp -r ${HOME}/samples/python/common/acllite ${THIRDPART_PATH}
- 1
- 2
- 3
2.更改工程源码
更改工程源码以适配自己的模型
1. 进入到官方的工程源码目录并打开工程源码
# 进入到官方的工程源码目录
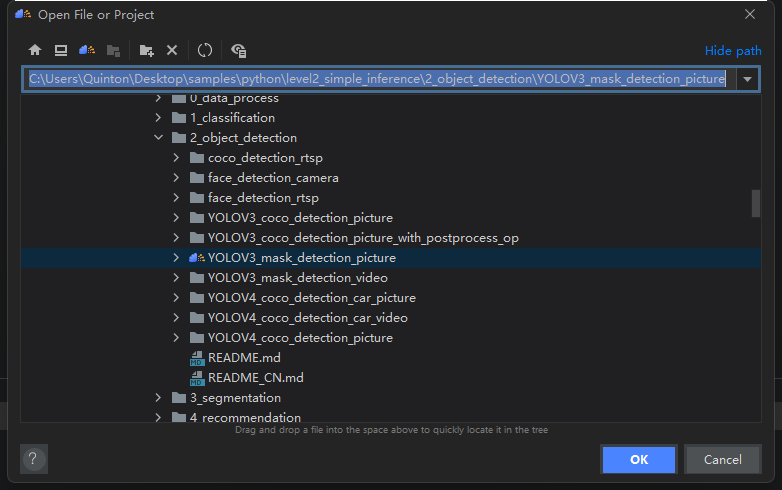
cd /home/HwHiAiUser/samples/python/level2_simple_inference/2_object_detection/YOLOV3_mask_detection_picture/src/
# 打开工程源码
gedit mask_detect.py
- 1
- 2
- 3
- 4

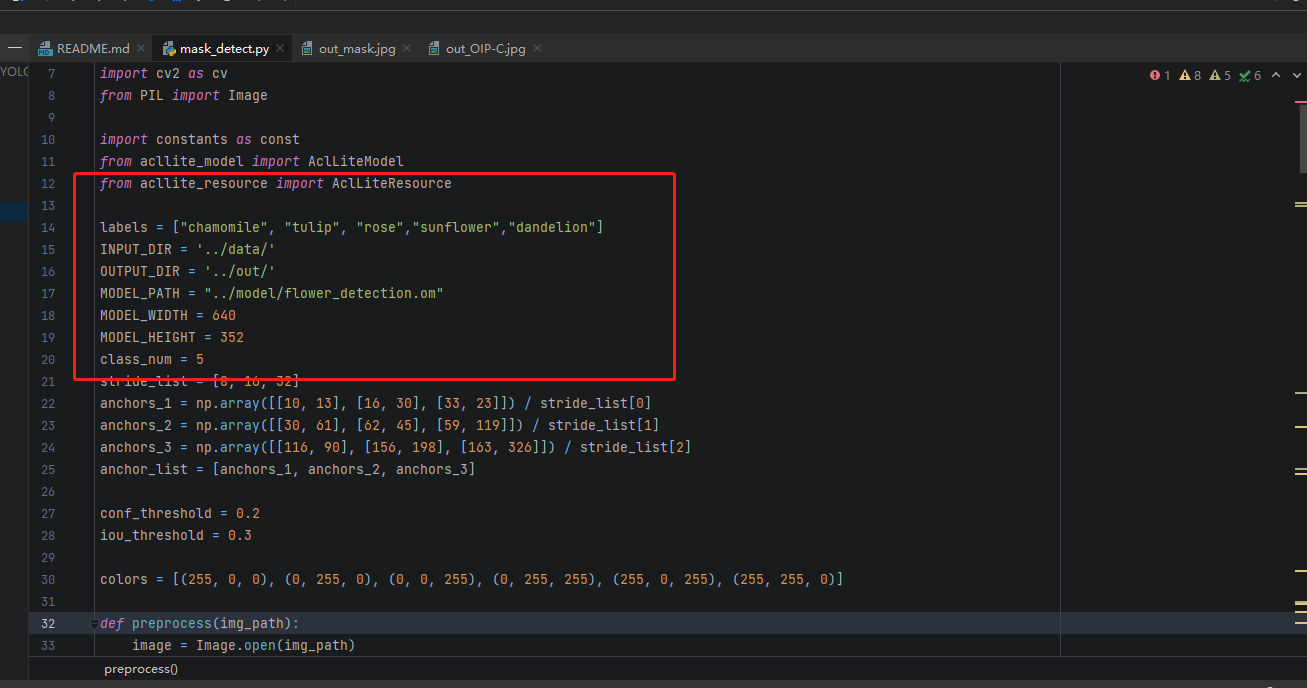
2.前处理代码与后处理代码
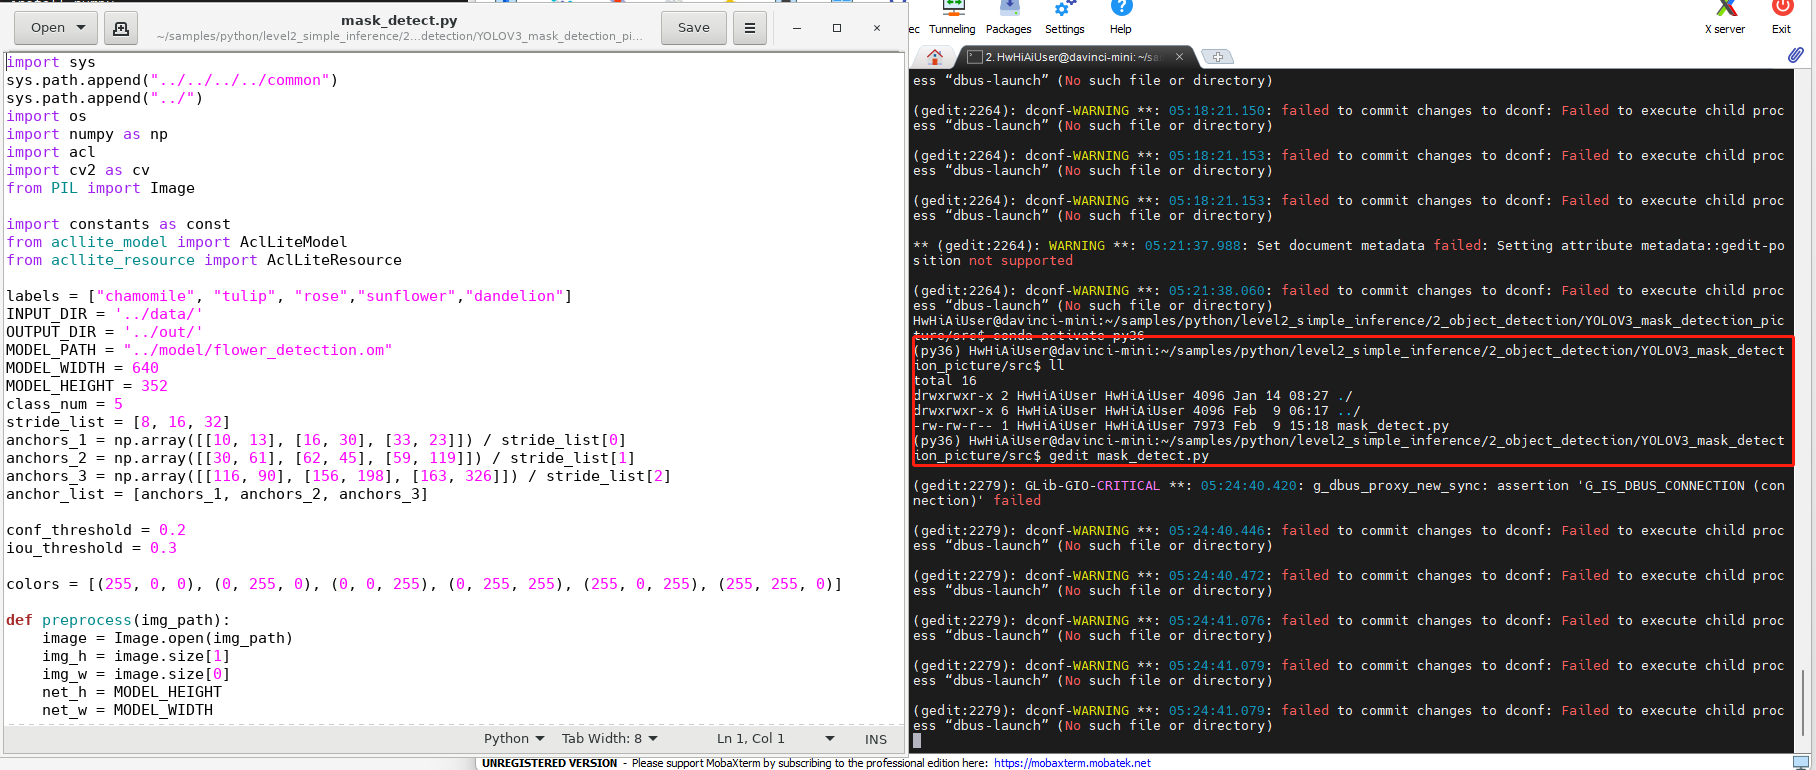
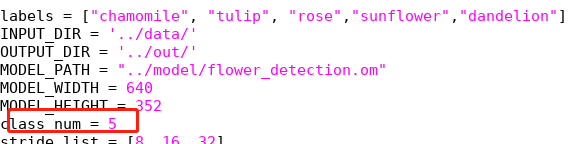
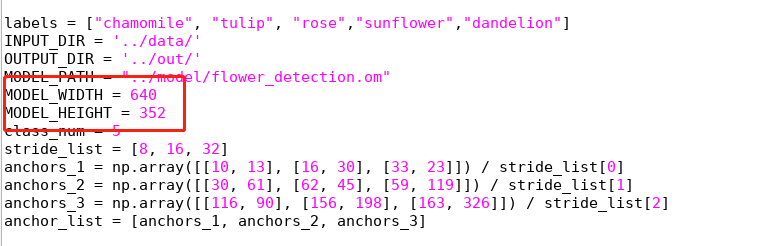
- 将labels后标注分类改为自己模型的标注分类

- 更改模型路径

- 更改类别个数
- 使用Netron打开装换好的om模型
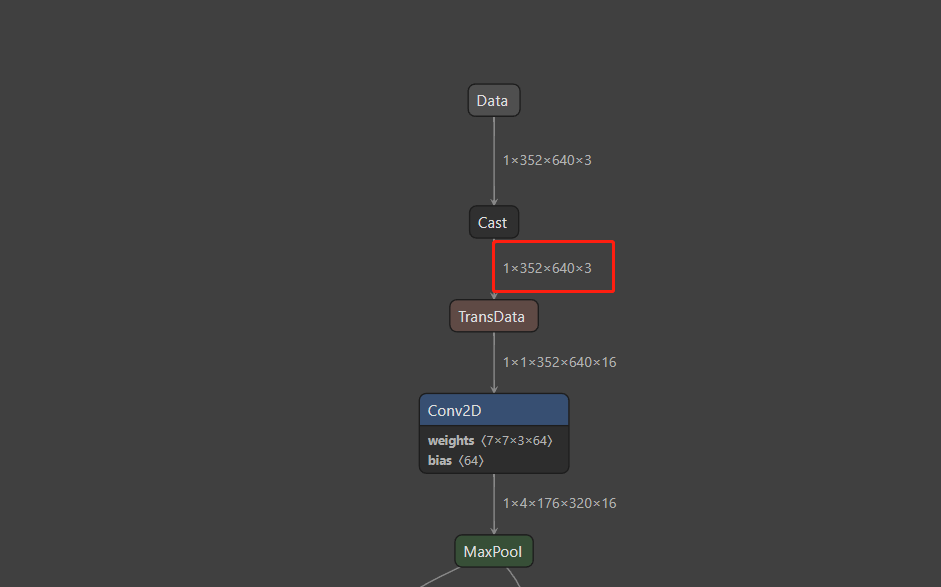
1×352×640×3,可以得到输入宽高,并在源码对应处进行修改
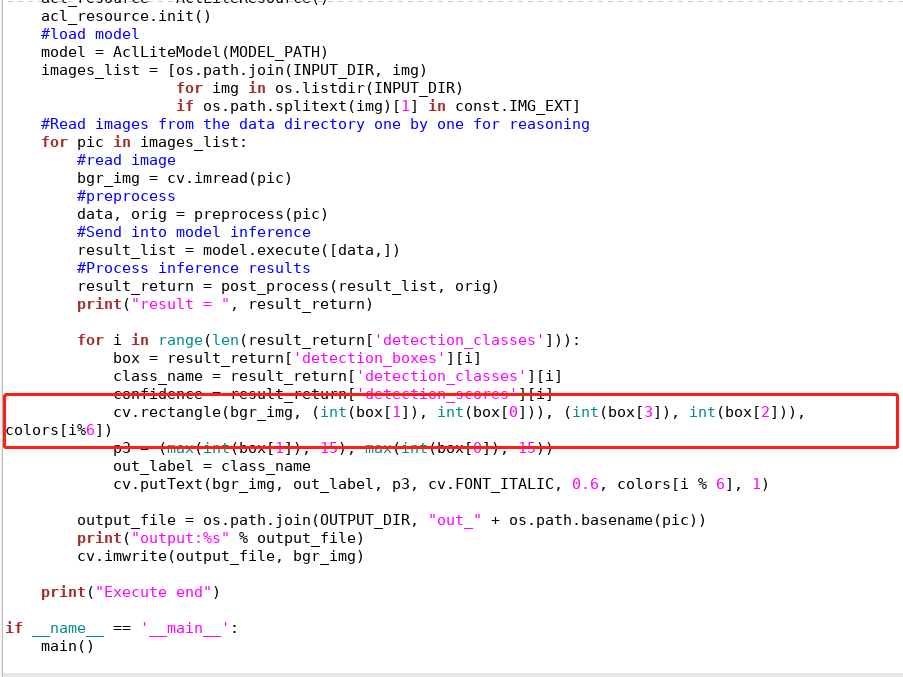
- 后处理部分代码需要根据自己的模型进行更改,主要是对输出识别坐标以及画框的修改
- 本文使用的修改完的代码
import sys
sys.path.append("../../../../common")
sys.path.append("../")
import os
import numpy as np
import acl
import cv2 as cv
from PIL import Image

import constants as const
from acllite_model import AclLiteModel
from acllite_resource import AclLiteResource

labels = ["chamomile", "tulip", "rose","sunflower","dandelion"]
INPUT_DIR = '../data/'
OUTPUT_DIR = '../out/'
MODEL_PATH = "../model/flower_detection.om"
MODEL_WIDTH = 640
MODEL_HEIGHT = 352
class_num = 5
stride_list = [8, 16, 32]
anchors_1 = np.array([[10, 13], [16, 30], [33, 23]]) / stride_list[0]
anchors_2 = np.array([[30, 61], [62, 45], [59, 119]]) / stride_list[1]
anchors_3 = np.array([[116, 90], [156, 198], [163, 326]]) / stride_list[2]
anchor_list = [anchors_1, anchors_2, anchors_3]

conf_threshold = 0.2
iou_threshold = 0.3

colors = [(255, 0, 0), (0, 255, 0), (0, 0, 255), (0, 255, 255), (255, 0, 255), (255, 255, 0)]

def preprocess(img_path):
    image = Image.open(img_path)
    img_h = image.size[1]
    img_w = image.size[0]
    net_h = MODEL_HEIGHT
    net_w = MODEL_WIDTH

    scale = min(float(net_w) / float(img_w), float(net_h) / float(img_h))
    new_w = int(img_w * scale)
    new_h = int(img_h * scale)

    shift_x = (net_w - new_w) // 2
    shift_y = (net_h - new_h) // 2
    shift_x_ratio = (net_w - new_w) / 2.0 / net_w
    shift_y_ratio = (net_h - new_h) / 2.0 / net_h

    image_ = image.resize( (new_w, new_h))
    new_image = np.zeros( (net_h, net_w, 3), np.uint8)
    new_image[shift_y: new_h + shift_y, shift_x: new_w + shift_x, :] = np.array(image_)
    new_image = new_image.astype(np.float32)
    new_image = new_image / 255

    return new_image, image

def overlap(x1, x2, x3, x4):
    left = max(x1, x3)
    right = min(x2, x4)
    return right - left

def cal_iou(box, truth):
    w = overlap(box[0], box[2], truth[0], truth[2])
    h = overlap(box[1], box[3], truth[1], truth[3])
    if w <= 0 or h <= 0:
        return 0
    inter_area = w * h
    union_area = (box[2] - box[0]) * (box[3] - box[1]) + (truth[2] - truth[0]) * (truth[3] - truth[1]) - inter_area
    return inter_area * 1.0 / union_area

def apply_nms(all_boxes, thres):
    res = []
    for cls in range(class_num):
        cls_bboxes = all_boxes[cls]
        sorted_boxes = sorted(cls_bboxes, key=lambda d: d[5])[::-1]

        p = dict()
        for i in range(len(sorted_boxes)):
            if i in p:
                continue
            truth = sorted_boxes[i]
            for j in range(i + 1, len(sorted_boxes)):
                if j in p:
                    continue
                box = sorted_boxes[j]
                iou = cal_iou(box, truth)
                if iou >= thres:
                    p[j] = 1
        for i in range(len(sorted_boxes)):
            if i not in p:
                res.append(sorted_boxes[i])
    return res

def decode_bbox(conv_output, anchors, img_w, img_h, x_scale, y_scale, shift_x_ratio, shift_y_ratio):
    def _sigmoid(x):
        s = 1 / (1 + np.exp(-x))
        return s

    h, w, _ = conv_output.shape
    pred = conv_output.reshape((h * w, 3, 5 + class_num))
    pred[..., 4:] = _sigmoid(pred[..., 4:])
    pred[..., 0] = (_sigmoid(pred[..., 0]) + np.tile(range(w), (3, h)).transpose((1, 0))) / w
    pred[..., 1] = (_sigmoid(pred[..., 1]) + np.tile(np.repeat(range(h), w), (3, 1)).transpose((1, 0))) / h
    pred[..., 2] = np.exp(pred[..., 2]) * anchors[:, 0:1].transpose((1, 0)) / w
    pred[..., 3] = np.exp(pred[..., 3]) * anchors[:, 1:2].transpose((1, 0)) / h

    bbox = np.zeros((h * w, 3, 4))
    bbox[..., 0] = np.maximum((pred[..., 0] - pred[..., 2] / 2.0 - shift_x_ratio) * x_scale * img_w, 0)  # x_min
    bbox[..., 1] = np.maximum((pred[..., 1] - pred[..., 3] / 2.0 - shift_y_ratio) * y_scale * img_h, 0)  # y_min
    bbox[..., 2] = np.minimum((pred[..., 0] + pred[..., 2] / 2.0 - shift_x_ratio) * x_scale * img_w, img_w)  # x_max
    bbox[..., 3] = np.minimum((pred[..., 1] + pred[..., 3] / 2.0 - shift_y_ratio) * y_scale * img_h, img_h)  # y_max

    pred[..., :4] = bbox
    pred = pred.reshape((-1, 5 + class_num))
    pred[:, 4] = pred[:, 4] * pred[:, 5:].max(1)
    pred = pred[pred[:, 4] >= conf_threshold]
    pred[:, 5] = np.argmax(pred[:, 5:], axis=-1)

    all_boxes = [[] for ix in range(class_num)]
    for ix in range(pred.shape[0]):
        box = [int(pred[ix, iy]) for iy in range(4)]
        box.append(int(pred[ix, 5]))
        box.append(pred[ix, 4])
        all_boxes[box[4] - 1].append(box)

    return all_boxes

def convert_labels(label_list):
    if isinstance(label_list, np.ndarray):
        label_list = label_list.tolist()
        label_names = [labels[int(index)] for index in label_list]
    return label_names

def post_process(infer_output, origin_img):
    print("post process")
    result_return = dict()
    img_h = origin_img.size[1]
    img_w = origin_img.size[0]
    scale = min(float(MODEL_WIDTH) / float(img_w), float(MODEL_HEIGHT) / float(img_h))
    new_w = int(img_w * scale)
    new_h = int(img_h * scale)
    shift_x_ratio = (MODEL_WIDTH - new_w) / 2.0 / MODEL_WIDTH
    shift_y_ratio = (MODEL_HEIGHT - new_h) / 2.0 / MODEL_HEIGHT
    class_number = len(labels)
    num_channel = 3 * (class_number + 5)
    x_scale = MODEL_WIDTH / float(new_w)
    y_scale = MODEL_HEIGHT / float(new_h)
    all_boxes = [[] for ix in range(class_number)]
    for ix in range(3):
        pred = infer_output[2 - ix].reshape((MODEL_HEIGHT // stride_list[ix], \
        MODEL_WIDTH // stride_list[ix], num_channel))
        anchors = anchor_list[ix]
        boxes = decode_bbox(pred, anchors, img_w, img_h, x_scale, y_scale, shift_x_ratio, shift_y_ratio)
        all_boxes = [all_boxes[iy] + boxes[iy] for iy in range(class_number)]

    res = apply_nms(all_boxes, iou_threshold)
    if not res:
        result_return['detection_classes'] = []
        result_return['detection_boxes'] = []
        result_return['detection_scores'] = []
        return result_return
    else:
        new_res = np.array(res)
        picked_boxes = new_res[:, 0:4]
        picked_boxes = picked_boxes[:, [1, 0, 3, 2]]
        picked_classes = convert_labels(new_res[:, 4])
        picked_score = new_res[:, 5]
        result_return['detection_classes'] = picked_classes
        result_return['detection_boxes'] = picked_boxes.tolist()
        result_return['detection_scores'] = picked_score.tolist()
        return result_return

def main():
    if not os.path.exists(OUTPUT_DIR):
        os.mkdir(OUTPUT_DIR)
    #ACL resource initialization
    acl_resource = AclLiteResource()
    acl_resource.init()
    #load model
    model = AclLiteModel(MODEL_PATH)
    images_list = [os.path.join(INPUT_DIR, img)
                   for img in os.listdir(INPUT_DIR)
                   if os.path.splitext(img)[1] in const.IMG_EXT]
    #Read images from the data directory one by one for reasoning
    for pic in images_list:
        #read image
        bgr_img = cv.imread(pic)
        #preprocess
        data, orig = preprocess(pic)
        #Send into model inference
        result_list = model.execute([data,])
        #Process inference results
        result_return = post_process(result_list, orig)
        print("result = ", result_return)

        for i in range(len(result_return['detection_classes'])):
            box = result_return['detection_boxes'][i]
            class_name = result_return['detection_classes'][i]
            confidence = result_return['detection_scores'][i]
            cv.rectangle(bgr_img, (int(box[1]), int(box[0])), (int(box[3]), int(box[2])), colors[i%6])
            p3 = (max(int(box[1]), 15), max(int(box[0]), 15))
            out_label = class_name
            cv.putText(bgr_img, out_label, p3, cv.FONT_ITALIC, 0.6, colors[i % 6], 1)

        output_file = os.path.join(OUTPUT_DIR, "out_" + os.path.basename(pic))
        print("output:%s" % output_file)
        cv.imwrite(output_file, bgr_img)

    print("Execute end")

if __name__ == '__main__':
    main()
- 1
- 2
- 3
- 4
- 5
- 6
- 7
- 8
- 9
- 10
- 11
- 12
- 13
- 14
- 15
- 16
- 17
- 18
- 19
- 20
- 21
- 22
- 23
- 24
- 25
- 26
- 27
- 28
- 29
- 30
- 31
- 32
- 33
- 34
- 35
- 36
- 37
- 38
- 39
- 40
- 41
- 42
- 43
- 44
- 45
- 46
- 47
- 48
- 49
- 50
- 51
- 52
- 53
- 54
- 55
- 56
- 57
- 58
- 59
- 60
- 61
- 62
- 63
- 64
- 65
- 66
- 67
- 68
- 69
- 70
- 71
- 72
- 73
- 74
- 75
- 76
- 77
- 78
- 79
- 80
- 81
- 82
- 83
- 84
- 85
- 86
- 87
- 88
- 89
- 90
- 91
- 92
- 93
- 94
- 95
- 96
- 97
- 98
- 99
- 100
- 101
- 102
- 103
- 104
- 105
- 106
- 107
- 108
- 109
- 110
- 111
- 112
- 113
- 114
- 115
- 116
- 117
- 118
- 119
- 120
- 121
- 122
- 123
- 124
- 125
- 126
- 127
- 128
- 129
- 130
- 131
- 132
- 133
- 134
- 135
- 136
- 137
- 138
- 139
- 140
- 141
- 142
- 143
- 144
- 145
- 146
- 147
- 148
- 149
- 150
- 151
- 152
- 153
- 154
- 155
- 156
- 157
- 158
- 159
- 160
- 161
- 162
- 163
- 164
- 165
- 166
- 167
- 168
- 169
- 170
- 171
- 172
- 173
- 174
- 175
- 176
- 177
- 178
- 179
- 180
- 181
- 182
- 183
- 184
- 185
- 186
- 187
- 188
- 189
- 190
- 191
- 192
- 193
- 194
- 195
- 196
- 197
- 198
- 199
- 200
- 201
- 202
- 203
- 204
- 205
- 206
- 207
- 208
- 209
- 210
- 211
本文使用的模型:
链接:https://pan.baidu.com/s/1sFvODQjQDnSIz6r7xZF0NA
提取码:jezq
由于数据集过少,模型精度不高,本文只为打通流程
四、MindStudio win(可选)
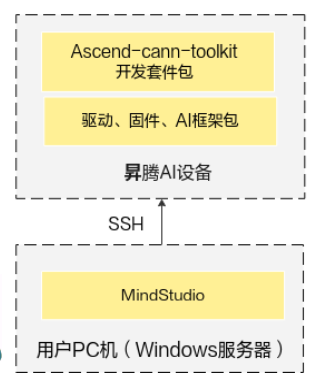
将MindStudio安装在Windows服务器上时,Windows服务器为本地环境,Linux服务器为远端环境
当然也可以使用vscode、clion、pycharm等ide进行远程开发
使用ide只是为了便于调试开发,可以跳过
1.依赖需要
以下可以前往对应官网下载安装
- Python3.7.5
- MinGW
- CMake
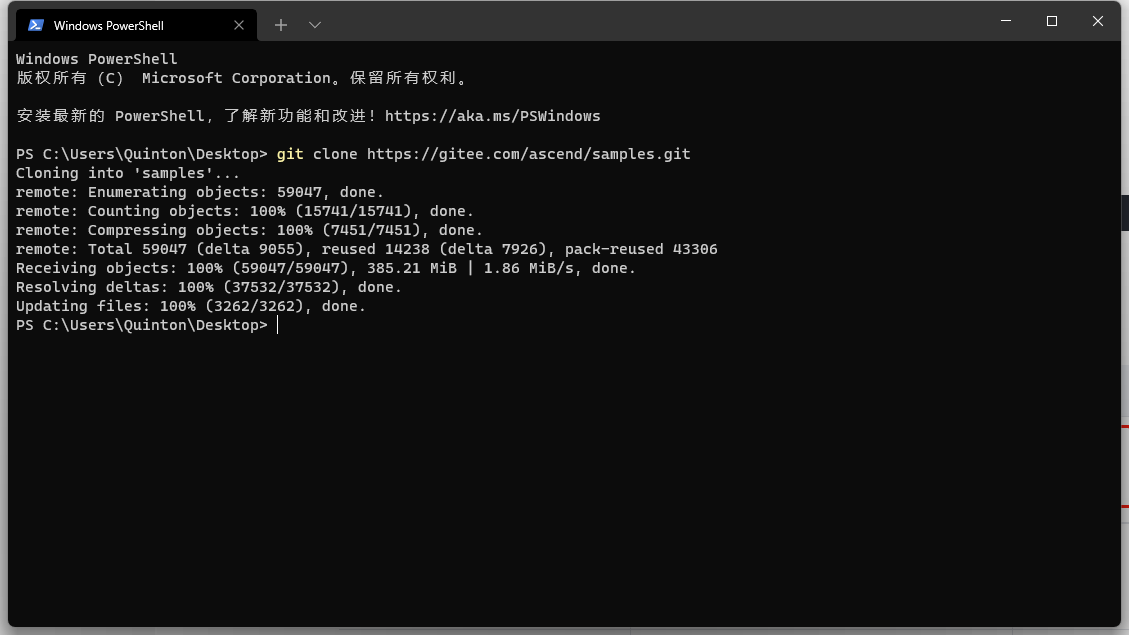
2.win端下载工程源码
git clone https://gitee.com/ascend/samples.git
- 1
3.准备软件
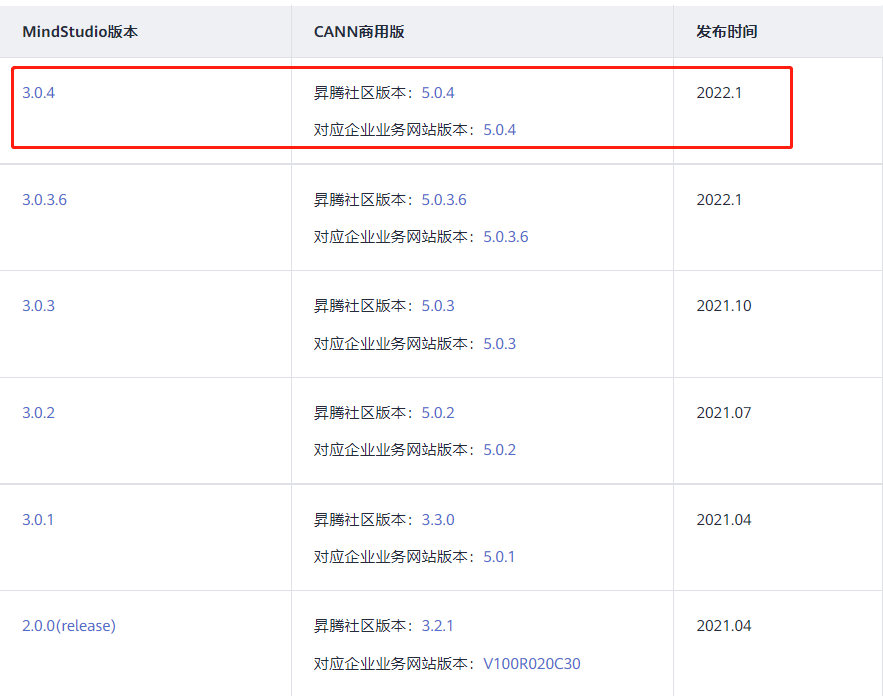
- 注意MindStudio版本,为了能顺利安装依赖,建议选择3.0.4版本
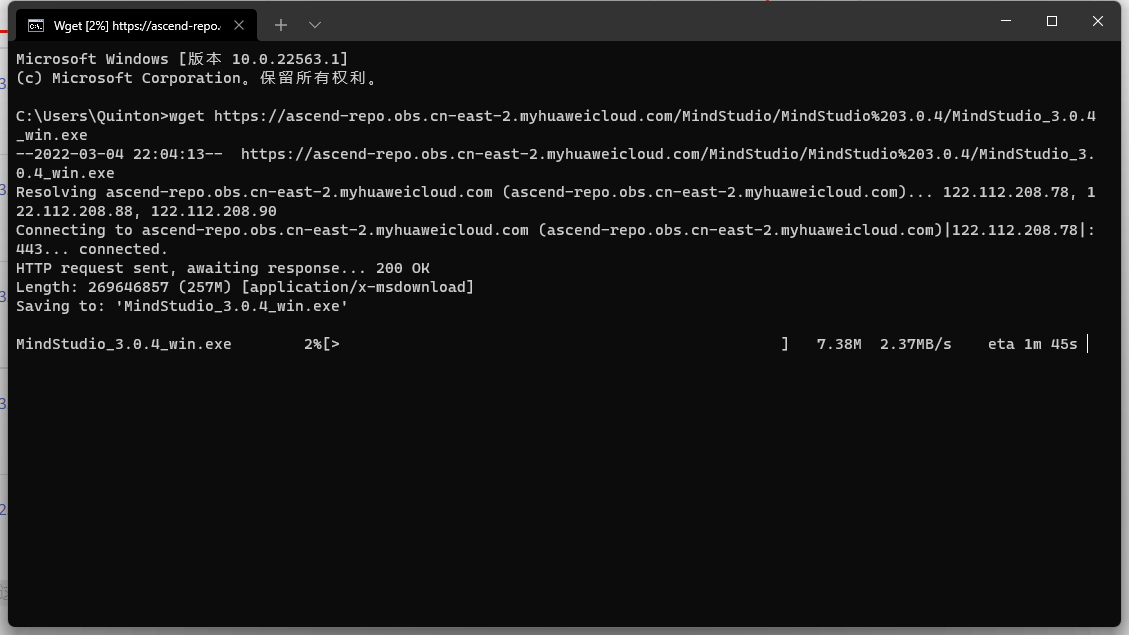
- 在Windows上下载软件包
wget https://ascend-repo.obs.cn-east-2.myhuaweicloud.com/MindStudio/MindStudio%203.0.4/MindStudio_3.0.4_win.exe
- 1
- 运行安装

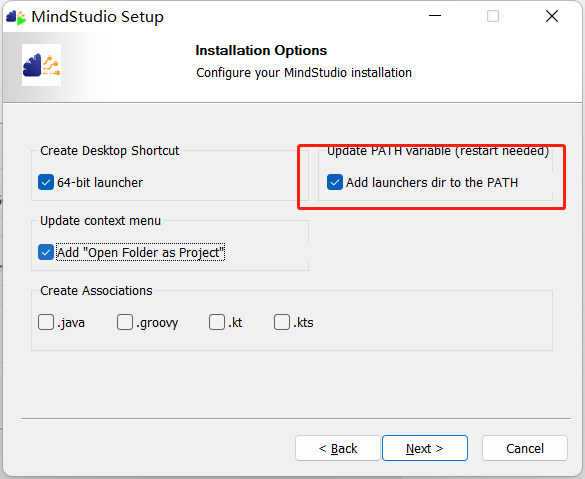
- 勾选添加环境变量
- 安装完成

- 下载jbr
wget https://cache-redirector.jetbrains.com/intellij-jbr/jbr_dcevm-11_0_10-windows-x64-b1341.35.tar.gz
- 1
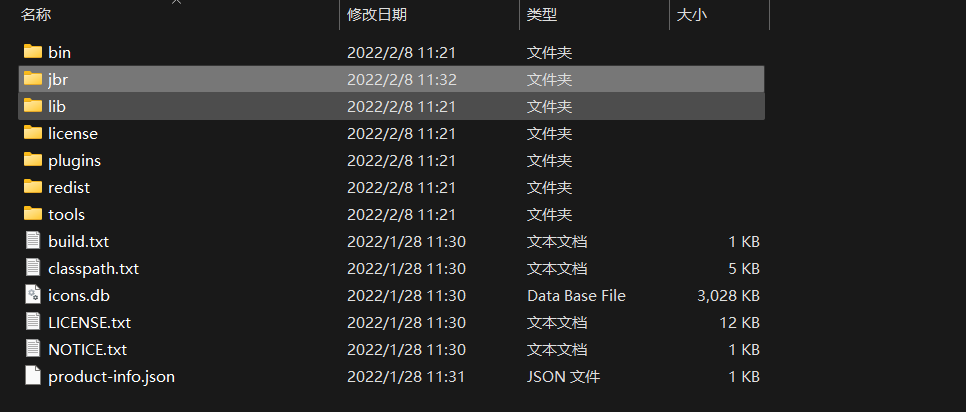
解压jbr,放入MindStudio根目录
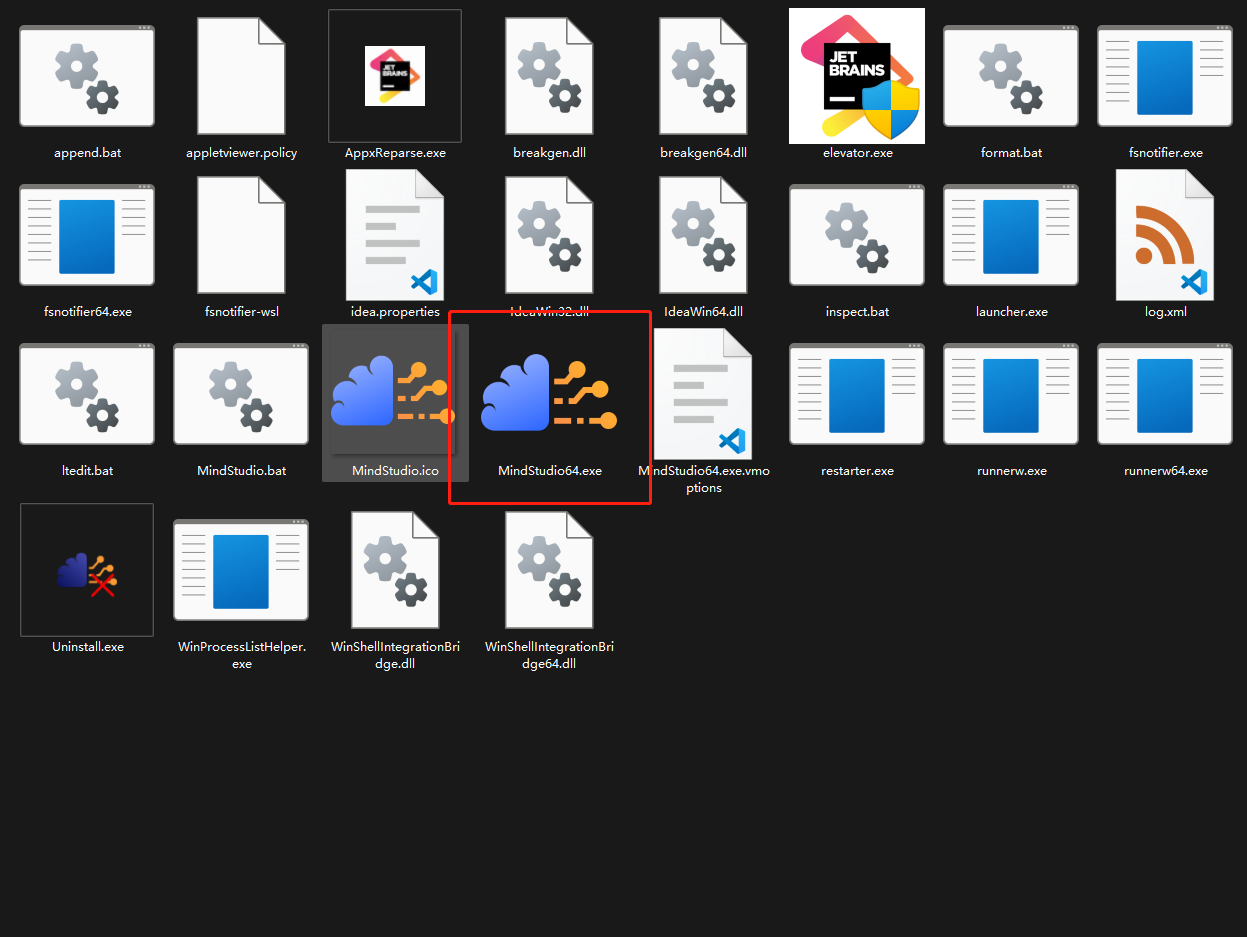
- 进入bin文件夹,运行MindStudio64.exe
4.依赖配置
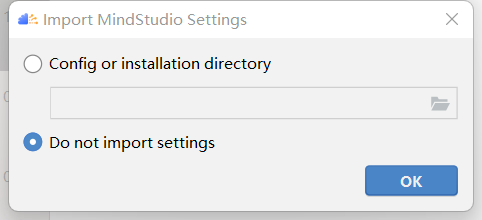
- 打开后选择不导入设置,然后选择OK
- 进入此页面,open打开工程
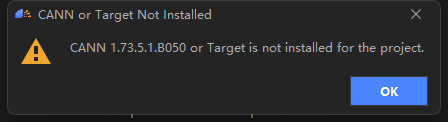
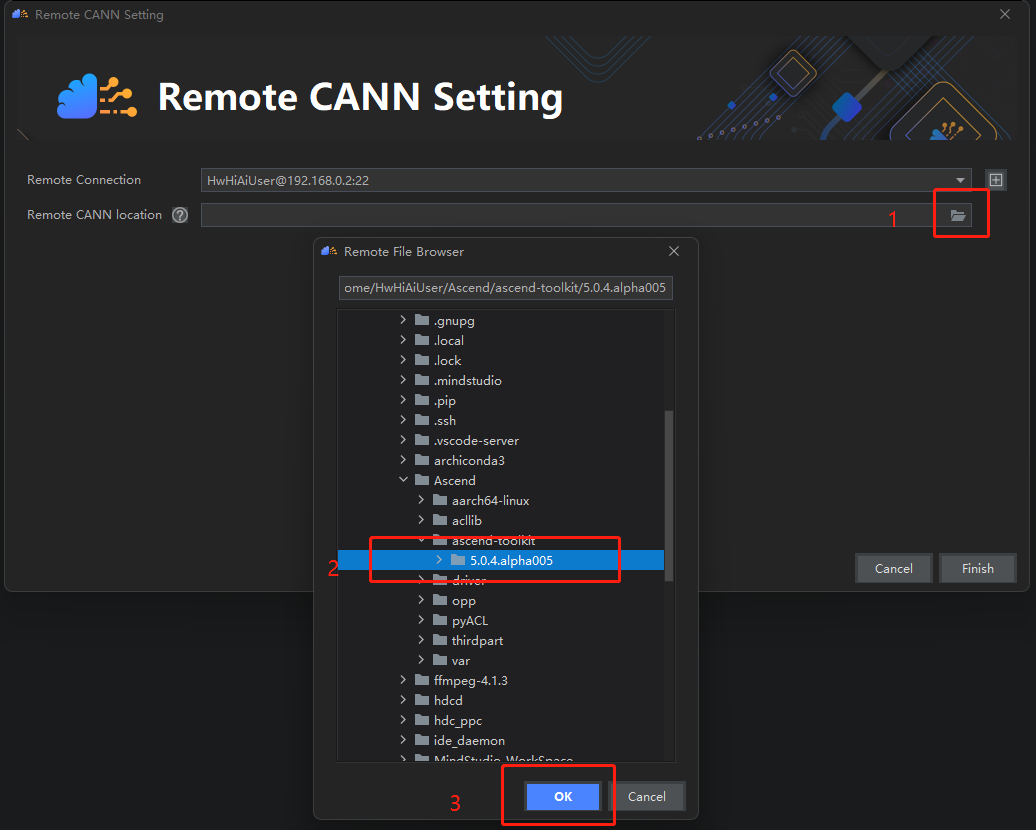
- cann包安装
选择OK
install

连接200dk
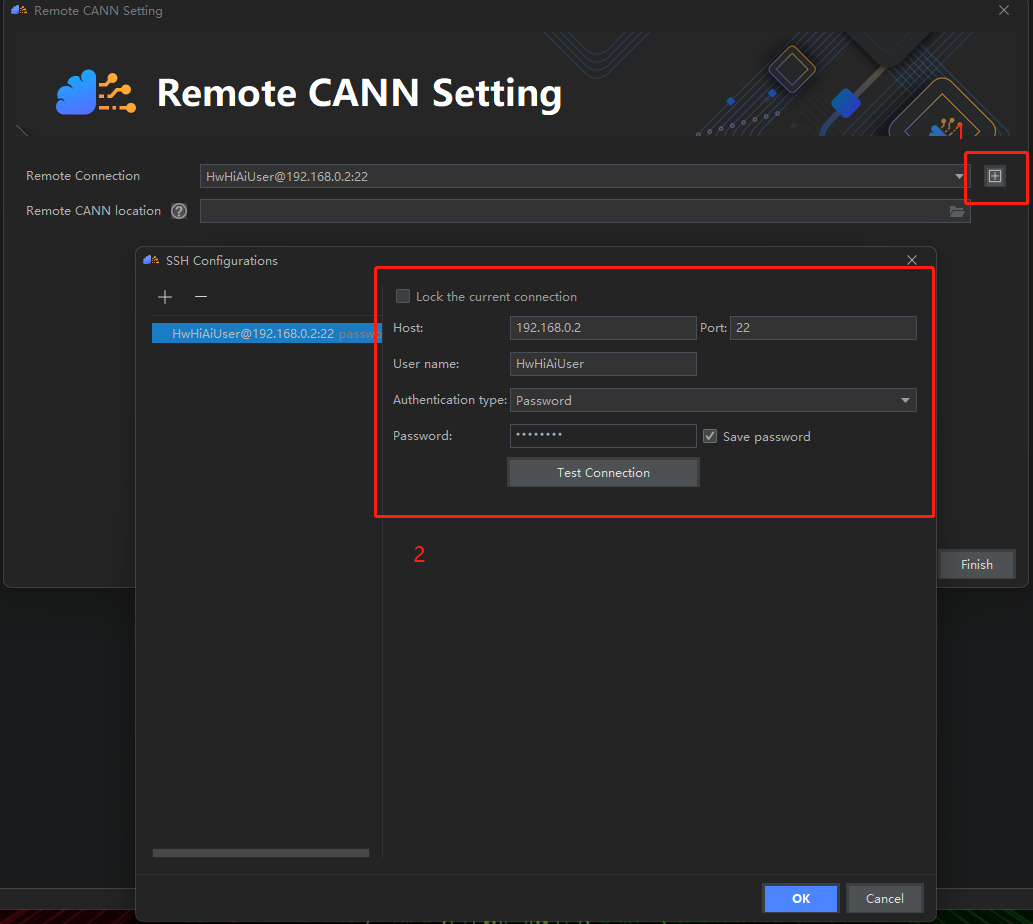
选择200dk中的cann
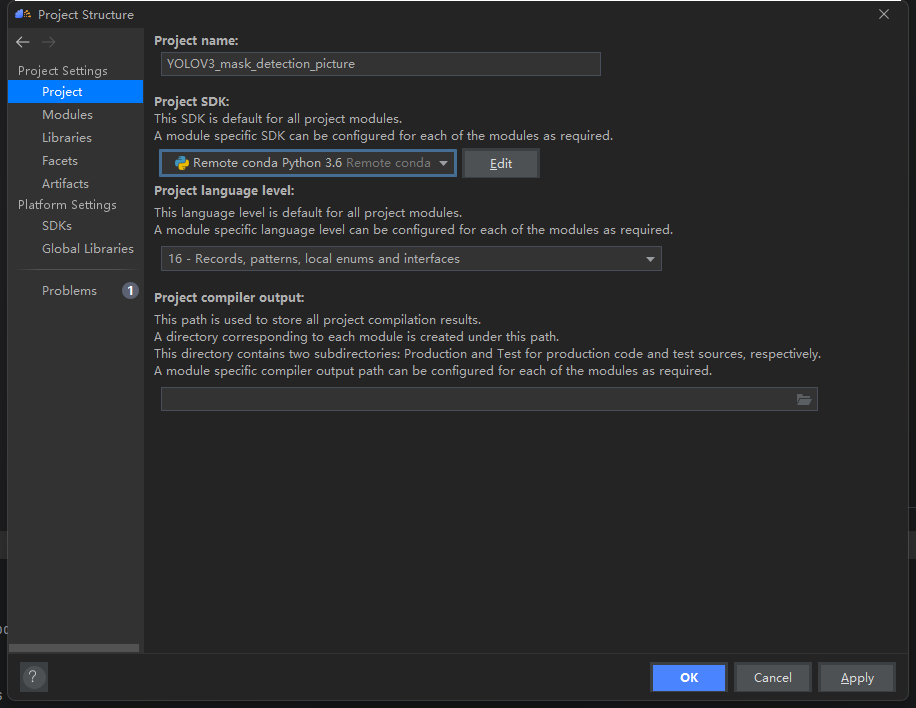
- 进入工程
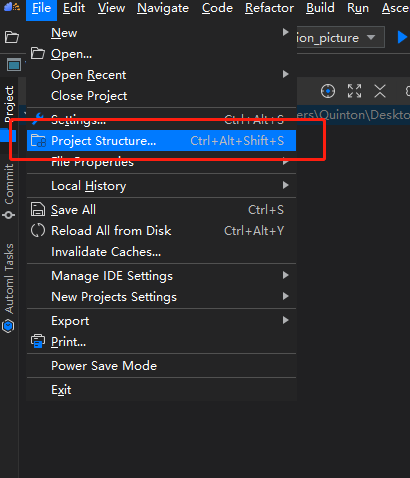
- 配置SDK
选择增加python SDK
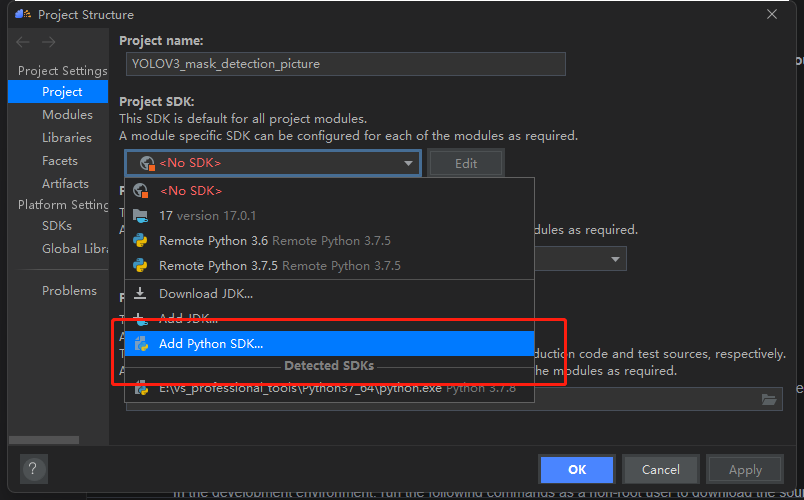
添加200dk中的SDK,选择conda虚拟环境中的python
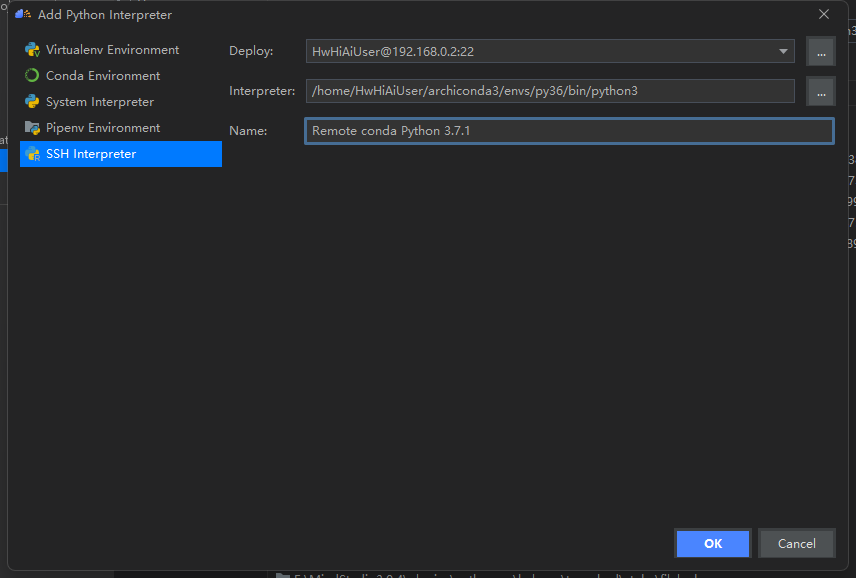
添加完成
- 运行程序选择SDK
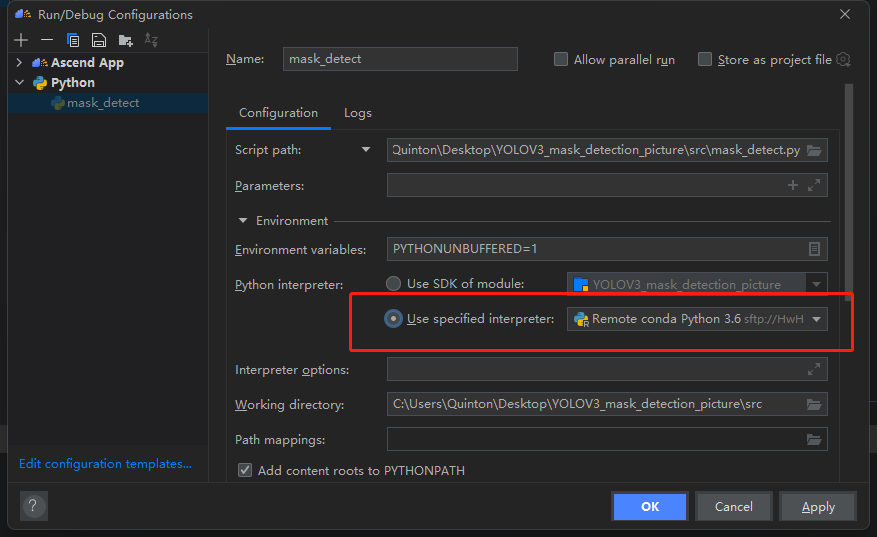
5.部署工程
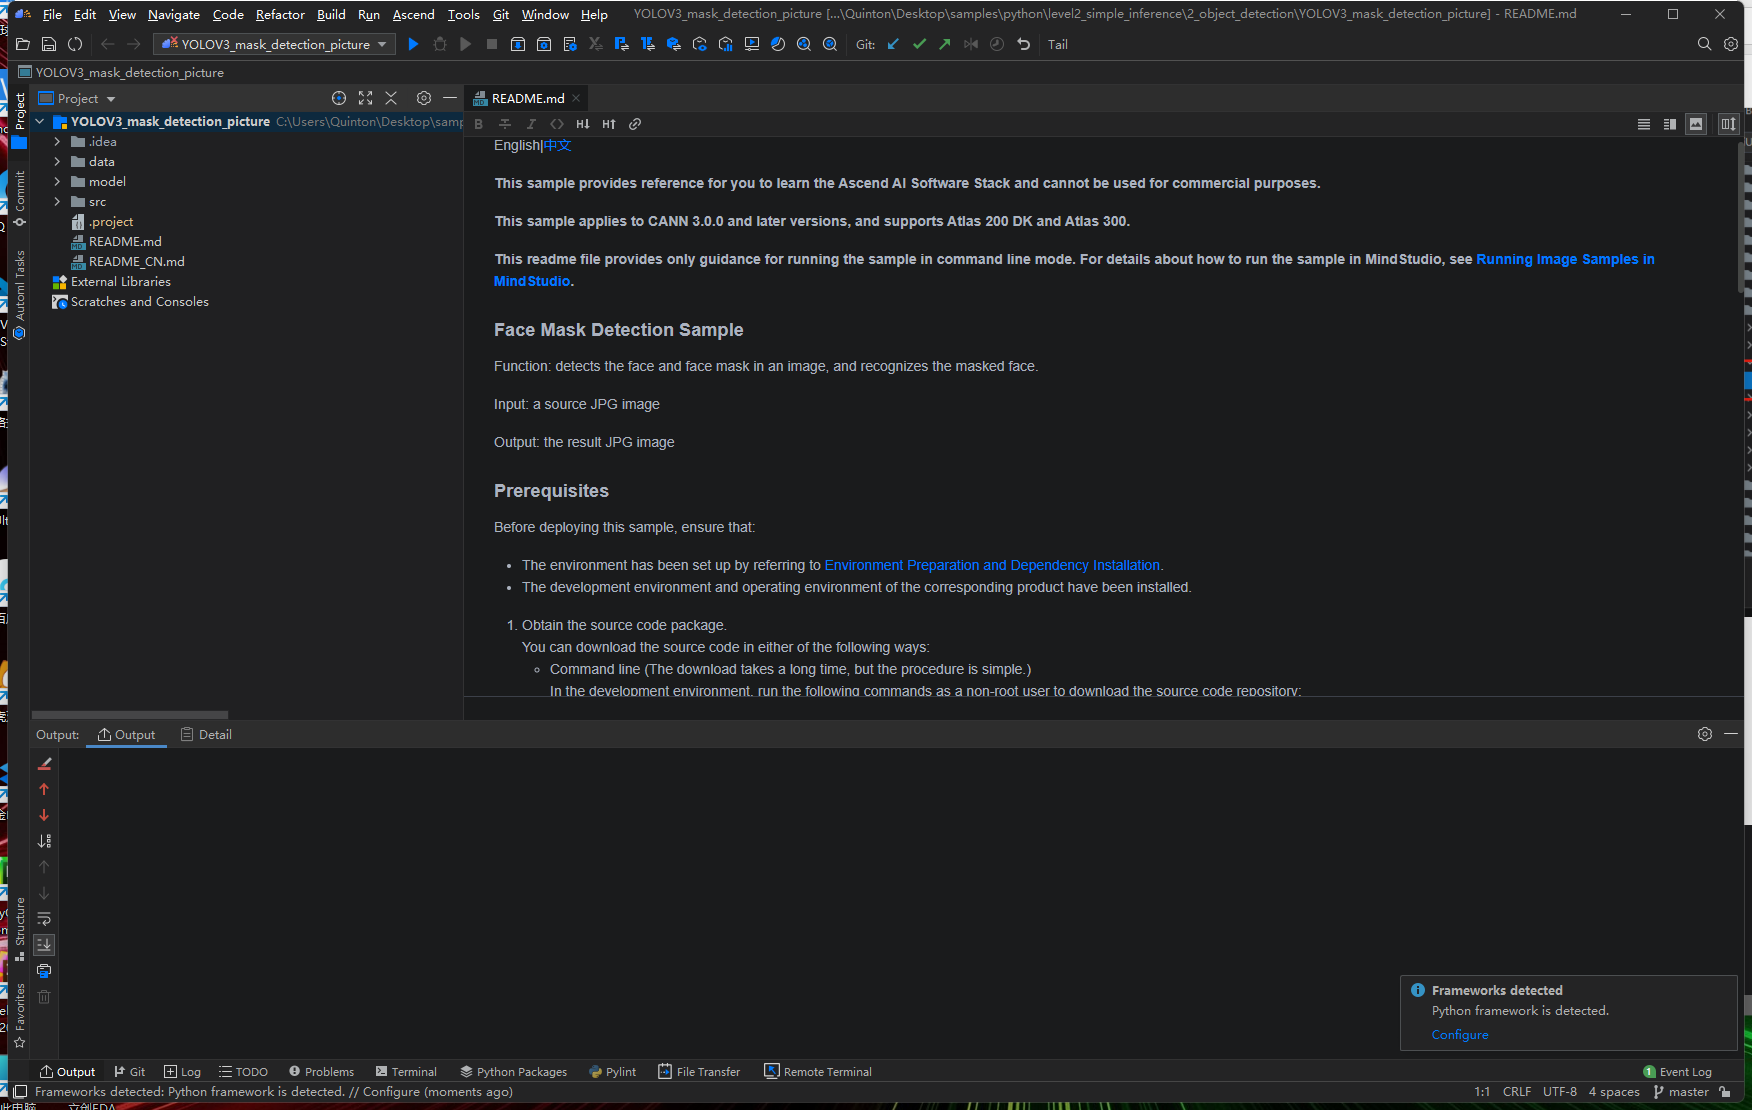
- 更改源码
在MindStudio中打开源码,更改源码可以参照上文
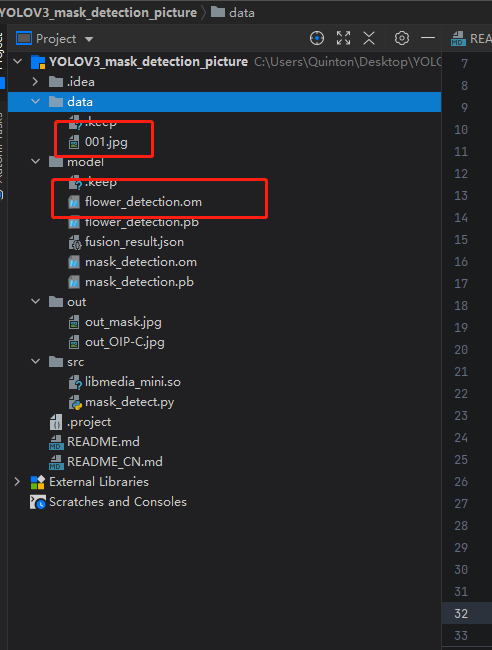
- 将图片和模型放入对应的文件夹
五、Atlas离线推理
1.命令行方式
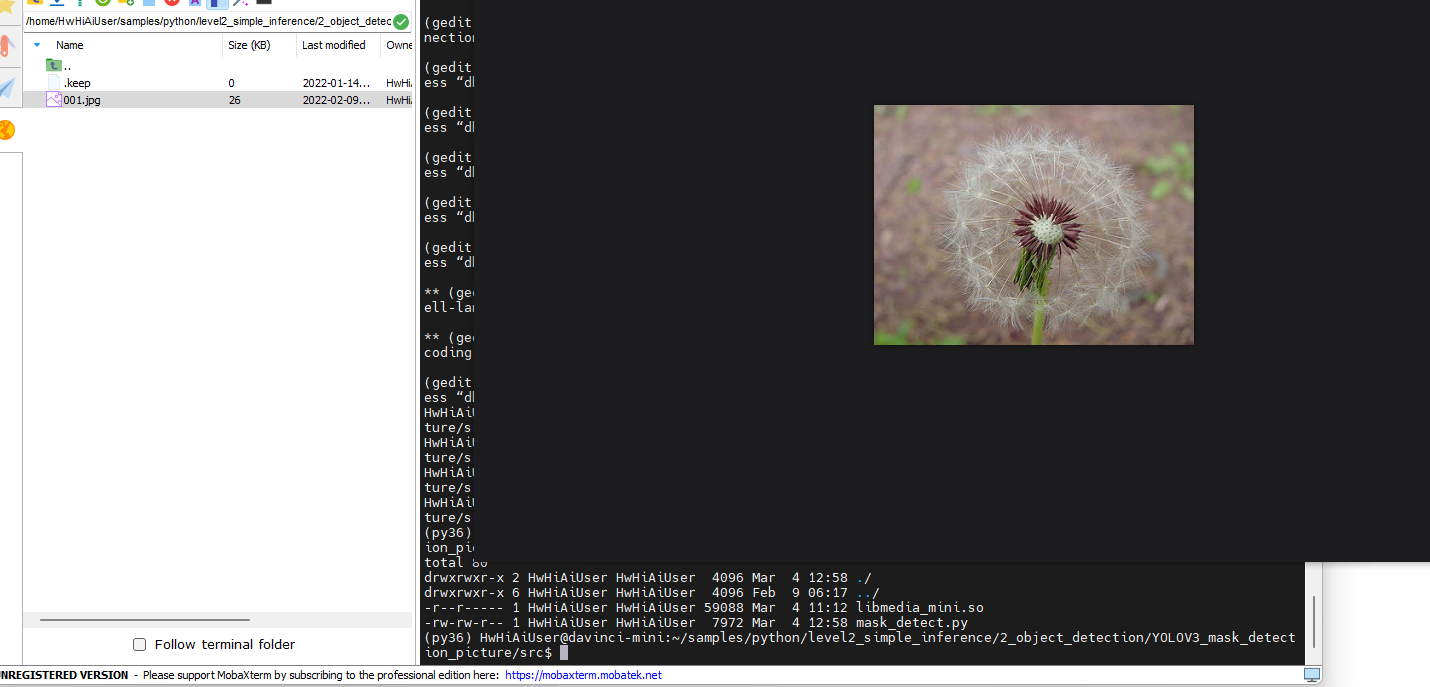
- 将需要进行识别的图片上传至工程data目录
- 运行程序
进入到源码目录
# 进入到python3,6虚拟环境
conda activate py36
#
python3.6 mask_detect.py
- 1
- 2
- 3
- 4
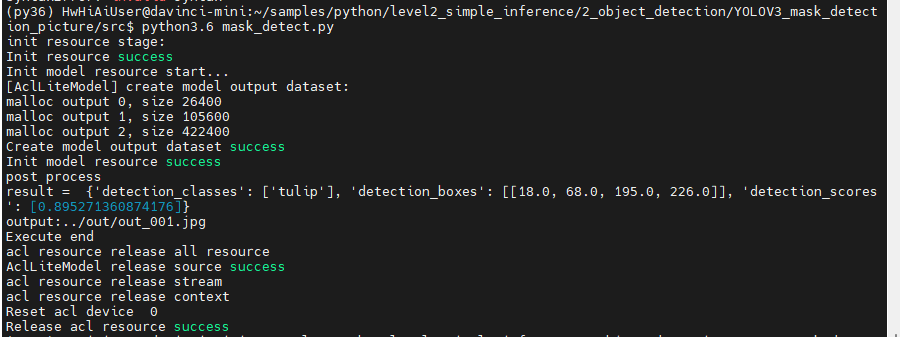
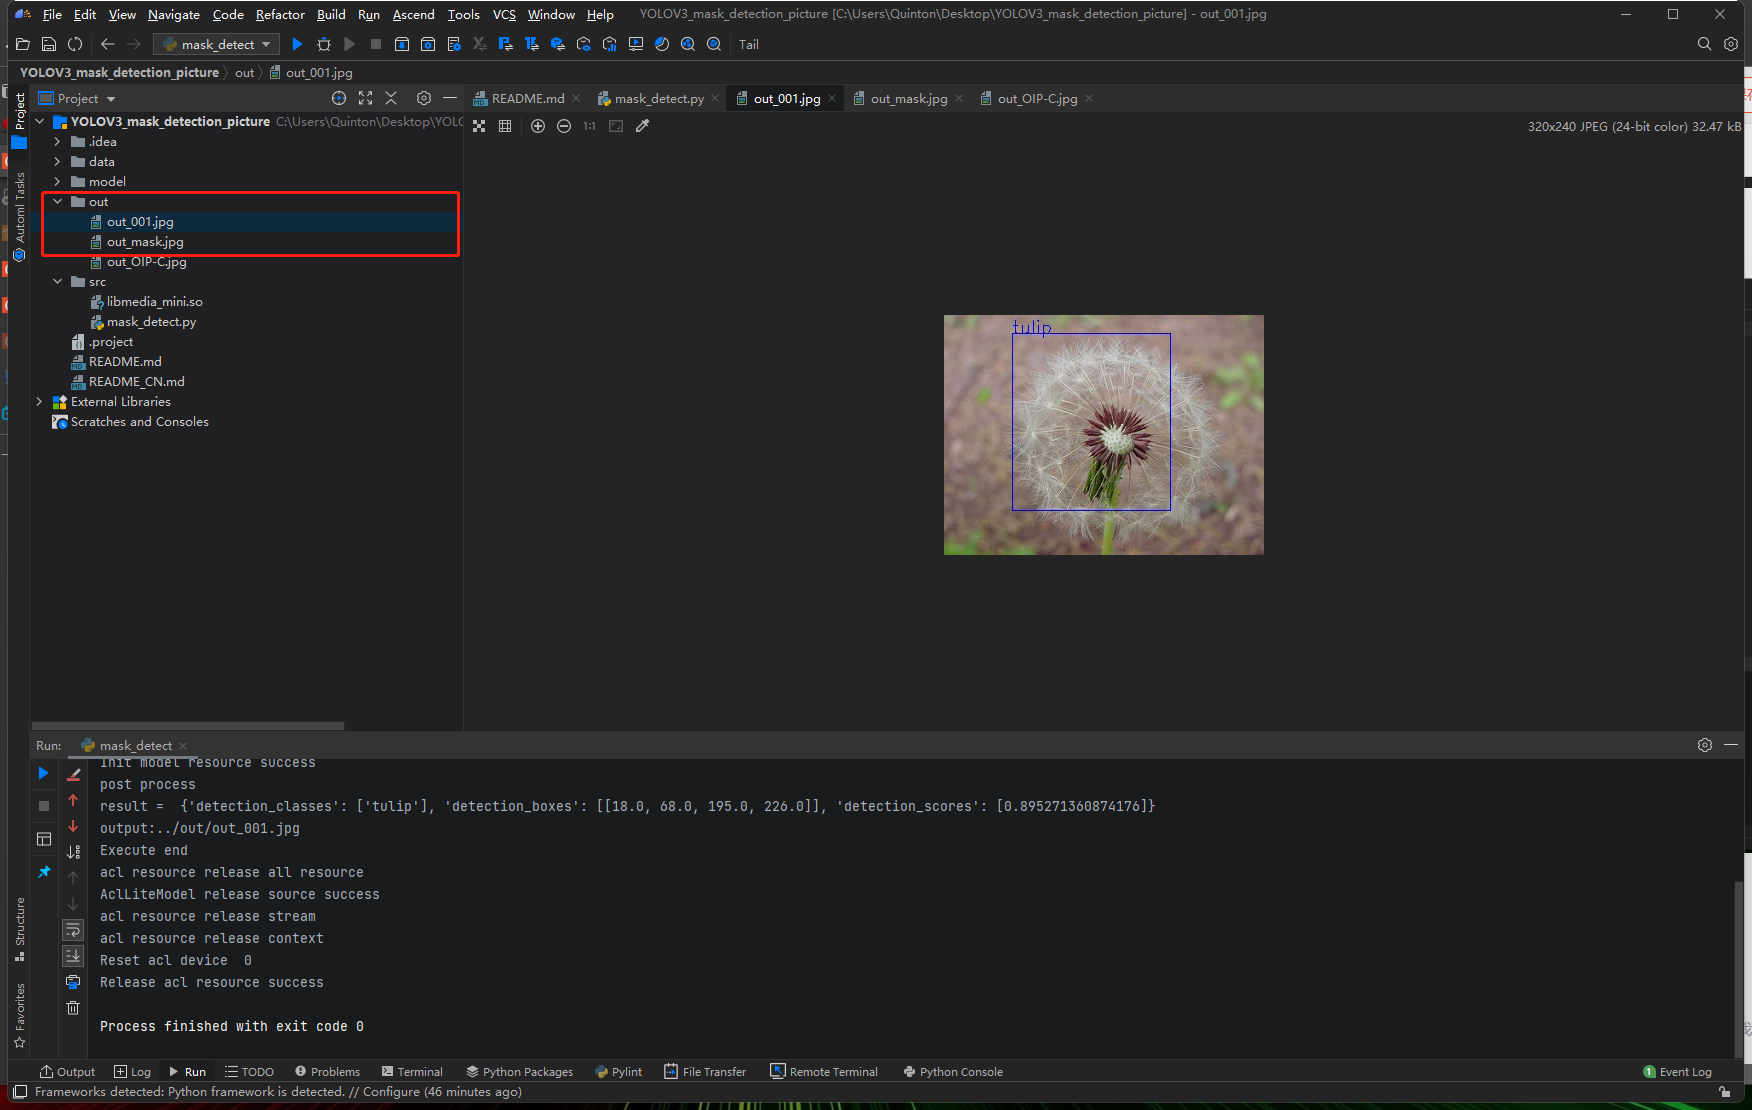
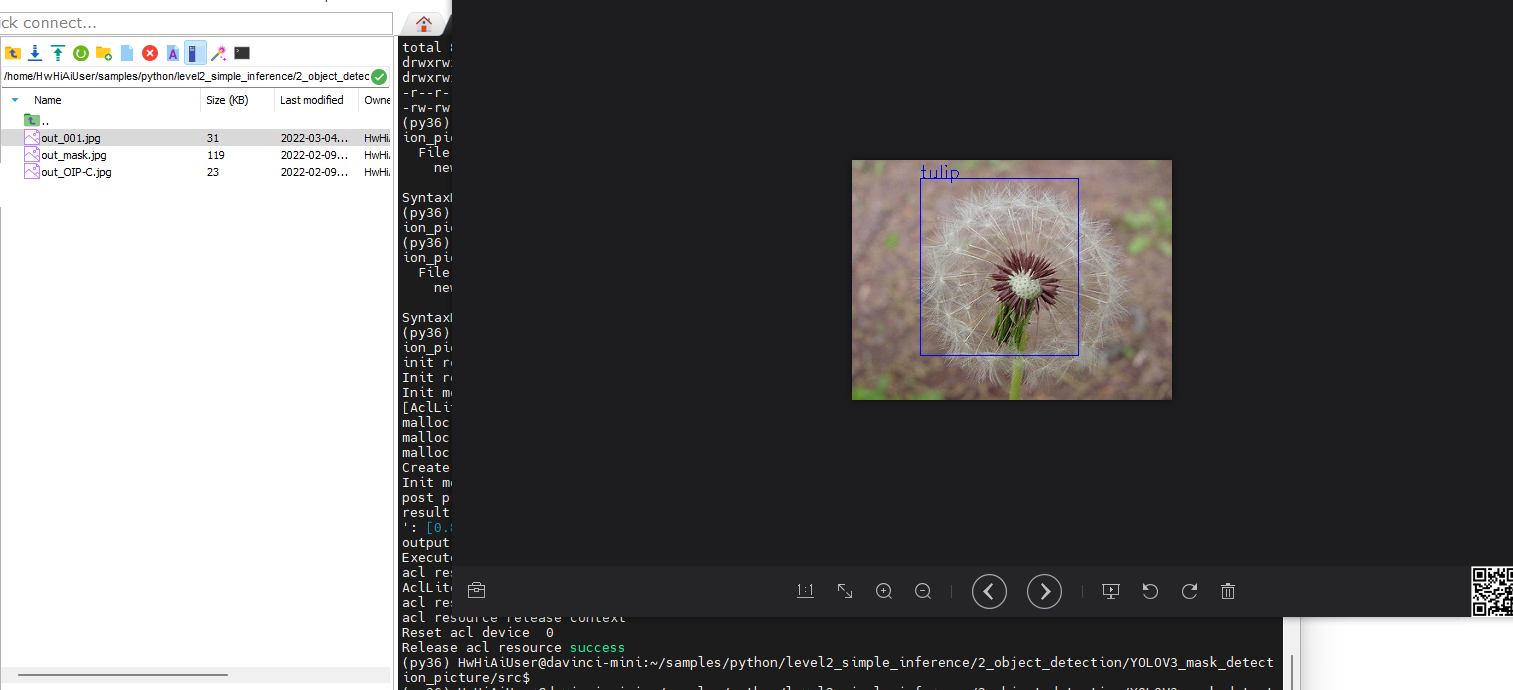
- 识别成功的输出图像保存在out目录下
由于数据集过少,模型精度不高,从而识别不准确
2.MindStudio
- 部署好之后,点击运行
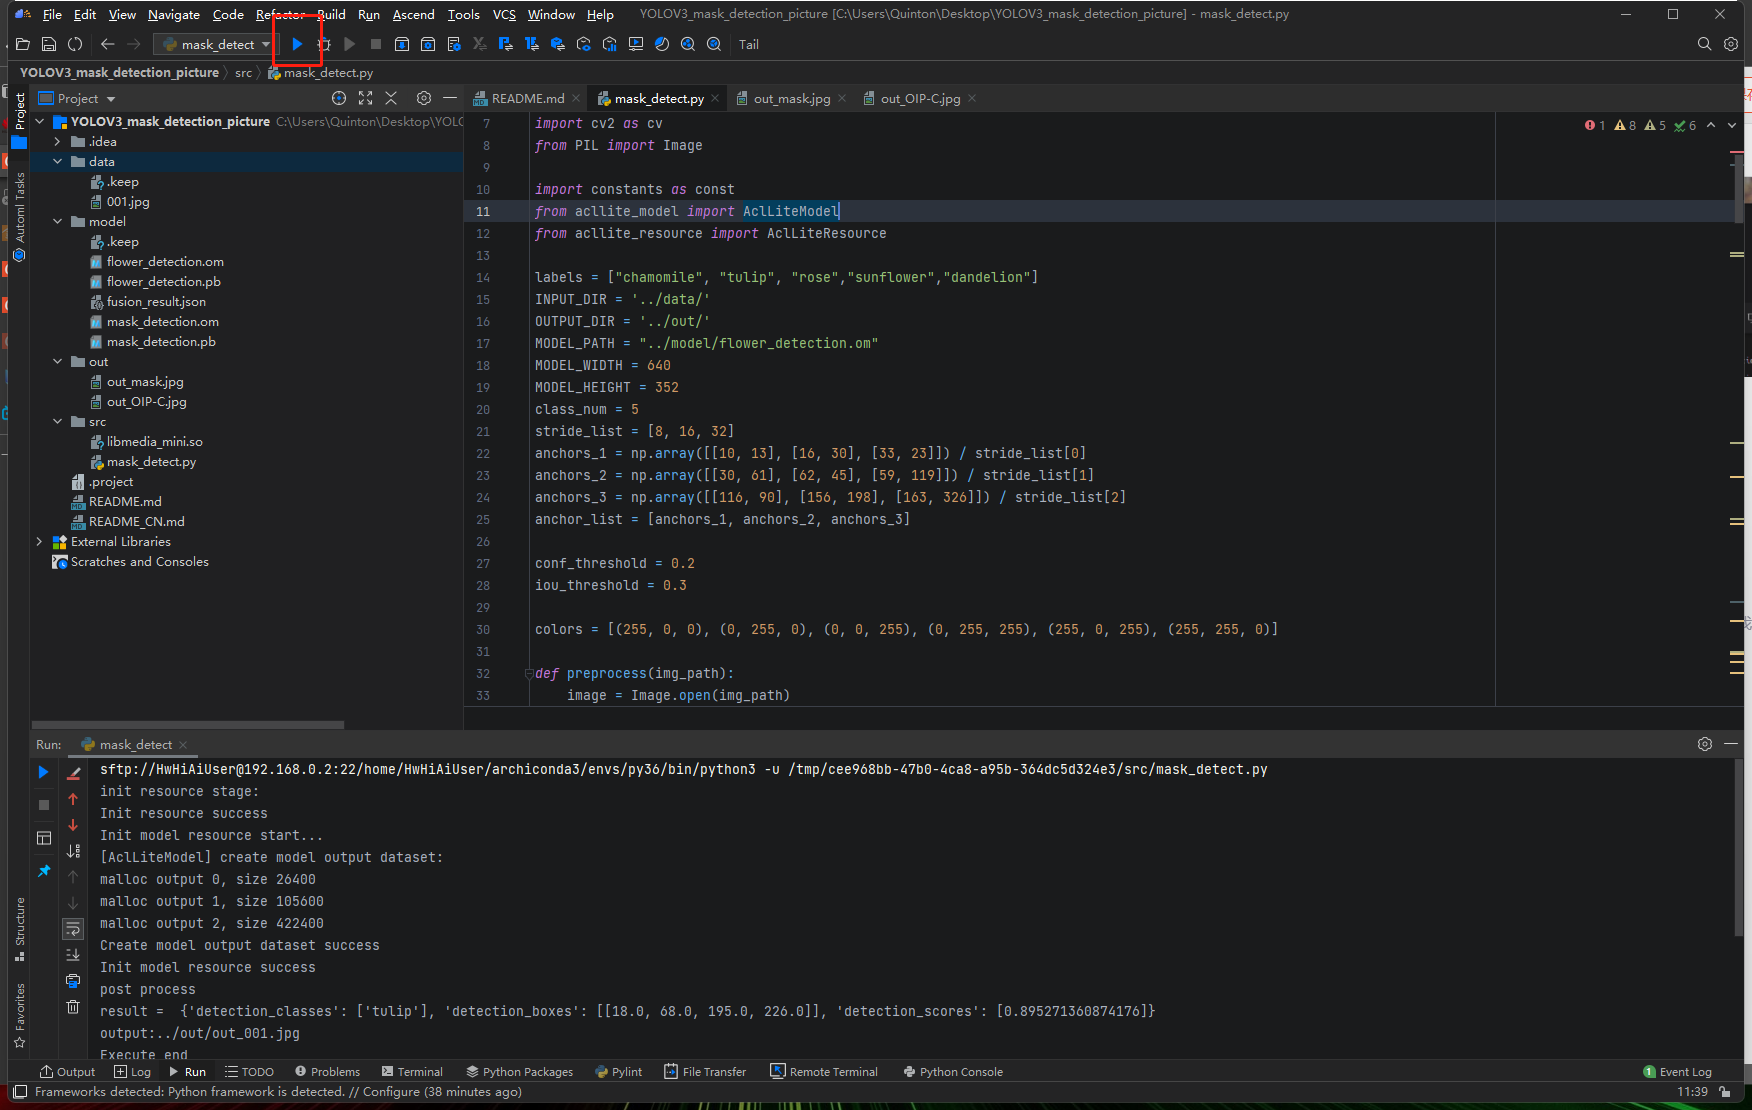
- 运行成功
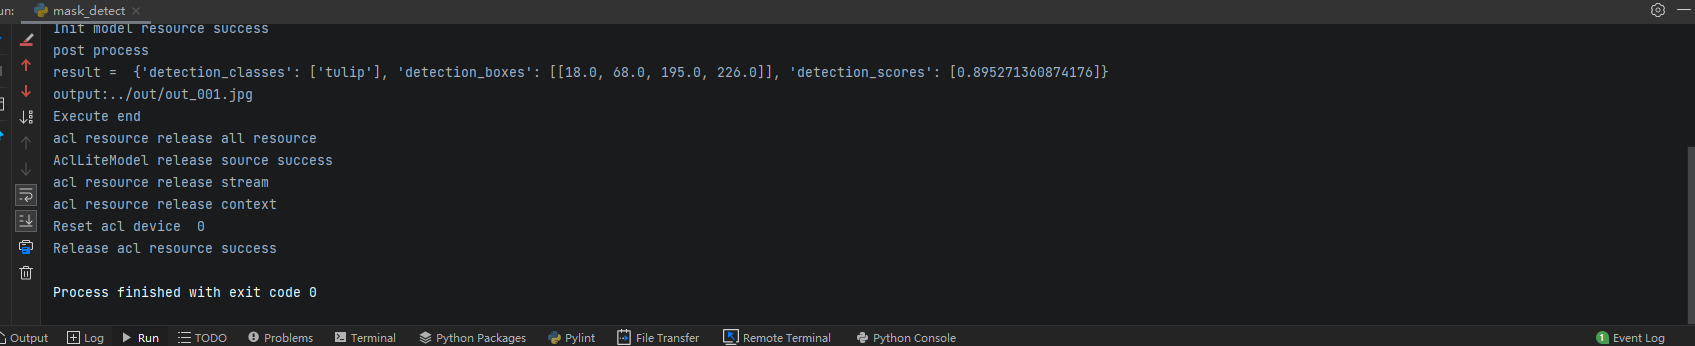
- 将远程工程同步到本地
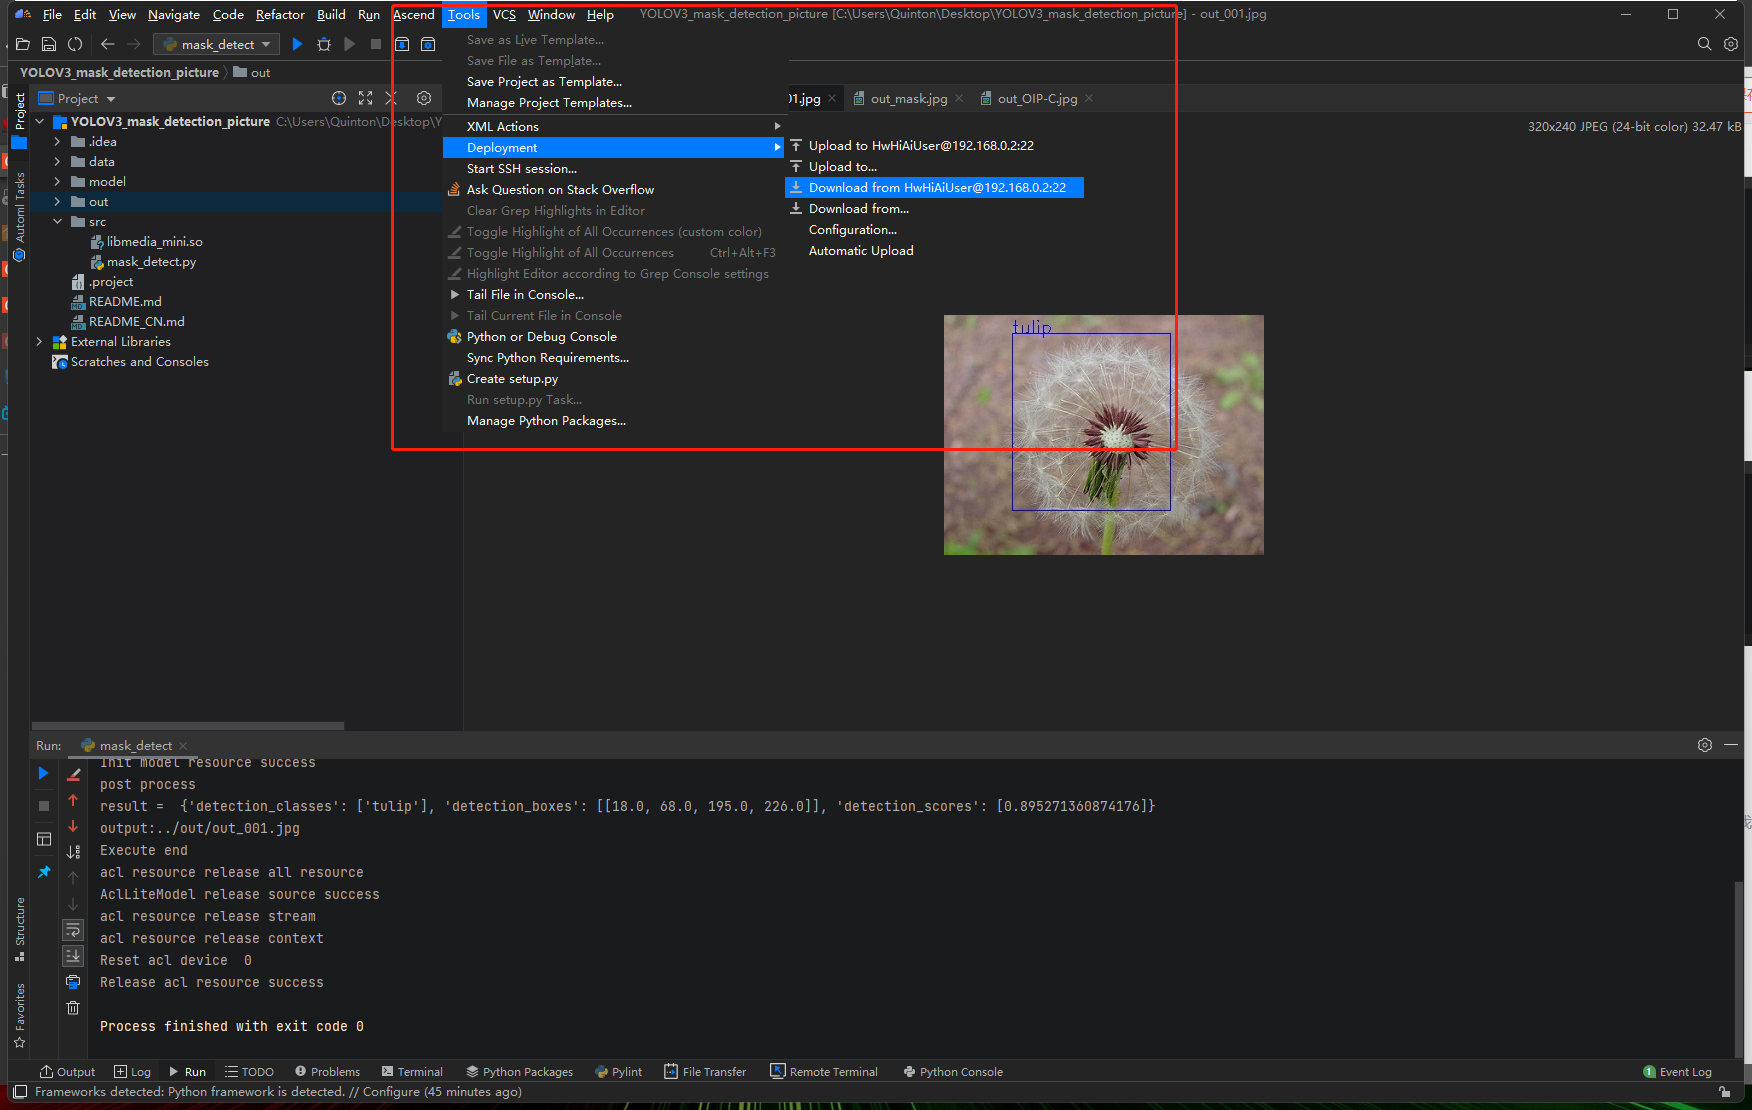
- 识别成功的输出图像保存在out目录下
由于数据集过少,模型精度不高,从而识别不准确