
- 1Mac M1:通过docker安装RocketMQ、RocketMQ-Dashboard_macos docker版本的rocketmq为什么是amd64
- 2鸿蒙(HarmonyOS)应用开发——应用程序入口UIAbility(题目答案)_harmonyos3.0应用开发系列课答案
- 3android p data/system目录下几个重要文件的作用_scan_as_system
- 4对内存溢出和内存泄露的简单总结理解_内存溢出和内存泄漏
- 5NLP 中语言表示 (向量化) 的基本原理和历史演变综述_语义向量化
- 6mysql根据逗号将一行数据拆分成多行数据,顺便展示其他列
- 7HarmonyOS应用开发学习笔记 arkTS自定义弹窗(CustomDialog)简单使用 arkTS弹出框回调、监听_arkts自定义弹窗(customdialog) 回调
- 8wps计算机里wps云盘图标,使用注册表删除我的电脑中的WPS网盘、百度网盘、微盘云等图标...
- 9如何在 Android Studio 中重命名软件包名称_android studio重命名包名
- 10java transactions数组_java里面Transaction transaction = (Transaction)(list.get(i));是什么意思...
Android 服务动态发现 SPA 之 Auto Service_auto-service
赞
踩
转载请标明出处:http://blog.csdn.net/zhaoyanjun6/article/details/125859181
本文出自【赵彦军的博客】
SPI
SPI(Service Provider Interface)是 Java 提供的一种动态服务发现机制。通过SPI 机制,我们可以直接跨模块查找到想要的接口实现类,从而避免不必要的模块间依赖,降低模块之间的耦合性。
Java 内置的 SPI 机制是通过 ServiceLoader 查找某个接口的所有实现类,并实例化。
每个需要实例化模块下需要以该接口的全限定名(包名+类名)为文件名放到 resources/META-INF/services/ 目录下,然后将他的实现类的全限定名按行依次写到该文件中。
1、创建接口类 StudentInterface
public interface StudentInterface {
    void eat(String name);
}
- 1
- 2
- 3
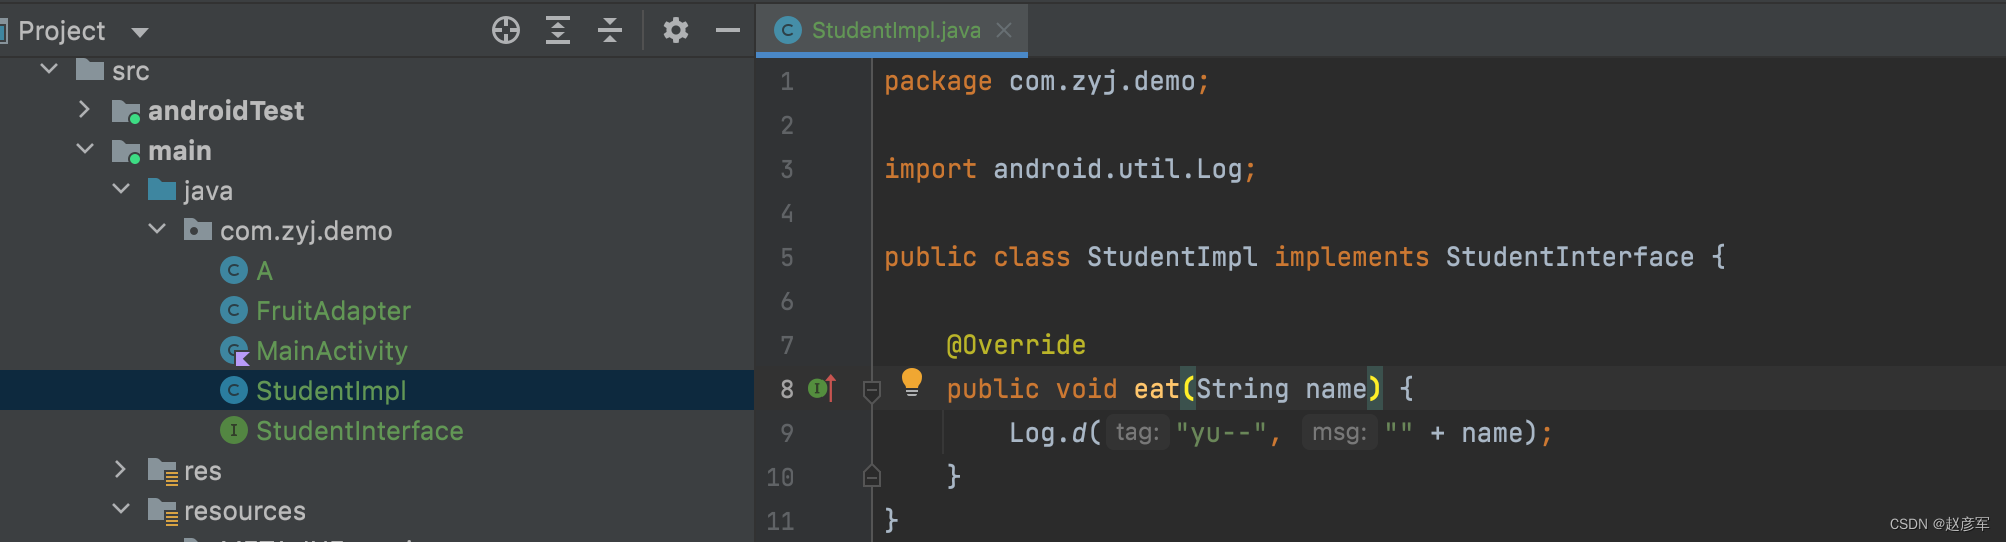
2、创建接口实现类 StudentImpl
package com.zyj.demo;

import android.util.Log;

public class StudentImpl implements StudentInterface {

    @Override
    public void eat(String name) {
        Log.d("yu--", "" + name);
    }
}
- 1
- 2
- 3
- 4
- 5
- 6
- 7
- 8
- 9
- 10
- 11
StudentImpl 类的全路径为 : com.zyj.demo.StudentImpl
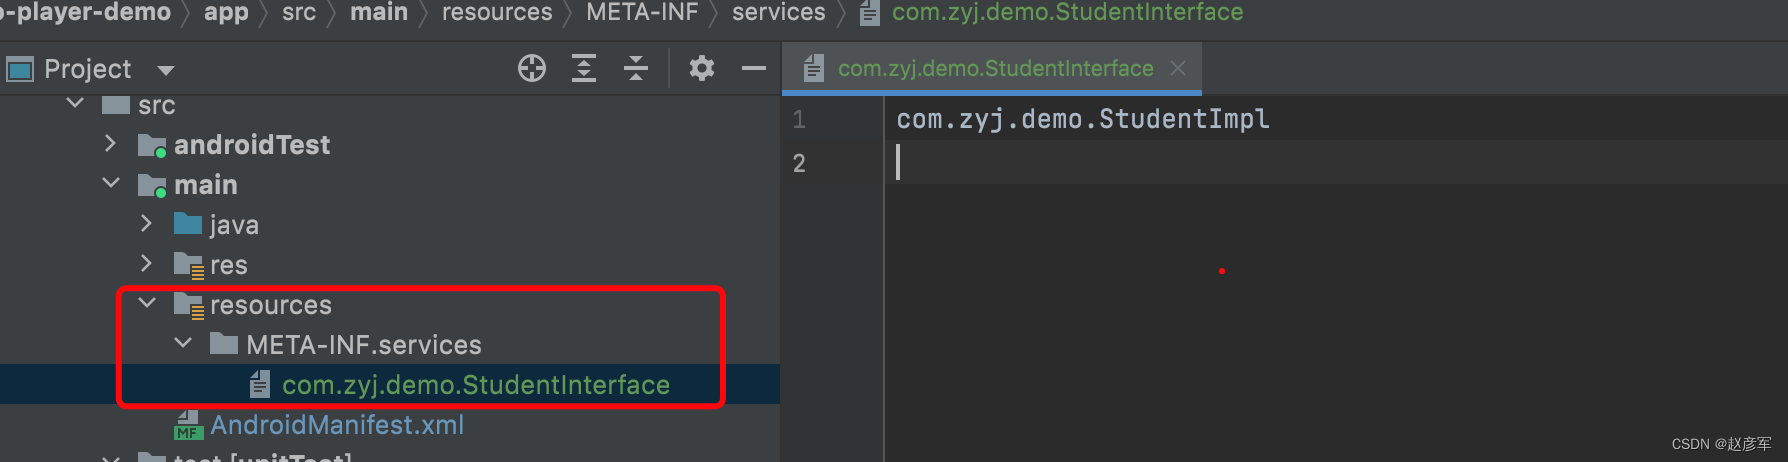
3、创建目录
- 在
main目录下,创建resources目录 - 在
resources目录下,创建META-INF目录 - 在
META-INF目录下,创建service目录
在 service 目录下,创建 com.zyj.demo.StudentInterface 文件
文件的内容为:com.zyj.demo.StudentImpl
4、ServiceLoader 发现服务
接口可以有多个实现类,所以返回值是一个集合
//发现服务,接口可以有多个实现类,所以返回值是一个集合
ServiceLoader<StudentInterface> serviceLoader = ServiceLoader.load(StudentInterface.class);

//遍历服务
for (StudentInterface impl : serviceLoader) {
    impl.eat("zyj");
}
- 1
- 2
- 3
- 4
- 5
- 6
- 7
总结
- 动态服务发现机制,可以很好的解耦,不必直接依赖接口实现类。
- ServiceLoader.load 每次都会创建一个新对象。生命周期用完即销毁
- 缺点也很明显,要手动往
resources/META-INF/services/写入文件。
有没有一种自动写入的工具,可以解放双手?
有的,下面我们就介绍 auto-service
auto-service
auto-service 是 google 出品的自动发现服务工具 ,是 SPA 的一种方式。
- SPA :Service Pool for Android
依赖:
 annotationProcessor 'com.google.auto.service:auto-service:1.0'
 implementation 'com.google.auto.service:auto-service-annotations:1.0'
- 1
- 2
我们只需要在 接口的实现类上,加上 @AutoService 注解,就可以了。
@AutoService(StudentInterface.class)
public class StudentImpl implements StudentInterface {

    @Override
    public void eat(String name) {
        Log.d("yu--", "" + name);
    }
}
- 1
- 2
- 3
- 4
- 5
- 6
- 7
- 8
发现服务,还是需要 ServiceLoader.load ,这个跟 Java 使用的是一致的。
//发现服务,接口可以有多个实现类,所以返回值是一个集合
ServiceLoader<StudentInterface> serviceLoader = ServiceLoader.load(StudentInterface.class);

//遍历服务
for (StudentInterface impl : serviceLoader) {
    impl.eat("zyj");
}
- 1
- 2
- 3
- 4
- 5
- 6
- 7
总结
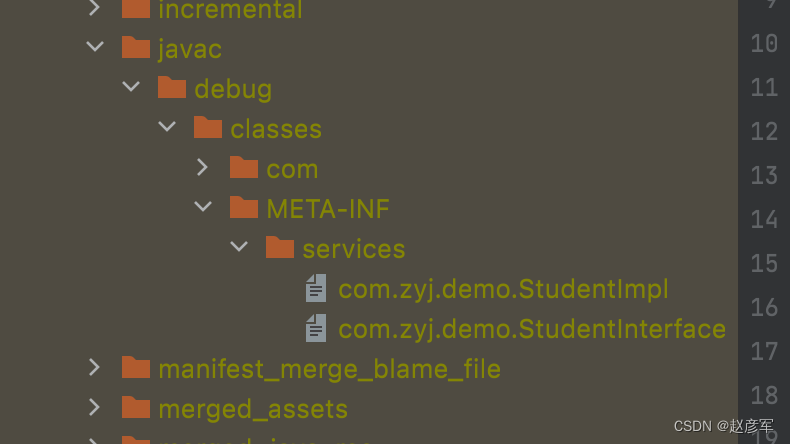
auto-service 的优势是,自动的往 resources/META-INF/services/ 写入文件,解放了双手,666666
我们看一眼这个目录,在 build 目录可以看到
识别多个服务
由于接口可以有多个实现类,所以我们通过 ServiceLoader.load(StudentInterface.class); 有可能有多个实例,我们如何区分自己需要的哪一个。
用 impl.getClass().getSimpleName() 可以获取实现类的名字。如下:
    void test() {
        ServiceLoader<StudentInterface> serviceLoader = ServiceLoader.load(StudentInterface.class, StudentInterface.class.getClassLoader());
        for (StudentInterface impl : serviceLoader) {

            if (impl.getClass().getSimpleName().equals("StudentImpl")) {
                //这就是我们的需要的服务
                impl.eat("zyj");
            }
        }
    }
- 1
- 2
- 3
- 4
- 5
- 6
- 7
- 8
- 9
- 10
实例作用域问题
即使用了 auto-service ,也不能解决实例作用域问题,如果需要全局使用,就需要自己实现单例了,这里不再展开。
SPA应用实战1 —— 子模块如何获取主模块的BuildConfig信息
多模块开发/组件化开发过程中,主模块(plugin为com.android.application的模块,一般指app模块)可以依赖任何模块,但是子模块无法依赖主模块,如果子模块想拿主模块的内容要怎么办呢? 下面演示如何通过Spa来获取主模块的Context和BuildConfig中的内容。
先在接口层定义一个BuildService
public interface BuildService {
    String buglyId(); // build.gradle中使用buildConfigField定义的buglyId

    boolean debuggable();

    String versionName();

    int versionCode();

    String applicationId();

    String buildType();
}
- 1
- 2
- 3
- 4
- 5
- 6
- 7
- 8
- 9
- 10
- 11
- 12
- 13
在app模块中,实现这个service接口并使用 @AutoService 标记
BuildServiceImpl.java
@AutoService(BuildService.class)
public class BuildServiceImpl implements BuildService {
    @Override
    public String buglyId() {
        return BuildConfig.BUGLY_ID;
    }

    @Override
    public boolean debuggable() {
        return BuildConfig.DEBUG;
    }

    @Override
    public String versionName() {
        return BuildConfig.VERSION_NAME;
    }

    @Override
    public int versionCode() {
        return BuildConfig.VERSION_CODE;
    }

    @Override
    public String applicationId() {
        return BuildConfig.APPLICATION_ID;
    }

    @Override
    public String buildType() {
        return BuildConfig.BUILD_TYPE;
    }
}
- 1
- 2
- 3
- 4
- 5
- 6
- 7
- 8
- 9
- 10
- 11
- 12
- 13
- 14
- 15
- 16
- 17
- 18
- 19
- 20
- 21
- 22
- 23
- 24
- 25
- 26
- 27
- 28
- 29
- 30
- 31
- 32
准备工作已经完成,现在我们在pages模块的BuildInfoActivity中应用它
public class BuildInfoActivity extends AppCompatActivity {

    @Override
    protected void onCreate(@Nullable Bundle savedInstanceState) {
        super.onCreate(savedInstanceState);
        BuildInfoPageBinding viewBinding = BuildInfoPageBinding.inflate(LayoutInflater.from(this));
        setContentView(viewBinding.getRoot());

        BuildService buildService = Spa.getService(BuildService.class);
        viewBinding.applicationId.setText("applicationId: " + buildService.applicationId());
        viewBinding.versionName.setText("versionName: " + buildService.versionName());
        viewBinding.versionCode.setText("versionCode: " + buildService.versionCode() + "");
        viewBinding.buildType.setText("buildType: " + buildService.buildType());
        viewBinding.debuggable.setText("debuggable: " + buildService.debuggable());
        viewBinding.buglyId.setText("buglyId:" + buildService.buglyId());
    }
}}
- 1
- 2
- 3
- 4
- 5
- 6
- 7
- 8
- 9
- 10
- 11
- 12
- 13
- 14
- 15
- 16
- 17
- 18

