
热门标签
热门文章
- 1关于mpvue和taro框架实战对比_mpvue taro 对比
- 2轻松写出高质量内容:6款自媒体ai写作工具全攻略! #人工智能#知识分享_ai工具写作自媒体
- 3OpenCV测量物体的尺寸技能 get~
- 4【LeetCode】每日一题:排序链表
- 5PMP认证证书的实际作用!_pmp是啥证书有什么作用
- 6python 堆的使用 heapq_heapq 包
- 7MYSQL中编辑表格相关基本操作指南_mysql怎么编辑表内内容英文
- 8RabbitMQ系列【13】优先级队列_rabbitmq优先级队列
- 9Spring MVC数据绑定和响应——简单数据绑定(一)默认类型数据绑定_chapter12项目在哪里
- 10现在企业出现网络安全问题的原因都有哪些?_2.引起这件网络安全风险的原因是什么?
当前位置: article > 正文
@SpringBootTest单元测试测试类的使用_@springboottest 使用
作者:繁依Fanyi0 | 2024-07-03 18:40:57
赞
踩
@springboottest 使用
前言
使用SpringBoot 测试类可在不需要启动程序时,即可使用。当你运行你的测试方法时他会自己启动程序调用所需使用到的mapper,service接口,实现方法。故而可在测试类中像编写正常service方法一样编写代码
一.依赖录入
		<!--Spring Boot 测试-->
        <dependency>
            <groupId>org.springframework.boot</groupId>
            <artifactId>spring-boot-starter-test</artifactId>
            <scope>test</scope>
        </dependency>
- 1
- 2
- 3
- 4
- 5
- 6
二.编写测试类
import com.sinosoft.springbootplus.AccidentApplication;
import lombok.extern.slf4j.Slf4j;
import org.junit.Test;
import org.junit.runner.RunWith;
import org.springframework.boot.test.context.SpringBootTest;
import org.springframework.test.context.junit4.SpringRunner;

@SpringBootTest(classes = Application.class)
@RunWith(SpringRunner.class)
@Slf4j
public class test {
    @Autowired
    XXXService xxxService;

    @Test
    public void testDemo() {
        // ...
    }
}

- 1
- 2
- 3
- 4
- 5
- 6
- 7
- 8
- 9
- 10
- 11
- 12
- 13
- 14
- 15
- 16
- 17
- 18
- 19
- 20
- 21
在这里讲解下几个注解的作用及流程
1.@SpringBootTest(classes = 启动类名称.class)
基本等同于启动了整个服务,此时便可以开始功能测试。
注:
1)如果注解@SpringBootTest(classes = 启动类名称.class)中配置了项目启动类,则该测试类可以放在test.java下任何包中
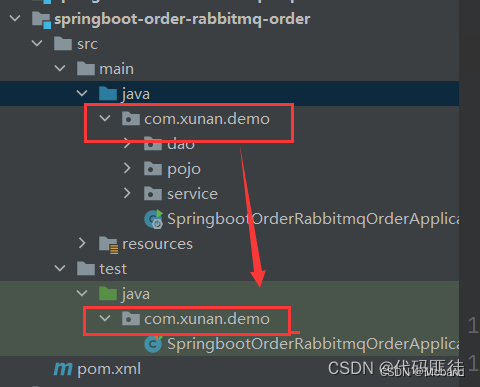
2)如果注解@SpringBootTest没有配置里面的参数classes = Application.class,则需要确保test.java下的测试类包与启动类所在的包一致,即在test.java下也需要创建com.xunan.demo包,并将测试类放在该包下。
不然会报 Unable to find a @SpringBootConfiguration, you need to use @ContextConfigura错误
2.运行器指定@RunWith
在JUnit中有很多个Runner,他们负责调用你的测试代码,每一个Runner都有各自的特殊功能,你要根据需要选择不同的Runner来运行你的测试代码。一般使用@RunWith(SpringRunner.class)
声明:本文内容由网友自发贡献,不代表【wpsshop博客】立场,版权归原作者所有,本站不承担相应法律责任。如您发现有侵权的内容,请联系我们。转载请注明出处:https://www.wpsshop.cn/w/繁依Fanyi0/article/detail/784175
推荐阅读
相关标签

