
- 1OpenCV基础(28)使用OpenCV进行摄像机标定Python和C++_c++下采用opencv采用棋盘格标定相机参数
- 2java面试100题(应届生必备)_java应届生面试题
- 3Java如何开发PC客户端(Windows,Mac,Linux)_java客户端开发
- 4测试主流设备分析TalkingData等网站_talking data查看主流移动设备
- 5miniconda利用annaconda网站的d2l安装包安装d2l_怎么下载d2l
- 6通往AGI之路:揭秘英伟达A100、A800、H800、V100在高性能计算与大模型训练中的霸主地位_a800和h800对于模型训练
- 7AI在线取英文名_ai起英文名
- 8常见的web攻击有哪些?如何防御?
- 9纯干货|国内国外的高大上的后台管理系统模版分享,免费版的也太香了吧!(附下载链接)_liger ui下载
- 106个将好看的照片变成卡通头像的网站_ailab照片转换
QT Quick QML 动画——SpringAnimation弹簧动画、NumberAnimation数字动画和Behavior_qml springanimation
赞
踩
所有的热爱都要不遗余力,真正喜欢它便给它更高的优先级,和更多的时间吧!
QML其它文章请点击这里: QT QUICK QML 学习笔记
1. SpringAnimation 弹簧动画
SpringAnimation 弹簧动画,通过适当的弹簧常数模拟了弹簧的振荡行为。
1)继承关系:
SpringAnimation 继承了NumberAnimation,NumberAnimation又继承了PropertyAnimation(后面用到再记录),PropertyAnimation又继承了基类Animation。Animation继承了一大堆,就不说了。
2)实例一,参考安神的例程
参考了安晓辉老师的《QT Quick 核心编程》一书。
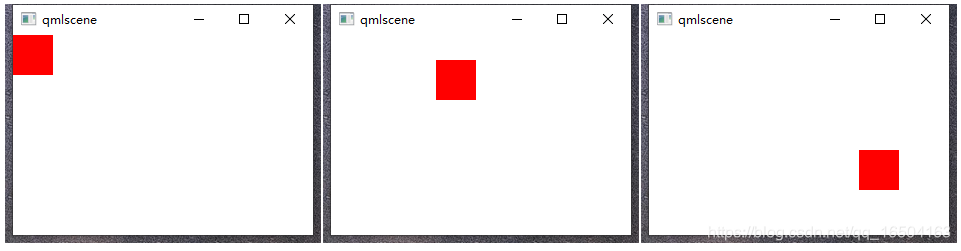
当单击鼠标时,矩形会从原始点移动到目标点,移动的过程就像弹簧一样晃动。SpringAnimation具体属性定义点击这里
import QtQuick 2.0

Rectangle{
    width: 400;		height: 200

    Rectangle{
        id: rect
        width: 40	height: 40
        //anchors.centerIn: parent;  //不能用锚布局, 不然就固定死了
        x: 0;	y: 0;
        color: "red"
    }

    SpringAnimation{
        id: springX
        target: rect    //绑定的Item目标
        property: "x"   //绑定的Item目标的属性"x"
        spring: 5       //X轴移动的加速度(具体请看下文的属性介绍)
        damping: 0.06   //值越大,越不会振荡;越小越振荡
        epsilon: 0.25
    }

    SpringAnimation{
        id: springY
        target: rect
        property: "y"   //y轴加速度
        spring: 0.1
        damping: 0.06
        epsilon: 0.25
    }

    MouseArea{
        anchors.fill: parent
        onClicked: {
            springX.from = rect.x
            springX.to = mouse.x -rect.width/2;
            springX.start();

            springY.from  = rect.y
            springY.to = mouse.y -rect.height/2;
            springY.start();
        }
    }
}

- 1
- 2
- 3
- 4
- 5
- 6
- 7
- 8
- 9
- 10
- 11
- 12
- 13
- 14
- 15
- 16
- 17
- 18
- 19
- 20
- 21
- 22
- 23
- 24
- 25
- 26
- 27
- 28
- 29
- 30
- 31
- 32
- 33
- 34
- 35
- 36
- 37
- 38
- 39
- 40
- 41
- 42
- 43
- 44
SpringAnimation动画,适用于x、y值发生更改时,使用时需绑定,如上述绑定在rect的"x"和“y”上。
运行结果如下:
开始初始化界面——>晃动界面(动态的不会上传呀…)——>鼠标执行的目标界面
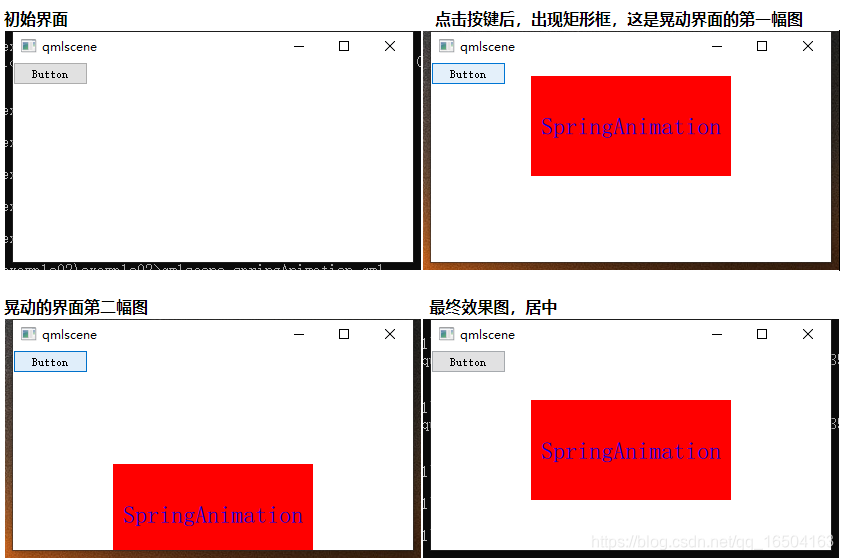
3)实例二:使用一个按键来弹出一个有弹簧动画的窗口
import QtQuick 2.0
import QtQuick.Controls 1.4

Item {
    id : root;
    width: 400;  height: 200

    Rectangle{
        id: rect;
        visible: false;
        width: root.width/2;	height: root.height/2;
        anchors.horizontalCenter: root.horizontalCenter;
        y: 0;
        color: "red"

        Text {
            id: txt;
            text: "SpringAnimation";
            anchors.centerIn: parent;
            font.pixelSize: 24;
            color: "blue";
        }
    }

    SpringAnimation {
        id: rectAnimation;
        target: rect;    property: "y";   //绑定Item的“y”属性。
        spring: 2;
        damping: 0.1;
        duration: 2000;   //弹出的延续时间2s
        onStarted: {
            rect.visible = true;
        }
    }

    Button {
        id: btn;
        text: "Button";
        onClicked: {
            rectAnimation.from = -root.height;
            rectAnimation.to = root.height * 0.25;
            rectAnimation.start();
        }
    }
}
- 1
- 2
- 3
- 4
- 5
- 6
- 7
- 8
- 9
- 10
- 11
- 12
- 13
- 14
- 15
- 16
- 17
- 18
- 19
- 20
- 21
- 22
- 23
- 24
- 25
- 26
- 27
- 28
- 29
- 30
- 31
- 32
- 33
- 34
- 35
- 36
- 37
- 38
- 39
- 40
- 41
- 42
- 43
- 44
- 45
点击按键,会弹出一个有弹簧动态效果的矩形框,如下:
4)实例三:官方历程
  import QtQuick 2.0

  Item {
      width: 300; height: 300

      Rectangle {
          id: rect
          width: 50; height: 50
          color: "red"

          Behavior on x { SpringAnimation { spring: 2; damping: 0.2 } }
          Behavior on y { SpringAnimation { spring: 2; damping: 0.2 } }
      }

      MouseArea {
          anchors.fill: parent
          onClicked: {
              rect.x = mouse.x - rect.width/2
              rect.y = mouse.y - rect.height/2
          }
      }
  }
- 1
- 2
- 3
- 4
- 5
- 6
- 7
- 8
- 9
- 10
- 11
- 12
- 13
- 14
- 15
- 16
- 17
- 18
- 19
- 20
- 21
- 22
官方用到了Behavior on 来绑定。运行结果同"例1"
5)具体属性
点击返回
● damping : real
弹簧阻尼值。越大,越不会振荡;越小越振荡
默认值为0,取值0~1.0。
● epsilon : real
值的变化率和变化量,它接近于0就可以认为等于0。这将取决于值的使用情况。对于像素位置,0.25。对于scale,0.005足够。
默认值是0.01。调整这个值可以提供较小的性能改进。
● mass : real
属性的“质量”。
当物体静止时,更大的质量会导致更慢的移动和更大的弹簧般的运动。默认值为1.0。
modulus : real
模值,默认值为0。
比如设为x方向上设为1,那么x方向最大运动量就是1。设为360,但是目标为370,那么就始终差10才能达到目标值。
spring : real
此属性描述将目标拉向源的强度。 用来控制动画的加速度,有效值范围是0~5.0。默认值为0(禁用了spring的动作)。
velocity : real
设定动画的最大速率。 默认值是0(没有最大速度)。
2. Behavior
Behavior为Item的属性变化绑定一个默认的动画对象。一个属性只能绑定一个“behavior”;
1)属性介绍
● animation : Animation
在触发行为时要运行的动画类型。
● enabled : bool
当属性变化时是否触发该行为;默认为true。
2)实例
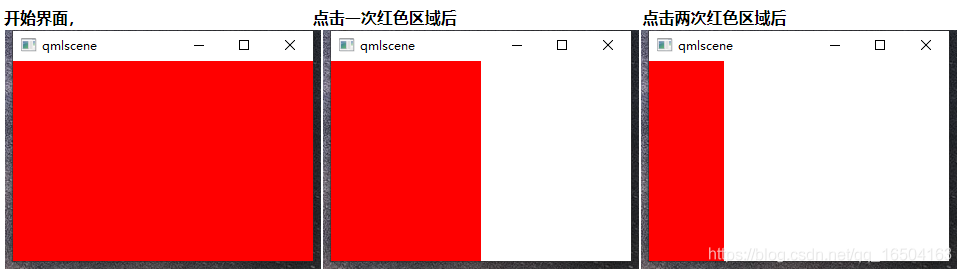
使用behavior给width绑定了NumberAnimation动画,当红色鼠标区域被点击时,红色宽度变为原来的一半:
import QtQuick 2.0

Rectangle {
    id: rect
    width: 400;  height: 200
    color: "red"

    Behavior on width {
        NumberAnimation { duration: 1000 }
    }

    MouseArea {
        anchors.fill: parent
        onClicked: rect.width = rect.width/2;
    }
}
- 1
- 2
- 3
- 4
- 5
- 6
- 7
- 8
- 9
- 10
- 11
- 12
- 13
- 14
- 15
- 16
运行结果:
使用Behavior定义动画时,不需要设置之前用的target、property、from、to等属性,方便快捷了很多。
要在一个behavior中执行多个动画,可以使用ParallelAnimation或SequentialAnimation。
QML其它文章请点击这里: QT QUICK QML 学习笔记

