
- 1基于ssm+vue.js+uniapp小程序的家政公司服务平台附带文章和源代码设计说明文档ppt
- 2Python爬虫杭州天气预报数据可视化分析大屏系统
- 3医院网络设计(完整文档+思科拓扑图)_医院网络拓扑图设计方案
- 4 哲理故事三百篇 _问题详情 妮倪 学钢琴伤眼睛?8岁女孩学钢琴达到多少度近视? a. 300 b. 600
- 5视觉检测方案(2)
- 6Ubuntu 20.04 LTS 安装教程
- 7【赠书活动|第三期《Spring Cloud Alibaba核心技术与实战案例》】
- 8【蚁群算法ACO】基本原理和多种改进方法_蚁群算法原理
- 92024年幻兽帕鲁服务器搭建教程 一分钟学会幻兽帕鲁保姆级搭建教程
- 10推荐系统的架构
Android 之App Widget_android appwidgetprovider
赞
踩
1 App Widget简介
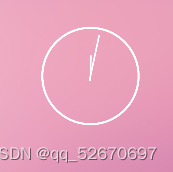
应用微件是可以嵌入其他应用(如主屏幕)并接收定期更新的微型应用视图。这些视图称为界面中的微件,您可以使用应用微件提供程序发布微件。能够容纳其他应用微件的应用组件称为应用微件托管应用。下面的屏幕截图显示了闹钟微件。
2 App Widg
要创建应用微件,您需要:
描述应用微件的元数据,如应用微件的布局、更新频率和 AppWidgetProvider 类。此对象应在 XML 中定义。
定义允许您基于广播事件以编程方式与应用微件连接的基本方法。通过它,您会在更新、启用、停用和删除应用微件时收到广播。
3 桌面小部件的开发步骤
1.在应用的 AndroidManifest.xml 文件中声明AppWidgetProvider类。
例如:
- <receiver android:name=".ExampleAppWidgetProvider" >
- <intent-filter>
- <action android:name="android.appwidget.action.APPWIDGET_UPDATE" />
- <action android:name="com.skywang.widget.UPDATE_ALL"/>
- </intent-filter>
- <meta-data android:name="android.appwidget.provider"
- android:resource="@xml/example_appwidget_info" />
- </receiver>
<receiver>元素需要android:name属性,该属性指定应用微件使用的AppWidgetProvider 。
<intent-filter>元素必须包含一个具有 android:name属性的<action>元素。此属性指定AppWidgetProvider接受 ACTION_APPWIDGET_UPDATE广播。这是您必须明确声明的唯一一项广播。AppWidgetManager 会根据需要自动将其他所有应用微件广播发送到AppWidgetProvider。
<meta-data>元素指定AppWidgetProviderInfo资源,并且需要以下属性:
android: name-指定元数据名称。使用android.appwidget.provider将数据标识为AppWidgetProviderInfo 描述符。
android :resource-指定AppWidgetProviderInfo资源位置。
2. 编辑AppWidgetProviderInfo对应的资源文件
- <appwidget-provider xmlns:android="http://schemas.android.com/apk/res/android"
- android:minWidth="40dp"
- android:minHeight="40dp"
- android:updatePeriodMillis="86400000"
- android:previewImage="@drawable/preview"
- android:initialLayout="@layout/example_appwidget"
- android:configure="com.example.android.ExampleAppWidgetConfigure"
- android:resizeMode="horizontal|vertical"
- android:widgetCategory="home_screen">
- </appwidget-provider>
    <!--
    android:minWidth : 最小宽度
    android:minHeight : 最小高度
    android:updatePeriodMillis : 更新widget的时间间隔(ms),"86400000"为1个小时
    android:previewImage : 预览图片
    android:initialLayout : 加载到桌面时对应的布局文件
    android:resizeMode : widget可以被拉伸的方向。horizontal表示可以水平拉伸,vertical表示可以竖直拉伸
    android:widgetCategory : widget可以被显示的位置。home_screen表示可以将widget添加到桌面,keyguard表示widget可以被添加到锁屏界面。
    android:configure : 定义要在用户添加应用微件时启动以便用户配置应用微件属性的 Activity
     -->
3. 编辑example_appwidget.xml等资源文件
新建layout/example_appwidget.xml,代码如下:
- <?xml version="1.0" encoding="utf-8"?>
- <LinearLayout xmlns:android="http://schemas.android.com/apk/res/android"
- android:layout_width="match_parent"
- android:layout_height="match_parent"
- android:orientation="vertical" >
-
- <LinearLayout
- android:layout_width="wrap_content"
- android:layout_height="wrap_content"
- android:layout_gravity="center"
- android:orientation="horizontal" >
-
- <TextView
- android:layout_width="wrap_content"
- android:layout_height="wrap_content"
- android:text="HomeScreen Widget" />
-
- <Button
- android:id="@+id/btn_show"
- android:layout_width="wrap_content"
- android:layout_height="wrap_content"
- android:text="Show" />
- </LinearLayout>
-
- <ImageView
- android:id="@+id/iv_show"
- android:layout_width="wrap_content"
- android:layout_height="wrap_content"
- android:layout_gravity="center"/>
-
- </LinearLayout>
- 4. 编辑ExampleAppWidgetProvider.java
-
-
- public class ExampleAppWidgetProvider extends AppWidgetProvider {
- private static final String TAG = "ExampleAppWidgetProvider";
-
- private boolean DEBUG = false;
- // 启动ExampleAppWidgetService服务对应的action
- private final Intent EXAMPLE_SERVICE_INTENT =
- new Intent("android.appwidget.action.EXAMPLE_APP_WIDGET_SERVICE");
- // 更新 widget 的广播对应的action
- private final String ACTION_UPDATE_ALL = "com.skywang.widget.UPDATE_ALL";
- // 保存 widget 的id的HashSet,每新建一个 widget 都会为该 widget 分配一个 id。
- private static Set idsSet = new HashSet();
- // 按钮信息
- private static final int BUTTON_SHOW = 1;
- // 图片数组
- private static final int[] ARR_IMAGES = {
- R.drawable.ic_launcher,
- R.drawable.sample_0,
- R.drawable.sample_1,
- R.drawable.sample_2,
-
- };
-
- // onUpdate() 在更新 widget 时,被执行,
- @Override
- public void onUpdate(Context context, AppWidgetManager appWidgetManager, int[] appWidgetIds) {
- Log.d(TAG, "onUpdate(): appWidgetIds.length="+appWidgetIds.length);
-
- // 每次 widget 被创建时,对应的将widget的id添加到set中
- for (int appWidgetId : appWidgetIds) {
- idsSet.add(Integer.valueOf(appWidgetId));
- }
- prtSet();
- }
-
- // 当 widget 被初次添加 或者 当 widget 的大小被改变时,被调用
- @Override
- public void onAppWidgetOptionsChanged(Context context,
- AppWidgetManager appWidgetManager, int appWidgetId,
- Bundle newOptions) {
- Log.d(TAG, "onAppWidgetOptionsChanged");
- super.onAppWidgetOptionsChanged(context, appWidgetManager, appWidgetId,
- newOptions);
- }
-
- // widget被删除时调用
- @Override
- public void onDeleted(Context context, int[] appWidgetIds) {
- Log.d(TAG, "onDeleted(): appWidgetIds.length="+appWidgetIds.length);
-
- // 当 widget 被删除时,对应的删除set中保存的widget的id
- for (int appWidgetId : appWidgetIds) {
- idsSet.remove(Integer.valueOf(appWidgetId));
- }
- prtSet();
-
- super.onDeleted(context, appWidgetIds);
- }
-
- // 第一个widget被创建时调用
- @Override
- public void onEnabled(Context context) {
- Log.d(TAG, "onEnabled");
- // 在第一个 widget 被创建时,开启服务
- context.startService(EXAMPLE_SERVICE_INTENT);
-
- super.onEnabled(context);
- }
-
- // 最后一个widget被删除时调用
- @Override
- public void onDisabled(Context context) {
- Log.d(TAG, "onDisabled");
-
- // 在最后一个 widget 被删除时,终止服务
- context.stopService(EXAMPLE_SERVICE_INTENT);
-
- super.onDisabled(context);
- }
-
-
- // 接收广播的回调函数
- @Override
- public void onReceive(Context context, Intent intent) {
-
- final String action = intent.getAction();
- Log.d(TAG, "OnReceive:Action: " + action);
- if (ACTION_UPDATE_ALL.equals(action)) {
- // “更新”广播
- updateAllAppWidgets(context, AppWidgetManager.getInstance(context), idsSet);
- } else if (intent.hasCategory(Intent.CATEGORY_ALTERNATIVE)) {
- // “按钮点击”广播
- Uri data = intent.getData();
- int buttonId = Integer.parseInt(data.getSchemeSpecificPart());
- if (buttonId == BUTTON_SHOW) {
- Log.d(TAG, "Button wifi clicked");
- Toast.makeText(context, "Button Clicked", Toast.LENGTH_SHORT).show();
- }
- }
-
- super.onReceive(context, intent);
- }
-
- // 更新所有的 widget
- private void updateAllAppWidgets(Context context, AppWidgetManager appWidgetManager, Set set) {
-
- Log.d(TAG, "updateAllAppWidgets(): size="+set.size());
-
- // widget 的id
- int appID;
- // 迭代器,用于遍历所有保存的widget的id
- Iterator it = set.iterator();
-
- while (it.hasNext()) {
- appID = ((Integer)it.next()).intValue();
- // 随机获取一张图片
- int index = (new java.util.Random().nextInt(ARR_IMAGES.length));
-
- if (DEBUG) Log.d(TAG, "onUpdate(): index="+index);
- // 获取 example_appwidget.xml 对应的RemoteViews
- RemoteViews remoteView = new RemoteViews(context.getPackageName(), R.layout.example_appwidget);
-
- // 设置显示图片
- remoteView.setImageViewResource(R.id.iv_show, ARR_IMAGES[index]);
-
- // 设置点击按钮对应的PendingIntent:即点击按钮时,发送广播。
- remoteView.setOnClickPendingIntent(R.id.btn_show, getPendingIntent(context,
- BUTTON_SHOW));
-
- // 更新 widget
- appWidgetManager.updateAppWidget(appID, remoteView);
- }
- }
-
- private PendingIntent getPendingIntent(Context context, int buttonId) {
- Intent intent = new Intent();
- intent.setClass(context, ExampleAppWidgetProvider.class);
- intent.addCategory(Intent.CATEGORY_ALTERNATIVE);
- intent.setData(Uri.parse("custom:" + buttonId));
- PendingIntent pi = PendingIntent.getBroadcast(context, 0, intent, 0 );
- return pi;
- }
-
- // 调试用:遍历set
- private void prtSet() {
- if (DEBUG) {
- int index = 0;
- int size = idsSet.size();
- Iterator it = idsSet.iterator();
- Log.d(TAG, "total:"+size);
- while (it.hasNext()) {
- Log.d(TAG, index + " -- " + ((Integer)it.next()).intValue());
- }
- }
- }
- }

AppWidgetProvider重要的几个重写方法,比如onDeleted、onEnabled、onDisabled、onReceive、onUpdate方法的作用已经在代码里面做了注释
5. 编辑ExampleAppWidgetService.java
- public class ExampleAppWidgetService extends Service {
-
- private static final String TAG="ExampleAppWidgetService";
-
- // 更新 widget 的广播对应的action
- private final String ACTION_UPDATE_ALL = "com.skywang.widget.UPDATE_ALL";
- // 周期性更新 widget 的周期
- private static final int UPDATE_TIME = 5000;
- // 周期性更新 widget 的线程
- private UpdateThread mUpdateThread;
- private Context mContext;
- // 更新周期的计数
- private int count=0;
-
- @Override
- public void onCreate() {
-
- // 创建并开启线程UpdateThread
- mUpdateThread = new UpdateThread();
- mUpdateThread.start();
-
- mContext = this.getApplicationContext();
-
- super.onCreate();
- }
-
- @Override
- public void onDestroy(){
- // 中断线程,即结束线程。
- if (mUpdateThread != null) {
- mUpdateThread.interrupt();
- }
-
- super.onDestroy();
- }
-
- @Override
- public IBinder onBind(Intent intent) {
- return null;
- }
-
- /*
- * 服务开始时,即调用startService()时,onStartCommand()被执行。
- * onStartCommand() 这里的主要作用:
- * (01) 将 appWidgetIds 添加到队列sAppWidgetIds中
- * (02) 启动线程
- */
- @Override
- public int onStartCommand(Intent intent, int flags, int startId) {
- Log.d(TAG, "onStartCommand");
- super.onStartCommand(intent, flags, startId);
-
- return START_STICKY;
- }
-
- private class UpdateThread extends Thread {
-
- @Override
- public void run() {
- super.run();
-
- try {
- count = 0;
- while (true) {
- Log.d(TAG, "run ... count:"+count);
- count++;
-
- Intent updateIntent=new Intent(ACTION_UPDATE_ALL);
- mContext.sendBroadcast(updateIntent);
-
- Thread.sleep(UPDATE_TIME);
- }
- } catch (InterruptedException e) {
- // 将 InterruptedException 定义在while循环之外,意味着抛出 InterruptedException 异常时,终止线程。
- e.printStackTrace();
- }
- }
- }
- }
(01) onCreate() 在创建服务时被执行。它的作用是创建并启动线程UpdateThread()。
(02) onDestroy() 在销毁服务时被执行。它的作用是注销线程UpdateThread()。
(03) 服务UpdateThread 每隔5秒,发送1个广播ACTION_UPDATE_ALL。广播ACTION_UPDATE_ALL在ExampleAppWidgetProvider被处理:用来更新widget中的图片。
6.编译代码生成apk文件,将其安装到手机
7.长按手机的桌面(不同品牌手机可能操作方式不一样)会弹出桌面设置界面,选择添加工具
widget在添加到桌面前的效果图:

widget在添加到桌面后的效果图:

[详细] -->赞
踩

