
- 1C语言基础知识理论版(很详细)_c语言的理论
- 2最新 | Ask Me Anything 一种提示(Prompt)语言模型的简单策略(斯坦福大学 & 含源码)_llm prompt
- 3聚类篇——(二)K-means聚类_kmeans聚类问题描述
- 4【C/C++】【学生成绩管理系统】深度剖析
- 5TTS 语音合成技术学习
- 6独立开发变现周刊(第119期):一个自学开发者创建一个月收入12.5万美元的软件公司...
- 7Python_tkinter(按钮,文本框,多行文本组件)_tkinter button边上加字
- 8Redis进阶 - 朝生暮死之Redis过期策略_redis 定时 过期
- 9Git -- reset 详解_git reset 文件
- 10李宏毅2023机器学习作业HW06解析和代码分享
husky配置实现代码提交前校验与规范提交信息_husky提交规范
赞
踩
husky是一个Git Hook管理工具,主要用于实现提交前eslint校验和commit信息的规范校验。
Husky 的原理是让我们在项目根目录中写一个配置文件,然后在安装 Husky的时候把配置文件和 Git Hook 关联起来,这样我们就能在团队中使用 Git Hook 了。
-
首先,确保已经安装了husky和commitlint。如果没有安装,可以使用以下命令进行安装:
npm install -D husky commitlint -
在项目中启用husky钩子,事实上是在项目根目录生成配置文件的文件夹(.husky)。查看
.git/config,可以看到配置中修改了core.hooksPath指向为.husky。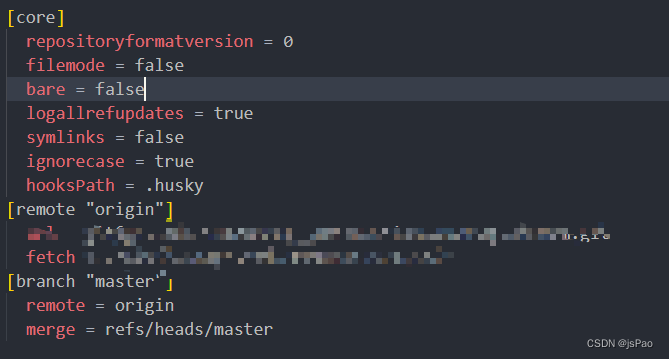
npx husky install -
项目配置文件添加配置,实现跑命令前先安装husky
- "scripts": {
- "prepare": "husky install"
- },
-
添加husky hook的pre-commit配置文件。执行之后会增加文件
.husky/pre-commit(其中的注释是我另外添加的)。npx husky add .husky/pre-commit "npm run lint"#!/bin/sh # . 指令为source,表示不产生新的shell,在当前shell下执行命令,共享上下文,类似将两个文件拼接到一起 # 执行 .husky/_/husky.sh . "$(dirname "$0")/_/husky.sh" npm run lint
-
类似的,我们也可以添加commit-msg钩子,来规范我们的commit message信息
npx husky add .husky/commit-msg 'npx --no-install commitlint --edit "$1"' -
在
package.json文件中,定义相关的指令。例如,以下是一个示例配置:- "scripts": {
- "dev": "vite serve --mode development",
- "build": "vite build --mode test",
- "preview": "vite preview",
- "test:unit": "vitest --environment jsdom --root src/",
- "lint": "eslint . --ext .vue,.js,.jsx,.cjs,.mjs --fix --ignore-path .gitignore",
- "prepare": "husky install",
- "commitlint": "commitlint --config commitlint.config.js -e -V"
- },
需要确保在项目的根目录下有一个eslint.config.js文件也可以是.eslintrc.js文件(用于配置eslint)和一个commitlint.config.js文件也可以是.commitlintrc.js(用于配置commitlint)
.eslintrc.js
- module.exports = {
- root: true,
- /**环境提供预定义的全局变量 */
- env: {
- /**Node.js全局变量和Node.js范围 */
- node: true,
- /**浏览器全局变量 */
- browser: true,
- },
- /**定义ESLint的解析器 */
- parser: 'vue-eslint-parser',
- parserOptions: {
- ecmaVersion: 'latest',
- sourceType: 'module',
- parser: '@typescript-eslint/parser',
- },
- /**定义文件继承的子规范 */
- extends: ['eslint:recommended', 'plugin:vue/vue3-essential', 'plugin:@typescript-eslint/recommended', './.eslintrc-auto-import.json'],
- plugins: ['vue', '@typescript-eslint'],
- rules: {
- 'no-var': 'error', //要求使用 let 或 const 而不是 var
- camelcase: 'off', // 双峰驼命名格式
- indent: ['error', 4, { SwitchCase: 1 }], //代码缩进2个空格
- semi: ['error', 'always'], //行尾需要有分号
- quotes: ['error', 'single'], //强制使用一致的反勾号、双引号或单引号
- 'linebreak-style': ['error', 'windows'], //强制使用一致的换行风格,"unix":\n 表示 LF , "windows":\r\n 表示 CRLF
- // eqeqeq: ['error', 'always', { null: 'ignore' }], //比较时强制使用 === 或者 !==,但对null作比较时可以不用全等
- 'no-unused-vars': 'off',
- '@typescript-eslint/no-unused-vars': [
- 'warn',
- {
- argsIgnorePattern: '^_',
- varsIgnorePattern: '^_',
- },
- ], //不允许使用未使用的变量
- '@typescript-eslint/no-explicit-any': 'off', //不允许任何类型
- '@typescript-eslint/no-empty-function': 'off', //不允许空函数
- 'vue/html-indent': ['error', 4], //在<template>中强制一致缩进
- 'vue/singleline-html-element-content-newline': 'off', //要求在单行元素的内容之前和之后有一个换行符
- 'vue/max-attributes-per-line': 'off', //执行每行的最大属性数(被 prettier 最大单行控制了暂off)
- 'vue/multi-word-component-names': 'off', //要求组件名称始终为多字
- 'vue/html-self-closing': 'off', //执行自我封闭式
- 'no-undef': 'off', //禁用未声明的变量,除非它们在 /*global */ 注释中被提到
- '@typescript-eslint/ban-ts-comment': 'off', // 不允许@ts-<指令>评论或要求指令后的描述
- '@typescript-eslint/ban-types': 'off', // 不允许某些类型
- '@typescript-eslint/no-non-null-assertion': 'off', // 不允许使用!后缀操作符的非空断言
- },
- globals: {
- //可以定义全局中的变量的权限(只读,可读可写)
- defineProps: 'readonly',
- defineEmits: 'readonly',
- defineExpose: 'readonly',
- withDefaults: 'readonly',
- uni: 'readonly',
- },
- ignorePatterns: [
- // # 忽略目录
- '/dist',
- '/public',
- '/src/public',
- '/src/static',
- '/node_modules',
- // # 忽略文件
- '**/*-min.js',
- '**/*.min.js',
- '**/*-min.css',
- '**/*.min.css',
- '**/*.tsbuildinfo',
- '**/*.config.js',
- '**/*.config.ts',
- '/src/manifest.json',
- ],
- };

commitlint.config.js
- module.exports = {
- extends: [
- "@commitlint/config-conventional"
- ],
- rules: {
- 'type-enum': [2, 'always', [
- 'upd', 'feat', 'fix', 'refactor', 'docs', 'chore', 'style', 'revert'
- ]],
- 'type-case': [0],
- 'type-empty': [0],
- 'scope-empty': [0],
- 'scope-case': [0],
- 'subject-full-stop': [0, 'never'],
- 'subject-case': [0, 'never'],
- 'header-max-length': [0, 'always', 72]
- }
- };
rule配置说明::rule由name和配置数组组成,如:'name:[0, 'always', 72]',数组中第一位为level,可选0,1,2,0为disable,1为warning,2为error,第二位为应用与否,可选always|never,第三位该rule的值。
commitlint 的默认格式为
# 注意:冒号前面是需要一个空格的, 带 ? 表示非必填信息,也可以根据自己项目需要自定义配置
type(scope?): subject
body?
footer?
scope 指 commit 的范围(哪些模块进行了修改)
subject 指 commit 的简短描述
body 指 commit 主体内容(长描述)
footer 指 commit footer 信息
type 指当前 commit 类型,一般有下面几种可选类型:
- upd:更新某功能(不是 feat, 不是 fix)
- feat:新功能(feature)
- fix:修补bug
- docs:文档(documentation)
- style: 格式(不影响代码运行的变动)
- refactor:重构(即不是新增功能,也不是修改bug的代码变动)
- test:增加测试
- chore:构建过程或辅助工具的变动
使用示例
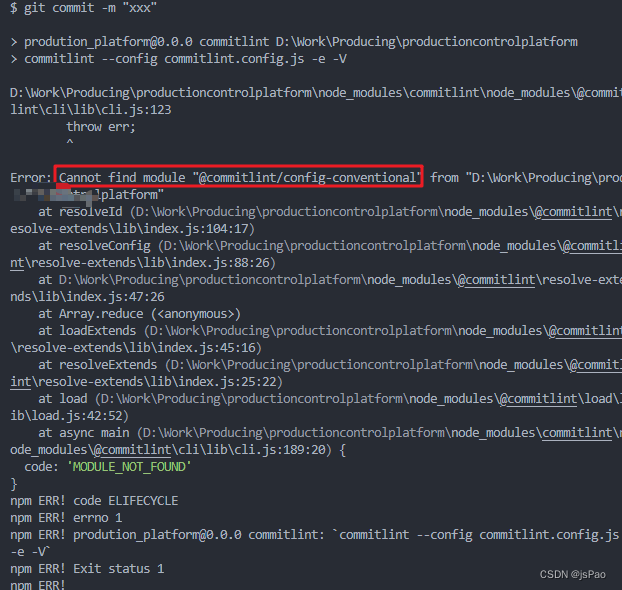
控制台报错:Cannot find module "@commitlint/config-conventional" ,是因为缺少依赖,执行下面的命令
npm i -D @commitlint/config-conventional @commitlint/cli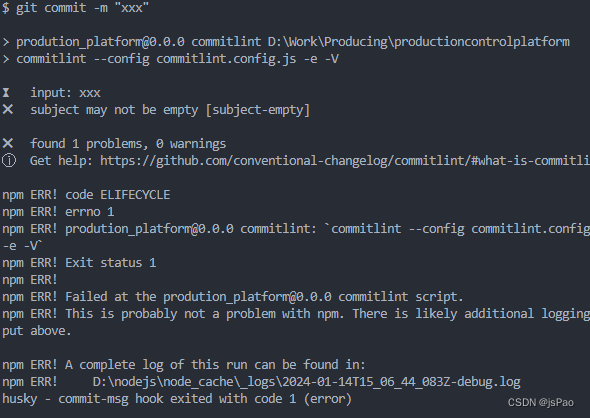
husky给出了commit-msg的input为xxx,触发了subject-empty,type-empty两个规则,提交不符合规范,被拦了下来。
正确的例子:type后面要有空格
git commit -m 'feat: 增加 xxx 功能'
git commit -m 'bug: 修复 xxx 功能'
完成以上步骤后,husky就已经配置好了。在提交代码时,husky会自动执行eslint校验和commit信息的规范检查,如果存在不符合规范的情况,husky会阻止提交并给出相应的提示信息。
Git 支持的所有钩子见下表(加粗的为常用钩子)
| Git Hook | 调用时机 | 说明 |
|---|---|---|
| pre-applypatch | git am执行前 | |
| applypatch-msg | git am执行前 | |
| post-applypatch | git am执行后 | 不影响git am的结果 |
| pre-commit | git commit执行前 | 可以用git commit --no-verify绕过 |
| commit-msg | git commit执行前 | 可以用git commit --no-verify绕过 |
| post-commit | git commit执行后 | 不影响git commit的结果 |
| pre-merge-commit | git merge执行前 | 可以用git merge --no-verify绕过。 |
| prepare-commit-msg | git commit执行后,编辑器打开之前 | |
| pre-rebase | git rebase执行前 | |
| post-checkout | git checkout或git switch执行后 | 如果不使用--no-checkout参数,则在git clone之后也会执行。 |
| post-merge | git commit执行后 | 在执行git pull时也会被调用 |
| pre-push | git push执行前 | |
| pre-receive | git-receive-pack执行前 | |
| update | ||
| post-receive | git-receive-pack执行后 | 不影响git-receive-pack的结果 |
| post-update | 当 git-receive-pack对 git push 作出反应并更新仓库中的引用时 | |
| push-to-checkout | 当``git-receive-pack对git push做出反应并更新仓库中的引用时,以及当推送试图更新当前被签出的分支且receive.denyCurrentBranch配置被设置为updateInstead`时 | |
| pre-auto-gc | git gc --auto执行前 | |
| post-rewrite | 执行git commit --amend或git rebase时 | |
| sendemail-validate | git send-email执行前 | |
| fsmonitor-watchman | 配置core.fsmonitor被设置为.git/hooks/fsmonitor-watchman或.git/hooks/fsmonitor-watchmanv2时 | |
| p4-pre-submit | git-p4 submit执行前 | 可以用git-p4 submit --no-verify绕过 |
| p4-prepare-changelist | git-p4 submit执行后,编辑器启动前 | 可以用git-p4 submit --no-verify绕过 |
| p4-changelist | git-p4 submit执行并编辑完changelist message后 | 可以用git-p4 submit --no-verify绕过 |
| p4-post-changelist | git-p4 submit执行后 | |
| post-index-change | 索引被写入到read-cache.c do_write_locked_index后 |
可以参考下这篇文章 滑动验证页面

