
- 1以http为协议头开头的url_htt开头的
- 2数据挖掘(机器学习)面试--SVM面试常考问题_数据挖掘面试常规问题
- 3网易技术面试,Android UI-开源框架ImageLoader的完美例子,程序员面试防坑宝典
- 4【vivado】ILA调试报错 The debug hub core was not detected 以及 Data read from hw_ila [hw_ila_1] is corrupted_warning: [labtools 27-3361] the debug hub core was
- 5Base64编码解码_base解码
- 6专业课课本复习(数电,通原,数信,信号与系统,数据结构)_表征cpld容量的关键指标是查找表的数量吗
- 7Anaconda Navigator无法打开的问题(已解决)_anaconda navigator打不开
- 8python 车牌识别训练模型_python cnn tensorflow 车牌识别 网络模型
- 9【Python】ffmpeg模块处理视频、音频信息_audio video ffmpeg-python 分离
- 10数据建模五大步(以KNeighborsClassifier算法为主)_joblib加载模型kneighborsclassfier
springboot整合spring-data-redis_spring-boot-data-redis
赞
踩
前言
官方网站:Spring Data Redis
其实,整合是一个循序渐进的学习,你肯定是要了解之前底层的相关知识,才能够具体知道现在框架方法api到底tm有什么作用,所以建议先看看我之前的redis博客。
可以不看,但是可以以我这个为目录,针对性得去了解相关知识(学习任何东西,都应该这样)。
(41条消息) Cenos7 --- Redis下载和安装(Linux版本)_本郡主是喵的博客-CSDN博客
(41条消息) redis学习 -- 常用指令_本郡主是喵的博客-CSDN博客
(41条消息) redis -- 持久化存储方案_本郡主是喵的博客-CSDN博客
(41条消息) redis的4种模式,单机,哨兵、主从复制、集群_本郡主是喵的博客-CSDN博客
1.快速入门
1.1导入相关依赖
- <!--spring-data-redis组件-->
- <dependency>
- <groupId>org.springframework.boot</groupId>
- <artifactId>spring-boot-starter-data-redis</artifactId>
- </dependency>
- <!--commons-pools连接池,lettuce没有内置的数据库连接池所以要用第三方的 -->
- <dependency>
- <groupId>org.apache.commons</groupId>
- <artifactId>commons-pool2</artifactId>
- </dependency>
- <!--web组件-->
- <dependency>
- <groupId>org.springframework.boot</groupId>
- <artifactId>spring-boot-starter-web</artifactId>
- </dependency>
- <!--test组件-->
- <dependency>
- <groupId>org.springframework.boot</groupId>
- <artifactId>spring-boot-starter-test</artifactId>
- <scope>test</scope>
- </dependency>

1.2 配置文件
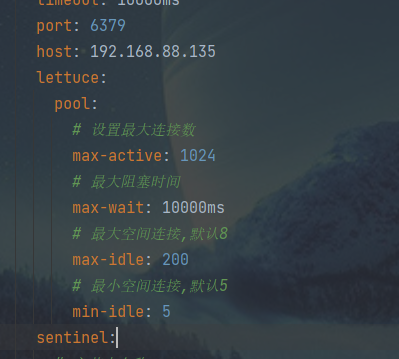
application.yml
- server:
- port: 8080
-
-
- # redis配置
- spring:
- redis:
- password: 123456
- # 默认0库
- database: 0
- #连接超时时间
- timeout: 10000ms
- port: 6379
- host: 192.168.88.135
- lettuce:
- pool:
- # 设置最大连接数
- max-active: 1024
- # 最大阻塞时间
- max-wait: 10000ms
- # 最大空间连接,默认8
- max-idle: 200
- # 最小空间连接,默认5
- min-idle: 5
1.3 核心代码
- @SpringBootTest
- class SpringDataRedisDemo1ApplicationTests {
-
- @Autowired
- // 这一种完全够用(与第二种,稍微一点差别,具体看下文)
- private RedisTemplate redisTemplate;
- @Autowired
- // 转对redis的string类型的
- private StringRedisTemplate stringRedisTemplate;
-
-
-
- @Test
- void testDemo() {
- ValueOperations value = redisTemplate.opsForValue();
- value.set("qhx","name");
- System.out.println(value.get("qhx"));
-
- ValueOperations<String, String> stringValueOperations = stringRedisTemplate.opsForValue();
- System.out.println(stringValueOperations.get("name"));
-
-
- }
-
- }
此处可以忽略。
我们在application.yml配置文件信息,按住ctrl + 单击点进去,发现是一个映射redis配置信息的类。

就是,假如有些配置你不知道,可以依托这个去相应的官网文档上去查找相应的用法。
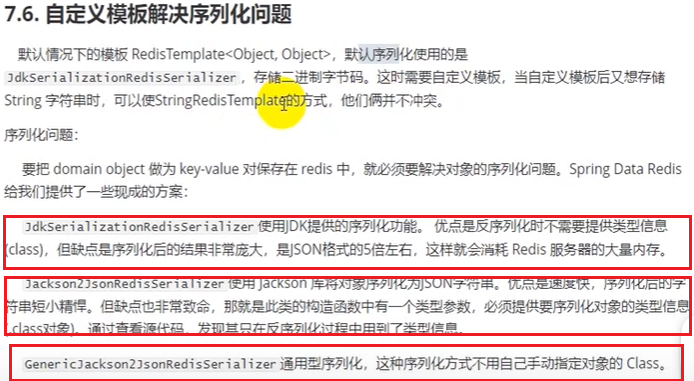
1.4 自定义模版解决序列化问题
打开redis可视化客户端,发现我们成功存入数据,但是是java字节数据。如何解决?

先看下图。
RedisConfig.java
- @Configuration
- public class RedisConf {
- @Bean
- public RedisTemplate<String,Object> redisTemplate(LettuceConnectionFactory lettuceConnectionFactory){
- RedisTemplate<String,Object> redisTemplate = new RedisTemplate<>();
- // 为string 的key设置序列化
- redisTemplate.setKeySerializer(new StringRedisSerializer());
- // 为string类型的value设置序列化
- redisTemplate.setValueSerializer(new GenericJackson2JsonRedisSerializer());
- // 为hash类型的value设置json序列化
- redisTemplate.setHashKeySerializer(new StringRedisSerializer());
- // 为hash类型的key设置json序列化
- redisTemplate.setHashValueSerializer(new GenericJackson2JsonRedisSerializer());
- // 设置数据库连接池
- redisTemplate.setConnectionFactory(lettuceConnectionFactory);
- return redisTemplate;
- }
- }
再次运行。

成功!
此处可以忽略。
可以看出,我们设置key先转成java字节数据,最后存入数据库中。
自定义后,我们设置key先转成java string数据,最后存入数据库中。
2.操作各种类型数据
此处可以忽略
其实,这些api如果你没有学过,需要跟着敲一遍,敲得途中你可能会发现这些api的意思(有基础的前提下)。
2.1 操作string类型数据
- // 添加一条数据
- ValueOperations ops = redisTemplate.opsForValue();
- ops.set("name","zhangsan");
- // 获取一条数据
- String name = (String) ops.get("name");
- System.out.println(name);
- // 层级关系
- ops.set("user:01","lisi");
- // 添加多条数据
- HashMap<String, String> hashMap = new HashMap<>();
- hashMap.put("age","20");
- hashMap.put("address","wei");
- ops.multiSet(hashMap);
- // 获取多条数据
- ArrayList<Object> list = new ArrayList<>();
- list.add("age");
- list.add("address");
- List listValue = ops.multiGet(list);
- listValue.forEach(System.out::println);
2.2 操作hash类型数据
- HashOperations hashOps = redisTemplate.opsForHash();
- // 添加hash单条数据
- hashOps.put("user","name","qhx");
- // 获取hash单条数据
- String hash = (String) hashOps.get("user", "name");
- // 添加hash多条数据
- HashMap<String, String> hashMap = new HashMap<>();
- hashMap.put("age","20");
- hashMap.put("address","wei");
- hashOps.putAll("user",hashMap);
- // 获取hash类型的多条数据
- ArrayList<String> list = new ArrayList<>();
- list.add("age");
- list.add("address");
- List user = hashOps.multiGet("user", list);
- user.forEach(System.out::println);
- // 获取hash类型所有数据
- Map entries = hashOps.entries("user");
- entries.forEach((key,value)->{
- System.out.println(key+"-->"+value);
- });
- // 删除Hash类型数据
- hashOps.delete("user","age","name");
2.3 操作list类型数据
- ListOperations listOps = redisTemplate.opsForList();
- // 左添加
- listOps.leftPush("students","w1");
- listOps.leftPushAll("students","w2","w3");
- // 右添加
- listOps.leftPush("students","w4");
- // 在w1前面左添加w0
- listOps.leftPush("students","w1","w0");
- // 获取数据
- List list = listOps.range("students", 0, 4);
- System.out.println(list);
- // 获取总条数
- Long students = listOps.size("students");
- // 删除1条数据
- listOps.remove("students",1,"w0");
- // 左弹出
- listOps.leftPop("students");
- listOps.rightPop("students");
-
2.4 操作set类型数据
- SetOperations setOps = redisTemplate.opsForSet();
- // 添加数据
- setOps.add("ids","1","2");
- // 获取数据
- Set ids = setOps.members("ids");
- ids.forEach(System.out::println);
- // 删除数据
- setOps.remove("ids","1","2");
2.5 操作sorted-set类型数据
- ZSetOperations zSetOps = redisTemplate.opsForZSet();
- // 添加多条数据(我自己也属实看不懂)将数据封装到hash里。
- ZSetOperations.TypedTuple<Object> objectTypedTuple1 = new DefaultTypedTuple<>("wls",1D);
- ZSetOperations.TypedTuple<Object> objectTypedTuple2 = new DefaultTypedTuple<>("qhx",2D);
- ZSetOperations.TypedTuple<Object> objectTypedTuple3 = new DefaultTypedTuple<>("zlx",3D);
- Set<ZSetOperations.TypedTuple> tuples = new HashSet<>();
- tuples.add(objectTypedTuple1);
- tuples.add(objectTypedTuple2);
- tuples.add(objectTypedTuple3);
- zSetOps.add("names",tuples);
- // 添加单条数据
- zSetOps.add("names","qhx1",4D);
- // 获取数据
- Set names = zSetOps.range("names", 0, 3);
- names.forEach(System.out::println);
- // 删除数据
- zSetOps.remove("names","qhx","wls");
2.6 获取所有的key和给key设置过期时间
- // 获取所有的keys(当前数据库)
- Set keys = redisTemplate.keys("*");
- keys.forEach(System.out::println);
- // 给已存在key设置失效时间
- ValueOperations ops = redisTemplate.opsForValue();
- ops.set("name","qhx",200, TimeUnit.SECONDS);
- // 给key设置失效时间
- redisTemplate.expire("age",30,TimeUnit.SECONDS);
3.配置哨兵模式
先在redis中启用哨兵模式。
还有别忘了用Linux防火墙把相应的端口打开(或者,直接关闭防火墙)。
1.方式一,在aplication.yml文件中新加 spring.redis.sentinel
预览图:
- sentinel:
- # 主节点名称
- master: mysaster
- # 主服务器密码
- password: 123456
- # 哨兵节点
- nodes: 192.168.88.135:26379,192.168.88.135:26380,192.168.88.135:26381
2.方式二,
在上文RedisCong.java中添加
- @Bean
- public RedisSentinelConfiguration redisSentinelConfiguration(){
- RedisSentinelConfiguration redisSentinelConfiguration = new RedisSentinelConfiguration()
- // 主节点名称
- .master("mymaster")
- // 哨兵
- .sentinel("192.168.88.135",26379)
- .sentinel("192.168.88.135",26380)
- .sentinel("192.168.88.135",26381);
- // 密码
- redisSentinelConfiguration.setPassword("123456");
- return redisSentinelConfiguration;
- }


