
热门标签
热门文章
当前位置: article > 正文
SpringBoot快速入门6---Swagger、任务及初识分布式_分布式swagger
作者:神奇cpp | 2024-08-06 23:34:40
赞
踩
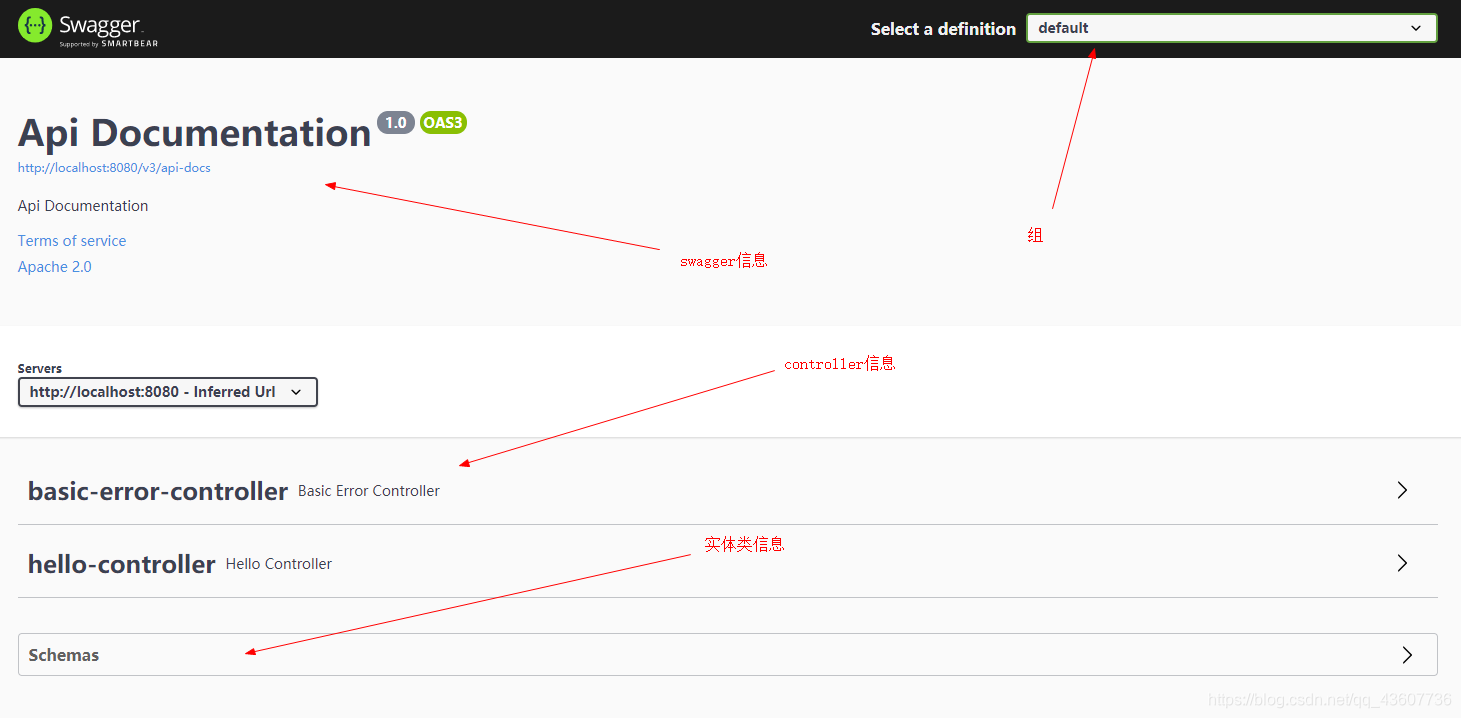
分布式swagger
Swagger
简介
-
典型前后端分离:Vue + SpringBoot
-
后端时代:前端只用管理静态页面,html ==> 后端,模板引擎 jsp ==> 后端是主力
-
前后端分离时代:
- 后端:后端控制层,服务层,数据访问层
- 前端:前端控制层,视图层
- 伪造后端数据,json,不需要后端,模拟后端传值
- 前后端交互 ==> API
- 前后端相对独立,松耦合
- 前后端甚至可以部署在不同的服务器上
-
产生一个问题:
- 前后端集成联调,前端人员和后端人员无法做到"及时协调,尽早解决",最终导致问题集中爆发
- 解决方案:
- 首先指定一个schema[计划的提纲],实时更新最新的API,降低集成的风险
- 早些年:指定word计划文档
- 前后端分离:
- 前端测试后端接口:postman,idea自带的测试接口
- 后端提供接口,需要实时更新最新的消息及改动
-
Swagger号称世界上最流行的API框架,RestFul API 文档在线自动生成工具 => API文档与API定义同步更新,可以直接运行,在线测试API接口,支持多种语言:java,php
在项目中使用Swagger
- 需要springfox,swagger2,ui
SpringBoot集成Swagger
-
新建一个springboot web项目
-
导入相关依赖
<!-- https://mvnrepository.com/artifact/io.springfox/springfox-swagger2 -->
<dependency>
    <groupId>io.springfox</groupId>
    <artifactId>springfox-swagger2</artifactId>
    <version>3.0.0</version>
</dependency>

<!-- https://mvnrepository.com/artifact/io.springfox/springfox-swagger-ui -->
<dependency>
    <groupId>io.springfox</groupId>
    <artifactId>springfox-swagger-ui</artifactId>
    <version>3.0.0</version>
</dependency>
<!--或者-->
<dependency>
    <groupId>io.springfox</groupId>
    <artifactId>springfox-boot-starter</artifactId>
    <version>3.0.0</version>
</dependency>
- 1
- 2
- 3
- 4
- 5
- 6
- 7
- 8
- 9
- 10
- 11
- 12
- 13
- 14
- 15
- 16
- 17
- 18
- 19
-
编写一个Hello工程
-
创建SwaggerConfig,开启swagger
@Configuration //@EnableSwagger2 //开启Swagger2, 3.0版本以下 @EnableOpenApi //开启Swagger 3.0版本 public class SwaggerConfig { }- 1
- 2
- 3
- 4
- 5
-
测试运行
3.0版本前
http://localhost:8080/swagger-ui.html
3.0版本http://localhost:8080/swagger-ui/index.html
配置Swagger
@Configuration
@EnableOpenApi //开启Swagger
public class SwaggerConfig {

    //配置了swagger的docket的bean实例
    @Bean
    public Docket docket(){
        return new Docket(DocumentationType.SWAGGER_2)
            .apiInfo(apiInfo())
            //是否启动swagger,为false则swagger不能在浏览器中访问
            .enable(false)
            .select()
            //配置扫描接口
            //RequestHandlerSelectors:配置要扫描接口的方式
            //basePackage:指定要扫描的包
            //RequestHandlerSelectors.any()扫描全部,一般不用
            //RequestHandlerSelectors.none()都不扫描
            //RequestHandlerSelectors.withClassAnnotation(GetMapping.class)只扫描被注解注解过的类
            //RequestHandlerSelectors.withMethodAnnotation(ApiOperation.class)通过方法注解扫描
            .apis(RequestHandlerSelectors.basePackage("com.study.controller"))
            //paths() 过滤的路径
            .paths(PathSelectors.ant("/study/**"))
            .build();
    }

    //配置swagger信息:apiInfo,两种方法
    private ApiInfo apiInfo(){
        /*return new ApiInfo("++ swagger 日记",
                "喵",
                "1.0",
                "http://localhost:8080/",
                new Contact("study",null,"123@qq.com"), //作者信息
                "Apache 2.0",
                "http://www.apache.org/licenses/LICENSE-2.0",
                new ArrayList());*/
        return new ApiInfoBuilder()
                .title("++ swagger 接口测试")
                .version("1.0")
                .build();
    }

}
- 1
- 2
- 3
- 4
- 5
- 6
- 7
- 8
- 9
- 10
- 11
- 12
- 13
- 14
- 15
- 16
- 17
- 18
- 19
- 20
- 21
- 22
- 23
- 24
- 25
- 26
- 27
- 28
- 29
- 30
- 31
- 32
- 33
- 34
- 35
- 36
- 37
- 38
- 39
- 40
- 41
- 42
-
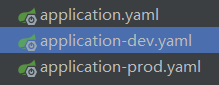
我只希望我的swagger在生产环境中使用,在发布的时候不使用,怎么做?
-
判断是不是生产环境 flag = false
-
注入enable(flag)的值
//配置了swagger的docket的bean实例 @Bean public Docket docket(Environment environment){ //设置要启动swagger的环境 Profiles profiles = Profiles.of("dev"); //获取项目的环境,判断是否处于自己设定的环境中 boolean flag = environment.acceptsProfiles(profiles); return new Docket(DocumentationType.SWAGGER_2) .apiInfo(apiInfo()) //是否启动swagger .enable(flag) .select() .apis(RequestHandlerSelectors.basePackage("com.study.controller")) .build(); }- 1
- 2
- 3
- 4
- 5
- 6
- 7
- 8
- 9
- 10
- 11
- 12
- 13
- 14
- 15
- 16
- 17
- 18
-
分组和接口注释
-
配置API文档的分组
-
在Docket对象中
return new Docket(DocumentationType.SWAGGER_2) .apiInfo(apiInfo()) //分组 .groupName("pp")- 1
- 2
- 3
- 4
-
-
如何配置多个组
//多建几个Docket对象 @Bean public Docket docket1(){ return new Docket(DocumentationType.SWAGGER_2).groupName("A"); } @Bean public Docket docket2(){ return new Docket(DocumentationType.SWAGGER_2).groupName("B"); }- 1
- 2
- 3
- 4
- 5
- 6
- 7
- 8
- 9
- 10
-
@Api:用在controller类,描述API接口 @ApiOperation:描述接口方法 @ApiModel:描述对象 @ApiModelProperty:描述对象属性 @ApiImplicitParams:描述接口参数 @ApiResponses:描述接口返回值 @ApiIgnore:忽略接口方法- 1
- 2
- 3
- 4
- 5
- 6
- 7
-
例子
@Api(tags = "Hello控制类") @RestController public class HelloController {- 1
- 2
- 3
@ApiModel("用户实体类") //文档注释 public class User { @ApiModelProperty("用户名") private String username; @ApiModelProperty("密码") private String password;- 1
- 2
- 3
- 4
- 5
- 6
- 7
Swagger使用测试功能
-
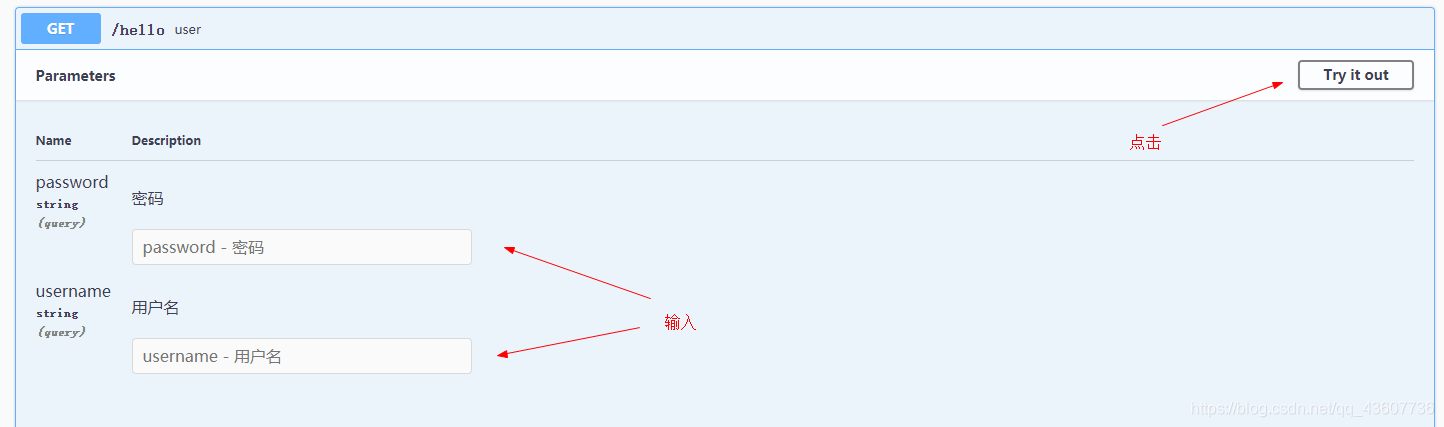
编写需要测试的请求
@GetMapping("/hello") public User user(User user) { return user; }- 1
- 2
- 3
- 4
-
User类
@ApiModel("用户实体类") //文档注释 public class User { //这个注释名会被当做测试的表单input的name属性,所以controller参数直接传值User对象 //或者把这里的注释名跟controller方法参数名设置相同 @ApiModelProperty("用户名") private String username; @ApiModelProperty("密码") private String password;- 1
- 2
- 3
- 4
- 5
- 6
- 7
- 8
- 9
-
进入swagger管理界面
http://localhost:8080/swagger-ui/index.html
-
然后执行,就能看到测试结果
-
总结:
- 我们可以通过Swagger给一些比较难理解的属性或者接口增加注释信息
- 接口文档实时更新
- 可以在线测试
任务
异步任务
-
在启动器中开启springboot自带的异步功能
@SpringBootApplication @EnableAsync //开启异步任务功能 public class Springboot9TestApplication { public static void main(String[] args) { SpringApplication.run(Springboot9TestApplication.class, args); } }- 1
- 2
- 3
- 4
- 5
- 6
- 7
- 8
- 9
-
在需要异步的方法上添加注解
@Service public class AsyncService { @Async //告诉spring这是一个异步的方法 public void hello(){ try { Thread.sleep(3000); } catch (InterruptedException e) { e.printStackTrace(); } System.out.println("数据处理中。。。"); } }- 1
- 2
- 3
- 4
- 5
- 6
- 7
- 8
- 9
- 10
- 11
- 12
- 13
- 14
定时任务
-
在启动器中开启springboot自带的定时功能
@SpringBootApplication @EnableScheduling //开启定时功能 public class Springboot9TestApplication { public static void main(String[] args) { SpringApplication.run(Springboot9TestApplication.class, args); } }- 1
- 2
- 3
- 4
- 5
- 6
- 7
- 8
- 9
-
在需要定时执行的方法上添加注解
@Service public class ScheduledService { //在一个特定的时间执行这个方法 //秒 分 时 日 月 周几 //30 0/5 10,18 * * ? 每天10点和18点,每隔5分执行一次 @Scheduled(cron = "0/5 * * * * 0-7") //需要放入cron表达式 public void hello(){ System.out.println("hello, 你被执行了"); } }- 1
- 2
- 3
- 4
- 5
- 6
- 7
- 8
- 9
- 10
- 11
- 12
邮件发送
-
导入依赖
<dependency> <groupId>org.springframework.boot</groupId> <artifactId>spring-boot-starter-mail</artifactId> <version>2.4.5</version> </dependency>- 1
- 2
- 3
- 4
- 5
-
编写配置
spring: mail: username: 835241124@qq.com password: svcgwlpbhtqpbbfc host: smtp.qq.com # 开启加密验证,QQ专用 properties: {mail.smtp.ssl.enable: true}- 1
- 2
- 3
- 4
- 5
- 6
- 7
-
编写测试
@SpringBootTest class Springboot9TestApplicationTests { @Autowired JavaMailSenderImpl javaMailSender; @Test void contextLoads() { //一个简单的邮件 SimpleMailMessage message = new SimpleMailMessage(); message.setSubject("通知"); //标题 message.setText("你好"); //正文 String[] strings = new String[2]; //给两个人发送 strings[0]="xxx@qq.com"; strings[1]="xxx@qq.com"; message.setTo(strings); //接收方 message.setFrom("xxx@qq.com"); //发送方 javaMailSender.send(message); } }- 1
- 2
- 3
- 4
- 5
- 6
- 7
- 8
- 9
- 10
- 11
- 12
- 13
- 14
- 15
- 16
- 17
- 18
- 19
- 20
- 21
-
复杂邮件
@Test void contextLoads2() throws MessagingException { //一个复杂的邮件 MimeMessage mimeMessage = javaMailSender.createMimeMessage(); //组装 MimeMessageHelper helper = new MimeMessageHelper(mimeMessage, true, "utf-8"); //true:支持多文件 helper.setSubject("通知"); //得先执行setText再执行addInline helper.setText("<h1 style=\"color:red\">你好</h1><img src=\"cid:123\">", true); //true:支持html解析 helper.addInline("123",new File("C:\\Users\\Done\\Desktop\\111.png")); //附件 //helper.addAttachment("111.png",new File("C:\\Users\\Done\\Desktop\\111.png")); helper.setTo("835241124@qq.com"); helper.setFrom("835241124@qq.com"); javaMailSender.send(mimeMessage); }- 1
- 2
- 3
- 4
- 5
- 6
- 7
- 8
- 9
- 10
- 11
- 12
- 13
- 14
- 15
- 16
分布式理论
什么是分布式系统
- 在《分布式系统原理与范型》一书中有如下定义:“分布式系统是若干独立计算机的集合,这些计算机对于用户来说就像单个相关系统”
- 分布式系统是由一组通过网络进行通信、为了完成共同的任务而协调工作的计算机节点组成的系统。分布式系统的出现是为了用廉价的、普通的机器完成单个计算机无法完成的计算、存储任务。其目的是利用更多的机器,处理更多的数据
- 分布式系统(distributed system)是建立在网络之上的软件系统
- 首先需要明确的是,只有当单个节点的处理能力无法满足日益增长的计算、存储任务的时候,且硬件的提升(加内存、加磁盘、使用更好的CPU)高昂到得不偿失的时候,应用程序也不能进一步优化的时候,我们才需要考虑分布式系统。因为,分布式系统要解决的问题本身就是和单机系统一样的,而由于分布式系统多节点、通过网络通信的拓扑结构,会引入很多单机系统没有的问题,为了解决这些问题又会引入更多的机制、协议,带来更多的问题
单一应用架构
- 当网站流量很小时,只需一个应用,将所有功能都部署在一起,以减少部署节点和成本。此时,用于简化增删改查工作量的数据访问框架(ORM)是关键
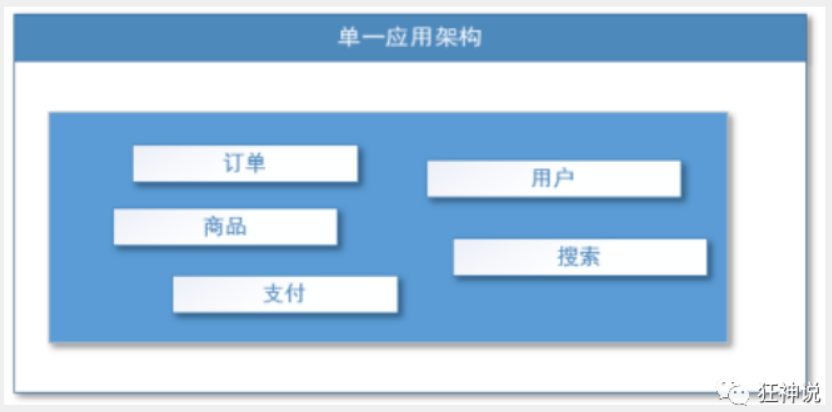
- 适用于小型网站,小型管理系统,将所有功能都部署到一个功能里,简单易用
- 缺点:
- 性能扩展比较难
- 协同开发问题
- 不利于升级维护
垂直应用架构
- 当访问量逐渐增大,单一应用增加机器带来的加速度越来越小,将应用拆成互不相干的几个应用,以提升效率。此时,用于加速前端页面开发的Web框架(MVC)是关键
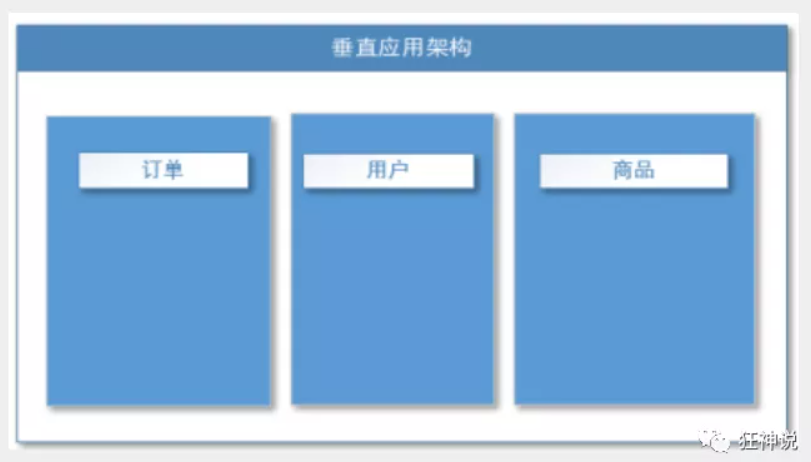
- 通过切分业务来实现各个模块独立部署,降低了维护和部署的难度,团队各司其职更易管理,性能扩展也更方便,更有针对性
- 缺点:公用模块无法重复利用,开发性的浪费
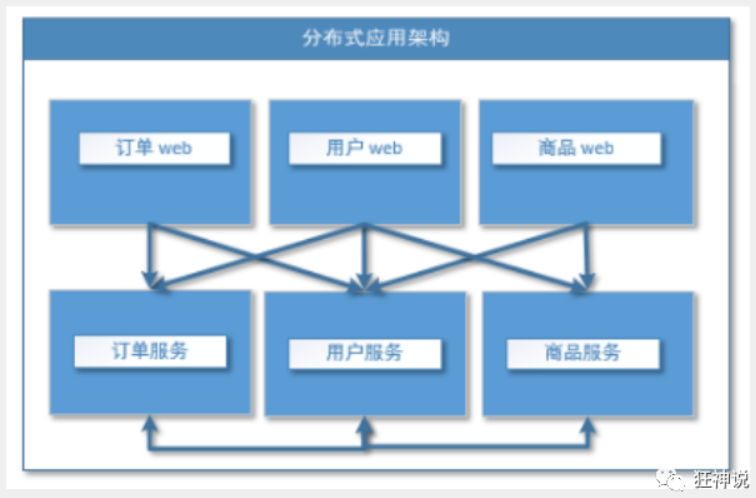
分布式服务架构
- 当垂直应用越来越多,应用之间交互不可避免,将核心业务抽取出来,作为独立的服务,逐渐形成稳定的服务中心,使前端应用能更快速的响应多变的市场需求。此时,用于提高业务复用及整合的**分布式服务框架(RPC)**是关键
流动计算架构
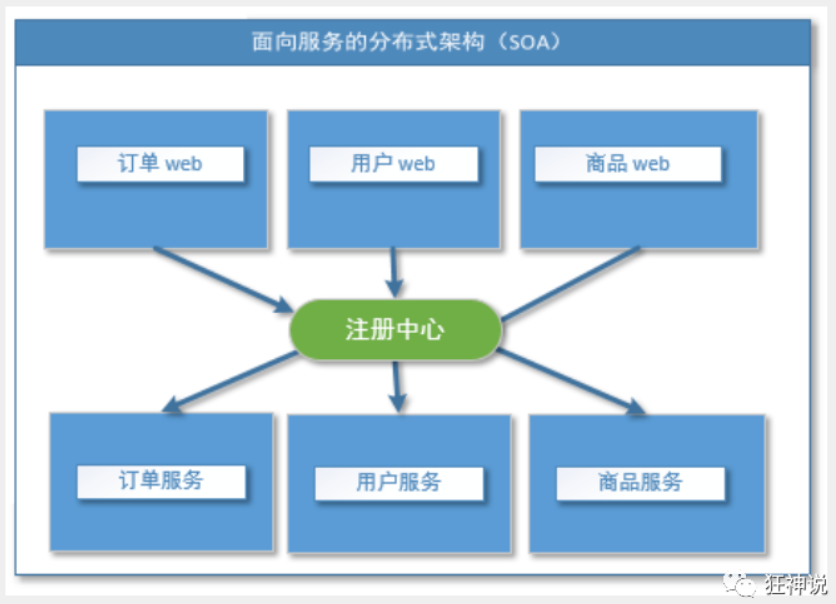
- 当服务越来越多,容量的评估,小服务资源的浪费等问题逐渐显现,此时需增加一个调度中心基于访问压力实时管理集群容量,提高集群利用率。此时,用于提高机器利用率的资源调度和治理中心(SOA)[ Service Oriented Architecture]是关键
什么是RPC
- RPC【Remote Procedure Call】是指远程过程调用,是一种进程间通信方式,它是一种技术的思想,而不是规范。它允许程序调用另一个地址空间(通常是共享网络的另一台机器上)的过程或函数,而不用程序员显式编码这个远程调用的细节。即程序员无论是调用本地的还是远程的函数,本质上编写的调用代码基本相同
- 也就是说两台服务器A,B,一个应用部署在A服务器上,想要调用B服务器上应用提供的函数/方法,由于不在一个内存空间,不能直接调用,需要通过网络来表达调用的语义和传达调用的数据。为什么要用RPC呢?就是无法在一个进程内,甚至一个计算机内通过本地调用的方式完成的需求,比如不同的系统间的通讯,甚至不同的组织间的通讯,由于计算能力需要横向扩展,需要在多台机器组成的集群上部署应用。RPC就是要像调用本地的函数一样去调远程函数
RPC基本原理
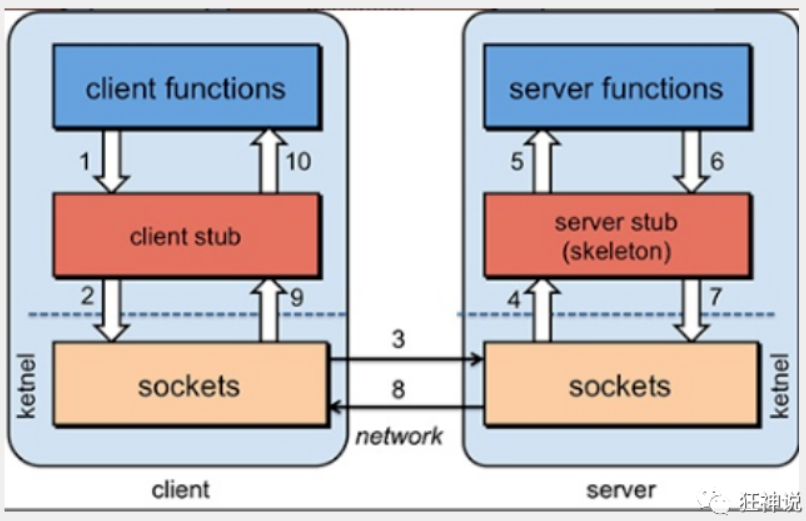
步骤解析
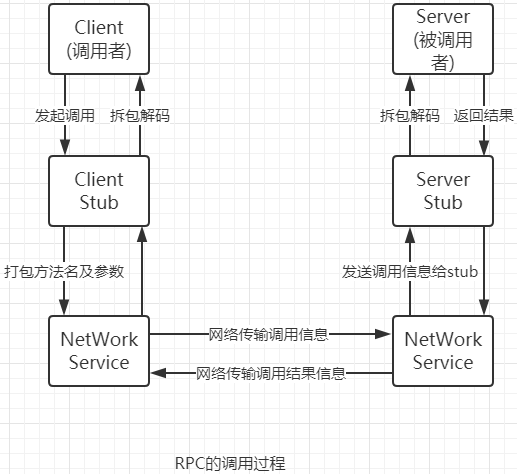
- PRC两个核心模块:通讯,序列化
最后,感谢狂神说
声明:本文内容由网友自发贡献,不代表【wpsshop博客】立场,版权归原作者所有,本站不承担相应法律责任。如您发现有侵权的内容,请联系我们。转载请注明出处:https://www.wpsshop.cn/w/神奇cpp/article/detail/939825
推荐阅读
相关标签

