
热门标签
热门文章
- 1C++之STL(六&七)
- 2Java-集合框架(刨析源码,深层讲解)_ggbond代码
- 3CrossOver对mac电脑的危害 CrossOver23激活码 parallels对mac的损害 Mac电脑运行Windows_mac用crossover损害电脑吗
- 4Pycharm试用期结束后还想继续使用的解决方法,亲证有效。_pycharm专业版试用期到期了还能再使用吗
- 5推荐一个让WebSocket通信更简单的React组件 - react-websocket
- 6期末复习(二)_在初始为空的平衡二叉树中依次插入33、88、66、22、11、15、44、40,画出平衡二叉
- 7记一次 Android CPU高使用率排查_androidcpu占用率120
- 8低空经济腾飞:无人机空域申请流程及策略
- 9nginxWebUI 存在前台远程命令执行漏洞,安装以及复现过程_ubuntu nginx web ui
- 10MySQL运维实战(3.1) MySQL官方客户端使用介绍_mysql 客户端
当前位置: article > 正文
Android Studio 模仿美团界面_android仿美团外卖首页
作者:码创造者 | 2024-06-20 04:00:59
赞
踩
android仿美团外卖首页
目录
activity_main.xml
- <?xml version="1.0" encoding="utf-8"?>
- <LinearLayout xmlns:android="http://schemas.android.com/apk/res/android"
- android:orientation="vertical"
- android:background="#ffffff"
- android:layout_width="match_parent"
- android:layout_height="match_parent">
-
- <FrameLayout
- android:id="@+id/main_frame_layout"
- android:layout_weight="1"
- android:layout_width="match_parent"
- android:layout_height="0dp">
- </FrameLayout>
-
- <LinearLayout
- android:layout_width="match_parent"
- android:layout_height="75dp">
- <Button
- android:id="@+id/btn1"
- android:layout_weight="1"
- android:layout_width="0dp"
- android:layout_height="match_parent"
- android:background="#ffffff"
- android:text="首页"
- android:textSize="20dp"/>
- <Button
- android:id="@+id/btn3"
- android:layout_weight="1"
- android:layout_width="0dp"
- android:layout_height="match_parent"
- android:background="#ffffff"
- android:text="消息"
- android:textSize="20dp"/>
- <Button
- android:id="@+id/btn4"
- android:layout_weight="1"
- android:layout_width="0dp"
- android:layout_height="match_parent"
- android:background="#ffffff"
- android:text="我的"
- android:textSize="20dp"/>
- </LinearLayout>
-
- </LinearLayout>

shouye_layout.xml
第一个fragment
(代码中涉及到的一些图片,大家可以自己命名一些相同的图片放到对应的文件夹中,或者更改相应的代码,也可以到文章底部的工程文件中下载)
- <?xml version="1.0" encoding="utf-8"?>
- <LinearLayout xmlns:android="http://schemas.android.com/apk/res/android"
- android:orientation="vertical"
- android:background="#ffffff"
- android:layout_width="match_parent"
- android:layout_height="match_parent">
-
- <FrameLayout
- android:id="@+id/main_frame_layout"
- android:layout_weight="1"
- android:layout_width="match_parent"
- android:layout_height="0dp">
- </FrameLayout>
-
- <LinearLayout
- android:layout_width="match_parent"
- android:layout_height="75dp">
- <Button
- android:id="@+id/btn1"
- android:layout_weight="1"
- android:layout_width="0dp"
- android:layout_height="match_parent"
- android:background="#ffffff"
- android:text="首页"
- android:textSize="20dp"/>
- <Button
- android:id="@+id/btn3"
- android:layout_weight="1"
- android:layout_width="0dp"
- android:layout_height="match_parent"
- android:background="#ffffff"
- android:text="消息"
- android:textSize="20dp"/>
- <Button
- android:id="@+id/btn4"
- android:layout_weight="1"
- android:layout_width="0dp"
- android:layout_height="match_parent"
- android:background="#ffffff"
- android:text="我的"
- android:textSize="20dp"/>
- </LinearLayout>
-
- </LinearLayout>
xiaoxi_layout.xml
第二个fragment
(代码中涉及到的一些图片,大家可以自己命名一些相同的图片放到对应的文件夹中,或者更改相应的代码,也可以到文章底部的工程文件中下载)
- <?xml version="1.0" encoding="utf-8"?>
- <LinearLayout xmlns:android="http://schemas.android.com/apk/res/android"
- android:orientation="vertical"
- android:background="#ffffff"
- android:layout_width="match_parent"
- android:layout_height="match_parent">
-
- <FrameLayout
- android:id="@+id/main_frame_layout"
- android:layout_weight="1"
- android:layout_width="match_parent"
- android:layout_height="0dp">
- </FrameLayout>
-
- <LinearLayout
- android:layout_width="match_parent"
- android:layout_height="75dp">
- <Button
- android:id="@+id/btn1"
- android:layout_weight="1"
- android:layout_width="0dp"
- android:layout_height="match_parent"
- android:background="#ffffff"
- android:text="首页"
- android:textSize="20dp"/>
- <Button
- android:id="@+id/btn3"
- android:layout_weight="1"
- android:layout_width="0dp"
- android:layout_height="match_parent"
- android:background="#ffffff"
- android:text="消息"
- android:textSize="20dp"/>
- <Button
- android:id="@+id/btn4"
- android:layout_weight="1"
- android:layout_width="0dp"
- android:layout_height="match_parent"
- android:background="#ffffff"
- android:text="我的"
- android:textSize="20dp"/>
- </LinearLayout>
-
- </LinearLayout>
Wode_layout.xml
第三个fragment
(代码中涉及到的一些图片,大家可以自己命名一些相同的图片放到对应的文件夹中,或者更改相应的代码,也可以到文章底部的工程文件中下载)
- <LinearLayout xmlns:android="http://schemas.android.com/apk/res/android"
- android:orientation="vertical"
- android:layout_width="match_parent"
- android:layout_height="match_parent">
-
- <LinearLayout
- android:layout_width="match_parent"
- android:layout_height="180dp"
- android:background="#ffcc33"
- android:orientation="vertical">
-
- <LinearLayout
- android:layout_width="match_parent"
- android:layout_height="wrap_content">
- <ImageView
- android:layout_width="wrap_content"
- android:layout_height="wrap_content"
- android:layout_marginTop="25dp"
- android:layout_marginLeft="25dp"
- android:src="@drawable/touxiang"/>
- <TextView
- android:layout_width="wrap_content"
- android:layout_height="wrap_content"
- android:layout_marginTop="35dp"
- android:layout_marginLeft="25dp"
- android:text="是我哦"
- android:textSize="25dp"/>
- <TextView
- android:layout_width="wrap_content"
- android:layout_height="wrap_content"
- android:layout_marginTop="35dp"
- android:layout_marginLeft="25dp"
- android:text="假装有id"
- android:textSize="25dp"/>
- <ImageView
- android:layout_width="wrap_content"
- android:layout_height="wrap_content"
- android:layout_marginLeft="130dp"
- android:src="@drawable/shezhi"/>
- <ImageView
- android:layout_width="wrap_content"
- android:layout_height="wrap_content"
- android:src="@drawable/kefu"/>
- </LinearLayout>
- <LinearLayout
- android:layout_width="match_parent"
- android:layout_height="wrap_content"
- android:orientation="horizontal"
- android:layout_marginTop="10dp">
-
- <ImageView
- android:layout_width="200px"
- android:layout_height="200px"
- android:src="@drawable/sc"
- android:layout_weight="1"/>
- <ImageView
- android:layout_width="200px"
- android:layout_height="200px"
- android:src="@drawable/pj"
- android:layout_weight="1"/>
- <ImageView
- android:layout_width="200px"
- android:layout_height="200px"
- android:src="@drawable/zj"
- android:layout_weight="1"/>
- <ImageView
- android:layout_width="200px"
- android:layout_height="200px"
- android:src="@drawable/kq"
- android:layout_weight="1"/>
-
- </LinearLayout>
- </LinearLayout>
- </LinearLayout>
首页里面的ListView
food_item.xml
- <LinearLayout xmlns:android="http://schemas.android.com/apk/res/android"
- android:orientation="horizontal"
- android:layout_width="match_parent"
- android:layout_height="match_parent">
-
- <ImageView
- android:id="@+id/food_image"
- android:layout_width="wrap_content"
- android:layout_height="wrap_content"/>
-
- <TextView
- android:layout_width="wrap_content"
- android:layout_height="wrap_content"
- android:id="@+id/food_name"
- android:textSize="20dp"
- android:layout_gravity="center_vertical"
- android:layout_marginLeft="10dp"/>
-
- </LinearLayout>
Food
在包内创建一个Java类并命名为Food,写入如下代码:
- public class Food {
- private String name;
- private int imageId;
- public Food(String name, int imageId) {
- this.name = name;
- this.imageId = imageId;
- }
-
- public String getName() {
- return name;
- }
-
- public int getImageId() {
- return imageId;
- }
- }
FoodAdapter
在包内创建一个Java类并命名为FoodAdapter,写入如下代码:
- public class FoodAdapter extends ArrayAdapter<Food> {
- private int resourceId;
-
- public FoodAdapter(Context context, int textViewResourceId,
- List<Food> objects){
- super(context, textViewResourceId, objects);
- resourceId = textViewResourceId;
- }
- @Override
- public View getView(int position, View convertView, ViewGroup parent){
- Food food = getItem(position);
- View view = LayoutInflater.from(getContext()).inflate(resourceId,parent,false);
- ImageView foodImage = (ImageView) view.findViewById(R.id.food_image);
- TextView foodname = (TextView) view.findViewById(R.id.food_name);
- foodImage.setImageResource(food.getImageId());
- foodname.setText(food.getName());
- return view;
- }
- }
Shouye
在包内创建一个Java类并命名为Shouye,写入如下代码:
(代码中涉及到的一些图片,大家可以自己命名一些相同的图片放到对应的文件夹中,或者更改相应的代码,也可以到文章底部的工程文件中下载)
- public class Shouye extends Fragment implements AdapterView.OnItemClickListener {
- ListView listView;
- SimpleAdapter simpleAdapter;
- @Override
- public View onCreateView(LayoutInflater inflater, ViewGroup container,
- Bundle savedInstanceState) {
- View view = inflater.inflate(R.layout.shouye_layout, container, false);
- listView = view.findViewById(R.id.list_view);
- simpleAdapter = new SimpleAdapter(getActivity(),getData(),R.layout.food_item,
- new String[]{"title","image"},new int[]{R.id.food_name,R.id.food_image});
- listView.setAdapter(simpleAdapter);
- listView.setOnItemClickListener(this);
-
- return view;
- }
-
- private List<Map<String,Object>> getData(){
- String [] title = {"井盒炒饭","全鸡汉堡","小煎鸡饭","猪脚饭"};
- int [] image = {R.drawable.chaofan,R.drawable.hls,R.drawable.xcj,R.drawable.zjf};
- List<Map<String,Object>> list = new ArrayList<>();
- for (int j=0;j<5;j++){
- for (int i=0;i<4;i++){
- Map map = new HashMap();
- map.put("title",title[i]);
- map.put("image",image[i]);
- list.add(map);
- }
- }
- return list;
- }
-
- @Override
- public void onActivityCreated(@Nullable Bundle savedInstanceState) {
- super.onActivityCreated(savedInstanceState);
- }
-
- @Override
- public void onItemClick(AdapterView<?> parent, View view, int position, long id) {
-
- }
-
- }
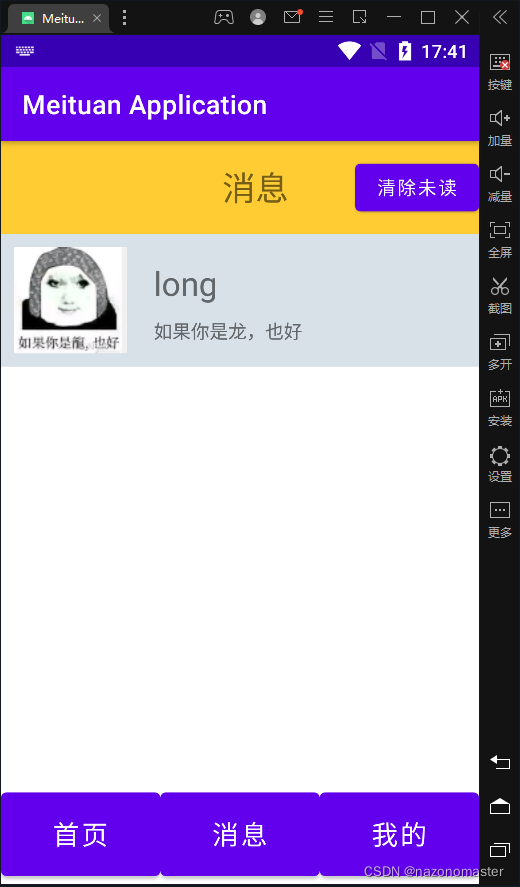
消息界面中的机器人聊天功能:
activity_robot.xml
- <?xml version="1.0" encoding="utf-8"?>
- <LinearLayout xmlns:android="http://schemas.android.com/apk/res/android"
- xmlns:app="http://schemas.android.com/apk/res-auto"
- xmlns:tools="http://schemas.android.com/tools"
- android:layout_width="match_parent"
- android:layout_height="match_parent"
- android:orientation="vertical"
- android:background="#d8e0e8"
- tools:context=".MainActivity">
-
- <androidx.recyclerview.widget.RecyclerView
- android:id="@+id/msg_recycler_view"
- android:layout_width="match_parent"
- android:layout_height="0dp"
- android:layout_weight="1"/>
-
- <LinearLayout
- android:layout_width="match_parent"
- android:layout_height="wrap_content">
-
- <EditText
- android:id="@+id/input_text"
- android:layout_width="0dp"
- android:layout_height="wrap_content"
- android:layout_weight="1"
- android:maxLines="2"
- android:hint="输入信息"/>
-
- <Button
- android:id="@+id/send"
- android:layout_width="wrap_content"
- android:layout_height="wrap_content"
- android:text="发送"/>
-
- </LinearLayout>
-
- </LinearLayout>
msg_item.xml
(代码中涉及到的一些图片,大家可以自己命名一些相同的图片放到对应的文件夹中,或者更改相应的代码,也可以到文章底部的工程文件中下载)
- <?xml version="1.0" encoding="utf-8"?>
- <LinearLayout
- xmlns:android="http://schemas.android.com/apk/res/android"
- android:orientation="vertical"
- android:layout_width="match_parent"
- android:layout_height="wrap_content"
- android:padding="10dp">
-
- <LinearLayout
- android:id="@+id/left_layout"
- android:layout_gravity="left"
- android:layout_width="wrap_content"
- android:layout_height="wrap_content"
- android:orientation="horizontal"
- android:background="@mipmap/message_left">
-
- <TextView
- android:id="@+id/left_msg"
- android:layout_width="wrap_content"
- android:layout_height="wrap_content"
- android:layout_gravity="center"
- android:layout_margin="10dp"
- android:textColor="#fff"
- android:text="你好,小明"/>
- </LinearLayout>
-
- <LinearLayout
- android:id="@+id/right_layout"
- android:orientation="horizontal"
- android:layout_width="wrap_content"
- android:layout_height="wrap_content"
- android:background="@mipmap/message_right"
- android:layout_gravity="right">
-
- <TextView
- android:id="@+id/right_msg"
- android:layout_width="wrap_content"
- android:layout_height="wrap_content"
- android:layout_gravity="center"
- android:layout_margin="10dp"
- android:text="我杀你妈"
- />
- </LinearLayout>
-
- </LinearLayout>
Msg.java
在包内创建一个Java类文件,命名为Msg,写入如下代码:
- package com.example.meituanapplication;
-
- public class Msg {
- public static final int TYPE_RECEIVED = 0;
- public static final int TYPE_SENT = 1;
- // 消息内容
- private String content;
- // 消息类型
- private int type;
-
- public Msg(String content,int type){
- this.content = content;
- this.type = type;
- }
-
- public int getType(){
- return type;
- }
-
- public String getContent(){
- return content;
- }
-
- public void setContent(String content){
- this.content = content;
- }
-
- public void setType(int type){
- this.type = type;
- }
- }
MsgAdapter.java
在包内创建一个Java类文件,命名为MsgAdapter,写入如下代码:
- public class MsgAdapter extends RecyclerView.Adapter<MsgAdapter.ViewHolder> {
-
- private List<Msg> mMsgList;
- static class ViewHolder extends RecyclerView.ViewHolder{
- LinearLayout leftLayout;
- LinearLayout rightLayout;
- TextView leftMsg;
- TextView rightMsg;
- public ViewHolder(View view){
- super(view);
- leftLayout = (LinearLayout) view.findViewById(R.id.left_layout);
- rightLayout = (LinearLayout) view.findViewById(R.id.right_layout);
- leftMsg = (TextView) view.findViewById(R.id.left_msg);
- rightMsg = (TextView) view.findViewById(R.id.right_msg);
- }
- }
-
- public MsgAdapter(List<Msg> msgList){
- mMsgList = msgList;
- }
-
- @Override
- public ViewHolder onCreateViewHolder(ViewGroup parent, int viewType){
- View view = LayoutInflater.from(parent.getContext()).inflate(R.layout.msg_item,parent,false);
- return new ViewHolder(view);
- }
-
- @Override
- public void onBindViewHolder(ViewHolder holder,int position){
- Msg msg = mMsgList.get(position);
- if (msg.getType() == Msg.TYPE_RECEIVED) {
- holder.leftLayout.setVisibility(View.VISIBLE);
- holder.rightLayout.setVisibility(View.GONE);
- holder.leftMsg.setText(msg.getContent());
- }else if (msg.getType() == Msg.TYPE_SENT){
- holder.rightLayout.setVisibility(View.VISIBLE);
- holder.leftLayout.setVisibility(View.GONE);
- holder.rightMsg.setText(msg.getContent());
- }
- }
-
- @Override
- public int getItemCount() {
- return mMsgList.size();
- }
- }
Robot.java
在包内创建一个Java类文件,命名为Robot,写入如下代码:
- public class Robot extends AppCompatActivity {
- private List<Msg> msgList = new ArrayList<>();
- private EditText inputText;
- private Button send;
- private RecyclerView msgRecyclerView;
- private MsgAdapter adapter;
-
- @Override
- protected void onCreate(Bundle savedInstanceState) {
- super.onCreate(savedInstanceState);
- setContentView(R.layout.activity_robot);
-
- initMsgs();//初始化消息数据
- inputText = (EditText) findViewById(R.id.input_text);
- send = (Button) findViewById(R.id.send);
- msgRecyclerView = (RecyclerView) findViewById(R.id.msg_recycler_view);
- LinearLayoutManager layoutManager = new LinearLayoutManager(this);
- msgRecyclerView.setLayoutManager(layoutManager);
- adapter = new MsgAdapter(msgList);
- msgRecyclerView.setAdapter(adapter);
- send.setOnClickListener(new View.OnClickListener() {
- @Override
- public void onClick(View v) {
- String content = inputText.getText().toString();
- if (!"".equals(content)) {
- Msg msg = new Msg(content,Msg.TYPE_SENT);
- msgList.add(msg);
- adapter.notifyItemInserted(msgList.size() - 1);
- msgRecyclerView.scrollToPosition(msgList.size() - 1);
- inputText.setText("");
- }
- }
- });
- }
-
- private void initMsgs() {
- Msg msg1 = new Msg("long may the sun shine!",Msg.TYPE_RECEIVED);
- msgList.add(msg1);
- Msg msg2 = new Msg("you are dragon, more dragon thsn me.",Msg.TYPE_SENT);
- msgList.add(msg2);
- Msg msg3 = new Msg("如果你是龙,也好",Msg.TYPE_RECEIVED);
- msgList.add(msg3);
- }
- }
xiaoxi.java
在包内创建一个Java类文件,命名为Robot,写入如下代码:
- public class Xiaoxi extends Fragment {
- @Override
- public View onCreateView(LayoutInflater inflater, ViewGroup container,
- Bundle savedInstanceState) {
- View view = inflater.inflate(R.layout.xiaoxi_layout, container, false);
-
- LinearLayout nx = view.findViewById(R.id.xiaoxi_nie);
- nx.setOnClickListener(new View.OnClickListener() {
- @Override
- public void onClick(View v) {
- Intent intent = new Intent(getActivity(),Robot.class);
- startActivity(intent);
- }
- });
- return view;
- }
- }
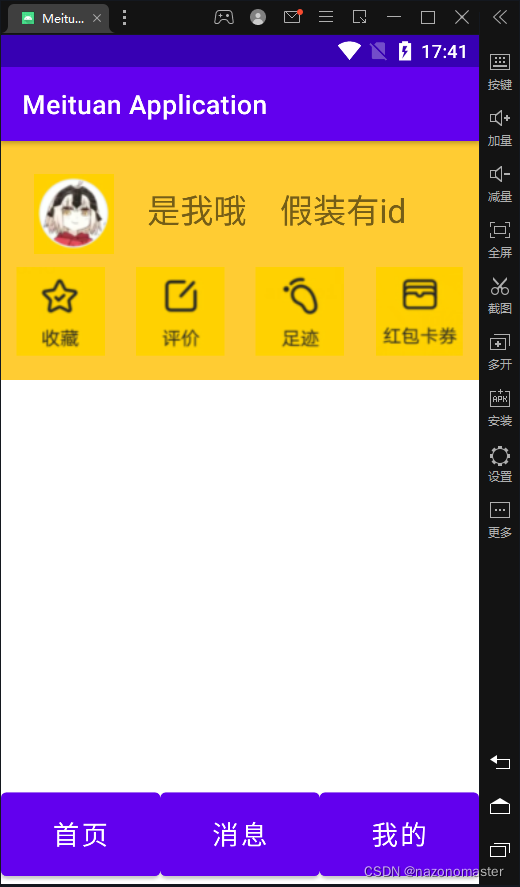
“我的”界面
Wode.java
在包内创建一个Java类文件,命名为Wode,写入如下代码:
- public class Wode extends Fragment {
- @Override
- public View onCreateView(LayoutInflater inflater, ViewGroup container,
- Bundle savedInstanceState) {
- View view = inflater.inflate(R.layout.wode_layout, container, false);
- return view;
- }
- }
Activity.java
最后是主要的活动的代码:
- public class MainActivity extends AppCompatActivity implements View.OnClickListener{
- //三个fragment
- private Shouye f1;
- private Xiaoxi f2;
- private Wode f3;
-
- //底部三个按钮
- private Button foot1;
- private Button foot2;
- private Button foot3;
-
- @Override
- protected void onCreate(Bundle savedInstanceState) {
- super.onCreate(savedInstanceState);
- setContentView(R.layout.activity_main);
-
- foot1 = (Button) findViewById(R.id.btn1);
- foot2 = (Button) findViewById(R.id.btn3);
- foot3 = (Button) findViewById(R.id.btn4);
- foot1.setOnClickListener(this);
- foot2.setOnClickListener(this);
- foot3.setOnClickListener(this);
-
- //第一次初始化首页默认显示第一个fragment
- initShouye();
- }
-
- //显示第一个fragment
- private void initShouye(){
- FragmentTransaction transaction = getSupportFragmentManager().beginTransaction();
- if (f1 == null){
- f1 = new Shouye();
- transaction.add(R.id.main_frame_layout,f1);
- }
- hideFragment(transaction);
- transaction.show(f1);
- transaction.commit();
- }
-
- //显示第二个fragment
- private void initXiaoxi(){
- FragmentTransaction transaction = getSupportFragmentManager().beginTransaction();
-
- if(f2 == null){
- f2 = new Xiaoxi();
- transaction.add(R.id.main_frame_layout,f2);
- }
- hideFragment(transaction);
- transaction.show(f2);
- transaction.commit();
- }
-
- //显示第三个fragment
- private void initWode(){
- FragmentTransaction transaction = getSupportFragmentManager().beginTransaction();
-
- if(f3 == null){
- f3 = new Wode();
- transaction.add(R.id.main_frame_layout,f3);
- }
- hideFragment(transaction);
- transaction.show(f3);
- transaction.commit();
- }
-
-
-
- //隐藏所有的fragment
- private void hideFragment(FragmentTransaction transaction){
- if(f1 != null){
- transaction.hide(f1);
- }
- if(f2 != null){
- transaction.hide(f2);
- }
- if(f3 != null){
- transaction.hide(f3);
- }
- }
-
- @Override
- public void onClick(View v) {
- if(v == foot1){
- initShouye();
- }else if(v == foot2){
- initXiaoxi();
- }else if(v == foot3){
- initWode();
- }
- }
-
- }
运行截图


工程文件
下面是整个项目工程的文件压缩包,如果需要的话可以通过积分下载:
声明:本文内容由网友自发贡献,不代表【wpsshop博客】立场,版权归原作者所有,本站不承担相应法律责任。如您发现有侵权的内容,请联系我们。转载请注明出处:https://www.wpsshop.cn/w/码创造者/article/detail/738561
推荐阅读
相关标签

