
热门标签
热门文章
- 1BL340系列设备登录指南:快速访问您的ARMxy嵌入式计算机
- 2【Android高级架构师系统学习文章】Android基础-ContentProvider全方位解析(系列篇4)_android contentprovider
- 3openresty+lua遍历 redis set_openresty lua-resty-redis
- 4Nacos与Eureka的区别_nacos和eureka的区别
- 5性能优化|全面剖析类加载机制_类加载机制和性能优化
- 6Docker:6种网络配置详解浅介_bridge网络模式
- 7基于Java得黑马头条项目------day08_黑马头条day08
- 8洛谷 P1886 滑动窗口
- 9ETL工具kettle数据迁移_kettle批量数据迁移
- 10Python3.x+Pyqt5实现主窗体里的工具栏,且工具栏里可以同时显示图标和文字_pyqt 工具栏图标下面带文字
当前位置: article > 正文
Nginx内网环境开启https双协议
作者:知新_RL | 2024-08-04 09:08:08
赞
踩
Nginx内网环境开启https双协议
前言
nginx开启https前提:
- 服务器支持open-ssl
- nginx 包含
--with-http_ssl_module --with-stream --with-stream_ssl_preread_module模块
一、open-ssl
1. 验证
openssl version
- 1
2. 安装
- 下载openssl安装包openssl安装包
- 安装openssl
 mkdir /usr/local/ssl
 cd /usr/local/ssl
 # 解压
 tar -xf openssl-3.0.1.tar.gz
 # 设置SSL库文件路径
 ./config --prefix=/usr/local/ssl/
 make
 make install
- 1
- 2
- 3
- 4
- 5
- 6
- 7
- 8
vi /etc/ld.so.conf
# 最后一行添加/usr/local/ssl/ 路径
sudo ldconfig
- 1
- 2
- 3
常见报错:openssl: error while loading shared libraries: libssl.so.10: cannot open shared object file: No such file or directory
系统版本和openssl版本不一致,具体哪里的日志记录需要的版本忘记了
3.生成ssl证书
# 第一步:生成私钥
mkdir /etc/ssl/certs/www.abc.com
cd /etc/ssl/certs/www.abc.com
openssl genrsa -des3 -out server.key 2048
# 输入一个4位以上的密码
# 确认密码
#第二步:生成CSR(证书签名请求)
openssl req -new -key server.key -out server.csr -subj "/C=CN/ST=JiLin/L=ChangChun/O=gsafety/OU=gsafety/CN=www.abc.com"
#第三步:去除私钥中的密码
#在第1步创建私钥的过程中,由于必须要指定一个密码。而这个密码会带来一个副作用,那就是在每次启动Web服务器时,都会要求输入密码
#这显然非常不方便。要删除私钥中的密码,操作如下:
openssl rsa -in server.key -out server.key
#第四步:生成自签名SSL证书
# -days 证书有效期-天
openssl x509 -req -days 3650 -in server.csr -signkey server.key -out server.crt
- 1
- 2
- 3
- 4
- 5
- 6
- 7
- 8
- 9
- 10
- 11
- 12
- 13
- 14
- 15
一、nginx
1. 验证支持模块
nginx -V
- 1
2. 安装必要模块
可以参考我之前的博客 Nginx 平滑升级
2.1 重新编译nginx
./configure --prefix=/usr/local/nginx --with-http_ssl_module --with-pcre --with-http_gzip_static_module --with-stream --with-stream_ssl_preread_module
- 1
生成nginx二进制执行文件到当前目录 /objs
make
- 1
2.2 替换原文件
替换
mv /usr/local/nginx/sbin/nginx /usr/local/nginx/sbin/nginx.bak
cp /usr/local/nginx-1.13.3/objs/nginx /usr/local/nginx/sbin/
- 1
- 2
验证
[root@web nginx-1.21.5]# make upgrade
/usr/local/nginx/sbin/nginx -t
nginx: the configuration file /usr/local/nginx/conf/nginx.conf syntax is ok
nginx: configuration file /usr/local/nginx/conf/nginx.conf test is successful
kill -USR2 `cat /usr/local/nginx/logs/nginx.pid`
sleep 1
test -f /usr/local/nginx/logs/nginx.pid.oldbin
kill -QUIT `cat /usr/local/nginx/logs/nginx.pid.oldbin`
- 1
- 2
- 3
- 4
- 5
- 6
- 7
- 8
升级
#验证模块是否加载成功
nginx -V
- 1
- 2
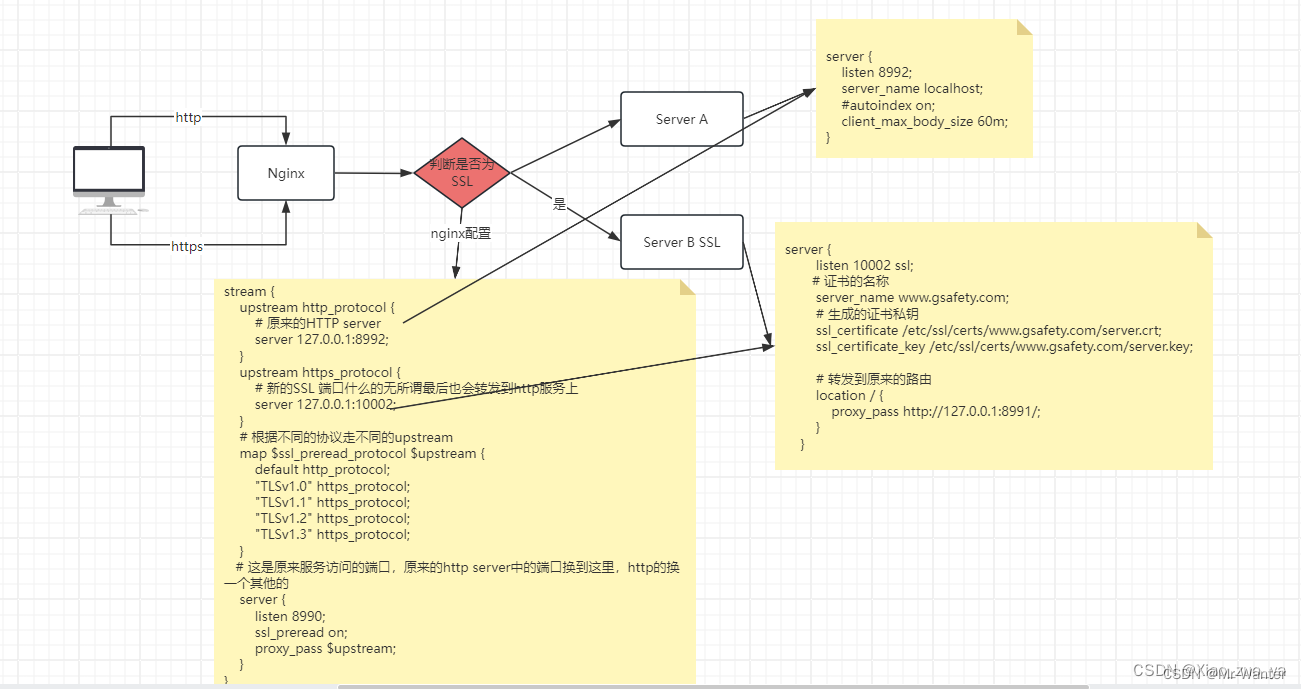
3. 配置https
下面是一段双协议支持的配置代码
请允许我抄袭一下小左同学的代码
stream {
    upstream http_protocol {
        # 8991端口是一个开启http的端口
        server 127.0.0.1:8991;
    }
    upstream https_protocol {
        # 10002端口是一个开启https的端口
        server 127.0.0.1:10002;
    }
    # 根据不同的协议走不同的upstream
    map $ssl_preread_protocol $upstream {
        default http_protocol;
        "TLSv1.0" https_protocol;
        "TLSv1.1" https_protocol;
        "TLSv1.2" https_protocol;
        "TLSv1.3" https_protocol;
    }
    server {
        listen 8990;
        ssl_preread on;
        proxy_pass $upstream;
    }
}
- 1
- 2
- 3
- 4
- 5
- 6
- 7
- 8
- 9
- 10
- 11
- 12
- 13
- 14
- 15
- 16
- 17
- 18
- 19
- 20
- 21
- 22
- 23
  server {
        listen 10002 ssl;
        server_name www.gsafety.com;
        ssl_certificate /etc/ssl/certs/www.abc.com/server.crt;
        ssl_certificate_key /etc/ssl/certs/www.abc.com/server.key;
        #减少点击劫持
        #add_header X-Frame-Options DENY;
        add_header X-Frame-Options AllowAll;
        #禁止服务器自动解析资源类型
        add_header X-Content-Type-Options nosniff;
        #防XSS攻击
        add_header X-Xss-Protection 1;
        #优先采取服务器算法
        ssl_prefer_server_ciphers on;
        #协议
        ssl_protocols TLSv1 TLSv1.1 TLSv1.2;
        ssl_session_cache shared:SSL:10m;
        ssl_session_timeout 10m;

        location / {
            proxy_pass http://127.0.0.1:8991/;
        }
    }
- 1
- 2
- 3
- 4
- 5
- 6
- 7
- 8
- 9
- 10
- 11
- 12
- 13
- 14
- 15
- 16
- 17
- 18
- 19
- 20
- 21
- 22
- 23
总结
openssl: error while loading shared libraries: libssl.so.10: cannot open shared object file: No such file or directory
这个问题是很大的难点,排查好久才找到一个对应版本安装成功(我的是麒麟银河V10,版本OpenSSL 1.1.1f),关键是怎么找到对应版本的过程当时没有记录,现在也想不起来了,声明:本文内容由网友自发贡献,不代表【wpsshop博客】立场,版权归原作者所有,本站不承担相应法律责任。如您发现有侵权的内容,请联系我们。转载请注明出处:https://www.wpsshop.cn/w/知新_RL/article/detail/927109
推荐阅读
相关标签
Copyright © 2003-2013 www.wpsshop.cn 版权所有,并保留所有权利。

