
- 1GraphRAG = 知识图谱 + RAG,优化全局搜索+局部搜索_graphrag 中文
- 2电力项目中大数据技术的典型应用_flink在电力方面的应用
- 3抛弃 Java 改用 Kotlin 的六个月后,我后悔了!
- 42024年VScode神仙插件,程序员必备(1),java线程池面试问题_算法竞赛vscode的插件
- 5MySQL 8.x 创建用户并授权_mysql8创建用户并授权
- 6深入解析:如何在遍历List时安全地删除元素_list 遍历删除
- 7Git 基础教程 - IDEA中的使用详解_idea怎么使用git
- 8聊聊测试团队管理_测试经理如何管理测试团队
- 9SQL Server数据误删恢复_sql server数据误删除恢复
- 10使用RoughViz可视化Vue.js中的草绘图表
SpringCloud微服务整合Spring Security OAuth2_springcloud整合oauth2
赞
踩
这里写目录标题
1、前置知识
- 首先得了解什么是OAuth2,这个的话可以参见博客:
https://blog.csdn.net/weixin_42272869/article/details/112260123
https://www.bilibili.com/video/BV1D94y1Z7t1?p=33&vd_source=bf9d70f3d2a451db07f40b6407c95a77 - 本文采用的是使用最广泛的、安全性最高的授权码模式进行讲解。
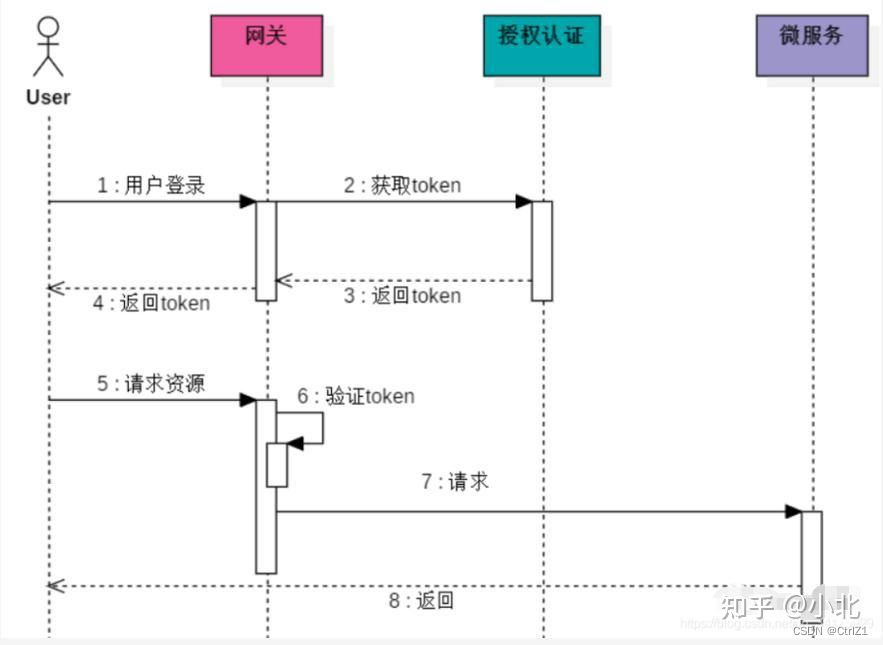
2、思想
-
单独创建一个鉴权微服务auth,负责整个项目的权限认证。外面请求进来先通过网关进行身份认证,未登录的去登录,已登录的网关找到auth进行鉴权,通过才放行到具体的普通功能性微服务。
-
大体过程可用下图展示
-
权限管理呢,主要包含两个部分:认证和鉴权。

-
OAuth2的整体流程图:
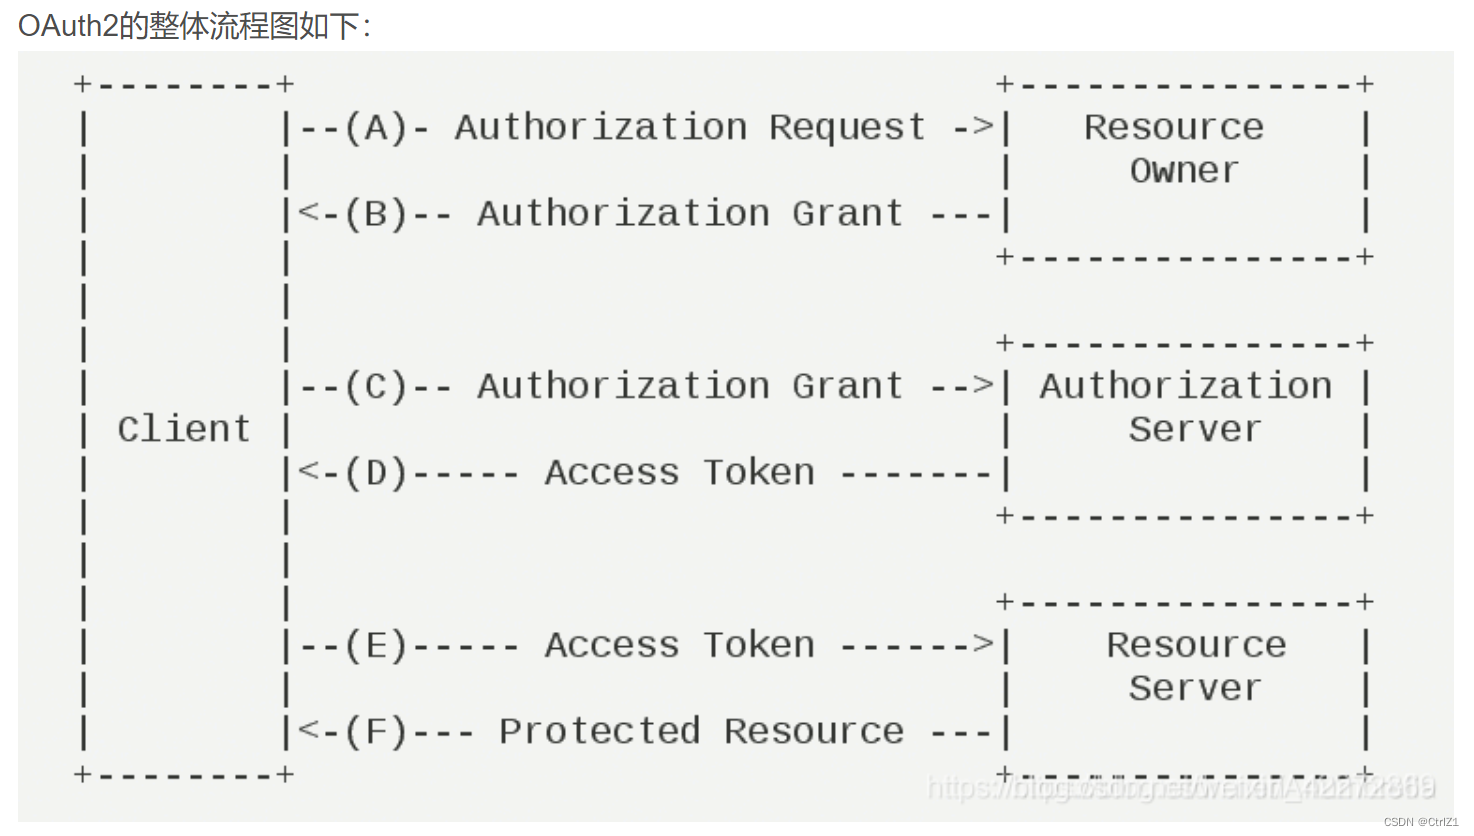
(A)客户端向资源所有者请求授权。授权请求可以直接对资源所有者(如图所示)进行,或者通过授权服务器作为中介进行间接访问(首选方案)。
(B)资源所有者允许授权,并返回凭证(如code)。
(C)客户端通过授权服务器进行身份验证,并提供授权凭证(如code),请求访问令牌(access token)。
(D)授权服务器对客户端进行身份验证,并验证授权凭证,如果有效,则发出访问令牌。
(E)客户端向资源服务器请求受保护的资源,并通过提供访问令牌来进行身份验证。
(F)资源服务器验证访问令牌,如果正确则返回受保护资源。 -
简单说就是:客户应用向授权服务器请求Access Token —> 授权服务器向用户征询意见,是否将权限授予客户应用 —> 用户同意 —> 授权服务器生成颁发Access Token给客户应用 —> 客户应用拿着Access Token去请求资源服务器 —> 资源服务器验证客户应用的Access Token —> 验证通过,返回数据
2.1、认证
- 说白了就是登录,之前比较传统的单点登录方法是使用session+redis,用户登录信息存放在服务端,压力比较大。
- 所以,微服务中的认证,还是建议使用令牌的方式,可以选择 JWT 令牌,这也是目前使用较多的一种方案。但是熟悉 JWT 的小伙伴都知道,纯粹的无状态登录无法实现注销,这就很头大,所以在实际应用中,单纯的使用 JWT 是不行的,一般还是要结合 Redis 一起,将生成的 JWT 字符串在 Redis 上也保存一份,并设置过期时间,判断用户是否登录时,需要先去 Redis 上查看 JWT 字符串是否存在,存在的话再对 JWT 字符串做解析操作,如果能成功解析,就没问题,如果不能成功解析,就说明令牌不合法。
- 这样有状态登录+无状态登录混在一起的方式,虽然看起来有点不伦不类,但是就当下来说,这个折衷的办法算是一个可行的方案了。
- 但是这样JWT的优点(本身保存用户登录信息,不需要保存在服务端)就不复存在了,换句话说,跟分布式session也没啥两样了。
- 这里不继续展开叙述,想了解JWT如何解决登录注销可以见博客:
- 认证包含两个过程:校验和登录,请求过来先校验是否合法,不合法就去进行登录等操作来获取权限。
2.2、鉴权
在我这个demo里是提取出用户表中的用户权限,即便是登录了的用户也需要具有权限才能访问固定的资源。
3、步骤
3.1、auth端
3.1.1、微服务目录

其中整合了swagger的两个配置文件和本项目无关,可忽略。
3.1.2、引入必要依赖
auth端:
<dependency>
    <groupId>org.springframework.boot</groupId>
    <artifactId>spring-boot-starter-security</artifactId>
</dependency>
- 1
- 2
- 3
- 4
还有一些必要的组件是放到了common模块,然后在auth端引入common模块就好了。比如有nacos,一些实体类等等。要记得引入common后也要做必要的配置,比如nacos,相关配置可见博客:https://blog.csdn.net/qq_41076797/article/details/128509393、https://blog.csdn.net/qq_41076797/article/details/128508723;这里就不详细说了。
3.1.3、配置用户鉴权实体类LoginUser
- 用户已经有实体类User了,这里要对它进行封装,从鉴权的角度把User包一层。
- 这里要实现UserDetails接口,实现其中的必要方法,这也属于固定套路,这样才能用于权限鉴定。
- 在auth微服务下面开个detail文件夹,创建实体类LoginUser,
package com.lyy.yingwudemo.yingwu_auth.service;

/**
 * @author :lyy
 * @date : 04-06-10:15
 */
import lombok.AllArgsConstructor;
import lombok.Builder;
import lombok.Data;
import lombok.NoArgsConstructor;
import org.springframework.security.core.GrantedAuthority;
import org.springframework.security.core.authority.SimpleGrantedAuthority;
import org.springframework.security.core.userdetails.UserDetails;

import java.util.Collection;

/**
 * 登录用户身份权限
 *
 * @author ruoyi
 */
@Data
@Builder
@AllArgsConstructor
@NoArgsConstructor
public class LoginUser implements UserDetails
{

    private static final long serialVersionUID = 1L;

    /**
     * 扩展字段
     */
    private Long userId;

    /**
     * 默认字段
     */
    private String username;
    private String password;
    private Boolean enabled;
    private Collection<SimpleGrantedAuthority> authorities;


    @Override
    public Collection<? extends GrantedAuthority> getAuthorities() {

        return this.authorities;
    }

    @Override
    public String getPassword() {

        return this.password;
    }

    @Override
    public String getUsername() {

        return this.username;
    }

    @Override
    public boolean isAccountNonExpired() {

        return true;
    }

    @Override
    public boolean isAccountNonLocked() {

        return true;
    }

    @Override
    public boolean isCredentialsNonExpired() {

        return true;
    }

    @Override
    public boolean isEnabled() {

        return this.enabled;
    }
}

- 1
- 2
- 3
- 4
- 5
- 6
- 7
- 8
- 9
- 10
- 11
- 12
- 13
- 14
- 15
- 16
- 17
- 18
- 19
- 20
- 21
- 22
- 23
- 24
- 25
- 26
- 27
- 28
- 29
- 30
- 31
- 32
- 33
- 34
- 35
- 36
- 37
- 38
- 39
- 40
- 41
- 42
- 43
- 44
- 45
- 46
- 47
- 48
- 49
- 50
- 51
- 52
- 53
- 54
- 55
- 56
- 57
- 58
- 59
- 60
- 61
- 62
- 63
- 64
- 65
- 66
- 67
- 68
- 69
- 70
- 71
- 72
- 73
- 74
- 75
- 76
- 77
- 78
- 79
- 80
- 81
- 82
- 83
- 84
- 85
- 86
3.1.4、创建根据用户名获取封装的用户信息的service:UserDetailServiceImpl
- 这个主要就是定义一个类实现固定的接口UserDetailsService中的固定的方法loadUserByUsername,这个方法就是根据字符串username返回一个UserDetails,因为得让springsecurity直到你要进行鉴权的对象啥样啊!
- 这里通过feign从用户服务member获取用户信息。
package com.lyy.yingwudemo.yingwu_auth.service;

import com.alibaba.fastjson.TypeReference;
import com.lyy.yingwuDemo.yingwu_common.entity.User;
import com.lyy.yingwuDemo.yingwu_common.utils.R;
import com.lyy.yingwudemo.yingwu_auth.feign.MemberFeignService;
import lombok.extern.slf4j.Slf4j;
import org.springframework.beans.factory.annotation.Autowired;
import org.springframework.security.authentication.AccountExpiredException;
import org.springframework.security.authentication.DisabledException;
import org.springframework.security.authentication.LockedException;
import org.springframework.security.core.authority.SimpleGrantedAuthority;

import org.springframework.security.core.userdetails.UserDetails;
import org.springframework.security.core.userdetails.UserDetailsService;
import org.springframework.security.core.userdetails.UsernameNotFoundException;
import org.springframework.security.crypto.bcrypt.BCryptPasswordEncoder;
import org.springframework.stereotype.Service;

import java.util.ArrayList;
import java.util.Collection;

/**
 * @author :lyy
 * @date : 04-06-13:21
 */
@Service
@Slf4j
public class UserDetailServiceImpl implements UserDetailsService {


    @Autowired
    private MemberFeignService memberFeignService;

    /**
     *
     * @param username
     * @return 就是负责构建一个UserDetails,咱们之前构建的实体类LoginUser就实现了UserDetails,所以是符合要求的
     * @throws UsernameNotFoundException
     */
    @Override
    public UserDetails loadUserByUsername(String username) throws UsernameNotFoundException {

        // 后面从管理端获取用户信息
        R r = memberFeignService.getMemberUsername(username);
        TypeReference<User> typeReference = new TypeReference<User>() {
   };
        User user=r.getData("user",typeReference);
        if(user==null)
            throw new UsernameNotFoundException("用户不存在");
        LoginUser userDetails = loadUser(user);
        if (!userDetails.isEnabled()) {

            throw new DisabledException("该账户已被禁用!");
        } else if (!userDetails.isAccountNonLocked()) {

            throw new LockedException("该账号已被锁定!");
        } else if (!userDetails.isAccountNonExpired()) {

            throw new AccountExpiredException("该账号已过期!");
        }
        return userDetails;
    }

    private LoginUser loadUser(User user) {

        Collection<SimpleGrantedAuthority> authorities =new ArrayList<>();
        user.getUserTags().stream().forEach(tag->
            authorities.add(new SimpleGrantedAuthority(tag.equals("1")?"ROLE_ADMIN":"ROLE_USER"))
        );

        LoginUser loginUser = new LoginUser();
        loginUser.setAuthorities(authorities);

        return LoginUser.builder()
                .userId(1L)
                .username(user.getUserName())
                .enabled(user.getEnable())
                .authorities(authorities)
                // 这里的密码就是正确密码,要拿前端传来的和下面的比较
                .password(new BCryptPasswordEncoder().encode(user.getPassWord())).build();
    }
}
- 1
- 2
- 3
- 4
- 5
- 6
- 7
- 8
- 9
- 10
- 11
- 12
- 13
- 14
- 15
- 16
- 17
- 18
- 19
- 20
- 21
- 22
- 23
- 24
- 25
- 26
- 27
- 28
- 29
- 30
- 31
- 32
- 33
- 34
- 35
- 36
- 37
- 38
- 39
- 40
- 41
- 42
- 43
- 44
- 45
- 46
- 47
- 48
- 49
- 50
- 51
- 52
- 53
- 54
- 55
- 56
- 57
- 58
- 59
- 60
- 61
- 62
- 63
- 64
- 65
- 66
- 67
- 68
- 69
- 70
- 71
- 72
- 73
- 74
- 75
- 76
- 77
- 78
- 79
- 80
- 81
- 82
- 83
- 84
3.1.5、如果不想自己设计用户service
不管要不要自己手动设计service,都要通过rpc调用,查询到username对应的那个用户,以及对应的权限。
参考以下代码
@Service
@Slf4j
public class SecurityUserDetailService implements UserDetailsService {


    @Autowired
    private UserService userService;

    @Autowired
    private PermissionService permissionService;


    @Override
    public UserDetails loadUserByUsername(String username) {


        UserEntity user = userService.getUserByUsername(username);
        if (user == null) {

            return null;
        }
        //获取权限
        List<PermissionEntry> permissions = permissionService.getPermissionsByUserId(user.getId());
        List<String> codes = permissions.stream().map(PermissionEntry::getCode).collect(Collectors.toList());
        String[] authorities = null;
        if (CollectionUtils.isNotEmpty(codes)) {

            authorities = new String[codes.size()];
            codes.toArray(authorities);
        }
        //身份令牌
        String principal = JSON.toJSONString(user);
        return User.withUsername(principal).password(user.getPassword()).authorities(authorities).build();
    }
}
- 1
- 2
- 3
- 4
- 5
- 6
- 7
- 8
- 9
- 10
- 11
- 12
- 13
- 14
- 15
- 16
- 17
- 18
- 19
- 20
- 21
- 22
- 23
- 24
- 25
- 26
- 27
- 28
- 29
- 30
- 31
- 32
- 33
- 34
- 35
- 36
返回的User.withUsername……这个User是security包里的User,实现了UserDetail接口,只要返回的类是UserDetail的实现类即可,我们也可以自己实现。
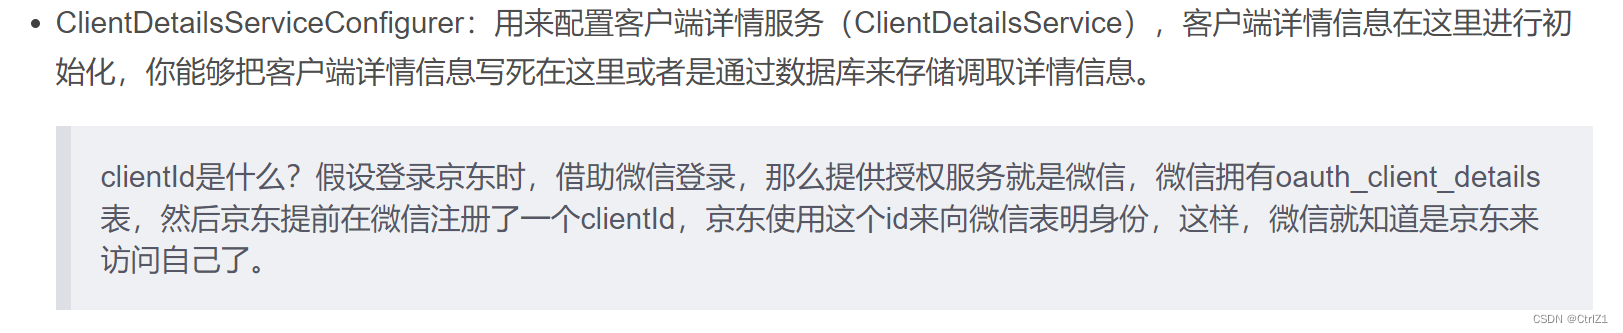
3.1.6、创建客户端信息获取service
-
所谓客户端:
我们可以这么理解:普通用户想访问B站的VIP资源,客户端就是这个普通用户。首先通过认证模块,检验该用户是否登录,登录后进行鉴权,判断是否有获取VIP资源的权力。 -
再举个例子加深对客户端的理解:
-
看了好多博客的实现都是把客户端信息保存在内存里,比如下面的代码:

-
然而,关于认证客户端相关信息均存储在内存中,服务一旦重启,即随即丢失,非常不利于维护。在实际项目中,势必要持久化存储。
-
这里要感谢https://blog.csdn.net/liuminglei1987/article/details/104363638
提供的四种方法,这里采用第3种,因为后面的配置还需要一个ClientDetailsService类型的bean。代码会在后面给出,因为这段代码在后面的配置文件中。

这里就会从数据库去判断用户是否有权限访问资源了。对应的需要在数据库建立对应的表,不然security怎么拿到用户的权限等信息呢,其实就是把上面的内存中的客户端配置改成字段的形式保存在数据库。官方的github里也提供了数据库建表的语句:https://github.com/spring-attic/spring-security-oauth/blob/main/spring-security-oauth2/src/test/resources/schema.sql -
如果你不建表那就会报错:

-
这肯定不是自动建表的哈,因为客户端只有咱们自己知道。所以下面建表:
# client 相关信息
create table oauth_client_details
(
    client_id               VARCHAR(256) PRIMARY KEY comment '必填,Oauth2 client_id',
    resource_ids            VARCHAR(256) comment '可选,资源id集合,多个资源用英文逗号隔开',
    client_secret           VARCHAR(256) comment '必填,Oauth2 client_secret',
    scope                   VARCHAR(256) comment '必填,Oauth2 权限范围,比如 read,write等可自定义',
    authorized_grant_types  VARCHAR(256) comment '必填,Oauth2 授权类型,支持类型:authorization_code,password,refresh_token,implicit,client_credentials,多个用英文逗号隔开',
    web_server_redirect_uri VARCHAR(256) comment '可选,客户端的重定向URI,当grant_type为authorization_code或implicit时,此字段是需要的',
    authorities             VARCHAR(256) comment '可选,指定客户端所拥有的Spring Security的权限值',
    access_token_validity   INTEGER comment '可选,access_token的有效时间值(单位:秒),不填写框架(类refreshTokenValiditySeconds)默认12小时',
    refresh_token_validity  INTEGER comment '可选,refresh_token的有效时间值(单位:秒),不填写框架(类refreshTokenValiditySeconds)默认30天',
    additional_information  VARCHAR(4096) comment '预留字段,格式必须是json',
    autoapprove             VARCHAR(256) comment '该字段适用于grant_type="authorization_code"的情况下,用户是否自动approve操作'
);
- 1
- 2
- 3
- 4
- 5
- 6
- 7
- 8
- 9
- 10
- 11
- 12
- 13
- 14
- 15
3.1.7、添加授权服务相关配置AuthorizationServerConfig
这里配置了如下内容:
- 设置oauth客户端 获取信息来源 clientDetailsService
- 设置默认的token存储方式(后面改成redis存储)
- 添加token增强器(在token中添加用户信息)
- 添加token 加密方式
下面是简单版配置,没有配置token增强和加密,先跑通。
package com.lyy.yingwudemo.yingwu_auth.config;

import org.springframework.beans.factory.annotation.Autowired;
import org.springframework.context.annotation.Bean;
import org.springframework.context.annotation.Configuration;
import org.springframework.http.HttpMethod;
import org.springframework.security.authentication.AuthenticationManager;
import org.springframework.security.crypto.bcrypt.BCryptPasswordEncoder;
import org.springframework.security.crypto.password.PasswordEncoder;
import org.springframework.security.oauth2.config.annotation.builders.JdbcClientDetailsServiceBuilder;
import org.springframework.security.oauth2.config.annotation- 1
- 2
- 3
- 4
- 5
- 6
- 7
- 8
- 9
- 10

