
热门标签
热门文章
- 1hdfs学习笔记
- 2Android应用程序开发以及背后的设计思想深度剖析_android app 设计思想
- 3从SQL质量管理体系来看SQL审核(4)- 如何设计一个优秀的SQL审核引擎
- 4基于python爬虫的个性化书籍推荐系统毕业设计开题报告_个性化推荐国外研究现状
- 5性能猛兽:OrangePi Kunpeng Pro评测!_orangepi aipro kunpeng pro
- 6Unity的三种截取屏幕方式_unity 获取 整个虚拟机的屏幕
- 7Java中的数据结构:选择与优化
- 8Hadoop技术在协同过滤就业推荐系统中的应用及推荐原理解析_基于用户协同过滤算法是在哪计算的hadoop
- 9Kafka的数据存储_kafka数据存储在哪里
- 10OAuth2的入门理解和案例解析_解析oauth2中的信息
当前位置: article > 正文
微信小程序 之 mpvue
作者:知新_RL | 2024-07-03 10:17:45
赞
踩
mpvue

一、mpvue ( Vue in Mini Program )
- mpvue.com
- 美团工程师推出的基于Vue封装的用于开发小程序的框架
- 融合了原生小程序和Vue的特点
- 组件化开发
二、初始化项目
1. 检查node和npm版本
node -v && npm -v
2. 安装vue-cli脚手架
npm install vue-cli -g3. 创建mpvue项目
- vue init mpvue/mpvue-quickstart 项目名
- // 接下来可一路回车,后续可在project.config.json中进行配置
4. 进入改项目目录中,安装依赖
npm install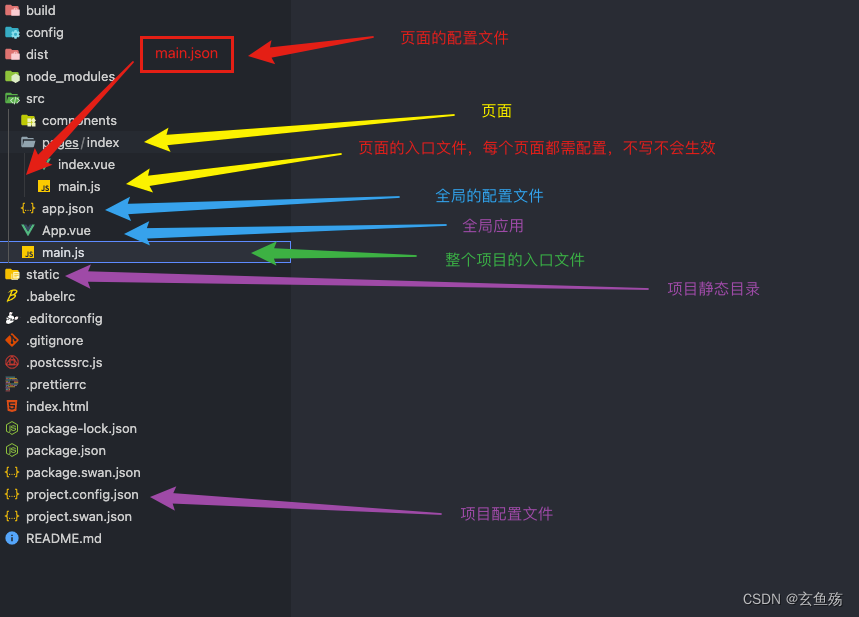
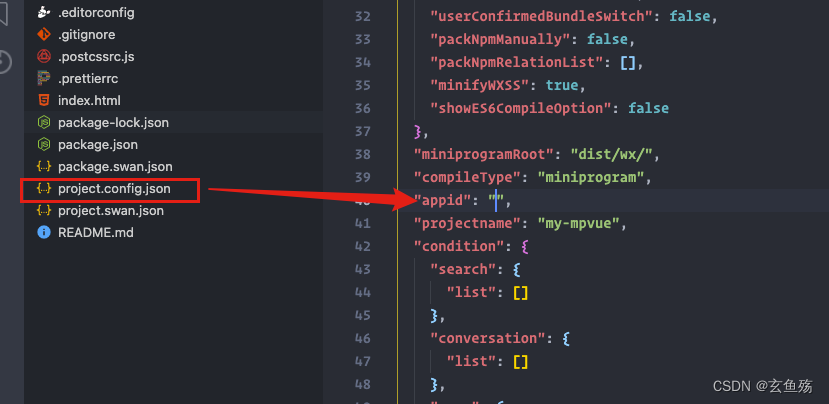
5. 在 project.config.json 配置 appid
appid : 在微信公众平台注册一个后,即可拥有
6. 执行,生成dist文件夹
npm run dev因为这里是开发小程序,所以执行后并不会打开浏览器,因为没必要~,生成的dist文件夹才是我们所需要的
7. 下载微信开发者工具
稳定版 Stable Build 更新日志 | 微信开放文档
8. 微信开发者工具打开改项目 ( 打开dist文件夹即可 )
9. 即可看到效果
三、mpvue中基本功能的使用
01. 全局配置文件 => app.json小程序配置 | 微信开放文档
02. 单个页面配置文件 => main.json
注 :单个页面的配置会覆盖全局配置

03. 单个页面挂载文件 => main.js
注 :在每个页面中都需要使用, 组件实例.$mount() 去挂载当前组件,否则对应的页面不能生效
但是,如果只是组件,那么可不写,直接引用,然后component注册即可使用
- // 导入vue
- import Vue from 'vue'
- // 导入组件
- import Index from './index.vue'
- // 生成一个vue实例
- const index = new Vue(Index)
- // 挂载到元素
- index.$mount()
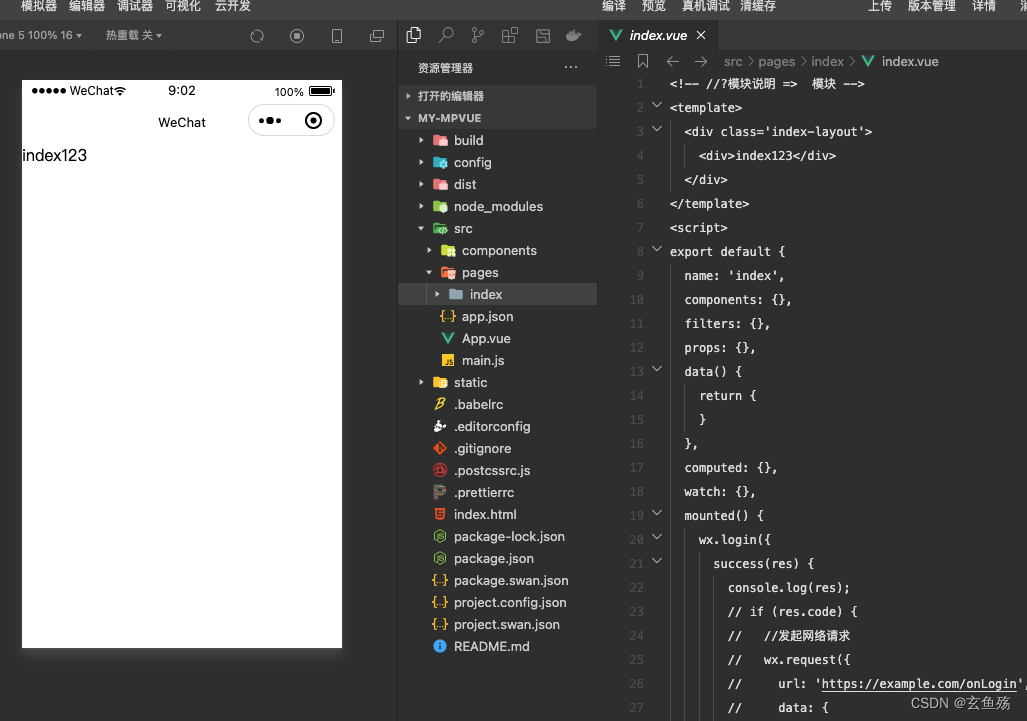
04. 页面的样式
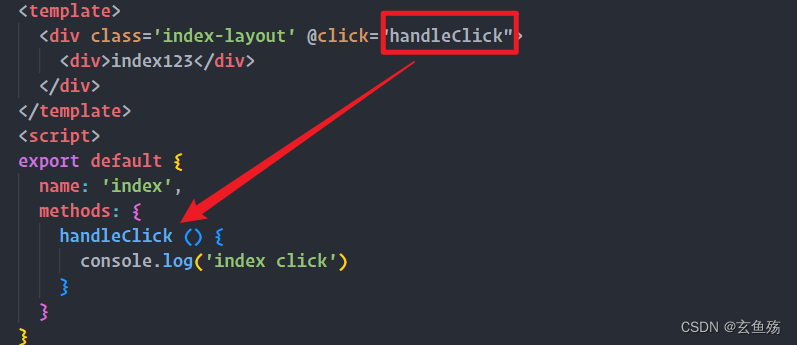
- <!-- //?模块说明 => 首页模块 -->
- <template>
- <div class='index-layout'>
- <div>index123</div>
- </div>
- </template>
- <script>
- export default {
- name: 'index'
- }
- </script>
- <style>
- /*
- 如果要设置整个页面样式(例如高度),需要在page中设置
- 每个页面都有一个page包裹着,相当于<page></page>
- */
- page {
- height: 100%;
- text-align: center;
- }
- /* 单纯设置这个是不会生效的 */
- .index-layout {
- height: 100%;
- background-color: #07c160;
- }
- </style>

05. 绑定方法 => 和vue中一样
06. 生命周期
除了 Vue 本身的生命周期外,mpvue 还兼容了小程序生命周期,这部分生命周期钩子的来源于微信小程序的 Page, 除特殊情况外,不建议使用小程序的生命周期钩子。
四、mpvue中进阶功能的使用
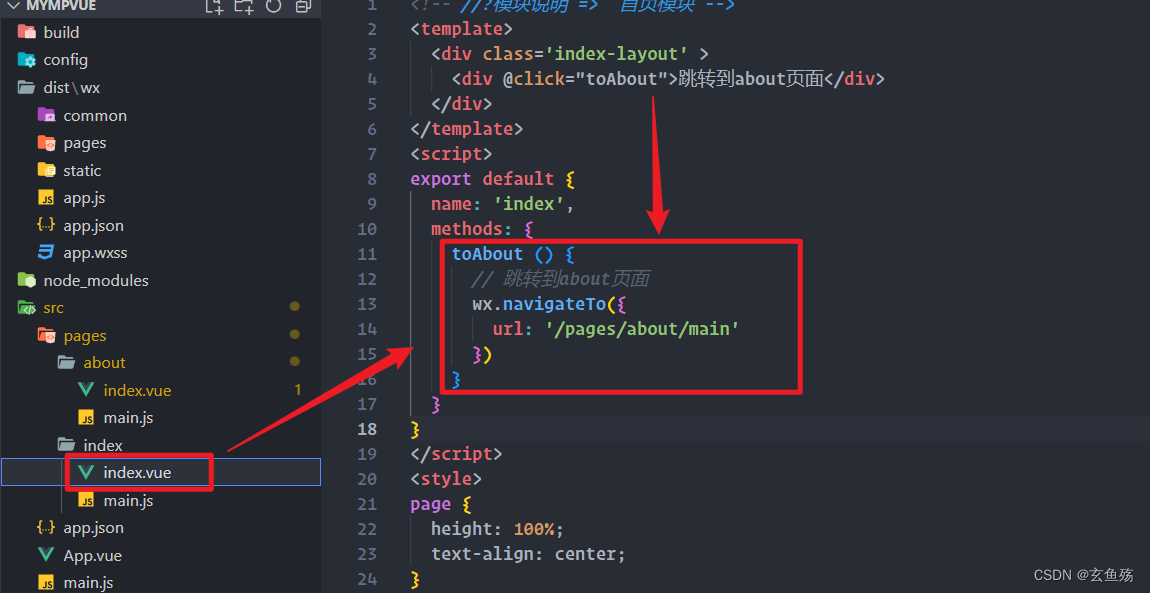
01. 页面跳转
1 - 创建about组件,配置挂载组件main.js
2 - 在app.json中配置该页面
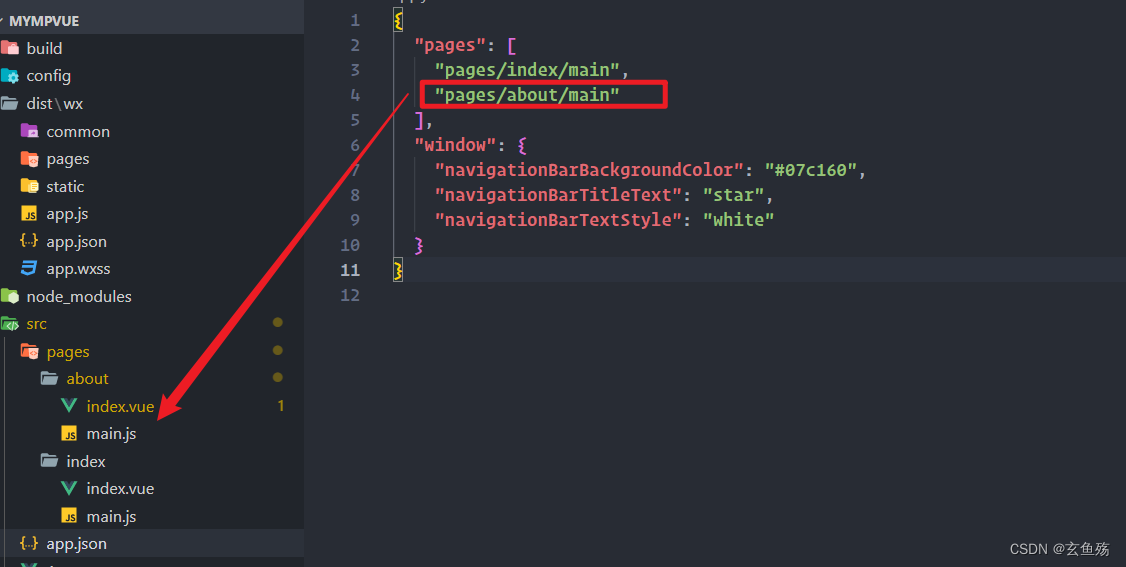
3 - 用 wx.navigateTo 跳转wx.navigateTo(Object object) | 微信开放文档
在mpvue中对vue-router的支持不好,问题较多,页面跳转的是可使用小程序提供的API
- wx.navigateTo() 保留当前页面,可回退
- wx.redirectTo() 不保留,不能回退
- wx.switchTab() 使用于tabBar页面
4 - 删除dist文件夹,重新执行 npm run dev
注 : 如果是新建的页面,那么需要重新打包,否则会报错且不会生效
5 - 传递过程如果有参数传递
传递
- let data = {id : 1, name : '张三'}
- // id 和 data 即为传递的参数
- wx.navigateTo({
- url: '/pages/about/main?id='+data.id+'&data=' + JSON.stringify(data)
- })
接收
- mounted(){
- console.log(this.$mp.query.id,JSON.parse(this.$mp.query.data));
- }
02. 使用vuex
1. 下载vuex并在根目录中创建store文件夹
npm i vuex2. 在store文件夹下创建index.js
- import Vue from 'vue'
- import Vuex from 'vuex'
-
- import state from './state.js'
- import mutations from './mutations.js'
- import actions from './actions.js'
- import getters from './getters.js'
-
- Vue.use(Vuex)
-
- const store = new Vuex.Store({
- state,
- mutations,
- actions,
- getters
- })
-
- export default store
3. 在store文件夹下创建state.js
- export default {
- // 初始化状态
- initName: 'star',
- initList: []
- }
4. 在store文件夹下创建actions.js
- export default {
- getList({
- commit
- }) {
- return new Promise((resolve, reject) => {
- // axios.get('/api/list').then(res => {
- // commit('setList', res.data);
- // resolve(res.data);
- // }).catch(err => {
- // reject(err);
- // })
- let bool = true
- let data = [{
- name: '张三',
- age: 18,
- }]
- if (bool) {
- commit('SET_LIST', data)
- resolve(data);
- }else{
- reject('error');
- }
- });
- }
- }
5. 在store文件夹下创建mutations.js
- export default{
- // 获取列表数据
- SET_LIST(state, value) {
- // 赋值给state中的initList
- state.initList = value
- }
- }
6. 在store文件夹下创建getters.js
- export default {
- // 拿到state中的initName数据
- getInitName: state => state.initName,
- }
7. 在入口文件main.js中导入
- import Vue from 'vue'
- import App from './App'
-
- import store from './store/index.js'
- // 将store挂载到Vue实例上,这样所有组件都可以使用store
- Vue.prototype.$store = store
-
- Vue.config.productionTip = false
- App.mpType = 'app'
-
- const app = new Vue(App)
- app.$mount()
8. 在组件中使用vuex
- <!-- //?模块说明 => 首页模块 -->
- <template>
- <div class='index-layout' >
- <div @click="toAbout">跳转到about页面</div>
- </div>
- </template>
- <script>
- import {mapState, mapGetters,mapMutations,mapActions } from 'vuex'
- export default {
- name: 'index',
- computed:{
- // 使用mapGetters的getInitName方法获取初始化的initName值
- ...mapGetters(['getInitName']),
- // 使用mapState拿到initName的值
- ...mapState({
- initName: state => state.initName,
- initList: state => state.initList
- })
- },
- methods: {
- // 拿到mutations中定义的GET_LIST方法
- ...mapMutations(['SET_LIST']),
- // 拿到actions中定义的getList方法
- ...mapActions(['getList']),
- },
- mounted(){
- // 获取数据
- console.log(this.initName); //star
- console.log(this.getInitName); //star
-
- // 使用actions中定义的getList方法请求,获取数据
- // 相当于 this.$store.dispatch('getList');
- this.getList()
-
- console.log(this.initList); //{ name: '张三', age: 18}
-
- // 使用mutations中定义的SET_LIST方法设置数据
- // 相当于 this.$store.commit('SET_LIST', { name: '李四', age: 20 })
- this.SET_LIST({
- name: '李四',
- age: 20
- })
- console.log(this.initList); //{ name: '李四', age: 20}
- }
- }
- </script>
- <style>
- page {
- height: 100%;
- text-align: center;
- }
- .index-layout {
- height: 100%;
- background-color: #07c160;
- }
- </style>
03. 使用本地存储
- // 需要存储的内容。只支持原生类型、Date、及能够通过JSON.stringify序列化的对象。
- wx.setStorageSync('key', 'value')
- // 获取
- wx.getStorageSync('key')
04. 微信提示
- wx.showToast({
- title: '请求失败,请检查网络',
- icon: 'none'
- });
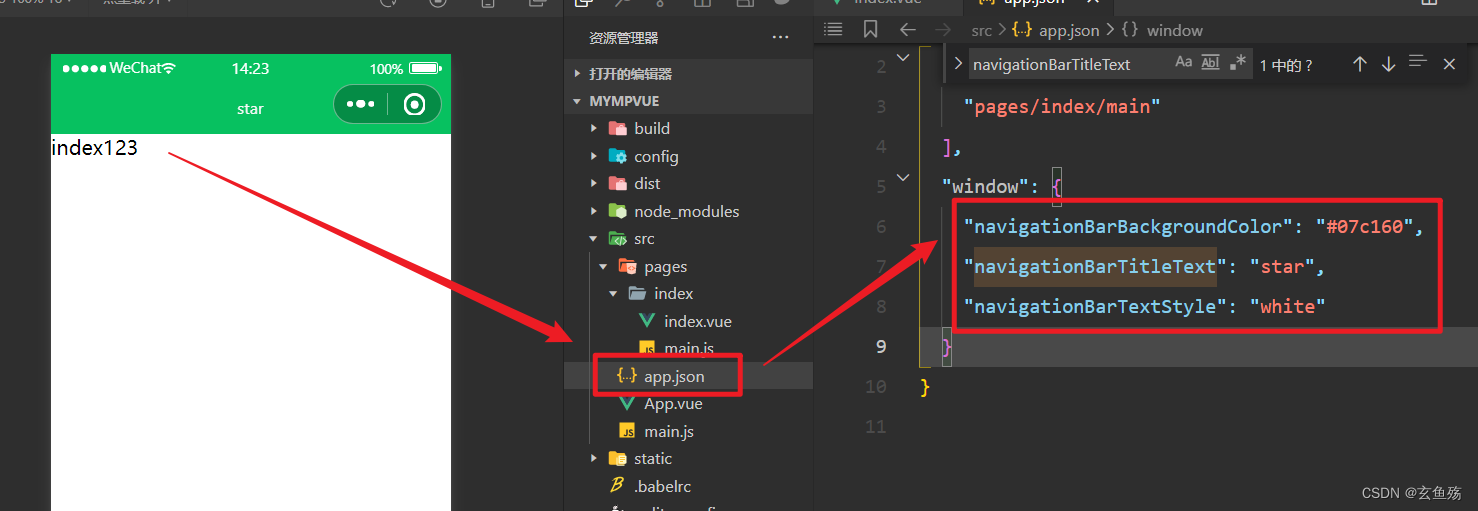
05. 设置小程序title
1. 调用方法
- wx.setNavigationBarTitle({
- title: '哈哈哈'
- });
2. 在main.json中
- {
- "navigationBarTitleText": "哈哈哈"
- }
06. 分享页面 wx.showActionSheet(Object object) | 微信开放文档
- share() {
- wx.showActionSheet({
- itemList: ['A', 'B', 'C'],
- success(res) {
- console.log(res.tapIndex)
- },
- fail(res) {
- console.log(res.errMsg)
- }
- })
- }
三、开始开发项目微信开放文档
1. 获取用户信息
wx.getUserProfile(Object object) | 微信开放文档
01 - 使用wx.getUserProfile
- <template>
- <div class='index-layout'>
- <div>index123</div>
- <button @click="getUserProfile"> 获取头像昵称 </button>
- </div>
- </template>
- <script>
- export default {
- name: 'index',
- mounted() {
- wx.login({
- success(res) {
- if (res.code) {
- //发起网络请求,把code传递给后端
- // wx.request({
- // url: 'https://example.com/onLogin',
- // data: {
- // code: res.code
- // }
- // })
- } else {
- console.log('登录失败!' + res.errMsg)
- }
- }
- })
- },
- methods: {
- getUserProfile(e) {
- // 推荐使用 wx.getUserProfile 获取用户信息,开发者每次通过该接口获取用户个人信息均需用户确认
- // 开发者妥善保管用户快速填写的头像昵称,避免重复弹窗
- wx.getUserProfile({
- desc: '用于完善会员资料', // 声明获取用户个人信息后的用途,后续会展示在弹窗中,请谨慎填写
- // 点击允许
- success: (res) => {
- console.log('success',res);
- },
- // 点击拒绝
- fail: (err) => {
- console.log('fail',err);
- }
- })
- },
- }
- }
- </script>
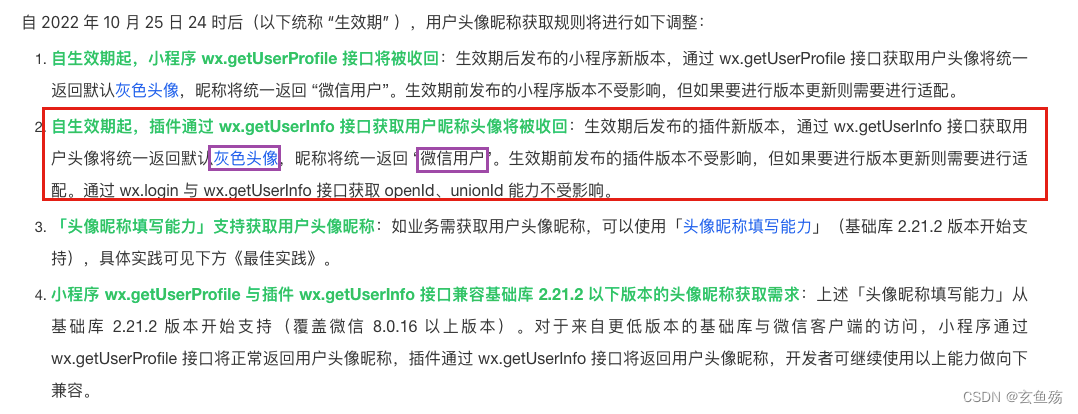
注 : 现在已经不建议使用 wx.getUserProfile 或 wx.getUserInfo
02 - 通过 wx.login 获取code wx.login(Object object) | 微信开放文档
- mounted() {
- wx.login({
- success(res) {
- if (res.code) {
- //发起网络请求,把code传递给后端
- wx.request({
- url: 'https://example.com/onLogin',
- data: {
- code: res.code
- }
- wx.setStorageSync('OPEN_ID', res.openId);
- wx.setStorageSync('UNION_ID', res.unionId);
- wx.getStorageSync('OPEN_ID')
- })
- } else {
- wx.showToast({
- title: '请求失败,请检查网络',
- icon: 'none'
- });
- // 设置顶部title
- wx.setNavigationBarTitle({
- title: '冲啊冲啊冲啊'
- });
- }
- }
- })
- },

03 - 获取用户手机号 获取手机号 | 微信开放文档
- <template>
- <button open-type="getPhoneNumber" @getphonenumber="getPhoneNumber">
- 获取手机号
- </button>
- </template>
-
- <script>
- export default {
- name: 'index',
- methods: {
- getPhoneNumber(e) {
- // 如果点击了拒绝
- if (e.target.errMsg !== 'getPhoneNumber:ok'){
- return wx.showToast({
- title:'用户未同意授权手机号',
- icon:'none'
- })
- }
- // 如果点击确认
- cosnt { code, encryptedData, iv } = e.target
- // 把数据传给后端,后端会去解密拿到手机号的
- wx.request({
- url: 'https://example.com/onLogin',
- data: {
- appId: '',
- openId: '',
- code,
- encryptedData,
- iv
- },
- method: "post",
- success: function (res) {
- console.log(res);
- }
- })
- }
- }
- };
- </script>

2. 轮播图
代码
- <!-- HTML代码 -->
- <swiper class="nav"
- :circular="swiperOption.circular"
- :autoplay="swiperOption.autoplay"
- :interval="swiperOption.interval"
- :duration="swiperOption.duration"
- :display-multiple-items="swiperOption.displayItems">
- <swiper-item
- class="item"
- v-for="(item,index) in smallIconList"
- :key="index"
- catchtouchmove='catchTouchMove'>
- <img class="img" :src="item">
- </swiper-item>
- </swiper>
-
- <JS代码>
- <script>
- export default{
- data(){
- return{
- // 轮播图片
- smallIconList:[
- 'https://pic2.zhimg.com/v2-e6f99e63f4bcc0ae5d4d717553c5e511_r.jpg',
- 'https://n.sinaimg.cn/sinakd10116/760/w640h920/20200808/555d-ixkvvue2643771.jpg'
- ],
- // 轮播参数
- swiperOption: {
- autoplay: true, // 自动轮播
- circular: true, // 无缝连接轮博
- interval: 3000, // 多久切换一次
- duration: 1000, // 展示多久
- //displayItems: 3, // 同时展示多少个
- vertical: true, // 是否纵向
-
- }
- }
- },
- methods:{
- // 禁止用户滑动
- catchTouchMove(res){
- return false
- }
- }
- }
- </script>
3. 分享给好友
01 - html
- <button
- open-type="share"
- class="btn">
- 分享
- </button>
02 - js
- export default {
- components: {},
- data() {
- return {}
- },
- computed: {},
- onShow() {},
- // 转发参数
- // 注 : 和 methods 处在同一层次
- onShareAppMessage() {
- const params = {
- name: 'coder',
- age: 18
- }
- // 分享参数
- let str = ''
- for (const key in params) {
- str += `${key}=${params[key]}&`
- }
- str = str.substring(0, str.length - 1)
- return {
- title: '分享的title',
- path: '当前的页面路径 => pages/home/text/main?' + str
- }
- },
- methods: {}
- }
4. 获取当前页面路径及参数
- export default {
- components: {},
- data() {
- return {
- currentUrl: ''
- }
- },
- computed: {},
- // 和 mounted 差不多
- onShow() {
- this.currentUrl = this.getCurrentPageUrlWithArgs()
- },
- onShareAppMessage() { },
- methods: {
- // 获取当前页面url
- getCurrentPageUrlWithArgs() {
- const pages = getCurrentPages() // 获取加载的页面
- const currentPage = pages[pages.length - 1] // 获取当前页面的对象
- const url = currentPage.route // 当前页面url
- const options = currentPage.options // 如果要获取url中所带的参数可以查看options
- // 这里直接返回的话,返回的就是存路径
- // return url
- // 拼接url的参数
- let urlWithArgs = url + '?'
- for (let key in options) {
- urlWithArgs += `${key}=${options[key]}&`
- }
- urlWithArgs = urlWithArgs.substring(0, urlWithArgs.length - 1)
- return urlWithArgs
- },
- }
- }
5. 长按图片进行扫码
show-menu-by-longpress => 加上这个属性即可
- <image class="code-img"
- src="http://www.baidu.com"
- show-menu-by-longpress>
- </image>
四、mpvue开发中遇到的坑!
1. 图片
01 - 不要在根元素上加背景图片
代码
- <!-- 提示 -->
- <!-- 在 main.js 中设置 Vue.prototype.$imageRootPath = '/static/images/' -->
-
- <template>
- <div class='topModule-layout' :style="{'background-image':'url('+bgimg+')'}">
- <img class="top-title-img" :src='topTitleImg' />
- </div>
- </template>
- <script>
- export default {
- name: 'topModule',
- data() {
- return {
- bgimg: this.$imageRootPath + 'fansWelfare/top-bgimg.png',
- topTitleImg: this.$imageRootPath + 'fansWelfare/top-title.png'
- };
- }
- };
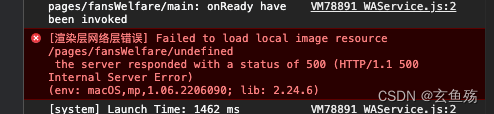
结果
02 - 线上背景图片不生效
代码
- <!-- 本地生效,线上不生效 -->
- <div @click="iconRun"
- class="buttom-bg"
- :class="{'no-buttom':showNotAllow}"
- :style="{'background-image':'url('+bgImg+')'}" />
-
- <!-- 使用img标签 -->
- <div @click="iconRun"
- class="buttom-bg"
- :class="{'no-buttom':showNotAllow}">
- <img :src="bgImg">
- </div>
2. swiper高度
01 - 直接设置css
- .swiper-info-layout{
- height: 748rpx;
- /*这个是swiper组件*/
- .swiper{
- height: 100%;
- margin: rem(15) rem(23) 0;
- }
- }
02 - 动态修改
html
- <template>
- <div class="swiper-info-layout">
- <swiper
- class="swiper"
- circular
- autoplay
- :interval="3000"
- :duration="500"
- :style="{height: swiperHeight }">
- <swiper-item
- v-for="(item, index) in swiperData"
- :key="index">
- <s-item :data-obj="item"></s-item>
- </swiper-item>
- </swiper>
- </div>
- </template>
js
- data() {
- return {
- swiperHeight: '0'
- }
- },
- mounted() {
- this.getEleHeight()
- },
- methods: {
- // 获取元素高度
- getEleHeight() {
- // 这里要延迟,不然获取不到
- setTimeout(() => {
- const query = wx.createSelectorQuery()
- // 通过类名获取元素,这里获取的是子组件的类名,方便设置
- query.select('.swiper-item-layout').boundingClientRect()
- query.exec((res) => {
- const winWid = wx.getSystemInfoSync().windowWidth // 获取当前屏幕的宽度
- const height = res[0].height // 获取组件高度
- const width = res[0].width // 获取组件宽度
- const swiperHeight = height / width * winWid + 'px' // 计算组件高度
- this.swiperHeight = swiperHeight // 设置组件高度
- })
- }, 100)
- }
- }
五、增加埋点 应用管理 - 帮助文档
1. 进入项目管理

2. 添加应用

3. 创建应用

4. SDK集成
5. 代码示例
main.js
- const gio = require('./utils/gio-minp/index.js').default
- // 每次发版需要修改version的值
- gio('init', '89d4e90ad33f3f2a', 'wx9107cfc9cb6414c5', {
- version: '1.0',
- vue: Vue
- })
- // 挂载全局gio
- Vue.prototype.$gio = gio
页面中监听
- <template>
- <div class="container"></div>
- </template>
-
- <script>
-
- export default {
- onShow() {
- // 埋点
- this.setGioPage()
- },
- onShareAppMessage() {
- return {
- title: this.title,
- path: `pages/xxx`
- }
- },
- methods: {
- setGioPage() {
- this.$gio('setPage', {
- pageName: `pages/account/subscribes/main?appointmentId=${this.appointmentId}`,
- title: this.title,
- source: 'xxx'
- })
- }
- }
- }
- </script>
声明:本文内容由网友自发贡献,不代表【wpsshop博客】立场,版权归原作者所有,本站不承担相应法律责任。如您发现有侵权的内容,请联系我们。转载请注明出处:https://www.wpsshop.cn/w/知新_RL/article/detail/782782
推荐阅读

相关标签

