
热门标签
热门文章
- 1OSI模型在网络通信中是怎样被应用的
- 2【系统架构师】-案例篇(十五)SOA、微服务与数据库_soa和微服务
- 3基于snownlp及朴素贝叶斯的情感分析——以大众点评网评论为例_snownlp情感分析基于朴素贝叶斯
- 4git报错:refusing to merge unrelated histories
- 5如何将Web主页性能提升十倍以上?
- 6详解DDR3原理以及使用Xilinx MIG IP核(app 接口)实现DDR3读写测试
- 7基于Next14+Auth5实现Github、Google、Gitee平台授权登录和邮箱密码登录_githubnextauth
- 8Python爬虫使用selenium爬取qq群的成员信息(全自动实现自动登陆)(1)
- 9Leetcode 1137. 第 N 个泰波那契数_给你整数 n,请返回第 n 个泰波那契数 tn 的值。(3分)题目内容:泰波那契序列 tn 定
- 10嵌入式截屏工具-gsnap移植 arm平台
当前位置: article > 正文
# Kafka_深入探秘者(4):kafka 主题 topic_kafka主题
作者:盐析白兔 | 2024-08-04 01:52:01
赞
踩
kafka主题
Kafka_深入探秘者(4):kafka 主题 topic
一、kafka 主题管理
1、kafka 创建主题 topic 命令
1)命令:
# 切换到 kafka 安装目录
cd /usr/local/kafka/kafka_2.12-2.8.0/

# 创建一个名为 heima 的 主题
bin/kafka-topics.sh --zookeeper localhost:2181 --create --topic heima --partitions 2 --replication-factor 1

# 或者把 localhost 换成 填写你的 虚拟机 IP 地址(如:172.18.30.110):
bin/kafka-topics.sh --zookeeper 172.18.30.110:2181 --create --topic heima --partitions 2 --replication-factor 1
- 1
- 2
- 3
- 4
- 5
- 6
- 7
- 8
- 9
2)命令 参数说明:
–zookeeper :指定了 kafka 所连接的 zookeeper 服务地址。zookeeper必传参数,多个zookeeper用’,"分开。
–topic : 指定了所要创建主题的名称
–partitions : 指定了分区个数,每个线程处理一个分区数据。
–replication-factor : 指定了副本因子,用于设置主题副本数,每个副本分布在不通节点,不能超过总结点数。如你只有一个节点,但是创建时指定副本数为2,就会报错
–create : 创建主题的动作指令。
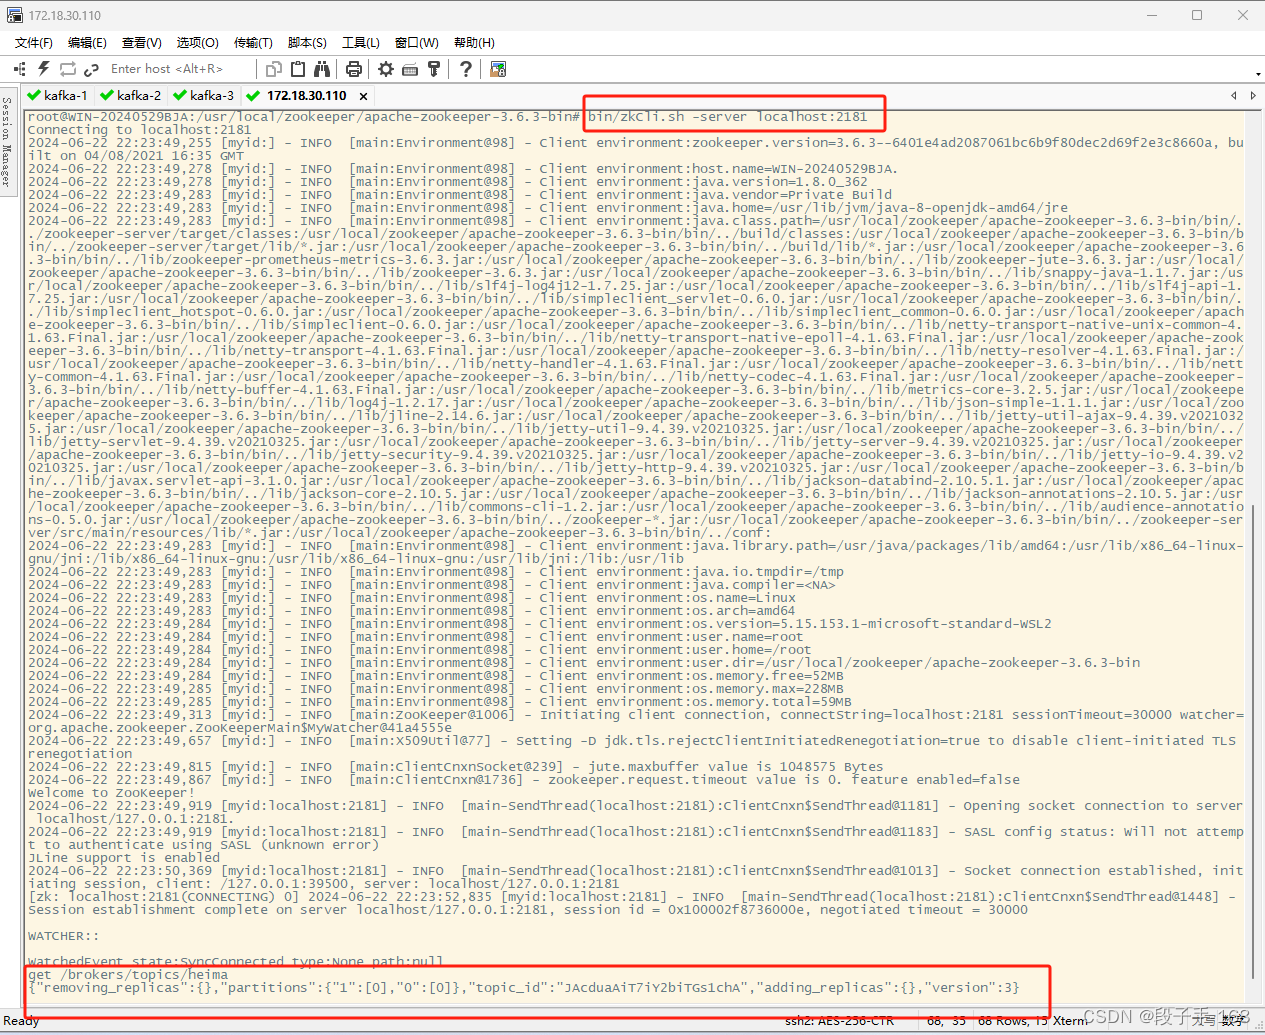
2、查看 topic 元数据信细的方法:
topic 元数据信息保存在 Zookeeper 节点中,
# 切换到 zookeeper 安装目录
cd /usr/local/zookeeper/apache-zookeeper-3.6.3-bin

# 连接 zookeeper 查看元数据
bin/zkCli.sh -server localhost:2181

# 查看 节点 信息:
get /brokers/topics/heima
- 1
- 2
- 3
- 4
- 5
- 6
- 7
- 8
- 9
- 10
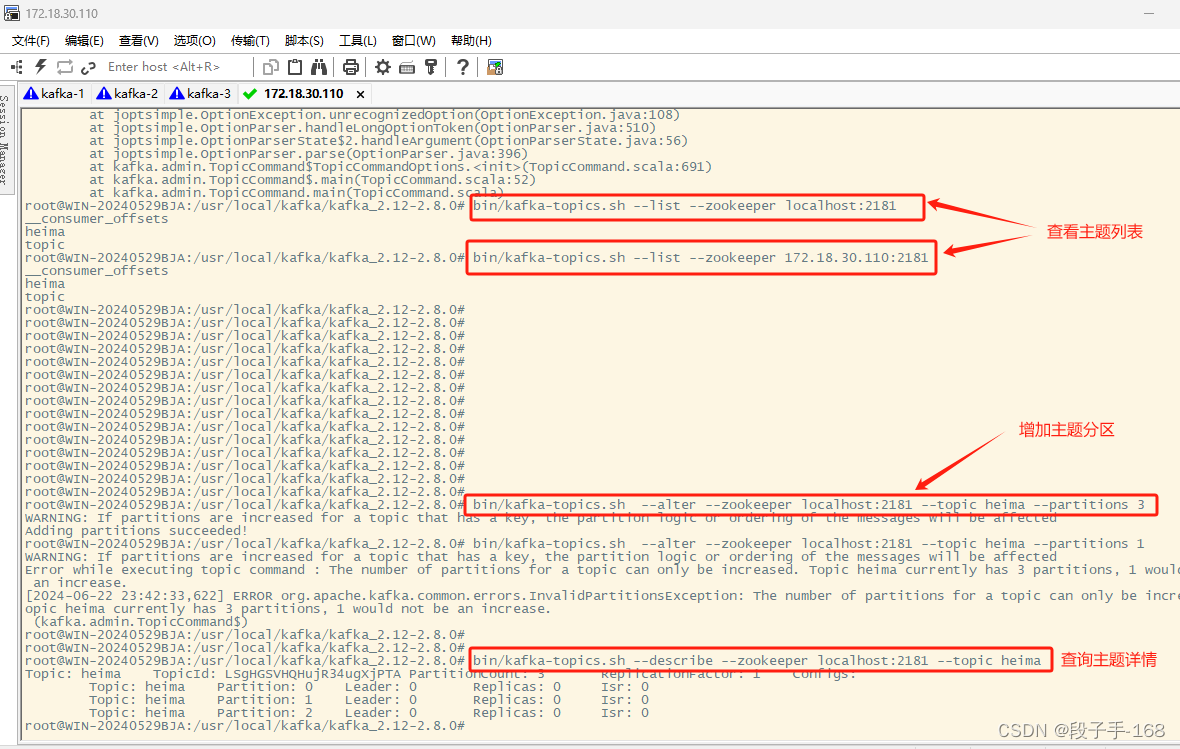
3、展示出当前所有主题
# 切换目录
cd /usr/local/kafka/kafka_2.12-2.8.0/

# 展示出当前所有主题
bin/kafka-topics.sh --list --zookeeper localhost:2181

# 或者把 localhost 换成 填写你的 虚拟机 IP 地址(如:172.18.30.110):
bin/kafka-topics.sh --list --zookeeper 172.18.30.110:2181
- 1
- 2
- 3
- 4
- 5
- 6
- 7
- 8
- 9
- 10
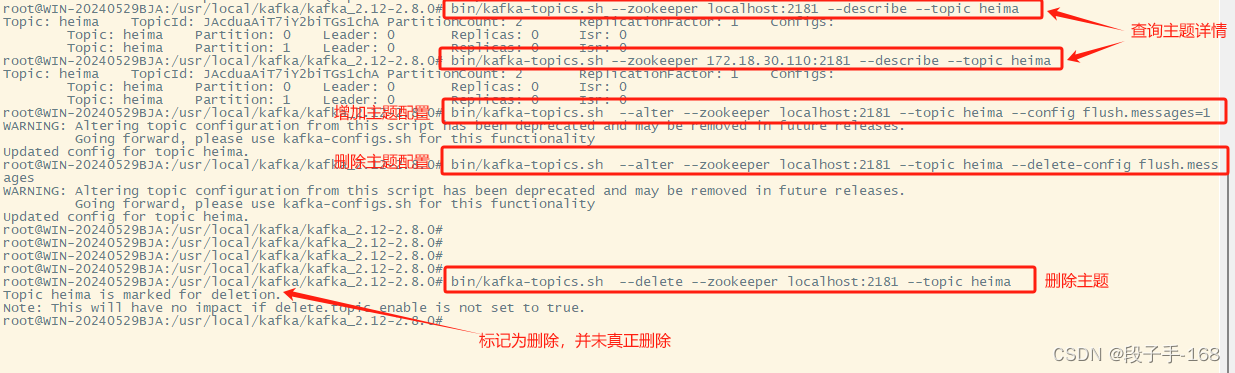
4、 查看主题详情:
# 切换目录
cd /usr/local/kafka/kafka_2.12-2.8.0/

# 查看主题详情
bin/kafka-topics.sh --zookeeper localhost:2181 --describe --topic heima

# 或者把 localhost 换成 填写你的 虚拟机 IP 地址(如:172.18.30.110):
bin/kafka-topics.sh --zookeeper 172.18.30.110:2181 --describe --topic heima
- 1
- 2
- 3
- 4
- 5
- 6
- 7
- 8
- 9
5、 修改 主题 topic 配置(增加配置)
# 切换到 kafka 安装目录
cd /usr/local/kafka/kafka_2.12-2.8.0/

# 修改 主题 topic 配置(增加配置)
bin/kafka-topics.sh  --alter --zookeeper localhost:2181 --topic heima --config flush.messages=1

# 或者把 localhost 换成 填写你的 虚拟机 IP 地址(如:172.18.30.110):
bin/kafka-topics.sh  --alter --zookeeper 172.18.30.110:2181 --topic heima --config flush.messages=1
- 1
- 2
- 3
- 4
- 5
- 6
- 7
- 8
- 9
6、 删除 主题 topic 配置 flush.messages=1
# 切换到 kafka 安装目录
cd /usr/local/kafka/kafka_2.12-2.8.0/

# 删除 主题 topic 配置 flush.messages=1
bin/kafka-topics.sh  --alter --zookeeper localhost:2181 --topic heima --delete-config flush.messages

# 或者把 localhost 换成 填写你的 虚拟机 IP 地址(如:172.18.30.110):
bin/kafka-topics.sh  --alter --zookeeper 172.18.30.110:2181 --topic heima --delete-config flush.messages
- 1
- 2
- 3
- 4
- 5
- 6
- 7
- 8
- 9
7、 删除 topic 主题
若 delete.topic.enable=true 直接彻底删除该 Topic 主题。
若 delete.topic.enable=false
如果当前 Topic 没有使用过,即没有传输过信息:可以彻底删除。
如果当前 Topic 有使用过,即有过传输过信息:并没有真正删除 Topic,只是把这个 Topic 标记为删除(marked fordeletion),重启 Kafka Server 后删除。
# 切换到 kafka 安装目录
cd /usr/local/kafka/kafka_2.12-2.8.0/

# 删除 topic 主题名为 heima 的主题
bin/kafka-topics.sh  --delete --zookeeper localhost:2181 --topic heima

# 或者把 localhost 换成 填写你的 虚拟机 IP 地址(如:172.18.30.110):
bin/kafka-topics.sh  --delete --zookeeper 172.18.30.110:2181 --topic heima
- 1
- 2
- 3
- 4
- 5
- 6
- 7
- 8
- 9
二、kafka 分区
1、kafka 增加分区
# 切换到 kafka 安装目录
cd /usr/local/kafka/kafka_2.12-2.8.0/

# 增加 topic 主题名为 heima 的主题的 分区为 3 个
bin/kafka-topics.sh  --alter --zookeeper localhost:2181 --topic heima --partitions 3

# 或者把 localhost 换成 填写你的 虚拟机 IP 地址(如:172.18.30.110):
bin/kafka-topics.sh  --alter --zookeeper 172.18.30.110:2181 --topic heima --partitions 3

# 查看 heima 主题详情:
bin/kafka-topics.sh --describe --zookeeper localhost:2181 --topic heima

# 或者把 localhost 换成 填写你的 虚拟机 IP 地址(如:172.18.30.110):
bin/kafka-topics.sh --describe --zookeeper 172.18.30.110:2181 --topic heima
- 1
- 2
- 3
- 4
- 5
- 6
- 7
- 8
- 9
- 10
- 11
- 12
- 13
- 14
- 15
2、其他主题参数配置
见官方文档: http://kafka.apache.org/documentation/#topicconfigs
bin/kafka-topics.sh --bootstrap-server localhost:9092 --create --topic my-topic --partitions 1 \
  --replication-factor 1 --config max.message.bytes=64000 --config flush.messages=1


bin/kafka-configs.sh --bootstrap-server localhost:9092 --entity-type topics --entity-name my-topic
  --alter --add-config max.message.bytes=128000


bin/kafka-configs.sh --bootstrap-server localhost:9092 --entity-type topics --entity-name my-topic --describe


bin/kafka-configs.sh --bootstrap-server localhost:9092  --entity-type topics --entity-name my-topic
  --alter --delete-config max.message.bytes
- 1
- 2
- 3
- 4
- 5
- 6
- 7
- 8
- 9
- 10
- 11
- 12
- 13
- 14
三、kafka 主题 topic 总结
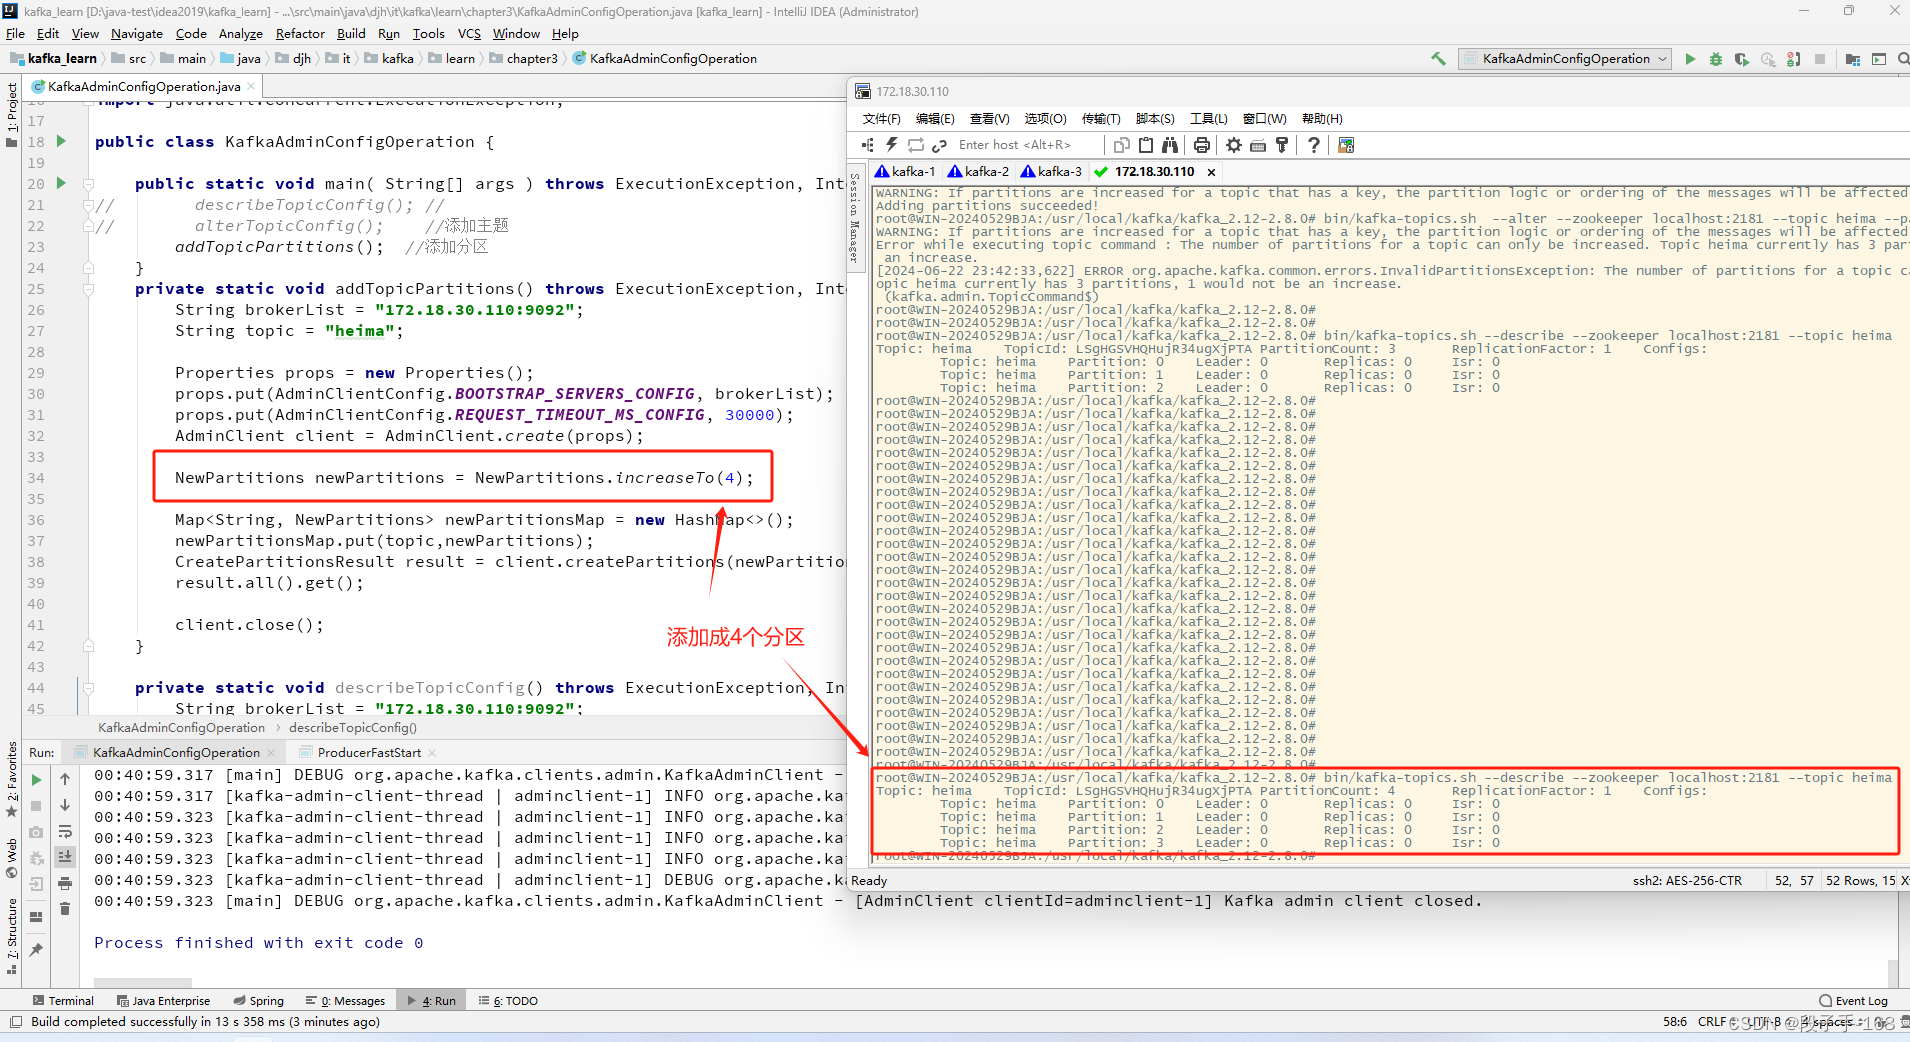
1、KafkaAdminClient 应用
我们都习惯使用 Kafka 中 bin 目录下的脚本工具来管理査看 Kafka,但是有些时候需要将某些管理查看的功能集成到系统 (比如Kafka Manager)中,那么就需要调用一些 API 来直接操作 Kafka 了。
2、在 kafka_learn 工程中,创建 KafkaAdminConfigOperation.java 类, KafkaAdminClient 应用
/**
 *  D:\java-test\idea2019\kafka_learn\src\main\java\djh\it\kafka\learn\chapter3\KafkaAdminConfigOperation.java
 *
 *  2024-6-22 创建 KafkaAdminConfigOperation.java 类, KafkaAdminClient 应用
 */
package djh.it.kafka.learn.chapter3;

import kafka.controller.NewPartition;
import org.apache.kafka.clients.admin.*;
import org.apache.kafka.common.config.ConfigResource;

import java.util.Collections;
import java.util.HashMap;
import java.util.Map;
import java.util.Properties;
import java.util.concurrent.ExecutionException;

public class KafkaAdminConfigOperation {

    public static void main( String[] args ) throws ExecutionException, InterruptedException {
        describeTopicConfig();   //获取主题详细信息
//        alterTopicConfig();    //添加主题
//        addTopicPartitions();  //添加分区
    }
    private static void addTopicPartitions() throws ExecutionException, InterruptedException {
        String brokerList = "172.18.30.110:9092";
        String topic = "heima";

        Properties props = new Properties();
        props.put(AdminClientConfig.BOOTSTRAP_SERVERS_CONFIG, brokerList);
        props.put(AdminClientConfig.REQUEST_TIMEOUT_MS_CONFIG, 30000);
        AdminClient client = AdminClient.create(props);

        NewPartitions newPartitions = NewPartitions.increaseTo(4);

        Map<String, NewPartitions> newPartitionsMap = new HashMap<>();
        newPartitionsMap.put(topic,newPartitions);
        CreatePartitionsResult result = client.createPartitions(newPartitionsMap);
        result.all().get();

        client.close();
    }

    private static void describeTopicConfig() throws ExecutionException, InterruptedException {
        String brokerList = "172.18.30.110:9092";
        String topic = "heima";

        Properties props = new Properties();
        props.put(AdminClientConfig.BOOTSTRAP_SERVERS_CONFIG, brokerList);
        props.put(AdminClientConfig.REQUEST_TIMEOUT_MS_CONFIG, 30000);
        AdminClient client = AdminClient.create(props);

        ConfigResource resource = new ConfigResource(ConfigResource.Type.TOPIC, topic);
        DescribeConfigsResult result = client.describeConfigs(Collections.singleton(resource));
        Config config = result.all().get().get(resource);
        System.out.println(config);
        client.close();
    }
}

- 1
- 2
- 3
- 4
- 5
- 6
- 7
- 8
- 9
- 10
- 11
- 12
- 13
- 14
- 15
- 16
- 17
- 18
- 19
- 20
- 21
- 22
- 23
- 24
- 25
- 26
- 27
- 28
- 29
- 30
- 31
- 32
- 33
- 34
- 35
- 36
- 37
- 38
- 39
- 40
- 41
- 42
- 43
- 44
- 45
- 46
- 47
- 48
- 49
- 50
- 51
- 52
- 53
- 54
- 55
- 56
- 57
- 58
- 59
- 60
- 61
上一节关联链接请点击
# Kafka_深入探秘者(3):kafka 消费者
声明:本文内容由网友自发贡献,不代表【wpsshop博客】立场,版权归原作者所有,本站不承担相应法律责任。如您发现有侵权的内容,请联系我们。转载请注明出处:https://www.wpsshop.cn/w/盐析白兔/article/detail/925776
推荐阅读

相关标签

